It often happens that in life you want to try something new. This is partly why smartphone users sometimes change their iPhone to some other Samsung or Xiaomi - and vice versa. And every time I myself or my friends buy a new phone and at the same time switch from one operating system to another, the question arises, how to transfer contacts to a new iPhone from your old Android? Today I will answer this question and show you how I do it.
If we are talking about transferring contacts from phone to phone within one system, for example, if you had Xiaomi and purchased it from the same company, or any other on Android, then everything is simple. It is enough to save the contacts of your friends and colleagues to your Google profile and then log in to it on another device. In this case, all phone numbers and email addresses will be automatically copied into memory and you will not notice any difference.
By the way, pay attention to the Caller ID application from Yandex. It allows you to filter out all unwanted calls with advertising.
The same thing happens with the iPhone - any user of Apple technology has an account in the iCloud cloud service, where all data is stored. To transfer them to another device, simply log in under your name.
But the problems begin when moving from one axis to another - there is no iCloud on Android, and there is no Google account on iPhone.
How to transfer contacts to iPhone from Android?
In order to transfer contacts from Android to iPhone, you must first go to the dialer on the first one and switch to the “Contacts” tab.
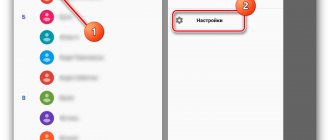
Next, click on the “Menu” icon in the upper right corner and select “Import and Export”
Here we find the item “Send contacts”
Select an email client and send it to your email.
It happens that a file with contacts is not attached in this way - that’s okay. Then select the “Export to memory” option and save the file with the .VCF extension to the built-in drive.
Then we send it to our email as an attachment to a regular letter.
Next, take your iPhone, go to your mail and open this file.
Click on the link “Open in...”
And select “Copy to Contacts” and save them to your iPhone
Transfer contacts
To transfer phonebook data from a SIM card to an iPhone, just follow three steps:
- Turn off the iPhone, remove the SIM card slot using the key.
- Insert the old SIM card into the mobile device and turn on the device.
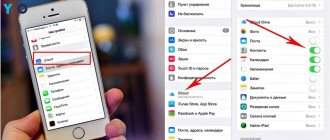
- Go to “Settings”, open the “Mail, addresses, calendars” section and click “Import SIM contacts”.
import SIM card contacts
If you are going to use a different phone number, remove the SIM card that is no longer needed. Open your contacts list and make sure that all the necessary data has moved to the iPhone phone book.
Contacts copied from SIM will look unpresentable on iPhone. The SIM card memory does not allow you to enter long first and last names, limiting the number of characters. Therefore, all entries on the iPhone will have to be edited manually, rewriting the contact’s name, adding, if necessary, a photo, date of birth and other useful information.
Where is the best place to store numbers?
In modern smartphones, subscriber numbers can be saved in various ways: on a SIM card, in the phone’s memory, in cloud services. The question of which is better often becomes a topic of discussion and debate between users. Let's look at the answers to the most common questions.
Question to the expert
What is more convenient to store on a SIM card?
The traditional method used in the days of Nokia push-buttons. On old-style identifiers it was possible to record up to 250 contacts, on more modern ones – up to 200. In case of theft, information can be restored from the telecom operator, but if it breaks, the data will be lost forever.
Is it correct to store in the memory of a mobile device?
The most common option, allowing you to store up to 1000 contacts. In this case, we are talking not only about the subscriber number, but also about the address, place of work, home telephone and other personal data. The contents of the address book can be lost if the gadget is broken or stolen, so there is no point in storing it separately. The best solution would be to synchronize with cloud storage.
What if you store it in the cloud?
Virtual services provide their clients with a certain amount of memory on the server for storing various information, including data from the phone book. iOS devices are integrated with the iCloud cloud service, so all contacts are saved there automatically.
4.9/5 — (29 votes)
Transferring from a jailbroken iPhone (jailbreak)
Direct transfer of contacts from an iPhone to a SIM card is not possible due to the closed nature of the operating system. However, if you are jailbroken, this iOS limitation is removed and you can copy and save data to the SIM.
interesting
Apple Watch sales drop 10% due to Apple Watch Series 7 delay
Pro versions of iPhone 14 will receive USB Type-C instead of Lightning
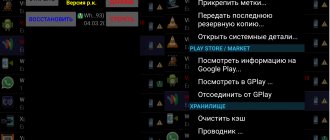
To record information, use the SIManager tweak from the BeYoIp repository. Versions 1.7 and higher are considered stable.
- install the utility on the jailbroken iPhone and run it;
- At the bottom of the main screen, click the “Write to SIM” button;
- in the window that opens, select “Copy iPhone to SIM”;
- After that, all phone numbers will be recorded on the SIM card.
How to correctly transfer contacts from an old phone (SIM card) to iPhone and iCloud
Create an Apple ID
Create an Apple ID account using these instructions (if you already have one, check if you remember the password. This can be done on icloud.com).
♥ ON THE TOPIC: How they spy on a person who was given an iPhone and how to prohibit surveillance.
How to Transfer Contacts Directly from SIM Card to iPhone
There are currently 3 types of physical SIM cards in use:
- Standart (aka Mini) – used from iPhone 2G to iPhone 3Gs,
- Micro – in iPhone 4 and iPhone 4s
- Nano – from iPhone 5 and later
SIM card cutting
If your previous phone worked with Standard or Micro SIM cards, then it can be cut to Nano format. In this case, it should be taken into account that the older the SIM card, the larger the size of the chip and, accordingly, the higher the chance of damaging it along with the contacts stored on it.
Import contacts from SIM card to iPhone
After you have cut the SIM card, insert it into the iPhone and go to Settings → Contacts and click on the Import SIM contacts button (for iOS 9 and earlier versions the path is slightly different: Settings → Mail, addresses, calendars → Import contacts SIM).
Setting up iCloud synchronization
After the data from the SIM card address book has been saved to the phone, it needs to be synchronized (exported) with the iCloud cloud. To do this, you need to follow these steps (iPhone must be connected to the Internet):
1. Open the Settings app and go to iCloud settings;
2. Log in using your Apple ID and password;
On iOS 10.2 and higher:
On iOS 10.1 and earlier versions of iOS:
3. Go to the iCloud section, switch the Contacts checkbox to the active position and in the window that appears, click “Merge”;
4. Wait a couple of minutes and go to iCloud.com from your computer and make sure that your contacts are successfully synced (more on this below).
♥ ON TOPIC: Why iPhone and iPad slow down and turn off in the cold.
How to transfer contacts from old phone to iPhone without cutting SIM card
If you don’t have many contacts and don’t want to bother with cutting the SIM card, you can transfer contacts manually using the web version of the iCloud service.
1. Connect your iPhone to the Internet.
2. Go to Settings → iCloud and enter your Apple ID account information.
On iOS 10.2 and higher:
On iOS 10.1 and earlier versions of iOS:
3. Set the Contacts switch to On.
4. Go to icloud.com from your computer and enter your Apple ID account information.
5. Open the Contacts web application.
6. Tap "+" at the bottom of the screen and select the "New Contact" option.
7. Manually fill in the contact details, adding a photo if necessary (it will be displayed on the full screen when calling), then click the Done button in the lower right corner and proceed to filling out the next contact, repeating step 6. For convenience and speed of action, you can invite someone to help you dictate contact information from your old phone.
8. That's it! The contact will automatically “fly” to the iPhone. Check!
♥ ON TOPIC: How to block all calls from unknown and hidden numbers on iPhone: 2 methods.
How to Transfer Contacts from Gmail (Google) to iPhone (iCloud)
1. Go to the Google Contacts website from your computer.
2. From the menu on the right, select Export.
2. In the window that appears, select contacts to export or All contacts and specify the vCard format (“vCard (for the Contacts application on iOS devices)”).
3. Click the Export button, after which the contacts from Gmail will be saved to your computer in vCard format (file type contacts.vcf).
4. Go to icloud.com from your computer and enter your Apple ID account information.
5. Open the Contacts web application.
6. Click on the gear icon in the lower left corner and select the “Import vCard” option.
7. In the window that appears, specify the contact file downloaded in step 3 and click the Select button.
8. That's it! Your contacts will be automatically added to iCloud and appear on your iPhone in a few seconds. Check!
Enable synchronization
To protect yourself from losing important phone book entries, enable contact synchronization with iCloud. With syncing, you can access your numbers on another Apple device or computer by signing in to your iCloud storage.
- Create an Apple ID account to gain access to all Apple services, including iCloud storage.
- Go to Settings, open the iCloud section and make sure the Contacts switch is in the On position.
synchronization via iCloud
To check synchronization, go to iCloud.com from your computer, log in with your Apple ID and check the entries in the Contacts application - the same numbers that are stored on the iPhone should be displayed there.
Systematization
If you didn’t take care of systematization earlier, then you should start organizing the information. A cleaned and easy-to-use phone book on a smartphone will save a lot of time in the future, will take up less space and will therefore be easier to transfer. Using the edit menu you can change your photo, name and add new phone numbers. It’s so convenient to store a person’s home and mobile numbers in one place. In the number information you can save your email, birthday and other important information.
Transferring numbers to a SIM card
Were you able to copy contacts from a SIM card to an iPhone, but what if it was necessary, vice versa? Difficulties may arise here, because other than restoring contacts on an iPhone from a SIM card, iOS can’t do anything else. Apple bypassed this feature, believing that cloud storage would be sufficient on their smartphone.
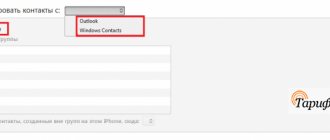
At first, the approach is disappointing, but there are tricks that allow you not to lose out here either. The iTunes service will help you not only learn how data is imported from a SIM to an iPhone, but also save information on Windows Contacts and Outook. Cloud storage makes it possible to save data on any convenient device.
If there were no problems with the reverse action, then here you can fool your head. First, launch iTunes and connect the service to your smartphone, and then simply follow the instructions:
- Select the phone icon, so you will go to the data tab stored on the smartphone.
- Find the information on the left and go to the subsection.
- Next, select “synchronize with”, just check the box.
- Select the service where it will be more convenient to store data and confirm the operation.
- Then, from your new smartphone, go to these services or download their mobile version from the app store.
To transfer contacts from SIM to iPhone back, follow the steps described above, and in the future you can simply copy them to new versions of smartphones directly from icloud.
Why store contacts on a SIM card
Despite its miniature size, many compare a SIM card to a mini-computer, because it has a processor, RAM, permanent and re-writable memory. It is the latter type that is responsible for the safety and deletion of contacts. The subscriber identity module card is actually a chip with a memory capacity of 128 kBt. It is enough to store no more than 250 contacts, which is already considered a disadvantage, because the address book of a modern subscriber stores up to 1000 numbers. However, there are certain reasons that force you to choose this method from many options.
- Data security. It is impossible to inject a virus into a SIM card and gain access to contacts.
- Phone failure. Some failures lead to permanent deletion of the address book.
- Transfer the device to a service center for repair. Not a single employee will be able to view the contacts, because they will remain on the removed SIM card.
- Reset OS settings to factory defaults. As a result, all programs and media files will be automatically deleted, and the phone book will be no exception.
- Using several mobile phones at the same time. From one SIM card it is possible to transfer subscriber numbers to any number of devices.
In addition, in just a couple of minutes you can copy information from a SIM card to any mobile phone, and then to a new identifier. If the numbers are stored on a SIM card, it can be inserted into any phone at any time, including a regular push-button phone.
Gmail + Android smartphone
For the operation you need:
- Phone or tablet with SIM card support and Android OS.
- Active Google account.
Transferring contacts to SIM is done in two stages:
- Log in to your Gmail profile by linking your account to your iPhone.
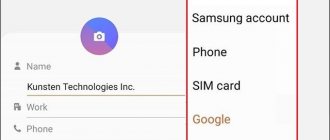
- On your iPhone, go to system settings and click Contacts.
- In the new section, click: “Accounts” - “Gmail”.
- In the “Google account” option, opposite “Contacts”, move the slider to activate.
- Wait for the synchronization to complete (this requires an Internet connection).
The numbers are imported to the cloud. Now you need to transfer them from the cloud to your SIM card. For this:
- Pick up an Android smartphone and install an iPhone SIM card into it.
- Log in to the same Google profile you used for your iPhone.
- Open: “Settings” - “Accounts” - “Google” - “Your profile name” - disable and re-enable the “Contacts” option so that it immediately synchronizes your address book.
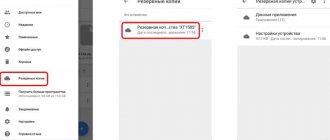
- After synchronizing the information with your smartphone, open the “Directory” application, go to settings and to the “Import/export” section.
- You need to import data from your phone memory to your SIM card. To do this, select the “Export to storage device: SIM” function. A gadget with the latest version of Android can offer export sources: phone, messenger connections, Google profile. Select your smartphone. Please read the warning about transferring only part of the information (limitation on the number of numbers in the database).
- After importing to SIM, turn off the device, remove the SIM card and place it in the iPhone.