Select the menu item “Delete multiple contacts”. The following source selection menu will appear:
The easiest and fastest way
To easily clear the SIM card memory on your smartphone, just take it out and insert it into some old simple phone. It’s not without reason that they say, “simplicity is the best beauty.” On such devices, all this is done very simply and quickly. Just go to contacts and in the settings select the option “Delete all” or “Delete several” and check the “All” box.
The device will ask where it will delete from. Select the “From SIM card” option. After this, the SIM card memory will be cleared.
Cleaning SIM on Android
The Android operating system has very extensive functionality and allows you to do a lot. But simply deleting all the numbers on a SIM card won’t work that easily. To do this you will have to delve into the settings. For example, consider a phone running Android 6. On older versions, everything is done in approximately the same way. At least the algorithm is the same.
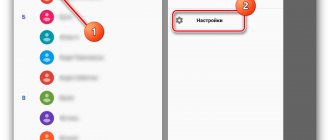
So, go to Contacts and open the options menu:
Select the menu item “Delete multiple contacts”. The following source selection menu will appear:
Select the SIM card that we want to clean. After this, a list of numbers and contacts that are present on it will be displayed:
Since we want to do a complete cleanup, check the “Select all” checkbox. Profit!
Note: If you were unable to find such an opportunity in your Android, use third-party applications. For example, HTC SIM Manager . This will allow you to keep control of the SIM card memory while creating or deleting contacts.
Removing numbers from SIM on iPhone
This is the official method from Apple. Unfortunately, it is not very convenient and here's why. This option allows you to completely delete all numbers from the iPhone’s memory, including those on its SIM card. That is, if you want your contacts to remain on the device itself, you will have to save them by synchronizing them with the iCloud service.
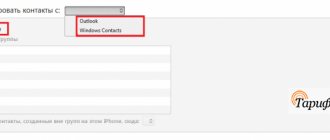
After this, you need to connect your phone to your computer and launch iTunes. In the program window, open your smartphone and go to the “Information” section. Here you need to check the “Sync Contacts” checkbox:
Below we check the “All contacts” checkbox. Scroll down the window to the “Advanced” subsection:
Here you need to check the “Contacts” box. Click on the “Apply” button. A confirmation window should appear, in which you need to click on the “Replace information” button. Ready. After this, the device’s memory and SIM card will be cleared. To return your contacts to the device itself, synchronize it with iCloud and they will be on the phone again.
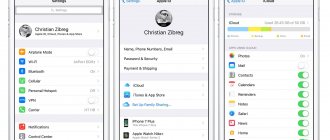
- Open the Contacts on your Android smartphone.
- Next, click on the Settings in the upper right corner, and then select “ Contacts to display ”.
How to delete a phone number on Android
To normally delete a contact from your address book, you will need to follow a few simple steps:
- Go to the phone book using the “Contacts” icon.
- Select the desired name or number and hold your finger on it until the additional context menu opens.
- Tap the delete key and then confirm the action.
In addition, you can call such a menu using other standard capabilities of a mobile device, and not by holding your finger. In this case you will need:
- Select the desired contact to delete from the list.
- Click on it.
- A control line in the form of 3 dots will open at the top or bottom, click on it.
- A menu will open with options, including tapping the delete key.
iPhone
In order to delete contacts using iTunes, you will need:
- Connect your smartphone to your computer using a USB cable;
- Launch iTunes;
- Click on the device icon in the upper right corner;
- Find the “Information” section;
- Check the box “Synchronize contacts”;
- Select “All contacts”;
- Go to the “Advanced” section, which is located at the very bottom;
- Check the box next to the “Contacts” line;
- Click on the “Apply” button;
- Select “Replace information”;
- The contacts will be deleted from the SIM card.
How to delete contacts from a SIM card
Some owners of mobile devices save phone contacts on a SIM card so that if the equipment is replaced, the necessary numbers will be saved. In such a situation, problems may arise with deleting old phones.
To delete data, you first need to display it on your smartphone. The process is as follows:
- Launch “Contacts” and press the “Menu” key.
- After this, the settings will open, where you should select the “Display” tab.
- Set the checkbox on the line “SIM card contacts” to enabled.
- Return to the phone book, where all the data from the SIM card will be shown in the list of mobile phones. Often they are distinguished by a special mark. They need to be selected and deleted normally, as in the method described above.
Almost all modern SIM cards include a set of service phone numbers that include a lock icon. When using the gadget, they may cause some inconvenience that will interfere with work, but they cannot be physically removed. Such phones are needed to call emergency services, check your mobile account and other operations. If such contacts are in the way and appear in the phone book, you can hide them. To do this, turn off the display. You should go to the settings menu and remove the display of service numbers.
How to quickly remove data from your Google account
A common problem is how to delete contacts from your phone so that they are not transferred to another device when you change your smartphone. Due to synchronization with Google, all information is automatically transferred to the new mobile phone.
To fix this, go to the system settings, to the “Accounts” section. We find a Google profile that will be linked to the new device. Click on it and uncheck the box next to the synchronization item shown in the screenshot.
From this moment on, information will not be transferred to the company’s servers. We remove unnecessary people from the phone book and enable the exchange of information with the company’s servers. The device will automatically start updating the data. Read what to do if numbers won’t load in the material: “Contacts won’t load on Android”
For information: on the Google website there is a function for selective deletion of mobile phones. Go to contacts.google.com, enter the Google profile data to which the device is linked and selectively remove elements from the list. For the actions to take effect, we re-synchronize.
Batch deleting contacts
When filtering mobile phones from the address book, it is very difficult and time-consuming to process each number. In this case, the Android operating system makes it possible to use batch data clearing. A particularly useful feature for people who have a lot of saved data. To carry out the operation you will need:
- Go to the phone book of your mobile device.
- Go to the settings menu and click on the “Advanced” button.
- In the new window, select the batch deletion category.
- Return to the contacts directory, after which you can check the box next to the desired name, and then press the delete button to clear several contacts from memory at once.
There is a simpler option for processing information. To do this you will need:
- Go to the phone book, find the contact you want to delete and hold your finger on it.
- A special cell will appear on the left on which you can place markers by briefly pressing. Checkboxes are placed next to all numbers that are planned to be deleted.
- At the end, you need to look up, where there will be the inscription “Delete” or the corresponding icon in the form of a trash can. Tap on the designation and confirm your intentions.
These methods are the main ones that help to perform mass deletion of mobile numbers in the phone book. However, it is not always convenient to use them. If you need to completely delete the directory on your smartphone, then the process will differ from those described.
Disabling an account
To completely delete the phone book on your Android mobile device, it is recommended to disable the account with which you previously synchronized. This functionality will be useful for users who are preparing equipment for sale or buying a smartphone from another person after use. In this case, there is a need to completely remove personal data or other people’s contacts. To disable your account you will need to do the following:
- Find in the smartphone menu a standard program for settings or a separate “Google Settings” icon.
- Having opened the software, you should find the section with personal data and go to the “Accounts” tab.
- Tap on the line with accounts, where several possible accounts will be presented. Often, telephone directory data is synchronized with Google.
- It is necessary to delete the “Contacts” section from your account, and also completely disable synchronization.
- If your Google accounts are not divided into several categories, then you should completely disable synchronization.
- Next, the user needs to go to the menu by clicking on the 3 dots at the top of the screen. In it, tap on the “Synchronize” button, after which the smartphone will update the information from the memory. Mobile number data or account information will be completely deleted from the smartphone.
The described actions help to leave only contact materials from instant messengers in the gadget’s memory, and delete previously saved phone numbers completely. If you need to leave saved contacts and delete data from instant messengers, then it is important to deactivate account synchronization in them. This allows you to exclude the appearance of data in the directory about contacts from social networks. networks.
Editing Google Synced Data
In the case when telephone numbers are duplicated in a Google account, the user has the opportunity not only to perform a complete deletion, but also to correct the information, and then synchronize the smartphone with the account. This will be a useful feature for users who have a large number of phones in the directory and do not know how to remove numbers from their account without deactivating it.
To perform the operation, use a step-by-step guide:
- To start editing phone data that is synchronized with Google, you need to go to the browser on your smartphone and open Contacts. Some versions of the Android operating system offer an application with a similar name; if it is not available, then you must log in through the Gmail service.
- When performing operations through a browser on a mobile device or computer, you need to log in to google.com/contacts. It is worth noting that it is more convenient to do the work via a PC.
- You must be authorized using your Google account password and login. After this, a telephone directory opens with photos that were previously saved.
- You need to click on the picture to select the ones you need.
- Removal is carried out through the “Trash” button, which is located at the top of the screen. All selected materials are completely deleted, the browser should be closed.
- After that, go to “Settings”, where you activate your Google account; this action is carried out if it has been disabled.
- Click on the menu in the form of an icon with 3 dots and find the synchronization key; by tapping on it, the directory list will be updated.
The described method does not work in the situation if the user saved phone numbers to the smartphone’s memory or to a SIM card. The method works only in the case when the owner of the mobile device used a Google account and all materials were saved there.
In some cases, the Trash button may be inactive. This indicates that certain phones in the list are saved via Google+. To solve the problem, you will need to go to the Circles section and delete numbers there, then go to Contacts and perform the same action.
There is nothing to demagnetize there!
In fact, a SIM card is one of the types of processor-based “smart cards” that differ depending on the supported mobile communication system. Next we will talk specifically about SIM cards working in our GSM networks.
Today, there are four standard sizes of SIM cards:
- Full-size (1FF), the size of a bank card;
- Mini-SIM (2FF), the usual large SIM card;
- Micro-SIM (3FF), those that were in the iPhone 4;
- Nano-SIM (4FF), thin SIM cards that are now in most smartphones.
When you buy a card now, you get a chip on a universal piece of plastic that meets all these standards. And whatever the form of SIM cards, they have one thing in common: this is a real computer in miniature . A small chip with six contacts (previously there were eight) contains almost the same components as in a regular system unit. The SIM card contains:
- Processor (CPU);
- Random access memory (RAM);
- Read-only memory (ROM);
- I/O controller;
- File system.
Of course, there is no battery or any kind of human interface, they are simply not needed. But the small SIM card has its own operating system, which allows you to store vital data for the phone, user files (contacts, SMS) and even Java applications.
Due to the desire to reduce the cost of components, operators issue cards with a minimum of memory, but technically, gigabytes of information can be stored on SIM cards. Of course, no one needs this, there are no terminals operating in this mode, and it’s easier to operate a large amount of data via USB.
Do you understand now? This is a board with contacts. There are no magnetized elements here. The principle of data recording has nothing to do with magnetism. Accordingly, there is nothing to be demagnetized.
How to clear a SIM card of contacts
In addition to deleting SMS messages, many people do not know how to delete contacts from a SIM card, and the following questions have also been received. The tips are too short for a separate article, so I’ll paste them into this one.
How to clear SIM card numbers:
That's all the wisdom, I hope after these tips, your SIM card will no longer be full. There was also a question related to the memory card, but that will be a completely different story. ?
Despite the shortcomings, this option for storing contacts is convenient for many users. However, sometimes it may be necessary to delete some entries.
Why do double contacts appear?
Sometimes smartphone users encounter the problem of double contacts. This may appear as a result of installing certain firmware that requires further synchronization. As a result, the directory can become significantly larger, and the phone owner has to increase the time it takes to find the right number. The problem can be solved; you can partially cope with the situation using the option for merging takes. To do this you need:
- Activate the directory on your mobile device.
- Press the menu key, then tap on the “Advanced” line.
- Select the key for merging takes.
- The operating system will make a proposal to combine duplicate numbers, confirming the action, a partial solution to the problem will occur.
In addition to the advice described, there are other options for working with duplicate mobile phones.
Removing duplicate contacts on Android
To completely remove duplicate numbers in the telephone directory, you should use tools from the Google service or install third-party programs, including Duplicate Contacts and others. The main methods are described below.
Google Contacts
To remove duplicates using this method, you should use a simple guide:
- On a mobile device or PC, go to the browser and enter the path com/contacts in the address bar.
- Register personal information for your Google account.
- Press the button that corresponds to the search for similar mobile phones.
- Select duplicate numbers from the list and delete them.
In the case when a small portion of the data was synchronized through, then you need to perform similar manipulations in the “Circles” section. In order for the smartphone to display the directory correctly after completing all operations, you will need to complete editing by synchronizing. This is done through the settings menu, and the user needs to carefully ensure that his account is activated. Certain companies that release firmware for mobile devices immediately disable the function.
Duplicate Contacts
This utility is the simplest for the average user. It is easy to work with using the instructions. You can download the application through the Play Market completely free of charge. To do this, you just need to use the search bar, indicating the name of the software. From the presented list, tap on the icon to open the description of the utility. At the top right there will be a key for installing into the smartphone’s memory, which needs to be used.
Before installation begins, the user must give permission to use personal data. Without this action, the application will not be able to work with the directory. Wait until the download is complete, then open the program and do the following:
- In the main menu, press the scan button so that the utility searches for duplicates of the directory.
- At the end of the analysis, the application will offer to delete duplicate numbers. To do this, you need to select duplicates and delete them.