How to transfer numbers from one phone to another via SIM card
If phone numbers are stored on the SIM card, then the database can be easily transferred to a new device. The method is relevant if you need to copy the phone book, but there is no access to the Internet, Google services are missing or not working. However, you will not be able to copy the phone book to a device without a SIM, such as a tablet.
Transferring contacts from an Android phone to an Android phone is done in two steps. The first requires saving contacts to the SIM card, and the second requires restoring. If the numbers are stored on a plastic card, then skip the first step and move on to the second.
: Transfer contacts from phone to SIM card
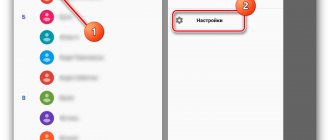
- Open the “directory” on your mobile device and select “Import/export”. As a rule, the item appears in the drop-down list after clicking the ellipsis button.
- In the window that appears, select export to a SIM card and wait for the operation to complete.
: transfer data from SIM card to smartphone or tablet
- Install the card into a new smartphone or tablet.
- Open the “directory” and select “Import/export”.
- In the window that appears, select import from a SIM card and wait for the operation to complete.
Note! The SIM card memory can hold up to 250 numbers. If there are more contacts, some of the records will not be saved.
Read also: People’s temperaments in psychology
Main disadvantages:
- Limit SIM card memory to 250 numbers.
- There is no option to selectively transfer contacts.
- When copying numbers, additional information and photographs are not saved.
Managing contacts in Android (import, export, transfer, customize)
When buying a new phone, the question always arises of transferring contacts from the old one to the new one. Everything is easier if the transfer is carried out with phones of the same brand (since most manufacturers have provided for this simple task) or if they were originally stored on a SIM card. But you often buy a new phone from another manufacturer or don’t use the SIM card’s memory at all, since the number of phones or other necessary information has exceeded the capabilities of SIM cards.
The article will cover:
- Contact storage options
- Getting a copy of contacts from Nokia S40, S60 phones
- Synchronizing contacts
- Grouping contacts in the phone book
- Setting up birthday notifications
- Reverse synchronization with S40, S60
Contact storage options
Contacts can be stored in three places: SIM card (last century), in the phone memory and in the Gmail profile. I think the first option can be skipped, since nowadays all people have 2-3 numbers, not counting home numbers, and the SIM card simply does not have enough memory. Storing contacts in the memory of an Android phone is no different from other mobile phones. The last option is interesting for its capabilities. Before continuing, you should decide on the choice of memory for contacts. I personally chose the Gmail profile storage option as the most performant. Select memory: Contacts -> [Menu] -> Options -> Settings -> Save contacts -> Here you need to select memory (I recommend the Gmail profile). Since setting up an account is beyond the scope of this article, it is not discussed here in its entirety, but only in terms of account synchronization.
Getting a copy of contacts from Nokia S40, S60 phones
There are several options for this operation. Let's look at the simplest ones. The first
and easiest is to use only your phone and Bluetooth: Select all contacts. Go to Contacts -> [Functions] -> Mark/Unmark -> Mark all Next, we’ll transfer them via Bluetooth [Functions] -> Send -> Via Bluetooth At this time, turn on Bluetooth on our new phone. Menu -> Settings -> Wireless networks -> Bluetooth settings -> Enable, and here Open On Nokia, select the second phone and transfer contacts to it.
All that remains is to wait for the transmission to end. After transfer, contacts immediately go into your address book. All that remains is to clear the list of notifications [Menu] -> Clear list. The disadvantage of this option is that if notes were made in the contacts in Russian, there may be problems when writing. Most likely, such contacts will simply remain hanging in the temporary directory /sdcard/bluetooth. They will have to be added separately. If you chose to store them in your Gmail profile, you can add them using the example in the next step.
Second
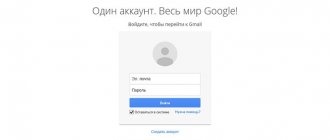
This option will be needed if your old phone does not have Bluetooth installed, as well as for all other options. In this case, you need to use Nokia PC Suite. Open Nokia PC Suite -> Contacts -> Press Ctr+A -> File -> Export -> Select csv file format -> Select the path and save. All contacts will be saved in one file. Next, go to https://gmail.com or https://www.google.com/contacts and log in with your Google/Gmail account. Select [Additional actions](Button in Gmail. The second link immediately accesses the following steps) -> Import -> Browse -> Select your csv file with contacts -> Import
As a result, in the first case, your contacts are stored on the phone (and wait for synchronization with the server if the Gmail profile is selected), in the second, the contacts are stored in the profile and wait for synchronization with the phone.
Synchronizing contacts
In order for our contacts to be in complete order, we need to synchronize. I emphasize that contacts stored in the phone’s memory are not synchronized. We enable synchronization: Menu -> Settings -> Accounts -> About and “Auto-sync” -> Next, at the bottom, select an account and check whether contact synchronization is enabled (by default, everything is enabled). The choice of other points is yours. After this, after a short period of time, the contacts imported into Gmail should appear in your phone's contacts. Saved contacts on your phone (if you select Gmail memory) should appear in your email contacts.
Grouping contacts in the phone book
Now all our contacts should be visible both in the phone and in the Gmail profile contacts. Synchronization priority when changing is given to the latest revision. If the phone memory has been selected, then creating groups is quite simple: Contacts -> Groups -> [Menu] -> Set the name and melody of the group as desired. To add a contact to a group, go to it and click on the icon of a person’s silhouette with a ‘+’ sign next to the search field. Selection will be possible only from contacts stored in the phone's memory. If the memory of a Gmail profile is used, then creating groups becomes somewhat more complicated since, for unknown reasons, creating groups for a profile is not available (I hope this, it seems to me, will be fixed soon). You can also catalog contacts from Gmail. But you can also do it on your phone. To do this you will need the aContacts application. You can find it in the Market, it has a Russian interface in the settings. It can also be assigned to standard use when dialing or making calls. But personally, I recommend using it only for creating groups. Go to the application: [Groups] -> [New group] -> Enter the name of the new group. To add to a group: Select a contact (hold) -> Grouping -> Add to group -> Select the desired group. After synchronization, groups will be created in Gmail.
Setting up birthday notifications
It is quite convenient when the birthdays of relatives or colleagues are displayed in advance on the calendar. By default, this option is not provided. You can install a widget with reminders. The simplest and least overloaded “Birthday Countdown”. You can find it in the Market. Requires virtually no setup. You can also make birthdays appear on the calendar. If contacts are stored in a Gmail profile: Log in with the desired account in https://www.google.com/calendar -> Settings -> Calendar Settings -> Calendars -> View interesting calendars -> Advanced -> Select “Contacts’ birthdays and events " and click Subscribe. After that, you need to synchronize the calendar there in the synchronization settings menu. Once completed, the birthdays should appear on the calendar.
Reverse synchronization with S40, S60
Phones have had a synchronization function for a long time.
But for objective reasons it is not used often. Google has completely turned this around, to the point of necessity and convenience, using its technology. But still, for those who have several phones and SIM cards, you can also synchronize contacts with your old device using SyncML technology. The downside of this synchronization is the transfer of basic contact fields, such as phone numbers, name, photo. Therefore, it is better to synchronize from the server to the phone. I think all the information on the second phone is not so relevant anymore. After all, the most important thing is still the phone number and name. And it is very convenient if they are updated on time. Therefore, this technology should be quite sufficient. In general, it is worth updating contacts only in the direction from the server to the mobile phone. To configure the S60, go to: Menu -> Communications -> Sync. (Synchronization) -> [Functions] -> New. prof. sync To configure the S40, go to: Menu -> Settings -> Configuration -> Personal conf. -> Add new “Synchronization”
Next, enter the following settings: Profile name: any_name Data transmission channel: Internet Access point: access_point_gprs Server address: https://m.google.com/syncml Port: 443 User name: login_from_gmail Password: your_password
Next, go to the second tab. We will synchronize only contacts (the rest can be switched to <No>) Select: Contacts -> Yes Set the settings: Remote database: contacts Synchronization type: Update phone (i.e. set the synchronization direction, as mentioned earlier)
All. The setup is complete. We make a backup of contacts, delete contacts from the Nokia address book and try to start synchronization. If everything started successfully, then there will be a regular window with a status and we will be notified upon completion of the operation. You can also transfer contacts back via Bluetooth. But you must agree, why go back to the last century?
Conclusion
Android is the child of two entities that were created on the network and became important parts of it - Linux and Google. The full potential of Android is revealed only when fully connected to the network. The constant development power of Google is binding and at the same time gives enormous potential to the Android device.
Links
https://info.mobilux.info https://anit.az/entry.php?4-SyncML-gmail.com-(android-symbian) https://andro1d.com/blog/info/1185.html https http://shoguevara.livejournal.com/8566.html https://m0sia.ru/node/82
Copy numbers to SIM card
Now let's look at how to transfer contacts from Android to a SIM card. To transfer data from your phone to a SIM, go to the phone number book application, click the additional functions menu, select “Import/export” and select “Export to SIM card”.
Rice. 9. Export numbers to a SIM card
After which you need to select all the numbers, or which ones to save, the only disadvantage of this method is the limitation on the number of contacts - 200-220 pieces. If you have fewer numbers, then you can safely use this method.
How to copy contacts from an Android smartphone to another Android smartphone or computer
Thanks to a special application from Google, you can copy selected contacts to other devices via email. This method is most suitable for transferring contacts between devices that you do not want to associate with a common account.
- On the source smartphone, launch the Contacts application. If it is not installed, download it from Google Play.
- Inside the application, log into the account to which the desired contacts are linked, and then select them.
- Click the Share button, then select Gmail and send copies of your contacts by mail.
Contacts in the form of a single VCF file will be attached to the letter. The recipient can save this document on their computer or smartphone. To add the entries stored in the file to the phone book of another Android device, just open the received VCF document using the Contacts application.
Contacts
Google LLC
Price: Free
Download
Price: Free
Google Sync
The easiest way to migrate to another phone along with all your phonebook entries is to use Google account sync.
- Open your old phone's settings. Find the Account section and go to Google.
- Tap on the account you are using to open the synchronization options. See when your contacts were last synced. Uncheck and check the box to start syncing right away.
- Go to the settings of the new phone. Add the Google account you used on your old smartphone.
- Open your account settings and sync your contacts and other data.
After synchronization is complete, entries from the phone book of the old mobile device will be in the memory of the new smartphone. This method will not work if the smartphones have different Google accounts. In this case, alternative methods can be used.
General information
| Name | User rating | Platform |
| SA Contacts Lite | 4.1 | Android, iOS |
| Contacts + | 4.2 | Android |
| HTC 'Media' | 4.2 | Android |
| My Contacts | 4 | Android, iOS |
| CLONEit | 4.2 | Android, iOS |
| Phone + Contacts - Phone - Calls | 4.1 | Android, iOS |
| MCBackup | 4.6 | Android, iOS |
| VCF Contacts | 4.5 | Android |
| Easy Backup | 4.7 | Android, iOS |
| Move Contacts Transfer/Backup | 4.5 | Android, iOS |
In conclusion, it is worth noting that these are the best applications for transferring contacts, which have a high rating among users, guarantee stable operation and fast execution of all functions.
Conclusion:
Based on the above guide, you can understand at least four ways to transfer contacts from Android to Android easily. Compared to these methods, Apeaksoft Phone Transfer can retrieve contacts saved on a new Android phone using a USB cable in one click.
Free Download
A SIM card is the easiest way to do this; however, it is a must that both the old and new Android phone are compatible with the same SIM card. And you can try to sync contacts between Android phones using Bluetooth. Another wireless way to import contacts from your old Android to your new phone is Gmail. You can find your favorite way and follow our instructions to get what you want simply.
Using a third party application
Situations may arise when, for some reason, it is impossible to exchange data using built-in programs. Then you should try the following steps.
1.Download, install and run the Bluetooth File Transfer program, it is available for free download on Google Play at the following link https://play.google.com/store/apps/details?id=it.medieval.blueftp.
2.Next you will see a list of folders that are on your phone: in this window, tap the “Options” button to open the menu.
3.Tap on the “Advanced” item.
4.Click on the line “Send contacts”.
5.You will see a list of groups. Do you like to play in bookmakers, then you will find the instructions from 1xbet-registration.club about registering a new user at 1xbet useful. Expand the required group and select the right people.
6.The next step is to decide whether you will send the data in one file or separately.
7.In the list of devices, select “Options” and “Search” to scan available devices.
8.In the found devices, select the name of the smartphone to which you will send data.
Adding a Bluetooth device
- Turn on Bluetooth on your mobile phone (sometimes the manufacturer hides this option in another submenu, so you need to find it yourself).
- Right-click the Bluetooth icon next to your watch and select Add Bluetooth Device. If it is not there, you can enable it in the control panel in the bluetooth settings.
- We mark, click find devices.
- Within a few tens of seconds, Windows will try to find nearby Bluetooth devices, including your mobile phone. If it doesn't find it, make sure your smartphone's Bluetooth is turned on and use the search option again.
- If our phone is found (usually it will be displayed along with the model name if you have not created your own), mark it.
- Select the access key and click.
- After a while the phone should ask if we want to connect to the device. We choose to agree to this and when you are asked for an access key, we copy it on the computer screen and approve it.
- Success messages should then appear on the phone display and on the computer monitor. Ready.