Have you already bought an iPhone 11? Well, you're cool!!! Let me call...? By the way, don’t let strangers on the street make calls from your phone. I have already been approached with a similar request a couple of times. Along the way, this is a “bearded” scam using paid numbers.
Some of you will say, “What if he was in trouble?” Well, of course that young man of impudent appearance was in trouble. But that’s not what the article is about... I hope that each of you is now holding a brand new iPhone XR/11 in your hands, and only one question is spinning in your head: “ How to transfer contacts from iPhone to iPhone?” "
It is precisely for this case that I wrote this article, where I offer, for your choice (and depending on your situation), at least three different methods for transferring contacts from an old device to a new one.
I am sure that you, like me, are ready to exchange your iPhone ONLY for a newer iPhone, and no Android will cloud the awareness of your choice. I can see how they are amateurs
Here are some more articles you might find useful:
- How to transfer contacts from a SIM card to iPhone - Instructions
- How to transfer .vcf contacts from computer to iPhone - Instructions
- If you need to delete contacts from iPhone, read this article
- How to Set Up iPhone - Complete Guide
- How to free up space in iCloud storage - detailed instructions
So, let's get back to transferring contacts from iPhone to iPhone. There are more than several ways to do this. I will not describe synchronizing contacts through Outlook or other strange methods, but will list only working methods that I have personally tested.
Which one to choose depends on your situation, because... in one of the methods you may need your Apple ID login and password, but in the other it is not needed. In general, I arranged all the methods in the order that I would follow myself.
Try it and leave comments if something doesn’t work out for you. Well, if it worked, be sure to write which method.
Synchronizing contacts via iCloud
The first method that I advise everyone to use is to sync contacts between multiple devices using iCloud (the free cloud storage that was given to you when you created your Apple ID).
This is done very simply, but requires you to have an Apple ID login and password . I don’t know what and how you have it configured in iCloud (if it is configured at all), but ideally it should look as described below.
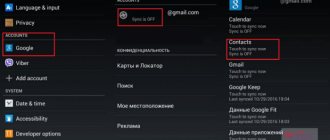
STEP 1 - On the old device, where all contacts are located, go to Settings - [Your name] - iCloud . Check that contact synchronization is activated (I indicated with an arrow).
STEP 2 - If the “ Contacts ” slider is activated, and the iCloud storage is not full of anything, then all your contacts have been in the cloud for a long time. When you add new contacts, they are also immediately sent to the cloud.
STEP 3 - Now, in order for the contacts to appear on another iPhone, you need to link it to the same iCloud. If you transfer contacts to your own iPhone, then there should be no questions. Go to Settings and enter your Apple ID information by clicking on “ Sign in to iPhone ”.
STEP 4 - Once the new iPhone is connected to your iCloud, make sure the Contacts is activated.
STEP 5 - After a couple of minutes, all your contacts will automatically appear on the new device.
If you want to save your contacts to your computer (let’s say to have a backup copy just in case), you can do this on the website icloud.com by going to the Contacts section.
There is a gear at the bottom of the screen; clicking on it will take you to the contact management menu. You are interested in exporting contacts. As a result, you will receive a file with a .vcf extension which will contain all your contacts.
This is how everything just SHOULD work. It’s another matter if you have “problems” with Apple ID and iCloud. I know that such users are a dime a dozen. What to do if the Apple ID is not available for some reason? ...
First of all, spank yourself on the butt for bringing your poor iPhone to this state. A little more and it will turn into a brick... Until this happens, follow the instructions below, because you can transfer contacts from iPhone to iPhone not only by official methods.
Sync via iTunes
Most often, users use iTunes to transfer contacts from iPhone to Outlook. It has all the necessary tools to complete this task.
- Connect your device to your computer.
- Open iTunes. Select your smartphone model from the Devices menu.
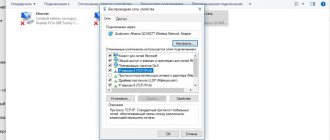
- Go to the "Information" tab and check the "Sync contacts with" checkbox.
- Select the Outlook program from the list and click “Apply”.
via iTunes
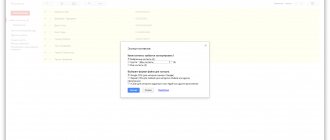
When synchronizing, you need to remember that iPhone treats Outlook as a data library. If there are no entries in the address book on the PC, the phone will perceive this as an update to zero and delete the contacts. Therefore, when confirming the desire to synchronize information, select the “Combine data” option - then synchronization will take place in both directions.
If synchronization of contacts with iCloud is enabled, you will not be able to sync them through iTunes. In this case, use the following method to copy contacts to Outlook.
Using a USB flash drive for iPhone
The second method that I would recommend to everyone is to back up your contacts using an iPhone flash drive. If you don’t know what kind of thing this “flash drive for iPhone” is, I advise you to familiarize yourself by reading the article at the link below:
- The ideal flash drive for iPhone - technologies from the future.
Naturally, you must first buy this flash drive, which means that if you don’t have it now, then you automatically move on to the next method.
But if you do get hold of this miracle of technology, watch and be amazed at how to transfer contacts from iPhone to iPhone with literally one movement of your hand.
STEP 1 - So... we need to have an iPhone with contacts, as well as a special flash drive with a Lightning connector. We insert the flash drive into the iPhone and install the companion application from the AppStore.
In my case, the manufacturer of the flash drive is Ugreen , which means the companion application for it is GeenDisk . You will be automatically redirected to the AppStore after you insert the USB flash drive into your phone.
STEP 2 - Launch the GreenDisk and go to the Settings section.
STEP 3 - Click on “ Back up Contacts ” and wait a couple of seconds
STEP 4 - Now insert the USB flash drive into the new iPhone. Here you also need to install the GreenDisk application.
STEP 5 - Again go to Settings , but now select the “ Restore Contacts ” item.
This is all! This is how contacts are transferred between any iOS devices in two clicks. In this case, old contacts will not be replaced and will remain on your device.
Now let's look at the case when you have neither access to iCloud nor the money to buy a flash drive. Both are very bad! Do something to get out of this state! In the meantime, I propose a method for very advanced cases.
Transfer iPhone Contacts to Gmail Using iCloud
iCloud is another common solution for importing contacts into Gmail, and with iCloud Keychain technology, imported contacts are 100% secure. Follow these steps:
- Go to www.icloud.com in a web browser and enter your Apple account with the correct username and password.
- Click Contacts and select all the synced contact items in iCloud.3. Right-click to choose to export contacts to your computer. Finally, move the exported contacts to Gmail.
Using the Simpler app
Even if you don't have access to iCloud, which your contacts are synced with, you can still install apps from the AppStore on this iPhone.
To do this, you will need any Apple ID with which you download the Simpler . With this application we will create a backup of iPhone contacts (only contacts) and then restore it to another iPhone.
STEP 1 - Download and launch the Simpler
STEP 2 - Click “ RES. COPIES ", and on the next page " Creating a backup copy... "
STEP 3 - During the backup process, all contacts will be recorded in one file with the extension .vcf (vCard file). Now you need to transfer this file to your new iPhone. The easiest way to do this is by email.
STEP 4 - Now that you have received the .vcf file on your new iPhone, open it from the stock Mail application and you will be prompted to add all contacts to the iPhone memory. And that's all!
For those who have not figured out what needs to be done with the .vcf file, read a separate article on this subject: how to transfer .vcf contacts from a computer to an iPhone - instructions here.
Adding an account
The easiest way to sync contacts with Outlook is to add a Microsoft service account to your iPhone.
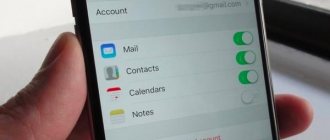
- Open Settings and go to the “Mail, Addresses, Calendars” section.
- Click "Add Account".
adding an account
- Select Outlook.com service.
- Enter your login details.
After adding an Outlook account to your iPhone, go to its settings and slide the Contacts switch to the On position. Synchronization of contacts with Outlook will begin.
How to Transfer iPhone Contacts to Computer for Backup
To backup iPhone contacts, transferring them to computer is a smart move and all your needs, EaseUS MobiMover Free excellent and free data transfer software can fulfill this requirement. With MobiMover, you can quickly transfer iPhone contacts to computer with one click once you mark the contacts for transfer.
- Download and install EaseUS MobiMover on your computer. System requirements are Windows 7, 8, 8.1 and 10. Moreover, make sure your iPhone is running iOS 8 or later. If your computer or iPhone does not meet these requirements, update it immediately.
Can a user transfer data from another Google account?
To move the necessary information, you must first export from the profile in which they are located. The operation is performed according to the following scheme:
- a page opens to view phone numbers;
- Next, you need to enter authorization data in the profile from which the mobile phones will be taken;
- Now you should select those cell phones that the owner wants to move;
- if you want to export all data, select “Select all”;
- Now the user will need to click the “More” button on the page;
- Several options will appear in the drop-down window; click on “Export”;
- when a new window opens, you should make sure that the necessary numbers are highlighted on the page;
- you can select a specific group of phone numbers or select all cell numbers;
- Now you should specify the format, it should be “Google CSV”;
- press the “Export” button;
- then a file will be downloaded to the computer, it will be called “Google”;
- to avoid confusion, you should immediately move this file to a separate folder;
- since the client already has a file with data ready, he can transfer it to another Google account;
- You will again need to open the section to view the numbers;
- Now you will need to enter login information in your new profile;
- the “More” button is selected, then in the drop-down menu the client clicks “Import”;
- when the import of files is displayed on the screen, you should find the “Browse” section;
- after clicking on the item, you will need to find the file in which the cell phone data is saved;
- All you have to do is click on the “Import” button so that all numbers are moved to another profile.
Synchronizing contact information from iPhone to Google is not difficult; the user can use any of the described methods. If you're having trouble moving it, we recommend contacting Apple Support.
How to download contacts to iPhone from Android
Users do not always switch from one iPhone to another. Some people have been holding an Android smartphone in their hands for a long time, and only now have they decided to try out the benefits of the iPhone. Such users also need to transfer contacts.
To import numbers from Android to iPhone, you can put into practice the same methods that were used to transfer from iPhone to iPhone:
- via SIM card;
- using Google services;
- via vcf file;
- using the My Contacts Backup application;
- via Wi-Fi or Bluetooth.
In addition, you can use an additional method. In this case, you will need the Move to iOS application.
You need to download it to your Android smartphone and follow several steps:
- When you start your iPhone for the first time, click the “Transfer data from Android” button.
- Launch the program on Android and click “Continue”.
- Confirm the user agreement.
- On iPhone, also click “Continue” and wait for the code to appear.
- Enter the digital value on your Android smartphone.
- Mark the contacts on Android and click the Next button.
- Wait for the process to complete.
To port numbers, you need a stable Wi-Fi connection.
The duration of the transfer will depend on the number of marked files. If only contacts were selected, the operation will only take a couple of minutes.
Ways to Transfer Contacts from iPhone to Google
There are three methods that allow you to combine entries made on an Apple device with your Google account:
- Automatic synchronization of your gmail mailbox with your iOS account;
- Moving your phone book from iCloud;
- Through direct connection of the smartphone to the computer.
Sync using your account
iOS settings allow you to combine contacts on your iPhone with phone numbers saved in Google. Data synchronization instructions consist of 5 steps:
- In the “Settings” menu, select the “Passwords and Accounts” section.
- Operation "Add account".
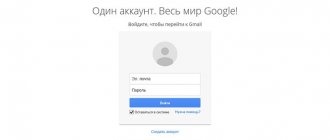
- We choose Google as the email provider class=”aligncenter” width=”477″ height=”799″[/img]
- Enter your email address and password.
Data from Google will be added to the phone book.
For iOS versions 10.2 and earlier, the procedure for enabling another account is performed in the “Mail, Contacts, Calendars” section.
Transfer information from iCloud
Before transferring contacts from iCloud to Gmail, it is better to back up your smartphone:
- In “Settings” select the name Apple>
You can move phone directory information from the cloud without using your iPhone. You will need to go to www.icloud.com and log in with your own AppleID.
Next, go to the “Contacts” icon and select those that need to be imported.
Create a file with a phone book. You need to create it in the “Settings” section, operation “VCard Export”.
The downloaded data must be uploaded to your Google account. To do this, look for “Contacts” in Google applications.
Select the “Import” command and load the vCard file generated in iCloud.
Additional sections: address, mail, social network profile are transferred to your Google account without errors. Subscriber groups will have to be configured manually.
Transferring information from iPhone via PC connection
Importing a telephone directory from a smartphone to a computer via a USB port is possible if you have the iPhone Transfer application or another similar program.
The algorithm of actions for transferring contacts is as follows:
- Install the application on your PC.
- Connect the iPhone to the computer using a USB cable.
- Open the application.
The program is paid. During the trial period, functionality is limited.
- Go to the Contact section.
- From the list, select those contacts that need to be transferred to Google.
- Generate VCard file.
- Upload data to Gmail.
The procedure for exporting a telephone directory to Google is described above.
The program successfully transfers additional data of each person and saves groups of people.
The iPhone Transfer app lets you copy photos, music, and messages.
Tutorial to Sync iPhone Contacts to Gmail (iOS 12 Supported)
Posted by Dorothy Collins November 01, 2021 16:58
Is the email address only for receiving or sending emails?
Gmail says no.
Today, with Gmail, you can handle contacts that you only did on the iPhone in the old days.
Managing iPhone contacts on Gmail is as convenient as possible.
The question arises: how to sync iPhone contacts with Gmail for updating?
This page contains 3 effective methods to transfer contacts from iPhone to Gmail.
Keep reading for a detailed guide.
- Part 1: Automatically Sync iPhone Contacts to Gmail Using Google Account
- Part 2. How to Transfer iPhone Contacts to Gmail Using iCloud
- Part 3. How to Export iPhone Contacts to Gmail Without iCloud (Easiest)
Sync Google contacts on iPhone and Android
After the release of smartphones on the iOS and Android platforms, their creators started talking about the possibility of synchronizing contacts via Google with the ability to transfer contacts from the phone to another iPhone or Android device. Many people began to realize the benefits of this function after the demonstration of iOS4 and Android 4 ICS. It makes sense to get acquainted with the principle of operation of contact synchronization using the most popular mobile systems.
In those days, when the space for contacts in phones was limited by the memory of these devices and SIM cards, many users were forced to store numbers in notebooks or notepads.
Business representatives at this moment preferred to use organizers, which were not available to everyone. Now smartphone owners are offered a very useful feature - Google contacts synchronization.
How to transfer contacts from phone to network? This is not a labor-intensive procedure that can be performed by almost every gadget owner.
Sync Android contacts with Google
Interest in this feature arose after the smartphone began asking users to have a Google account.
Features provided after account synchronization:
Smartphone owners do not necessarily need to activate an account, but then they will not be able to fully use the beneficial opportunities.
The point of synchronization is to combine all contacts that are on different devices in one place. For example, this is quite convenient for owners of gadgets (tablets, smartphones, smart watches, etc.)
), which have various contacts.
If all the numbers are in one Google account, then users will not have situations where at the moment they urgently need to find out the phone located on a discharged device.
Synchronizing and transferring contacts from Android via Google account
First, you should open the settings and scroll down the menu to find the required “Accounts” (or “Credentials and synchronization”) item.
Press the corresponding button called “Add account”.
A list of applications that can be installed opens, the activation of which is carried out as a result of specifying a login and password. Here you can notice the absence of VKontakte and Skype. There is no need to worry, because if you have contacts on your smartphone, they will be visible in this menu. Now you need to select a Google account.
The system will prompt you to create a new account or indicate an existing one. You need to know that a Google account provides information for logging into an email client with the same name. It includes a specific set of numbers and letters that are suitable for any services of this search engine.
Based on practice, it should be concluded that creating an account on a telephone device is not entirely convenient. It is more convenient to perform this procedure on a computer. After providing the required information, you need to continue connecting your account. As a result of these actions, synchronization with the database will occur.
Next, on your smartphone you need to find the “Contacts” section.
Using the phone settings button (usually at the top right), you need to open the context menu, and then the “Export” (or “Export contacts”) option.
You should specify the SIM card or phone memory as the synchronization source and then click on the “Next” button. To store contacts, you need to define a new location, namely the newly created Google account.
To transfer to the “cloud” you need to select the required phone numbers, then confirm the completed actions by clicking on the lower icon on the right, and also wait for the procedure to complete.
To check the result, you should open your email on your PC and go to the Google contacts page. A general list of information that was previously on the phone and will now be stored on the Internet will appear.
You can also distribute friends into different groups and combine several numbers under a common name. As a result of flashing the device, its owner will not need to restore the required contact numbers from scratch.
Transfer contacts from iPhone via Google account using synchronization
Google services are also in great demand among owners of Apple devices. Setting up iPhone contacts sync with Google allows you to transfer contacts to another phone. For these purposes, you should first select the “Settings” section in the list of applications.
After opening the item called “Accounts” in the list, click on the sub-item “Add account”.
In the list that opens we find Google.
Enter the required information in the appropriate fields. For example, in the very first of them you need to indicate a nickname or name. The “Description” column should be given a memorable name, since it is intended to ensure that the numbers in the address telephone book are not lost. After filling them out, click on the “Next” button and get into the newly created account (or one created earlier on the PC).
We carry out the procedure for synchronizing everything by turning on contact synchronization.
To check that all actions have been completed correctly, you should open your contact list. To complete the procedure, you will need to perform a reverse synchronization. To do this, find the “Settings” section and open the “Contacts” tab. After that, click on “Default Account” and from the available list we give preference to “Gmail”.
After visiting again, the “Contacts” section page should look like this:
To complete, you need to open your contacts and wait a bit for the synchronization process to complete. In order not to fill the memory of your mobile device with a huge number of phone numbers, it is better to store them on the Internet.
Disadvantages of storing contacts on your phone:
- slowdown of the device;
- memory full;
- need for flashing;
- lack of groups on different topics;
- erroneous deletion of numbers.
In addition, users have a convenient opportunity to edit information about friends directly online. Using a mouse, you can perform these actions much faster than using a smartphone. As a result of combining all contacts in one account, it is quite convenient to access them from different devices.
Source
Source: //pomogaemkompu.temaretik.com/1380371587260222376/cinhronizatsiya-kontaktov-google-na-iphone-i-android/
How to save numbers to a SIM card on iPhone
All users of smartphones based on the closed iOS operating system have no problems transferring phone numbers from a SIM card to an iPhone - for this purpose, the developers have created a convenient service. To perform the reverse procedure, you will need to use your imagination and several special programs.
Manual copying
The simplest, but most labor-intensive way to transfer contacts from iPhone to SIM card is manual copying. First you need to transfer the numbers to your computer and then to your smartphone.
The algorithm is as follows:
- On your PC you need to run the iFunBox program.
- Connect your phone to it using a USB cable.
- In the “Browse Folders” section, open the path Raw File System-var-mobile-library-AdressBook.
- Transfer contacts to computer.
The next step is to transfer the address book to your Android smartphone and copy its contents to the SIM card through the settings in the main menu.
Using Gmail and Android
Of all the existing options, this option is considered the most time-consuming and tedious, but since the developers did not provide the function of recording numbers on a SIM card from the iPhone address book, it is often used by owners of Apple gadgets. To successfully complete the procedure, you will need to use the Gmail email service.
The sequence of actions is as follows.
- Select “Settings” in the menu and go to the “Contacts” section.
- Open the “Accounts” tab, where in the list that appears, find Gmail.
- Check if you have an Internet connection (preferably via Wi-Fi).
- You will need to create an account or log in to the mail service.
- Move the slider to the right, activating the “Contacts” option, and wait for the synchronization process to complete.
- Remove the SIM card from the iPhone and immediately insert it into a smartphone with the Android operating system.
- Re-authorize into Google by entering your username and password. To do this, go to “Settings” → “Accounts” and select your profile.
- Wait until the smartphone finishes synchronizing the data, then enter the “Contacts” section and make sure that subscriber numbers appear in the address book.
- The next step will be the “Export to SIM card” action. To do this, click on the “Menu” icon (three vertical dots) at the top right of the screen, and click to activate the “Import/Export” option.
- The device will offer to transfer selected numbers or the entire list, so you should select the desired line and click on “Export”.
- A notification will appear on the screen warning that only part of the information (the most necessary) will be saved during copying. Click “Yes” if any important data is missing.
Wait until the operation is completed, that is, all numbers are transferred to the SIM card. After this, you can remove it and dispose of it as you wish.
Free utility My contacts Backup
To import phone numbers onto a SIM card, the iPhone owner will have to use another program and check its functionality on his device. This is the My Backup Contacts utility.
The number import algorithm assumes the following actions.
- Give the program access to the “Contacts” section on your smartphone by clicking on the “Allow” button.
- When the total number of subscribers appears, click on the “Backup” button.
- The program will generate a file in vcf format, which itself will offer to send it by email.
- After clicking “OK”, you will need to click on the “Email” button.
- When the form opens, enter your own address in the “To” field and activate the “Send” option.
- Go to your smartphone, go to your email and open the received letter.
Next, all that remains is to transfer the contacts to the SIM card. This will be easy to do even for a beginner.
Preparing to transfer contacts
As a rule, Google account is a common system for Android phones, but despite this, many owners of iOS smartphones also use synchronization and cloud storage from Google.
If the user previously installed Google on his phone, and also has an account in this system, then he can synchronize contacts in it so as not to lose them in the future. This is done in a few clicks.
It is also necessary to interrupt all synchronizations that were previously on the device before preparing contacts. Working with Google should not cause interference if the user interrupts all synchronizations, including system ones, that were previously on the device. Such correct actions will help the user in a few clicks to ensure the accuracy of the process so that system failures and other problems do not occur.
Some users also recommend closing and disabling all those programs and games that might be enabled. These are all the preparation steps that the user needs to complete. In order not to lose contacts, you should take all precautions and also check your device for viruses in advance. If they exist, you must first delete them, and only then synchronize and transfer contacts.
Problems transferring contacts
The most basic problem is the lack of synchronization. Google account does not import the necessary contacts into its database. This may be due to several reasons:
- Incorrect synchronization setting;
- Internet connection. The mail app may not sync contacts because there are no normal conditions for it to do so;
- An old version of Google or a non-working account.
All this can be solved through checks. It’s worth trying to reconfigure the synchronization again, and also connect to the mobile Internet. It is worth updating your account, logging into it on your PC, as well as installing a new version and updating it.
You can also reboot your device to check for system errors. If the problem is not solved, then you should contact a professional service.
Vyacheslav
For several years he worked in mobile phone stores of two large operators. I understand tariffs well and see all the pitfalls. I love gadgets, especially Android ones.
Ask a Question
Question to the expert
How to solve a problem without contacting service?
You can try deleting your Google account and installing it again, synchronizing from scratch. Unfortunately, you should not solve the problem yourself if it is difficult to do.
Is the Internet required for synchronization?
Yes, it is necessary. Synchronization will not occur without high-quality Internet.
Which way is the easiest?
Through settings. There is no need to download additional utilities for it. There will be no problems or difficulties with him.
4.7/5 — (18 votes)