It’s hard to imagine today, but earlier (and to be precise, in the early 2000s), the address book memory of most phones was limited to 150-200 contacts. Over time, the number of memory cells grew until this limitation was completely removed. And today our smartphones can have several hundred different phone numbers. Open your phone book and, with a high degree of probability, you will immediately come across subscribers whose data you do not need (or maybe you have already completely forgotten who they belong to). If so, then it’s time to clean up your contact list!
How to delete a phone number on Android
Removing a contact from your phone book is easy. To do this, follow these steps:
Step 1 . Launch the Contacts (may also be called People depending on the OS version)
Step 2 . Touch and hold on the contact you want to delete until the context menu appears.
Step 3 . Click the "Delete" button and then confirm your selection.
How to get rid of duplicates in a notebook
Unfortunately, you can't do this from the contacts app itself. To do this, you need to log into the web version of the Google Contacts service and right on the service page you will see the “Similar Contacts” tab. Press it and the service will give you all contacts that have duplicates. Next, you can either delete duplicate contacts or combine 2 duplicates into 1 full contact.
You can discuss this and other articles in our official Telegram chat.
News, articles and publication announcements
Free communication and discussion of materials
I think all Android users are already aware that at the presentation on June 7, Apple introduced FaceTime for Android. Of course, this is a truly grandiose event, given that the popularity of the Cupertino company’s proprietary video calling service has gone far beyond iOS. Another thing is that no one expected Apple to do this at all. Still, a few years ago, the company’s top management was resolutely against this. But, apparently, the opinions of even such people can change. All that remains is to figure out how to use FaceTime on Android smartphones.
Google Pay is one of the most, in my opinion, controversial Google services. On the one hand, the very possibility of contactless payment that it provides is very convenient and modern. But, on the other hand, from the point of view of comfort and logic of use, I personally like Samsung Pay and Apple Pay much more. It’s just that both Apple Pay and Samsung Pay are purely branded services available on devices from the same manufacturer, while Google Pay is a much more widespread solution. Therefore, as a rule, many more questions arise about working with it.
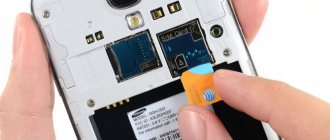
How to delete contacts from a SIM card
To delete contacts from a SIM card, you must first configure their display. The sequence of actions is as follows:
Step 1 . Launch the Contacts .
Step 2 . Press the Menu button on your smartphone.
Step 3 . The application settings will open, click the “Display” button.
Step 4 . Set the “SIM Card Contacts” checkbox to the “Enabled” position.
Step 5 . Return to the Contacts , find the SIM card contacts that have appeared in the list of numbers (they will be displayed with the appropriate mark), select and delete them at your discretion.
How to quickly clear your smartphone of unnecessary contacts
It’s hard to imagine today, but earlier (and to be precise, in the early 2000s), the address book memory of most phones was limited to 150-200 contacts. Over time, the number of memory cells grew until this limitation was completely removed. And today our smartphones can have several hundred different phone numbers. Open your phone book and, with a high degree of probability, you will immediately come across subscribers whose data you do not need (or maybe you have already completely forgotten who they belong to). If so, then it’s time to clean up your contact list!
Batch deleting contacts
Selecting and deleting each contact from the Android phone book individually is a rather labor-intensive and boring task if there are several hundred numbers on the phone. Therefore, you can use the batch uninstall function:
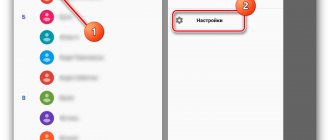
Step 1 . Launch the Contacts app and tap the Show More icon (represented by three dots). In the context menu that appears, select “Settings”.
Step 2 . Here, find the “Group deletion” item. Click Select All and then click the trash can icon. If necessary, you can delete only contacts from a specific group. To do this, go to the appropriate section.
On older devices the procedure will be slightly different:
Step 1 . Launch the Contacts .
Step 2 . Press the Menu button on your smartphone.
Step 3 . Click the "Advanced" button.
Step 4 . Click the "Batch Uninstall" button.
Step 5 . You will be returned to the Contacts , where you can check the boxes next to the numbers you need and delete them with one click of a button.
Possible problems and their solutions
If the contacts are not deleted, then the problem may lie in the activated synchronization of the phone book with various instant messengers, which is why the numbers may return to the list.
To disable synchronization, proceed as follows:
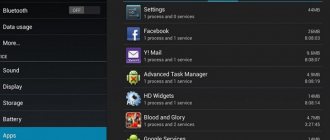
- Go to your smartphone settings and find the "Applications" .
- Find the messenger that causes contacts to return to your phone book, then select it.
- Go to section "Permissions" and open in a new window "Contacts".
- Check the box "Deny" .
Deleting contacts from your phone is done in a few clicks. But the catch is that in modern smartphones, data is synchronized with cloud services and instant messengers, so clearing the address book can be difficult. To work with numbers, system capabilities are provided, as well as programs from third-party developers.
Why do double contacts appear?
Installing different firmware on a smartphone and then synchronizing the data can lead to the appearance of double contacts on Android. As a result, the book of numbers can grow to indecent sizes, and the user will have to constantly wade through the jungle of identical contacts. This problem can be partially solved using the function of merging duplicates:
Step 1 . Launch the Contacts .
Step 2 . Press the Menu button on your smartphone.
Step 3 . Click the "Advanced" button.
Step 4 . Click the Merge Duplicates button.
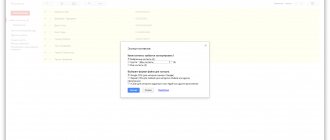
Step 5 . The OS will offer to find duplicate contacts and merge them. Click the Merge button to start this operation.
Method 2: Simple Contacts
You can also delete unnecessary entries in your contact book using third-party tools - for example, Simple Contacts.
- Open the application and give it permission to access your subscriber book.
- After loading the list, filter the entries for your own convenience - click on the button marked in the image and select the appropriate criterion.
- Next, select the required positions with a long tap, click on the three dots at the top right and select “Delete”.
Done – contacts will be deleted.
Simple Contacts is a good alternative to the built-in solution, but the free version displays ads.
How to Delete Duplicate Contacts on Android
Google tools or third-party applications such as Duplicate Contacts . Let's consider both options.
Google Contacts
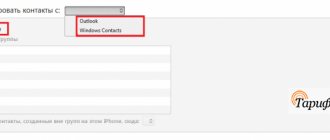
Step 1 . Launch your browser and go to contacts.google.com.
Step 2 . Google account information .
Step 3 . Click the "Find Similar Contacts" button.
Step 4 . Select duplicate contacts and delete them.
Duplicate Contacts
Step 1 . Install and launch the Duplicate Contacts .
Step 2 . The program will scan your contact list and show whether there are duplicate numbers on your smartphone.
Step 3 . Select and remove duplicate contacts.
Step 1: Disable Sync
Before permanently deleting Android contact book entries, you need to disable synchronization both with your Google account and with messenger applications like Viber and WhatsApp. Details of this procedure can be found in the article at the link below.
Read more: Disable data synchronization on Android
Disabling an account
To completely delete the phone book on your Android mobile device, it is recommended to disable the account with which you previously synchronized. This functionality will be useful for users who are preparing equipment for sale or buying a smartphone from another person after use. In this case, there is a need to completely remove personal data or other people’s contacts. To disable your account you will need to do the following:
- Find in the smartphone menu a standard program for settings or a separate “Google Settings” icon.
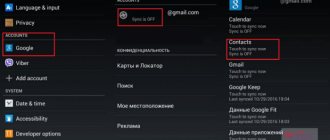
- Having opened the software, you should find the section with personal data and go to the “Accounts” tab.
- Tap on the line with accounts, where several possible accounts will be presented. Often, telephone directory data is synchronized with Google.
- It is necessary to delete the “Contacts” section from your account, and also completely disable synchronization.
- If your Google accounts are not divided into several categories, then you should completely disable synchronization.
- Next, the user needs to go to the menu by clicking on the 3 dots at the top of the screen. In it, tap on the “Synchronize” button, after which the smartphone will update the information from the memory. Mobile number data or account information will be completely deleted from the smartphone.
The described actions help to leave only contact materials from instant messengers in the gadget’s memory, and delete previously saved phone numbers completely. If you need to leave saved contacts and delete data from instant messengers, then it is important to deactivate account synchronization in them. This allows you to exclude the appearance of data in the directory about contacts from social networks. networks.
Editing Google Synced Data
In the case when telephone numbers are duplicated in a Google account, the user has the opportunity not only to perform a complete deletion, but also to correct the information, and then synchronize the smartphone with the account. This will be a useful feature for users who have a large number of phones in the directory and do not know how to remove numbers from their account without deactivating it.
To perform the operation, use a step-by-step guide:
- To start editing phone data that is synchronized with Google, you need to go to the browser on your smartphone and open Contacts. Some versions of the Android operating system offer an application with a similar name; if it is not available, then you must log in through the Gmail service.
- When performing operations through a browser on a mobile device or computer, you need to log in to google.com/contacts. It is worth noting that it is more convenient to do the work via a PC.
- You must be authorized using your Google account password and login. After this, a telephone directory opens with photos that were previously saved.
- You need to click on the picture to select the ones you need.
- Removal is carried out through the “Trash” button, which is located at the top of the screen. All selected materials are completely deleted, the browser should be closed.
- After that, go to “Settings”, where you activate your Google account; this action is carried out if it has been disabled.
- Click on the menu in the form of an icon with 3 dots and find the synchronization key; by tapping on it, the directory list will be updated.
The described method does not work in the situation if the user saved phone numbers to the smartphone’s memory or to a SIM card. The method works only in the case when the owner of the mobile device used a Google account and all materials were saved there.
In some cases, the Trash button may be inactive. This indicates that certain phones in the list are saved via Google+. To solve the problem, you will need to go to the Circles section and delete numbers there, then go to Contacts and perform the same action.
How to recover accidentally deleted entries
If you mistakenly deleted an important contact and at the same time disabled synchronization, all is not lost - there is a way to recover.
- Repeat the previous method, but in step 6 use the button with the gear icon.
- Next, click “Cancel Changes.”
- Now select a time interval, up to 30 days, then tap “Recover” and wait for the data to return.
- If the contacts were deleted more than a month ago, then the only available option is to restore the files using one of the instructions from the corresponding article.
Read more: Recovering deleted files on Android
We are glad that we were able to help you solve the problem. In addition to this article, there are 12,444 more instructions on the site. Add the Lumpics.ru website to your bookmarks (CTRL+D) and we will definitely be useful to you. Thank the author and share the article on social networks.
Describe what didn't work for you. Our specialists will try to answer as quickly as possible.