Typically, people who have an iPad or iPhone remain loyal to Apple technology and purchase other devices from Apple. In such a situation, the most common question is: “How to sync iPhone with iPad?”
Synchronization is almost always necessary, because with its help most user files will be copied to the new device, while remaining on the old one.
Below are four methods to sync iPhone and iPad with each other.
Using iTunes
Let's start with the fact that even within this method there are several options for how to do this. You can choose the best one for yourself.
To link an iPhone with an iPad, you need to log in to one of the accounts, connect the tablet and phone one by one, and synchronize the necessary data. Remember that the synchronization action cannot be undone, so select only the data types that need it.
After the device is detected in iTunes (an icon will appear in the upper left corner), click on it - the menu we need will open. The bottom section shows how much memory a certain type of data takes up on your phone. The connected device will be displayed in the middle, and in the left block there will be a list of items for synchronization. By checking the boxes, select the data we need and click “Synchronize”.
Then we turn off the phone, connect the tablet and carry out the same actions. The advantage of this method is its simplicity.
iCloud
Cloud service Aikladud is another method of synchronizing data between different Apple devices. Moreover, you can copy via iCloud in two ways.
First method:
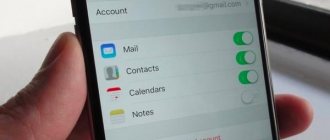
- On the device from which information will be copied, go to Settings.
- Open the iCloud section.
- Select the type of data that you want to synchronize (the gadget must be connected to a wireless network!).
- Take the device to which you want to copy the data. In the same way as described above, go to the iCloud section.
- Tap on the “Login” sign.
- Enter the authorization credentials of the Apple ID account of the device from which you want to copy the data.
- Synchronization will begin, during which you will be asked to merge the data with the existing ones. Give a permission.
Second method for new gadgets:
- On the device from which information will be copied, go to Settings.
- Open the iCloud section.
- Scroll down and click on “Backup”.
- Activate the “iCloud Backup” item.
- Tap on the words “Back up now” (the gadget must be connected to a wireless network!).
- Take a new device to which you want to copy the data. Turn it on and follow the instructions on the display.
- At the “Applications and Data” stage, select “Restore from iCloud backup”.
- Enter the authorization credentials of the Apple ID account of the device from which you want to copy the data.
- Select the latest one from the list of backups and synchronize it.
There is another option for how to sync iPhone with iPad using file transfer via AirDrop. Since this is not copying data, but simply transferring it (as through the Internet or cloud services), I will not describe it in this article.
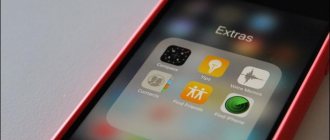
Sync apps
Currently, most, if not all, apps on iOS have support for cloud backup. In short, you can start playing on a tablet and then continue at the same level on your phone. You can connect your iPhone and iPad with one iCloud account, and the programs will synchronize themselves.
Since the free space on the cloud is not unlimited, it is possible and even necessary to disable applications that do not need it from synchronization. To do this, go to Storage & Backups in iCloud. The “Storage” tab contains all synchronized programs on your device, where you can disable them using the sliders.
Working with Media Library
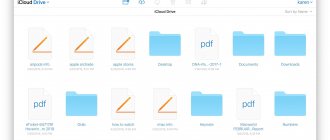
Let's now look at the second option through which you can transfer contacts from iPhone to iPad, and for this we will use a different data storage device. I would like to immediately mention that this process may seem complicated for some users. You will have to create two repositories for media libraries. However, if you can figure out all the subtleties, then you will be able to solve your issue. In order to exchange files, you first need to create a media library in iTunes for the selected device. For example, it could be an iPhone. After this, you need to close the program. Now we launch the application again, while holding down the Shift button on the keyboard if you are using a Windows operating system, and if you are using a MAC, then you should hold down Option. If everything was correct, a new menu should pop up in front of you, in which you will be asked to open one of the created media libraries or add a new one. Now you should create a new directory under a different name, then connect a second device, in our case it’s an iPad, and then perform synchronization.
Disable synchronization
If for some reason you want to disable syncing your iPhone with your iPad, connect your device via cable to the computer with the desired media library and click on the icon indicating the device. Then uncheck all data types in the left menu and click on the “Synchronize” button, then the “Apply” button to save the settings. After which you can delete the data file.
If you want to remove synchronization between iPhone and iPad and from cloud storage, then you need to change your account (provided you are using one) or remove all upload options to the cloud for all types of data.
How to sync iPhone with computer: all methods
The main feature of iOS is that we are forced to interact with the iTunes program, which is not so easy to love the first time. With the advent of the eleventh version, interaction has become more conceptual. Now, even for a person encountering this application for the first time, it will be much easier to understand the principle of operation. In this article we will look at how to synchronize an iPhone with a computer via i 11.0.2.
When you connect the cable to a device, be it an iPhone, iPad or iPod, iTunes launches on your computer. Which can be used to record data, music, movies, programs onto the device, or to create a backup copy on a PC (saving settings and data on the device).
The first one that opens is the standard tab, which presents all the information about your device. Starting from the firmware that is installed on it, and ending with the date of the last backup.
If we go a little lower, we will see extremely useful settings. Opposite each of the six points there is a place for a tick. I will try to explain which items should be included, which not, and why.
Point 1. “Sync automatically if iPhone is connected”
iTunes automatically starts transferring data from your PC as soon as your iPhone connects to iTunes. The problem may be that with such automatic interaction there is a risk of losing data previously recorded on the device. This can happen if the device was previously synchronized with another PC. Therefore, I would advise not to take risks.
Step 2. “Sync with this iPhone via Wi-Fi”
A convenient feature for those who have Wi-Fi connected and configured on their iPhone, and who do not want to use a USB cable. Although the speed of such synchronization and data transfer is much lower. More details about this here.
In addition to the fact that you need to check the box here, this function also needs to be confirmed on the iPhone. In the “Settings” application - “General” - “Sync.” from iTunes over Wi-Fi" .
Point 3. “Sync only tagged songs and videos”
This means that only the music or video you mark to move will move to your device.
Point 4. “Give preference to standard definition video”
This point needs no comment.
Point 5. “Reduce the bitrate of high-quality songs to...”
This means that you can set the music quality for all the songs that you have in your library, thereby you can save space on your device, but the quality of the songs will deteriorate.
Point 6. “Process music and videos manually”
The latest versions of iTunes have made the process of downloading music and videos to iPhone much easier. You can download music and videos directly to your device, bypassing the iTunes library. Previously, in order to upload videos or music, you had to set the path from the video or music files in iTunes, and then synchronize with the device. Now with this function the process has become easier.
Before you start filling your device with content, we recommend that you first go to Settings (the tab is in the upper left corner) of iTunes and go to the “Store” section.
In this section there are buttons with check marks that are worth paying attention to:
- “Show iTunes in the Cloud purchases.”
- “Sync playback information between devices.”
Both items are responsible for the instant transfer of information purchased from iTunes to the “cloud” (Internet), which can significantly increase the time it takes to synchronize the iPhone with the computer. Therefore, it is up to you to decide whether to tick these boxes or not.
In order to upload a video to an iPhone using the standard Video application, the video format must be mp4 . The standard player does not read other formats. But this only applies to the standard player. There are many video player apps in the Apple Store that support just as many video codec formats. You can download music to your iPhone in the standard application in mp3 format.
Synchronization (setting the path to iTunes on your PC) works like this. You should move the desired folder with music or video to the media library area.
interesting
Apple Watch sales drop 10% due to Apple Watch Series 7 delay
Know when Apple employees will return to offices
This is the area:
After this, the program communicates with the content you are transferring. And when it ends in the media library tab, the music or video you added will appear in the sections of the same name with a brief description of what you added.
After we have linked the folders with music or video from iTunes, we will move on to synchronizing directly with the device (in this case, the iPhone). To do this, go to the device tab,
where this panel will be visible:
Next, go to the “Movies” or “Music” tab and select what you want to synchronize.
We can directly synchronize everything we have by clicking one checkbox, or we can select individually what we want to transfer. After we have decided what we want to transfer, click the “Apply” button.
Synchronization of the iPhone with the computer via iTunes will begin, and what you noted will be transferred to the device. You can repeat the same thing with music separately, or all in one place, and then synchronize once.
The situation is similar with uploading photos to iPhone. You need to indicate in iTunes the folder where the photos are located, and do all the same steps as described earlier.
Important! If, after synchronizing your iPhone with your computer, you deleted this information on your PC, be it movies, music or photos, then when you resynchronize with the media library on the device, this information will also be lost.
Also, you should not change the location of this information after the initial synchronization of your iPhone with your computer. That is, you should not move a movie from folder to folder. During synchronization, the device will not find the path to the previously selected file and will delete it from the iPhone. Another feature is that if you previously checked the synchronization (checkbox), for example, for music, and later removed it for some reason, when you resynchronize with the device, this music will be deleted.
iTunes Store
By going to the iTunes Store tab, you will find yourself in a store where you can download paid and free games and applications.
The top of the program will display tabs for Music, Movies, Books, etc.
In order to purchase and download all this, you will need an Apple ID. What it is and what it is eaten with is written in previous reviews at this link.
Before purchasing music (it may not be a whole album, but a separate song), you can listen to it. About a minute or so.
App Store
After going to the “App Store” tab, a huge application store will open in front of you. In order to navigate the proposed content, there are the headings “Top Paid Applications” and “Top Free Applications”. There is also a separate list with application topics, ranging from the sections “Business”, “Catalogues”, “Education”, “Games” and ending with utilities and weather. How to install applications from the App Store is described here.
Sync one Apple ID with multiple devices
An important feature of iOS is that if you have more than one device, but let’s say an iPhone and iPad and they are connected to the same Apple ID, then at the time of purchasing a particular program or music, all purchases can be automatically downloaded and be installed on all devices. To enable this feature on iPhone, open “Settings” - “General” - iTunes - and Apple Store .
iTunes Match is a paid music cloud service from Apple that allows you to store your entire music library in iCloud. Plus, iTunes Match lets you access all your music from any device you have with internet access.
Automatic downloads is a feature of the iOS system that allows you to simultaneously download programs and music on several devices where this function is enabled.
iMobie AnyTrans program
AnyTrans - a complete replacement for iTunes
iMobie AnyTrans is an excellent iTunes replacement
. In addition to the fact that it is capable of producing all the same functions, the program is much more convenient, easier to use and more reliable. In addition to standard synchronization functions, the AnyTrans application also contains a file manager, application manager and other useful and convenient functions.
Despite the fact that Apple has simplified the iTunes application as much as possible, AnyTrans is easier and more intuitive to use. As soon as your Mac or iPhone is connected to your PC, an animation and a list of options appears on the computer screen.
How to do it?
Launch AnyTrans for iOS on your computer (PC and Mac) and click "Device Manager". Select your old iPhone as the source device.
Switch to one-touch control and select Clone Device or Merge Device.
Select the target iPhone and the categories of data you want to transfer, then find the “Start Transfer” menu item.
If you want to selectively move certain files to a category, you can follow these steps:
- Find the “Manage categories” menu item and select the one you need from among them.
- Browse through the files and then select the ones you want to transfer.
- Click "Send to Device" then "Start Transfer".
other methods
To link two iPhones, the capabilities of the popular cloud services Yandex.Disk (with a capacity of 10 GB) and Dropbox (2 GB) are used.
Another interesting article for you: How to remove the old protective glass from an iPhone yourself
File accessibility is carried out from various gadgets running on various platforms. To connect data do:
- Installing the client of the selected service on both iPhones.
- Create an account on smartphone #1.
- Enter the details of the created account on gadget No. 2.
After “collecting” the files into one folder, they will be transferred to the “cloud”. They can be accessed from an additional iPhone. For example, a file is created on the iPhone, and it is edited on a computer or laptop. Each cloud service allows you to transfer files from PC to iPhone without iTunes utility. Storage limit expansion occurs after a paid subscription.
Method 5: Connect via Bluetooth
Some Bluetooth-enabled devices, including wireless stereos and headsets, allow you to connect to multiple devices at the same time. With this technology, you can connect two iPhones to one device at the same time. This will not allow you to fully synchronize smartphones, but it will make some tasks easier.
Turn on the Bluetooth device you want to connect your iPhones to. Enable Bluetooth connection on your device to make it accessible to iPhone. Tap the Settings icon on your iPhone's home screen and select Bluetooth.
Press the Bluetooth button to toggle it from Off if necessary. to "On". Once it's turned on, your iPhone will begin searching for discoverable devices within range. Click on the name of the device you want to connect to.
When prompted, enter your device PIN or iPhone passcode. How to sync iPhones at the same time? Take a second smartphone and repeat the same steps without turning off the first one. This way you can make a double connection.
Errors on iPhone when syncing
Synchronization errors can occur under different codes and for different reasons. The most common ones are described below:
- loading conflicting programs or components. Even if you gain access to downloading through trusted Yandex or Google browsers, it is impossible to guarantee the security of each installation. For this reason, running iTunes, seeing a threat, may refuse synchronization to keep the device safe. To fix it, you will need to remove all questionable components and restart the PC;
- lack of the latest software version, choosing a backup copy with an unsupported firmware version. In this case, a complete update is required; it will not be possible to restore completely from the save;
- data scatter. Both on Android and Apple devices it is possible to place data in several folders. This may cause synchronization problems. To eliminate them, it is recommended to combine files in one place;
- iTunes installation problem. A free download is available for Windows, but to do this you need to log into your account and update the software to the latest version. Otherwise, the program will not be able to load;
- synchronization problems due to an incorrectly set date and time. Information needs to be corrected on each device.
Important! To set the correct time zone, automatic data updating over the Network is disabled.
Restarting the device
If after uninstalling the programs and rebooting each device the problem does not disappear, you should contact the developers.
Synchronizing multiple devices of the same brand is convenient for work. This eliminates the need to search for the necessary data, moving from one gadget to another. Setting up the process will take a few minutes, so don’t give up the feature.