11/27/2018 iOS and MacOS | mobile devices
Switching from iPhone to Android is, in my opinion, a little more difficult than switching in the opposite direction, especially if you have been using various Apple applications for a long time (which are not represented in the Play Store, while Google applications are also in the App Store). However, transferring most data, primarily contacts, calendar, photos, videos and music, is quite possible and relatively easy.
This guide will detail how to transfer important data from iPhone to Android when switching from one platform to another. The first method is universal for any Android phone, the second is specific to modern Samsung Galaxy smartphones (but it allows you to move more data and is more convenient). The site also has a separate guide on manually transferring contacts: How to transfer contacts from iPhone to Android.
Transferring Contacts
To transfer contacts, you need to log in to your iCloud and allow synchronization, to do this:
- Open settings
- Next, “iСloud” - (log in to your account) - and activate the “Contacts” section.
Retrieving all contacts from the cloud. To do this, open www.icloud.com on your PC, log in to your account and in the contacts section, select the ones you need.
- Open the section with the gear on your PC.
- We go to the “Export vCard” section and wait for the VCF file with all phone numbers to complete downloading.
- Open the page www.google.com/contacts and in the left menu go to the “Import contacts” section
- Include the downloaded file with a list of all contacts.
- The last step is to enable contact synchronization on your Android smartphone.
If you can't connect to a PC, this method will suit you!
We do all the steps described above and send the resulting file to your email.
- Download the file to your smartphone
- Open the downloaded document
- Your contacts will be automatically added to the new device
Transfer contacts via iTunes
Install iTunes on your PC and check for these settings.
Next, we perform the algorithm of actions:
- Connect iPhone to PC via cable
- Open the program on PC
- Go to the “Information” section or in other words “Information”
- Check the box “Contact synchronization”
- Select “Google Contacts”
- Log in using your Google account and click “Ok”
The entire phone book will be sent to iTunes
Transfer contacts using Google
Algorithm of actions to be performed on your “apple”
Go to the settings section, and then to the “Mail” item
- Adding a Google account
- Enter the required information
- Select the type of data for synchronization that you need
Algorithm of actions on Android
1. In the settings, look for the “Accounts and synchronization” item 2. Turn on automatic synchronization and add a Google account 3. Enter the same account data that you entered on iOS 4. Select the necessary sections for synchronization
All you have to do is wait for the transfer procedure to complete and check your notebook.
Receive contacts through Outlook
Go to the settings of this service and select the “Mail” section. Add an Outlook account. We select the information necessary for transfer and start the procedure. Next, go to the settings of your Android smartphone and do the same steps. We enter the data from Outlook, identical to that entered on IOS. We are waiting for the end of the transfer and checking our contacts.
Transferring contacts through third-party applications
Let's look at the most effective applications. They must first be installed on two devices.
CardDAV-Sync
1.Download the CardDAV application from Play-Market. 2. Open the utility and in the drop-down list we are interested in CardDAV 3. In the service line, enter the value: p02-contacts.icloud.com. 4.In the “Username and Password” line, write the data from your Apple ID. 5.Click on “Next” 6.Enter a random account name. 7.Activate the “Synchronize only from server to phone” section. 8.Complete the procedure with the appropriate button. 9.The transfer process has started
My Contacts Backup
Install the application from the official Apple store.
- Open the utility on Apple
- We agree to access the numbers
- Click on the “Backup” section
- We are waiting for the procedure to complete
- Select “Email” and send the document in VCF format to your email.
- Log in to your mailbox on Android. Open the file sent from Apple.
- Contacts are automatically synced with your smartphone.
Yandex moving
Create an account on Yandex or log into an existing one. Download the program on two phones. Open the application on the iPhone and enter the data from the Apple ID. You will see a 3-digit code that you need to remember.
Open the utility on the recipient smartphone. Go to “Settings” and go to the “Moving from phone to phone” section. We write the code that you remember and start the transfer process. We are waiting and checking our contacts. Detailed instructions here
Options
Unlike Android devices, it is not so easy for iPhone owners to copy phone numbers to a SIM card, and they will not be able to limit themselves to a couple of actions through the address book. As for transferring a directory from a SIM card, here, on the contrary, everything is done very easily, so if you need to move information from IOS to Android, you can use this method.
There are several ways to easily perform phone book synchronization:
- Do everything manually.
- Perform automatic import of numbers.
- Apply iTunes.
- Use Google Drive.
- Download a special application.
- Use services like “Yandex-Moving”.
You can use the Internet and technology - special sites and programs that allow you to synchronize and transfer all the necessary phone numbers to other smartphones.
For some, the manual copying method is the most acceptable. The procedure is performed as follows:
- We go to the phone book, select the desired user, then click on “Share Contact”.
- Click on the sending method - via email or SMS message.
- When a person’s card arrives on a smartphone, we save it in the phone book.
The disadvantage of this method is the need to synchronize each contact separately, because it will not be possible to send an entire group to another device.
Transferring the calendar
In your iCloud settings, we agree to calendar synchronization. On the website www.icloud.com, open the corresponding item and click on the “Share” icon in the drop-down list. Activate the Public Calendar function and copy the link that appears (webcal://….) .
Paste this link into your browser and change the webcal value to http. This is an ordinary text file that can be connected to Google Calendar.
For this:
- Open the tab www.google.com/calendar
- Go to the Other Calendars section and in the menu that opens, click on “Import calendar”.
- Open the downloaded document on your PC. Your events have now been transferred to your calendar on your Google account.
Of course, the easiest way is to continue using your old Gmail account, but you can also create a new @icloud.com account. To do this, in the iOS settings, select the iCloud section and turn on the Mail application in it - after that you will be prompted to register a new mailbox. And in order to receive correspondence sent to the old address, you need to enable redirection for it - in Gmail, call up the settings (gear in the upper right corner), in which, in the “Forwarding and POP/IMAP” tab, add a new iCloud address using the button “ Add forwarding address." After that, a confirmation email will be sent to it - click on the link, return to the Gmail settings and make sure that the correct address is indicated in the line “Forward copies of incoming messages to addresses:”, then click “Save changes”.
Bookmark synchronization
We will synchronize bookmarks from the Safari browser using iCloud. We will transfer bookmarks to the most popular browsers for Android: Chrome and Firefox. But before we begin, let’s turn on browser synchronization. We do not use the website for this, but the official PC client iCloud for Windows.
In the application, you need to select “Bookmarks”, in the options indicate the browser to which the transfer will be made. Click “Apply” and select “Merge”. We download the extension proposed by the application. Thanks to it, your bookmarks from the Safari browser are synchronized with the browser on your PC.
If you use Chrome on your Android smartphone, simply log in to your account (which you have linked on your PC) and your bookmarks will be automatically synced. If you use Firefox, do the following:
Setting up synchronization.
- Log in to the browser on your PC and smartphone under one account
- We enter the received code from the mobile version of the browser to the desktop version.
If it is not possible to install iCloud for Windows, you can use iTunes (first enable synchronization of bookmarks with iCloud in the phone settings)
- We connect the Apple via a cord to the computer and launch the iTunes service.
- Go to the device page
- Next, go to the “Details” tab
- We look for the “Other” item and click on “Synchronize bookmarks” (Choose from two options, one browser)
- Click on “Apply”
- Your bookmarks have been synced with the selected browser.
- We go to the selected browser on the PC and export bookmarks in an HTML file.
- Now all that remains is to import bookmarks using standard methods into desktop versions of the browser.
- On your smartphone, log in to the browser account linked to the desktop version.
Transfer / photo video
The Google+Photos application will help with this. Install Google + on your iPhone, log in to your account and activate auto-upload of photos and videos.
Now select “Download all photos and videos.” Once the download is complete, all media files will be in the application on your Android smartphone.
If using Google + does not suit you, the transfer can be done using a USB cable.
1.Connect the iPhone to the PC via a cable. 2. Go to Explorer 3. Right-click on the phone icon and in the list of devices and drives go to the “Import images and videos” section. 4. An import window will appear in front of you, where you can customize this parameter for yourself. (select the save path, delete, copy files, etc.) 5.Connect the Android device to the computer and transfer the folder with photos and videos to the Android memory through Explorer. The transfer can also be done to an external drive; we described how to do this here
Importing contacts into Gmail from other email services using Yandex as an example
If you did not use Gmail on your iPhone, but some other email service, for example, Yandex, to transfer contacts to Android you will first have to export your Yandex address book to Google mail.
For this:
- Go to the “Contacts” section of your Yandex mailbox.
- The required option is located in the “More” menu and is called “Save contacts to file”.
- When saving, select the vCard format from the “Mail Client” list.
- Next, import this file into Google Contacts according to the instructions above.
Exporting contacts in other email services is done in approximately the same way. The differences are extremely minor.
Copying music to iPhone
This section is especially important for music lovers. If your music is on iTunes, simply copy the files from your computer to your smartphone using any file explorer.
You can also use the player from Google. Namely Google Play Music. You can upload your tracks there from iTunes, after which you can listen to your library on your smartphone, PC and browser.
To implement this, install Google Play Music on your PC and select the location where your tracks are located (iTunes)
The service gives a limit to one user to download 50,000 tracks, which is enough!
If the method of listening to tracks via the Internet does not suit you, but downloading each track separately is still a problem. Third-party software will help here. Such applications are not entirely free. You can use iSyncr or DoubleTwist (there is also a computer version of the latter program, the interface resembles iTunes)
Transfer numbers using the phone book
If you have few numbers and don’t want to install third-party applications or connect a PC, you can transfer data manually:
- open iPhone phone book numbers
- We mark one of them for further sending
- the next step at the very bottom of the page is to click “ Share Contact ”
- There are two options for sharing: send a message via E-mail or SMS
You will have to repeat the procedure several times - separately for each number. Long, monotonous, but if this option suits you, then why not?
Transfer all data in a few clicks
There is an application that will help you migrate almost all data from your iPhone to Android smartphone.
Wondershare MobileTrans allows you to transfer messages, calendar, photos, videos and music. You can synchronize applications, contacts and calls, but this depends on your OS.
The application provides a trial period to evaluate the capabilities of the program. If you need to transfer backups or restore them, you will have to buy a subscription. The cost of a one-time subscription is $19.90, a license for one user is $39.90.
Using a license, you can transfer all contacts, calendars and other data. Purchasing a license allows you to work with no more than five devices and one computer.
Algorithm of actions for those who purchased a license:
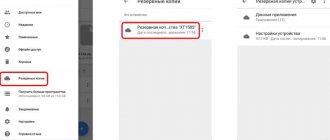
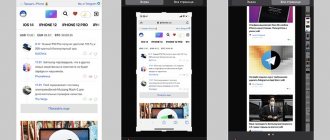
- Open the MobileTrans application and connect two devices via cable to the PC. Two devices will appear in front of you and occupy two sides of the screen, as in the photo below.
- If you need to enable USB debugging and accept the RSA key for Android, we do it.
- On Apple, the PC may require you to select the “Trusted Device” option
- Devices can be switched in the desired order to change the role of sender and recipient
- If you are asked to uncheck the “Encrypt iPhone backup” section in the iTunes service settings, we do it. Once the file transfer process is complete, you can re-enable this feature.
- When all the points above have been completed, you need to select the content to transfer by selecting the checkboxes. The application cannot be transferred from Apple to Android.
- We start copying data with the corresponding button. The file transfer speed depends on the amount of information transferred. This may take several hours.
- We monitor the charge on two devices; if one of the devices is disconnected, the transfer may not be completed correctly and the files will be damaged.
- Once the transfer is complete, disconnect the two devices from the PC.
Important: If you are transferring messages from an iPhone, turn off iMessage before you remove the SIM card from the Apple. Otherwise, all messages will arrive on iPhone and not on Android.
You can disable this feature in the settings, section “Messages”.
You'll have to come to terms with some things
Switching to a new platform can be a little daunting and inconvenient at first. I've listed a few tools that will make the transition from iPhone to Android easier, but there are some things you can't avoid. Obviously you will have to search and download the applications again, then transfer the information there. In addition, you will need to manually transfer important documents and files. However, again, use one of the cloud services. From there you can download it to your new smartphone.
The last thing you should do is disable iMessage before you finally part with your iPhone, otherwise you may encounter problems with SMS delivery. But if you forget, go to the Apple website and unregister.
Everything worked out? Transferring data from iPhone to Android is not as easy as transferring data from iPhone to iPhone, but you can do it! Happy transition! What other content delivery methods do you recommend? Write them in the comments.