;;
Skip to content
Reading time: 11 minutes. .3k.
Yuri Sanaev
System Administrator. Sales manager of computers and wi-fi equipment. Work experience - 10 years. Knows everything and even more about hardware and software.
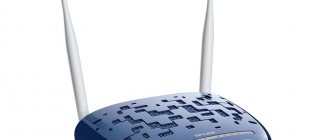
TP-TD-W8960N is an inexpensive Wi-Fi router with a built-in ADSL2+ modem, two antennas with a gain of 5 dBi and data transfer up to 300 Mbit/s. The device is perfect for creating a secure wireless network in your home or office; it will help organize high-speed Internet access and shared access to printers, documents, and multimedia content from several computers. We'll talk about the features, parameters and appearance, configuration and connection of the TD-W8960N router in this article.
Characteristics
The technical characteristics of the TP-TD-W8960N are among the best in the budget price segment. Together with an attractive price, reliability and wide functionality, they make the model one of the best-selling inexpensive routers.
| Wireless protocols | IEEE 802.11 b/g/n |
| Data transfer rate | Up to 300 Mbit/s |
| Number of antennas | 2, non-removable, gain 5 dBi |
| Connectors | 1 WAN, 3 LAN, 1 RJ11 |
| Control | Power, Wi-Fi, WPS |
| Indicators | Power, ADSL, Internet, Wi-Fi, WPS, LAN 1-4 |
A distinctive feature of the device is its variable LAN/WAN port. Its function is set by the user depending on the needs: to connect client computers or a cable from the provider. This makes it possible to use the TP-TD-W8960N modem to create different types of Internet connections: via ADSL or using an Ethernet cable.
Another budget model of the same brand and with similar characteristics is TP-TD-W8961N.
Overview of indicators and connectors
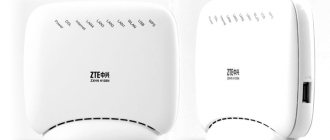
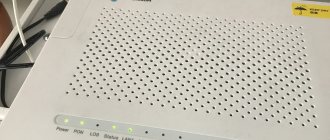
When making the router, the manufacturer changed the color scheme and made the device in a dark blue case. On the top panel there are holes for ventilation, closer to the front edge there is a panel with nine indicators:
- Power: on - the router is on, off - off;
- ADSL: on - connection established, blinking - connection in progress, off - connection failure;
- Internet: lit - there is access to the Internet, off - no access to the Internet or modem in bridge mode;
- Wi-Fi: on - a wireless connection is established, blinking - data is being sent or received, off - Wi-Fi is disabled;
- WPS: on - a new device is connected and added to the network, blinking - a new client is connecting to the network, off - the function is disabled or the new device cannot be connected to the network;
- LAN: on - a client is connected to the router, blinking - data is being transmitted or received, off - there are no connected devices.
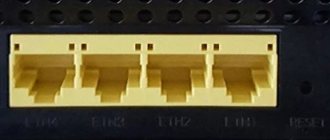
On the back of the router there are connectors:
- ADSL - for connecting the cable coming from the splitter;
- LAN 1-3 - connectors for connecting a PC or other devices to the router;
- LAN4/WAN - combined connector, can be used to connect a PC or cable from a service provider;
- Connector for power adapter.
On the same side there are buttons:
- ON/OFF — turn on/off the router;
- WPS/Reset: for convenient connection to the client router or to reboot the device;
- Wi-Fi—turn on/off the wireless network.
In addition to connectors and control buttons, there are two non-removable antennas on the back side.
Convenience and ease of setup
8.5
Unique product
Scientists from all over the world are in search of a remedy that would help make life easier for patients suffering from the “sweet” disease. Not long ago, a new product appeared on the market - a Chinese patch for diabetes. This product, called Dzhi Dao, is made using the secrets of Chinese medicine and innovative technologies.
This product is an adhesive surface on which a natural composition is applied - extracts of medicinal herbs. The treatment is based on the principle of transdermal effects on the body: the active components first penetrate through the skin into the blood and then are distributed throughout the body.
How long should I wait for the results of treatment? Ji Dao works slowly, gradually. Reviews from doctors from all over the world indicate that the use of this product really helps stabilize blood glucose levels in patients with diabetes.
The use of Chinese plaster to combat this disease has a number of advantages:
- The composition applied to the surface of the product is completely natural, so it is safe for the human body: the risk of allergies or other side effects is minimized.
- Unlike sugar-lowering drugs, the Chinese diabetes patch does not put a strain on the organs of the digestive tract (the components are “delivered” to the body through the skin).
- The product is inexpensive and easy to use at home.
- Dzhi Dao demonstrates a prolonged effect.
- The product is certified and has received positive reviews from doctors from all over the world.
The effectiveness of the patch is ensured by its composition:
- Licorice root extract. This component promotes the regeneration of vessel walls, restores blood flow, stimulates the production of insulin by the pancreas, helps dissolve cholesterol plaques and remove them from the body.
- Anemarrhena rhizome extract. Cleanses the kidneys and liver of waste and toxins, improves the functioning of these organs.
- Coptis root extract. Positively affects metabolism.
- Trichosanth extract. Natural immunomodulator.
- Rice seeds. Cleanse the body of diabetic patients of toxins.
How to use the Chinese patch for diabetes:
- the product is attached to the stomach, closer to the navel area (this is where many biologically active points are located);
- the skin should be cleaned of dirt and dried with a towel;
- Having removed the protective tape, the product is applied to the specified area and pressed with your fingers;
- The patch is left for 8–12 hours, after which the product is removed, the skin is washed again and a new product is attached.
How long does the treatment last? Doctors say that the optimal duration of the therapeutic course using the Dzhi Dao patch is four weeks. The product can also be used for preventive purposes.
Reviews from those patients who have already purchased a Chinese patch to combat diabetes and have experienced its effectiveness testify to the following effect of the product on the body:
- general well-being improves, a feeling of vigor and a surge of strength appears;
- blood glucose levels are normalized;
- immunity increases;
- the walls of blood vessels are strengthened;
- the product helps regulate blood pressure;
- the patch helps break down cholesterol plaques and remove them from the body;
- the product cleanses the digestive tract from waste, toxins, and helps get rid of helminths;
- The product has a positive effect on metabolism and restores hormonal balance in the body.
The following groups of patients are recommended to refuse diabetes treatment with this product:
- for those who have an individual intolerance to individual components of the medicinal composition;
- pregnant and lactating women;
- children under 12 years old.
It is not recommended to attach the patch to those areas of the skin that have wounds, scratches or other microtraumas.
Despite the large number of positive reviews about the Dzhi Dao patch on the Internet, you should not consider this medicine as a panacea for diabetes. Here are a few points to consider before purchasing the product:
- In general, the Chinese Dzhi Dao patch is a biologically active drug with a completely natural composition, which can be purchased without a prescription.
- It is true that the product has a positive effect on the body: it improves metabolism, improves the functioning of internal organs and, most importantly, stabilizes blood glucose levels. However, the claim that the patch will help you get rid of diabetes once and for all is a myth. This is a natural medicine that will only alleviate the course of the disease, minimize the manifestations of its symptoms and protect against the development of complications.
- It is necessary to take into account that Dzhi Dao is classified as a herbal medicine, which means that the product works much more slowly than sugar-lowering medications. You can't expect an immediate effect.
- There are many scammers operating online, so no one is immune from fakes: any user can become a victim of a “money scam.” Based on this, it is better to purchase a Chinese patch on the official website of the manufacturer, and not on dubious resources, no matter how much it costs.
Most experts do not regard Zhi Dao as an independent medicine. They recommend using the product as an adjuvant in the complex treatment of diabetes or to prevent complications of this disease.
Connecting a router
Before connecting and setting up, the modem must be installed correctly. If a wired connection is to be created, the device is usually located close to the PC so that the cable does not spoil the interior of the room. When creating Wi-Fi networks, a smart solution would be to place the router in the central part of the house or office. This will ensure a uniform signal in all rooms. If necessary, the device can be mounted on the wall using special holes on the bottom side.
Instructions for connecting the router:
- Run a telephone wire or Ethernet cable from your service provider and connect it to the ADSL or WAN sockets, respectively.
- When setting up a wired connection, run a cable from the LAN port to a similar port on the laptop or PC.
- Insert the power adapter plug into the connector on the router body and the plug into the socket.
- Press the power button and start the router.
Now you can start setting up the TP-TD8960N router for Rostelecom or another provider.
System update
Many network equipment manufacturers install older versions of firmware on their devices. In most cases, the factory firmware works quite stable and does not require reinstallation. But there are situations when reinstallation is necessary, for example, if the firmware is damaged by a virus or by the user.
To reflash a TP-Link router, you must first download the firmware file from the official website and save it, for example, on your desktop. Then go to system tools -> firmware update. On the page that opens, select the binary file downloaded earlier and click “Update”.
Important. This procedure is carried out exclusively through a wire. Otherwise, the access point may fail and the warranty will be void. You should also avoid disconnecting the equipment from the power supply.
Settings
If there are no instructions for setting up the TP-TD-W8960N in Russian, a detailed step-by-step description of the connection process can be found below. Just select the type you need and follow the instructions.
PPPOE
The PPPOE protocol is most often used by Rostelecom.
Instructions:
- Open a browser, enter tpmodem.net or 192.168.1.1 in the address bar.
- Specify login credentials - default is “admin/admin”.
- Select quick setup - “Quick Setup”.
- Click “Next”.
- Specify the connection type - “ADSL WAN”.
- In the “VPI/VCI” column, enter 8 and 35, respectively, in the “PPP Username” and “PPP Password” fields - the name and password provided by the provider.
- If a wireless network is not needed, remove the checkbox next to the “Enable Wireless” line. Otherwise, come up with a name for the Wi-Fi network, enter “WPA-Personal” in the “Network Authentication” field and specify a password.
- Check the entered information. If everything is correct, click “Confirm”.
The quick setup of the PPPOE connection is complete.
IP Over Ethernet
Setting up a router with a built-in ADSL modem in IP Over Ethernet mode is also easiest to do in the quick setup mode.
Procedure:
- Login to the web interface.
- Log in using “admin/admin” as the default login and password.
- In the menu on the left, select “Quick Setup”, in the next window click “Next”.
- Specify the connection type - “ADSL” or “Ethernet”.
- For ADSL: in the “WAN Type” field, click “IPOE”, then specify a dynamic or static IP in the “WAN IP Address Settings” field. If you select “Dynamic IP”, you will not need to enter anything else; click “Next”. If “ic IP” is specified, fill in the fields below “WAN IP Address”, “WAN Subnet Mask”, “WAN gateway IP Address”, click “Next”.
- For Ethernet: select “IPOE”, specify the IP type, for static IP fill in the fields “WAN IP Address”, “WAN Subnet Mask”, “WAN gateway IP Address”. Click “Next”.
- Uncheck the box next to “Enable Wireless” if a wireless network is not needed, or enter the name of the Wi-Fi network, set the security type to “WPA-Personal”, create and specify a password.
- Check the entered data and click “Confirm”.
The IP over Ethernet connection setup is complete.
Repeater mode
Repeater (repeater, “bridge”) mode is designed to expand a wireless network using multiple access points. It can be used to increase the coverage area of a router in a large home or office. When activated, the second router receives the signal from the first and transmits it to client devices, thereby expanding the coverage area of the wireless network.
This is what the setup looks like in repeater mode TP-TD-W8960N (the main router is a similar model):
- Open the web interface of the main router, select “Wireless” in the menu, click “Advanced”. In the “Channel” tab, instead of “Auto”, set the channel number to “1”. Click "Apple/Save".
- In the “Wireless” section, click “Wireless Bridge”. Set the access point mode to “Access Point”, in the “Bridge Restrict” line set to “Enabled”. Enter the MAC address of the additional router. Click “Save”.
- Go to the “Security” tab, select “WPA2-PSK” in the “Network Authentication” field, create and enter a password. Save changes.
- Close the interface of the first router, go to the second device and load its web interface.
- Click “Wireless” - “Advanced”, select the wireless network channel corresponding to the one installed on the first device. Save changes.
- Click “Wireless Bridge”, set “Enable” to “Bridge Restrict”, enter the MAC address of the main router.
- Go to the “Security” tab and change the security settings to match the settings on the first router.
- Click “Advanced Setup”, select “LAN”, change the IP address to 192.168.1.2, disable the “DHCP Server” function. Click “Save” to reboot the device.
Setting up the router in repeater mode is complete.
To expand your wireless network, you can look at the MAC addresses of routers on the bottom side of their cases.
Wi-Fi setup
To configure a wireless network on the TP-TD-W8960N, you must:
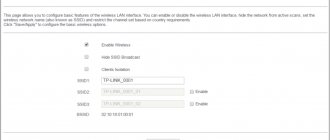
- Open the web interface, go to the “Wireless” tab, check the box next to “Enable Wireless”, come up with and enter a name in the “SSID” field, click “Save”.
- Open the “Security” tab, opposite “Enable WPS” leave “Enable” in order to be able to connect devices via WPS in the future. In the “Network Authentication” field, select “WPA2-PSK”, in the field below, create and enter a password. Save changes.
Wi-Fi setup is complete.
IP TV
The modem can be configured to watch interactive television.
Management:
- Connect the set-top box to any of the LAN ports (1-3).
- Open the web interface, go to the “IP TV” tab.
- Place a label next to the port to which the set-top box is connected.
- In the “VPI” and “VCI” fields, enter the data specified in the provider agreement.
- Save changes.
Now you can watch IP TV on all user devices.
How to set up TP Link TD W8960N
If you use an ADSL modem or other equipment, the connection will also not cause problems.
The user has completed the installation of the equipment, now you can proceed to directly setting the parameters. How to set up a tp link router for Rostelecom? All manufacturers have a special website with a user’s personal account. You can log in to it even before entering the parameters.
Proceed to the portal tplinklogin.net. Professionals, out of habit, enter the address 192.168.0.1. In fact, the domain name simply replaces the IP; it is used for all sites to quickly remember the portal login path.
An authorization panel will appear in front of the user. The login and password are usually specified as admin and admin. If the input parameters are different, they are printed on a label on the bottom of the equipment.
In the future, it is better to change your login and password for security. If the network is hacked, a third-party user will not be able to enter the equipment menu, adjust parameters and create additional problems for the owner.
After logging in, the person will be taken to the main page. You should start the procedure by visiting the “Network” section, proceed to the “WAN” item. Input parameters:
- Select PPPoE/Russia PPPoE as the connection type.
- Enter your username and password.
- Refuse the secondary connection.
Where can I get my login and password? The data is provided in the agreement, open the agreement and carefully study its contents. Are there no parameters in the document? Contact support and ask the operator to issue your credentials.
Setting up a network schedule
One of the interesting features of this router is setting a schedule for the day or week according to which the wireless network will operate.
Instructions:
- Open the “Wireless” tab, select “Wireless Schedule”.
- Put “Enable” in the top line.
- Specify "Each Day" or "Each Week" to set a schedule for the day or week.
- Specify the days of the week during which the schedule will operate, and note the Wi-Fi operating hours.
For the schedule to take effect, you must save the changes.
A little parting word
To protect your network, it is best to change the password to access the router settings menu. In the "Maintenance" section there is an "Administration" tab. Here you need to enter your new password twice. You also don't need to repeat your Wi-Fi password, it may be unsafe.
After adding new characteristics, the device must be rebooted. To do this, in the “SysRestart” tab, you need to put the icon next to “Current settings” and then press the “Restart” button.
Changing the factory password
The default login and password for logging into the web interface is “admin/admin”. To prevent others from using this data and changing the settings of the TP-TD-W8960N, you need to change the password to a more secure one.
Management:
- Open the “Management” tab, click “Access Control”, select “Passwords”.
- Enter the old password in the “Old Password” field.
- Create a new password, enter it in the “New Password” field, duplicate it in the line below.
Save changes.
Method 1. How to insert a signature into a Word document
- So, if you want to put an electronic digital signature on a document, agreement or statement (printed in Word 2007), you need to go to the “Insert” tab.
- The Quick Access Toolbar for that tab will open. In the panel, you must select the “Insert signature” icon.
- After which, a system window will open in front of you with a description of the “Signature” function.
- Just below, there will be two buttons. We need to click on “Ok”.
- Then the “Signature Setup” window will open, in which you need to enter your initials, position, email and last name.
- Click “Ok” and the digital signature appears on your document.
Firmware
After purchasing and connecting the router, it is recommended to update the TP-TD-W8960N firmware to the latest one, and then repeat this operation at least once every six months.
Management:
- Go to page https://www.tp-.com/ru/support/download/td-w8960n/.
- Select the hardware version of the router and click “Firmware”.
- Scroll down the page to the current firmware version. Click on the arrow button to download and specify the folder to save the file. Unpack the downloaded archive and extract the file with the .bin extension. This is the new firmware.
- Open the router’s web interface, go to the “Management” section, click “Firmware Upgrade”.
- Click “Select file” and specify the path to the downloaded firmware.
- Click “Up Firmware”.
Wait a few minutes until the router reboots.
Do not disconnect the device during the update process. This may damage it.
The model under review is a budget Wi-Fi router with a built-in ADSL2+ modem, a combined LAN/WAN port and high data transfer speeds. Good technical characteristics, wide functionality and low price make the device one of the most popular in its price segment.
Additional features of a wireless router
These include parental control, diagnostics of the device indicating possible methods for eliminating the detected malfunction. The ability to use iptv with the choice of desired content can also be considered an additional feature of the router.
Setting up digital television iptv
Rostelecom provides an STB set-top box for viewing. It connects to the router via the LAN port assigned in its settings. On the “Setting up a WAN connection” page, the created second-level interface for iptv is connected via a “Bridge”. On the “Port Grouping” page, an IP TV group is created, which includes the working iptv port (LAN4). Now it is used only for working with the set-top box. The PC will not be able to use it. The settings are applied and saved.
Sources used:
- https://www.tp-link.com/ru/support/faq/344/
- https://tvoi-setevichok.ru/setevoe-oborudovanie/nastroyka-routera-tp-link-td-w8960n-poshagovaya-instruktsiya.html
- https://otarifah.ru/tarify-rostelecom/kak-provesti-nastrojku-tp-link-td-w8960n-rostelekom.html
Network connection
First of all, connect the router to the computer using the wire (patch cord) supplied in the kit. Also put the contract with your provider in a visible place, as it contains information on connection settings.
After connecting, you need to open a web browser and type tpmodem.net in the address bar. This is the default address for logging into the web interface. The standard login and password are admin.
Also find in the contract the information provided by the provider - authentication methods, interfaces, login and password.
There are two ways to configure the TP-TD-W8960N - Quick Setup (quick) or Advanced Setup (extended). Let's choose the second option - it allows you to fine-tune and give you an idea of this process. However, in the first option, it is enough to specify the basic data, after which the router will reboot. The next time you turn it on, the Internet should be connected.
Setting details
The advanced setup process is a sequence of actions:
- Select Advanced Setup in the left menu and go to “Wan Service”. Click "ADD" to create the connection.
- From the proposed ATM or ETH interfaces, select the one you need (today all Russian providers use ETH, ATM is still in demand in several countries). Confirm your selection with the “Next” button.
- Now you need to select the connection type used by the provider in the “Select WAN service type” line. Next, the procedure will differ depending on the provider. Let's look at what the TP-TD-W8960N setup looks like for Rostelecom (the provider uses the PPPoE protocol).
PPPoE protocol
Instructions for setting up the Russian web interface are presented in the following video:
Here in the Username and Password fields you need to specify the provided login and password. If necessary, set the “Authentication Method” (you will need to constantly log in before connecting). There is no need to change any other parameters.
Proceed to the next settings where you need to select default gateways and click “Next” again.
DNS servers can be selected from the WAN gateways used or you can register them yourself by clicking “Use the following ic DNS IP address”.
IP over Ethernet
This means that the router will automatically receive an IP address or use a static one. For the first case, you will need to specify (if required by the provider) one of the options “Option 60 Vendor ID”, “Option61 IAID” and “Option 61 DUID”.
When setting a static address, you need to activate “Use the following ic IP address” and enter the following parameters:
- Network IP address;
- Subnet mask;
- Gateway IP address.
The remaining settings should be entered similarly to those described in the case of PPPoE.
Access point
Open the Wireless menu to configure your wireless access point. In the first Basic section, select the following:
- activate the “Enable Wireless” option to start the wireless network;
- if necessary, you can make the access point hidden - click “Access Point”;
- You can isolate clients on the network using the “Clients Isolation” parameter;
- the name of the point is indicated in the “SSID” field;
- the maximum number of clients is indicated in the “Max Clients” line.
In the “Security” section you can configure the following settings:
- if you are not going to use “WPS” for connection, specify “Disabled” in “WPS Setup”;
- In the “Network Authentication” line, several authorization methods are available to choose from.
If you select some authentication methods, you may need an access code for the future network or for the Radius server (you will need to enter its IP address).
IPTV
In order for the router to connect to the set-top box, you should go to the “IPTV” section:
- Next to the “Enable” line, activate the checkbox.
- Specify the port number that will be used or was used to connect the set-top box.
- Specify the “VPI” and “VCI” values provided by the provider in the contract.
When the setup is complete, all you have to do is restart the router - after this the changes will be applied.
Setting up a network schedule
In the TP-TD-W8960N web interface, you can go to the “Wireless Schedule” menu item. Here you can set a schedule for turning on or off the active wireless network. To customize it to your liking, follow these steps:
- Turn on Enable next to “Wireless Schedule”;
- “Apply to” allows you to specify the validity period of the schedule - you can select daily or weekly.
- It remains to enter the network operation intervals by setting the appropriate time for “Start” and “End”.
Thus, setting up a router is not a complicated procedure. The only thing is that you need to correctly indicate the provider data. Otherwise, there will be no access to the wireless network.
