- 39shared
- 2Facebook
- 32Twitter
- 5VKontakte
- 0Odnoklassniki
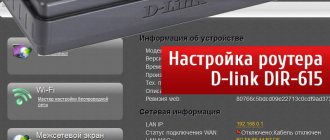
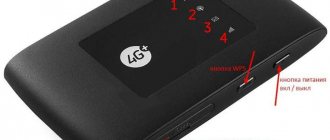
In this article we will provide detailed instructions for setting up the D-Link DIR-620 router. This router model has all the necessary functionality for distributing the Internet both “wired” and via a wireless Wi-Fi network. In addition to standard Ethernet connectors, the router is equipped with a USB port for connecting a USB modem, which provides connection to WiMAX and 3G GSM networks.
Authorization
In order to get to the router’s web interface, you need to open your Internet browser and type 192. 168.0.1 in the address bar, Username - admin , Password - admin (provided that the router has factory settings and its IP is not changed).
Difference between 615 and 620 models
The differences between routers of the same series are not large. Let's write a short description of the characteristics of D-Link DIR-615 and 620. Different characteristics:
| Differences | 615 | 620 |
| USB port for 3G | absent | There is |
| Preventing DoS attacks | There is | absent |
| Print server | absent | There is |
| Torrent client | absent | There is |
| Built-in FTP server | absent | There is |
Changing the factory password
For security reasons, it is recommended to change the factory password.
Default: Login admin , password admin .
In the router interface, you need to go to the System Administrator password menu .
In the New Password , enter a new password.
In the Confirm Password , repeat the new password.
Then click the Save Settings .
After this, the router will prompt you to re-enter its settings.
Conclusion
Using a DIR router allows you to easily access the Internet. For a beginner, all the necessary functions for connecting to the network are already available, so this device will be sufficient. And setting up the DIR 620 router according to our instructions is easy.
pros
The advantages of the DIR router include the following:
- Inexpensive equipment.
- Supports many functions: torrent, DLNA, control, printer, etc.
- Easily configured on any firmware version.
- Compact.
- Works stably.
Minuses
The disadvantages of the 620th DIR router model include the following:
- Overheats.
- The old version of the software has many shortcomings and glitches.
- Problems with WI-FI on the old revision.
- Small range.
Setting up an Internet connection
On the Advanced Settings ; select Network ; ⇒ WAN ;.
Click on the Add button.
Preparatory actions
After purchasing, unpack the device and place it in the optimal location. The signal is blocked by concrete walls and running electrical appliances, such as a microwave oven. Consider these factors when choosing a location. The network cable should also be long enough to connect it from the router to the PC.
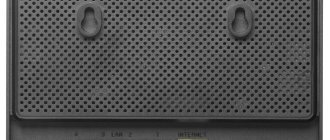
Pay attention to the back panel of the device. It contains all the available connectors, each with its own label, making connection easier. There you will find four LAN ports, one WAN, which is marked in yellow, USB and a connector for connecting the power cable.
The router will use the TCP/IPv4 data transfer protocol, the parameters of which must be checked through the operating system to obtain IP and DNS automatically.
We suggest that you read the article at the link below to understand how to independently check and change the values of this protocol in Windows.
Now the device is ready for setup and next we will tell you how to do it correctly.
Setting up a PPPoE connection
- In the Connection type: select PPPoE
- In the Port , select the WAN port - it is listed there as Port 5 .
- Username: Your login from the contract
- Password: Your password from the agreement
- Confirm password: repeat password
- Authentication algorithm: Auto
- Keep alive - check the box for permanent connection
- MTU - change the value to 1450 or less
In the Miscellaneous , make sure that NAT and Firewall .
If your provider provides Internet television service, check the Enable IGMP .
Comments (18)
Vladimir
10/22/2013 at 09:47
Guys, respect and respect for your help, from me and from my daughter! SmartTV with cartoons is already whistling. Now I ask you to help with connecting a network drive and setting up a torrent client in DIR-620.Answer
Andrey
01/05/2014 at 00:22
Everything works, thank you very much! But the Internet appears after 7-10 minutes, is it possible to somehow fix this?
Answer
admin
01/09/2014 at 19:26
I think it's possible. I just don't know what exactly your problem is.

Answer
Seryoga
01/19/2014 at 06:40
Dear admin! Help me configure the TP-LINK TD-W8961ND router on Rostelecom?
Answer
admin
01/21/2014 at 17:09
I'm probably already late with my answer, two days have passed. Write if it is still relevant.
Answer
Alexander
01/28/2014 at 16:36
Thanks a lot! Wi-Fi is set up. But the problem with IP is not included in any way. When I do a reset it works, then when I set up Wi-Fi, there is a black screen. What is the problem? Help me please!
Answer
admin
01/28/2014 at 17:31
And on the main settings page (on the advanced ones), open the IPTV setup wizard (there is such an item there) and in it indicate the port where the set-top box is connected.
Answer
Vladimir
02/09/2014 at 13:14
Wi-Fi works. Thanks a lot. I struggled for a long time until I came across this site. But how can I make sure that my computer also connects to the Internet (on which everything was configured?
Answer
Nasty
02/09/2014 at 18:08
Please help me, at first my wifi was not password protected, but then I set a password and I got two networks dir 620 and dir 620 2, one is password protected, and the second is not what to do, how to remove the one that is not password protected.
Answer
brisk
03/25/2014 at 18:28
thank you buddy, without you I would have been stuck for a long time 5+ for the article
Answer
brisk
03/25/2014 at 18:51
PS when installing Wi-Fi, pay attention to the “wireless mode:” section to select the B/G/N mode by default, in any case, I have B/G and new devices use N mode
Answer
Natalia
05/26/2014 at 19:44
Please help!!! We bought a modem, now we can’t set it up, admin won’t accept the password and login. The Internet is from Rostelecom. What should I do?
Answer
Konstantin
03/12/2015 at 09:43
Guys, thank you SO MUCH for the simple and accurate manual! You can’t even imagine how lame I am when it comes to settings, but following your instructions, I figured it out the first time and everything (EVERYTHING) worked!
Answer
Misha
08/25/2015 at 11:06
Dear admin, on my dlink router in the back there are two small buttons on how to use them
Answer
admin
09/16/2015 at 12:10
One for reset. And the second is probably for turning on the power.
Answer
Andrey
08.11.2015 at 14:17
Thanks a lot! They helped a lot. I racked my brain for two hours
Answer
Vladimir
11/19/2015 at 16:46
Useful article. Thank you. Problem with Wats Up. Incoming messages arrive on the smartphone only when the specified application is turned on. If you do not access the application, there is no notification of incoming messages. What is the problem? The smartphone works correctly on other WiFi networks.
Answer
Alexander
01/04/2016 at 02:25
The problem with wifi in dir 620 is that it constantly turns off once or twice a day, as I understand, mainly after updating Rostelecom, and the problem is that they cannot help me, wifi constantly turns off and can only be fixed after a reboot. Help.
Answer
Setting up an L2TP connection
- In the Connection type field: select L2TP + Dynamic IP
- In the Port field, select the WAN port - it is listed there as Port 5.
- Username: Your login from the contract
- Password: Your password from the agreement
- Confirm password: repeat password
- VPN server address: enter the address of the provider's VPN server
- Authentication algorithm: Auto
- Keep alive - check the box for permanent connection
- MTU - change the value to 1450 or less
In the Miscellaneous , make sure that NAT and Firewall .
If your provider provides Internet television service, check the Enable IGMP .
Click Save ;.
LAN configuration in Windows 7/10
In Windows, open Control Panel – Network and Sharing Center. Next, on the left, click on the “Change adapter settings” link. All your network connections will be displayed here. If you previously used the Internet on only one computer and the provider’s cable was connected directly to it, then a high-speed connection will definitely be on the list. Now there is no need for it, since the router will now connect to the Internet. All we have to do is configure “Local Area Network Connection”.
Right-click on the corresponding icon and select “Properties” from the menu that opens. Then go to the Internet Protocol Version 4 settings.
On the “General” tab, set the radio switches to the “Obtain an IP address automatically” and “Obtain DNS server address automatically” positions. Save the changes.
Now we can connect to the router via wire and make the necessary settings.
Configuring PPtP (VPN) while automatically obtaining a local IP address (DHCP)
- In the Connection Type field: select PPTP + Dynamic IP
- In the Name , enter the name of the connection (you don’t have to change it)
- Username: Your login from the contract
- Password: Your password from the agreement
- Confirm password: repeat password
- Connect automatically: check the box
- MTU value to 1450 or less
- Authentication algorithm: Auto
- Keep alive - check the box for permanent connection
- We save the settings with the Save the Reboot button, we reboot the router.
Reviews
DIR router consumers comment:
- “DIR is the best router in its price category. Served for more than 3 years and almost never let me down. Sometimes I rebooted a couple of times, but no more.”
- “Good price, speed is also decent, but not ideal. The flash drive falls off. After the update, DIR began to work better.”
- “The DIR router was purchased to organize a network in the office. I bought four of them. Everything works fine, but there is no full-fledged “Repeater” function. It's a shame."
- “At first I thought it was a waste of time to purchase this DIR, since everything worked terribly. Then I came across new software and reviews that you definitely need to install a new one on the D-link 620. Updated, now the Internet “flies”.
Setting up Wi-Fi on the router
1. From the advanced settings page, go to the Wi-Fi , select Basic settings ; and set the desired name of the wireless access point SSID . After that, click Edit ;.
2. After this, it is also recommended to set a password for your wireless network. To do this, go to the Wi-Fi security settings, select the authorization type (WPA2/PSK recommended), and then enter any password of at least 8 characters - this will help protect your wireless network from unauthorized access. Save your changes.
That's all: now you can try to use the Internet via a wireless Wi-Fi connection from a laptop, tablet or any other equipment.
Brief characteristics of the D-Link DIR-620 router
| Characteristic | Meaning |
| Type | Wi-Fi router |
| Wireless Standard | IEEE 802.11n, IEEE 802.11g, IEEE 802.11b, IEEE 802.3, IEEE 802.3u |
| Frequency range | 2400-2462 MHz |
| Max. wireless connection speed | 300 Mbit/s |
| Antenna | 2 x 2 dBi |
| Wireless Signal Strength | 17 dBm |
| Wireless Security | WEP/WPA/WPA2, WPA-PSK/WPA2-PSK |
| Ports | 4xLAN 100 Mbit/s, 1xWAN 100 Mbit/s, 1 USB 2.0 Type A |
| Passing VPN traffic | PPTP, L2TP, IPSec |
| DHCP server | There is |
| Firewall | There is |
| NAT | There is |
| WDS Bridge | There is |
| Possibility of connecting a 3G/LTE modem | There is |
| Dimensions (WxDxH) | 147 x 114 x 33 mm |
Saving/restoring router settings
After making the settings, it is recommended to save them so that if problems arise, you can restore them. To do this, go to the System Configuration menu .
- Select saving the current configuration. To save the current settings of the router, the settings file will be saved to the specified location on the hard drive.
- To restore settings from a file, you need to click and select Load a previously saved configuration into the device , specify the path to the settings file, then click the button.
Appearance
Before we start connecting the device, let's get to know it a little.
Front panel icons.
| Lights up (green) | Power is connected. | |
| Does not burn | There is no food. | |
| On (yellow) | After turning on, the device boots; after booting, a failure has occurred. | |
| Lights up (green) | The connection has been established. | |
| Flashing (green) | The WAN interface is working. | |
| On (yellow) | The connection is not ready. | |
| Lights up (green) | WIFI is on. | |
| Flashing (green) | WLAN interface active | |
| On (green) | A PC or other device is connected to this port. | |
| Flashing (green) | The LAN port you selected is active |