Where to install the router for optimal signal
To understand where it is best to install a router for optimal signal, you need to decide on the type of connection. If you select the connection type via cable, then there is no need to look for a specific location for the device, since the signal will be stable anywhere in the apartment.
More obstacles will arise if the user wants to establish communication between the laptop and the router (for example, Mercusys models) via a Wi-Fi connection. The optimal place to install the router is near the desktop, on which the laptop itself is located. There are several reasons for this:
- the power outlet is always nearby, and therefore the user has free access to turn the router on or off;
- The fewer obstacles in the way of the Wi-Fi signal, the more stable the connection with the Internet will be.
The situation becomes more complicated if the device is located at a distance from the computer. If the Wi-Fi router is placed incorrectly, the network connection speed will deteriorate significantly, the user will experience connection dropouts, and will also receive an unstable or extremely weak signal in neighboring rooms.
The most stable signal can be ensured only if the wireless network does not overcome various obstacles in the form of partitions (walls). Ideally, you need to choose a location so that the signal from the router can pass through doorways without obstruction.
Important! The strongest signal will be in the room where the router itself is located. The optimal installation point for the device is the middle of the apartment (if you need to connect several PCs to the router).
It is advisable to install the router in the hallway, since if all the doors are open, you will have direct visibility from any room. In this case, the router will be surrounded by all the necessary devices that connect to the general home network. Therefore, the signal will go more confidently.
The router is mounted high on the wall
Experts also advise installing the router as high as possible, preferably placing it on a cabinet, or mounting it on a wall with a distance of 2 meters from the floor. In this case, Wi-Fi signal coverage will be as efficient as possible.
It is necessary to take into account that the router must be correctly rotated towards the laptop (Asus or similar models), since even the smallest rotation or shift can reduce or improve the quality of the received signal (this is especially true with older models).
To establish the highest quality Wi-Fi transmission signal, it is advisable to also familiarize yourself with the places where it is not recommended to install the router:
- various recesses (niches) of the walls;
- areas behind the sofa, closet or aquarium (any limited spaces);
- under the table or on the floor;
- electrical appliances can interrupt the Wi-Fi signal, and therefore installation near them is undesirable;
- heating radiators and those places where there is no ventilation (sometimes the router itself heats up during operation, therefore it is not recommended to install it in places where the air temperature rises to 40 degrees).
Using these tips, you will be able to choose the optimal location for your router.
Important! Modern Wi-Fi signal distribution devices, with two or more antennas, easily cover the space of a standard apartment up to 100 square meters. m., when located in the hallway.
How to connect a router to a laptop
There are only two ways to connect a router to a laptop: via Wi-Fi or via cable. In most cases, the first option is chosen, since cables have almost gone out of use due to their inconvenience. However, installation via wire is more stable due to the lack of interference during data transmission.
Via Wi-Fi wirelessly
How to set up a laptop on a Wi-Fi router - procedure:
- On the taskbar, click on the “Connection” icon, which is depicted as increasing waves.
- Find your network, click on connect.
- In most cases, you must enter the password indicated on the sticker of the router itself.
These are all the steps that need to be taken to connect the router via Wi-Fi.
Connecting the router with a cable
Via cable
This method is much easier than setting up Wi-Fi. In an ideal situation, the Internet will start working on the laptop immediately after both devices are connected to each other via a special network cable.
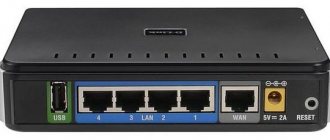
In most cases, when purchasing a router, the necessary power cord is immediately included in the package, so there is no need to buy it separately. To connect, you need to insert one end into the LAN port of the router, and the other into the laptop. If there is no port, you need to additionally purchase a USB-LAN adapter, for example, TP LINK UE300.
Using mobile Internet as a modem
All advertisements trumpet high-speed Internet access from anywhere in your home region - useful 3G and 4G USB modems are supplied in the form of a flash drive, take up minimal space and do not require wires or specific knowledge to set up. Users can only choose a provider, connect the purchased device to a laptop and receive the paid service. However, sometimes difficulties arise, so it is better to dwell on each point in more detail.
- Unpack the modem, install the SIM card in the appropriate slot according to the attached instructions. Connect to the USB port of a laptop or router. In the latter case, you will have to choose a suitable location to transmit a stable signal over a wide area.
- After connecting, you should immediately proceed to installation. As a rule, modems purchased from a large provider are fully configured or require a small number of manipulations to obtain the desired result. It is enough to use a disk with drivers for the modem and special software that allows you to track the speed, traffic consumed, and the number of days remaining on the tariff.
- If the device comes with login information, for example, a connection number or password, then all information will have to be entered in the network or work profile settings in the appropriate input fields.
Necessary network settings on a laptop or personal computer
If the user is using a cable connection, but there is no Internet after connecting two devices, you need to go to the network control center using the main menu of the laptop. There you need to find a tab with changes to the parameters of the connected adapter. Click on the local network you are using, find the properties tab by right-clicking.
In this situation, you need to establish an automatic connection to the IP, as well as the DNS address, and press the OK button. All that remains is to restart the laptop and try to get online again.
Changing static IP to dynamic
How to connect a router to a laptop via Wi-Fi for dummies - changing static IP to dynamic:
- Go to laptop settings.
- Find the Internet tab, select Wi-Fi or Ethernet.
- Select an item with a network connection.
- Click on the IP settings section, and then “Settings”.
- In the menu, change the IP settings, select the “Automatic (DHCP)” option.
After this, all that remains is to save the settings.
Starting the DHCP client
To start the DHCP client, follow the step-by-step instructions:
- Go to laptop settings.
- Select the control panel tab;
- Find the Network option.
- Click on TCP/IP.
- Click “Properties”, select the tab with the IP address.
- Activate the “Obtain an IP address automatically” button.
Network conflict
To resolve the conflict of Wi-Fi networks, you need to make sure that less than 13 Wi-Fi channels are used in the house, since this is the maximum allowed number that can be used in Russia.
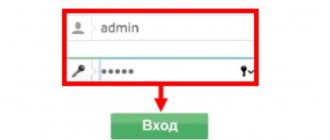
If an apartment building uses a lot of networks operating on the same channel with a certain Wi-Fi, then a signal conflict will arise. To fix the problem, you need to adjust the frequency range on which the router (for example, TP-Link models) directly operates. To do this, you can go to any browser to enter the IP address of the router in the address bar and follow the link.
Different Wi-Fi networks
Standard IP addresses:
- 192.168.1.1;
- 192.168.0.1.
The numbers can be clarified on the back of the purchased device.
A new window will open where you must enter your personal password and login. All necessary information must be in the documentation.
After logging in, find the menu tab to go to the basic Wi-Fi connection settings. In the “Communication channel” item, you need to set automatic adjustment (in the list that opens). Thus, the device will begin searching for the necessary parameters and select the most unloaded range.
Check and install the driver for Wi-Fi
If you can't connect to Wi-Fi, you probably need to install a driver. To do this, download and install the program manually. In newer versions this issue is easier - for example, version 10 of the software independently installs all the necessary drivers.
So, to check the driver, follow these steps:
- Right-click on the computer icon.
- Go to “Properties”, then go to “Device Manager”.
- Click on “Network adapters”, in which we look for the presence of a driver for connecting to WiFi. If the driver is not installed on your device, the device will be shown with an exclamation point in a yellow icon instead of programs. This means that the laptop does not recognize the existing adapter because there is no driver.
If there is no connection to the wireless Internet, then the adapter is not recognized. The next step is to install the driver. The required program can be selected on the official website of your laptop manufacturer, in accordance with the model of equipment and the operating system that is installed on it.
The program is downloaded in archive format, you need to run it. When the installation is complete, reboot your laptop. Then search and run the driver again.
Possible problems and their solutions
When connecting a laptop to a router, users often encounter certain problems that can be quickly resolved using the instructions.
You can fix Wi-Fi problems yourself
Weak, unstable signal
The situation can be easily corrected by moving the router to another location. The signal may be encountering too many obstacles.
Endless network address acquisition
The main reason is errors in the settings and encryption methods. It is also possible that the user has incorrectly selected the connection security type. To solve the problem, you need to use WPA/WPA2, as well as AES and NKIP automatic switching. These encryption methods should solve the problem.
Setting up wireless WiFi mode
Let's start setting up the wireless network. We enter the section “Wi-Fi”, “Basic settings”. We come up with and enter the network name (SSID), select the country, you can set the channel yourself or set it to “Auto”, then the router will independently determine which channels are less littered. We recommend choosing “802.11 B/G/N mixed” for the wireless mode; you can optionally set the maximum number of clients that can use this wireless network.
Next, go to the “Security Settings” item; it is better to set the network authentication to the most modern one, in our case it is “WPA2-PSK”. We write the PSK encryption key at least eight characters, ideally if there are letters, numbers, large and small. WPA encryption select “AES”.
The next section is “Mac filter”, here you can enter all the Mac addresses of your devices that are in the house. So that no one else can connect except them. Although it will not be difficult for an experienced hacker to figure out a suitable mac address for further connection. Therefore, it’s up to you to choose whether you need this poppy filter or not.