Author of the article
Maxim aka WisH
Higher education with a degree in Information Systems. Experience as a system administrator - 5 years.
Ask a Question
Today we’ll talk about how to connect the Internet on a computer and how to set up this connection. First, of course, you need to install Internet in the apartment. To do this, you need to choose an Internet provider, conclude an agreement and invite his representative to install the network. You will receive a wire, and then you will deal with connecting and setting up the Internet yourself (or order this service from professionals).
Why use a cable
The need to create a wired connection to the router may be due to:
- lack of a Wi-Fi module;
- network adapter failure;
- setting up the router;
- firmware update;
- insufficient Internet connection speed.
Speed may not be sufficient when processing videos while surfing the Internet or transferring files from computer storage. The network may be overloaded by the online video surveillance system. If the computer is located far from the router or users constantly connect to the Internet, then connecting a laptop or desktop device via a cable will be the optimal solution.
Setting up the router
If your provider uses a dynamic IP address, then when you connect the cable from the provider to the WAN port, the Internet should appear immediately. On the other hand, you should still go into the router settings and change at least the network name and Wi-Fi password.
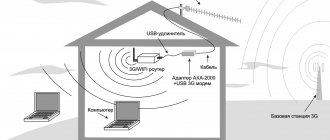
ATTENTION! If you want to connect a 3G/4G modem to the router, then see the instructions here.
For other types of connections, you also need to go to the device settings and enter some data from the contract. For setup, you can read the general instructions or look at specific models:
- ZyXEL Keenetic
- ASUS
- Linksys
- TR-Link
- D-Link
- Netis
- Tenda
The exact name of your router can be found on the same piece of paper, which is located on the bottom of the device.
Preparation
Before you connect your computer to the Internet via a router via cable, you will need the following things:
- the router itself;
- power cord.
- the computer in which the network card is located.
It is worth pointing out that most modern computers already have built-in cards, just like laptops, but if the procedure is to be done with an old sample, you will need to buy a new card.
It is best to take a cat5e cord, which is crimped on both sides. Usually it comes with a router and is more than 1.5 meters long. The cable is suitable if the router is located near the PC. In another situation, you will need to calculate the preliminary required length of the conductor and buy a new cord.
If the power cord comes with the router, the instructions for the cord may be helpful. You must act in accordance with it.
Connection
Connecting a laptop to the Internet via cable or other accessible method is quite easy. Just choose your option and open the instruction block.
Cable connection without a router
There is nothing complicated, just take the cable that comes from the entrance or from the street and insert it into the LAN port on your laptop.
Cable connection with router
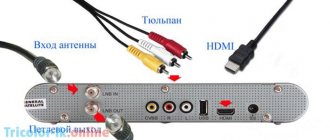
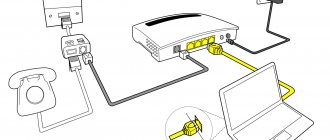
With a router it can be a little more complicated. Connect the router itself to the power supply, but position it in such a way that the wire from the provider can reach it. Look carefully at the ports that are located on the back of the device. Typically, Internet centers have two types of ports:
- WAN – here we must connect the cord from the provider. It is usually one and stands out among other ports in color. It may also have the inscription “Internet” or have a planet icon.
- LAN – here we connect local network devices. We can also connect a laptop here directly from this device. You can also connect here: a computer, a printer, a CCTV camera, a TV, etc. There are usually several such ports, and they are numbered.
The second option is that you can connect to the router via Wi-Fi. By default, after turning on, the router will immediately begin distributing the wireless network. Most often, the name of the network duplicates the name of the model. In general, you can find the network password and name (by default) under the case on a special piece of paper. The password can also consist of 8 digits and is located in the “PIN” line.
3G/4G modem
Usually there are no problems with connection - just take a flash drive and insert it into a free USB input on your PC.
How to connect cable internet to a computer
To carry out this procedure, you need to take a router with one unoccupied cable connector, a cord included, and a PC. Then take the cable and connect one end to the yellow LAN connector on the back of the router. The order in which the cable is connected does not matter. The other end of the conductor must be connected to the same connector on the PC.
All that remains is to check the appearance of the indicator when connecting the conductor connector to the computer. If this happens, the device display will show the corresponding information. The notification panel at the bottom right will show the connection without errors.
What does the Internet cable input on a computer look like?
Now you need to connect the cable to the system unit or laptop. You need to find the input for the connector. It looks the same on all devices. The photo below shows the input on the apple mac mini system unit. It is hard to miss because it is the largest and has a square shape. Just insert the plug and you will immediately know whether it fits or not.
On a regular, standard system unit, the hole for the cable is on the back side (see photo below). Simply insert the cable into this hole and turn on the computer.
How to connect the Internet via cable to a new computer
In the situation of an online connection to a computer device, the algorithm will be different. You will need to create and configure a connection. First you need to insert the cable into the computer card. Then take the appropriate steps:
- Go to Start.
- Find "Options".
- Click on the network management center.
- Select the settings for the new connection.
- In the new window, select “Internet Connection”.
- Click “Next” and select the appropriate option with a high-speed connection.
To set up communication on Windows 7, you need to follow the appropriate steps:
- Click on the “Start” menu.
- Select "My Computer".
- Then find "Control Panel".
- Find “Network and Sharing Center”.
- Click “Set up a new connection or network.”
- Select "Internet Connection".
- Opt for “High Speed”.
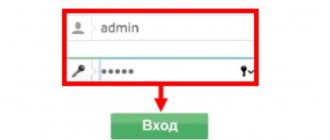
In the menu you will need to fill in some fields with your username and password to log in. The developer indicated this information in the service agreement. As a rule, they are standard. In one and the other field you need to insert the word admin. If the manipulations are performed correctly, a symbol of the created connection will be visible at the bottom of the computer monitor.
If the router was donated by someone and it is used, then you need to reset the settings and return the factory settings.
To do this, take a paperclip and click on the Reset button of the turned on router. It’s better to hold the button for a couple of seconds, since some routers have protection against sudden clicks, and the system turns off within 5–15 seconds if pressed continuously. During the reset, the network name and login password will be reset to the factory settings.
Wireless Internet
Using cable Internet is not always convenient: a computer or laptop is “tied” to the workplace by wires, and you will have to try hard to move it to another room. It is much more logical to connect the device to a wireless network; The laptop already has everything you need for this, but for a PC you will need to purchase a special adapter - built-in or in the form of a flash drive.
WiFi
To set up a home Wi-Fi network, you will need, as when connecting cable Internet, to run a wire from the provider into the apartment, but now connect it not to the computer, but to the router, not forgetting to plug the latter into a power outlet, and then:
- Enter the IP router indicated on the packaging or in the setup instructions in the address bar of any convenient browser and follow it.
- Enter your username and password in the appropriate fields of the new window (by default this is most often admin/admin), log in to “Settings” and proceed to read the information on the main menu page.
- Go to the “Quick Settings” subsection and click on the “Next” button.
- On the new page, select your country, city, provider and connection type from the drop-down lists, and then use the button with the same name.
- In the editable fields, enter the user name (you can use any), the login and password specified by the provider, and select the type of IP address: static or dynamic.
- Set the region of use of the router, come up with a name for the wireless network, configure the type of protection of transmitted data, password, mode, width and number of channels.
- Click on the “Finish” button and wait until the connection is established.
- Click on the “Internet Access” icon in the lower right corner of the screen and select the created and configured Wi-Fi network.
- Select it with a mouse click and click on the “Connect” button.
- By entering the login and password, the user will gain access to the Global Network; You can verify the presence of the Internet by paying attention to the icon: now it should represent diverging waves without any additional symbols.
Important: usually, in order to connect wireless Internet on a computer or laptop, “Quick Settings” is enough. If after all the manipulations there is still no connection, you should restart the PC and router and repeat the entire sequence of actions.
USB modem
To connect to the wireless Internet using a USB modem plugged into the port, simply insert the device into the connector, install special software or go, as in the example with a router, to the IP address specified by the manufacturer and enter your username and password, then click on the “Access” icon to the Internet” located in the lower right corner of the screen, and select your network. The sequence of actions is practically no different from connecting the router, and it makes no sense to consider it separately.
If desired, the user can proceed to fine-tune the modem of Megafon, MTS or any other operator - by devoting a little more time to the process, he can optimize the response time and increase the security of the Internet connection.
From smartphone
You can ensure a stable Internet connection on a desktop computer or laptop and using a smartphone. If Wi-Fi on the phone does not turn on, the owner of the device will still turn on mobile data transfer; so why not use it to power your PC?
To do this you will need:
- Enter the “Settings” menu of your smartphone.
- Go to the “Connections” item (similar names - “Network”, “Data” and so on).
- Make sure the Internet is available on your device, and then enter the “Mobile access point” section.
- On the next page, move the slider opposite the item with the same name to the “Enabled” position.
- And tap on it to start connecting settings.
- To make it easier to identify your network in the future, it is recommended that the owner of the phone click on the current name.
- And set a new one, then use the “Save” button.
- In the same way, you should change the access code from standard to unique.
- Now you need to repeat exactly the same steps on your computer or laptop that were described in the two previous sections: find the created access point and connect to it by entering the previously specified password. Until the connection is established, the “Connected devices” section on the smartphone will remain empty.
- As a result, the name of the PC will appear in it - this means that the distribution of mobile Internet is carried out as usual.
- Working in access point mode quickly drains the phone's battery. To avoid problems, you need to click on the three vertical dots in the upper right corner of the screen.
- Go to the “Timeout Settings” item.
- And specify after what time the hotspot should be turned off if there are no active connections.
- To increase the security of the connection, the user, by clicking on the three dots again, should go to the “Allowed devices” section.
- Move the slider to the “On” position.
- Enter the name and address of the network card of your computer or laptop and click on “Add”.
Important: you can add as many devices to the list as you like; It is important to remember that while this option is enabled, no “untrusted” equipment will be able to connect to the distributed signal.
Connecting the Internet without a router
To ensure a direct provider connection to the network user card, you will need to connect the cable directly to the Ethernet port. It is located on the back of the computer panel. A new connection needs to be configured. In the case of Windows 10, you must perform the following sequence of actions:
- Click the Start menu.
- Select "Options".
- Click on “Network and Internet”.
- Go to the VPN tab and “Configure adapter settings.”
- Then, in the folder with the location of all existing connections, hold down the right mouse button on the Ethernet tab.
- Then select “Properties” in the pop-up window.
- After this, select the TCP/IP version 4 protocol and click on “Properties” again or double-click on the item.
- All that remains is to provide a static IP address. To do this, you can clarify the settings with your provider.
- If you need to obtain a dynamic IP, you can not change anything in the protocol properties. Any settings and field values will be made by the server automatically. Just press the “OK” button and the network will be available via cable to the device.
Advanced settings
Communication has been established. Subsequently, you can manage it at your discretion: enable/disable, set up parental controls, limit speed, block entry to certain users, reduce the number of third parties to connect, limit the amount of information downloaded, block specific sites, and so on.
Note: A similar principle will work when working with devices running other series of Windows OS.
The only thing that will differ is the location of the icons on the monitor, program panels and pages. The sequence of actions and basic parameters will be almost identical. basicprovider
Why the Internet may not work after connecting
The root reasons why a wired connection may fail are different. Therefore, to eliminate any of them, you will need to perform a number of specific actions:
- The cable connection is not detected. To do this, you need to understand whether the conductor is connected to the required connector.
- A red cross appears on the taskbar, indicating a faulty cable, network card or LAN port of the device. If the difficulties are not in the conductor, then you should make sure that the computer is connected to the network. If everything is normal, then you will need to repair the network card.
- Flashing indicator, no network operation. In this case, you need to install or reinstall the driver.
- The new driver is installed, but the connection does not occur. You should go to the control panel, “Network Center”. For an online connection that says “Disabled,” press the power button.
- The router is faulty. If the conductor is not connected to the computer directly, but through a router, then the problem may be due to the fact that the router’s settings have gone wrong. In such a situation, you need to check this point and connect the network cable directly to the PC.
- There is no connection. If all of the above points were done correctly, but the malfunction remains, then perhaps the reason is the end of the period paid to the provider. You should contact the provider's technical support and check the balance status. Pay the bill, if necessary, and reconnect to the Internet.
- The connection failed due to viruses. It is necessary to scan the entire system with an antivirus, delete unnecessary files and, if necessary, reinstall the operating system.
If there is no network connection, a detailed explanation and step-by-step guidance is required. So, if the exclamation mark next to the Internet network icon is lit, it means there is no access to the network. In this case, you need to do the following:
- Press Win + R on your keyboard (Win is the Windows icon).
- In the search engine that opens, insert the command: ncpa.cpl.
- In the window with network connections, select “Properties”.
- Then find “Local Area Connection” or “Ethernet”.
- Next, open the IP line and click on its “Properties”.
- Set it to automatically receive the server address and save the settings.
If these steps do not help, then you can check the router settings. To do this, you need to go to the provider’s interface, enter your username and password, and enter the appropriate tab.
If, after connecting, the red cross on the network icon is lit, this means that you need to check the cable condition, the tight insertion of the cable to the LAN port and check that the network adapter is turned on. In the first case, the cable may have an intact structure externally, but due to strong kinks, the copper cores inside may be broken. Therefore, the conductor should be replaced. In the second case, due to the fact that small deviations may be visible during the manufacture of port connectors, the cable is not always inserted into the port. When connecting, it is ideal to hear a click and see the LED light up. In case of marriage, there will be no connection. In the third case, to check the network adapter, you need to go to the network connection and use the right mouse button to open the tab. Next, click on the “Enable” icon.
Through the device manager, which can be opened with the command in the search engine devmgmt.msc, you need to find the “Network adapters” tab and try to click on “Disconnect device” by selecting the appropriate router.
Connection methods
Internet in an apartment or private house can be organized using several methods. The simplest and most common of them will be presented below.
How to turn on the Internet using an Ethernet cable
This method has already been discussed above. To organize a wired connection, you need to plug the cable coming from the provider into the LAN connector on the motherboard of a desktop or laptop computer.
Next, the LED in the connector should blink, indicating that the port is operational. After this, the user will only have to configure the connection on the computer.
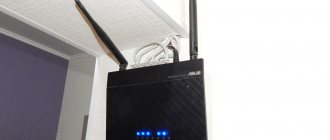
Appearance of the router for the Internet
Wireless connection
The most common type of synchronization with the Internet, which involves the use of a Wi-Fi router from any manufacturer.
A Wi-Fi router is a device that can distribute the Internet to other gadgets. In order to connect your home computer to the Internet, you need to take several steps according to the algorithm:
- Buy a router. This can be a transmitter from any manufacturer.
- Connect the router to the computer. The device comes with a power supply cable, a LAN cable and an Ethernet cord. The power supply cable must be plugged into a 220 Volt power supply. One end of the LAN wire is connected to the corresponding port on the back of the router, and the other to the connector with the same name on the computer motherboard. A cable coming from your Internet provider is inserted into the Ethernet port.
- After completing the above steps, you will need to turn on the Wi-Fi module and configure its operation on the manufacturer’s official website.
It is recommended to change the standard password for connecting to the Wi-Fi access point distributed by the router so that other people cannot gain access.
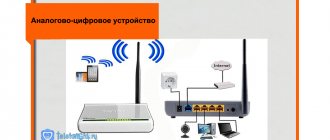
Modem Application
A modem is a device that converts an analog signal to a digital one. The modem is able to establish access to the global network after connection and initial setup. However, this method is already outdated and practically not used.
Modem appearance
Modems have several disadvantages:
- difficulty in setting parameters after connecting to a PC;
- instability of work, the possibility of regular failures and errors;
- underestimation of actual and maximum data transfer rates;
- impossibility of distributing the Internet to other devices.
Routers, compared to conventional modems, have higher throughput and are also capable of sharing the network simultaneously with ten different devices. However, the total speed in this case will be divided between all connected devices.
How to connect the Internet on your phone
This network connection method is suitable for smartphones, tablets, and old-style cell phones with buttons.
You can connect your phone to the Internet in the following sequence:
- choose a suitable mobile operator;
- conclude an agreement to connect the service, choose a tariff plan;
- purchase a SIM card and insert it into your smartphone;
- activate the SIM card by setting up the Internet according to the instructions in the SMS message from the operator.
Sometimes the Internet on a SIM card is activated by the seller of the cellular communication store of the selected operator immediately after its purchase according to the standard scheme. The user can only insert the SIM card into the phone and check the availability of the network.
Wired Internet connection
There are several options for connecting wired Internet in your apartment:
- Internet via telephone line.
- Internet via fiber optic.
Let's look at each one separately.
Connection via telephone line
To connect to the Internet via a telephone line, you do not need to run wires across the entire apartment. You just need to find out if your telephone operator provides Internet services. If yes, then to connect it you need:
- Connect to Internet service from your telephone provider.
- Buy a special divider that will divide the telephone line into telephone and Internet.
- Buy a modem or router. Here it is important to understand that it is an ADSL modem or router that is needed, because only they have the necessary input for the telephone wire.
- Connect a wire from the distributor to the modem or router, then connect the computer to the modem or router and configure the connection.
- Check the availability of Internet on devices.
A telephone line connection can be made by a technician from your phone provider. He can also provide all the necessary equipment for rent or sale. However, such Internet will depend on the equipment of your provider. If the equipment is bad, the data transfer speed will be low.
Fiber connection
Fiber optic Internet is considered the most reliable and fastest Internet today. Cases of technical problems are very rare, and the data transfer speed exceeds any other type of Internet and depends only on the chosen tariff. Often even this type of Internet is cheaper than any other. To connect to such a wired Internet, you need:
- Choose a suitable provider that can connect the Internet to your home. You should take your choice of provider seriously, because if it has a lot of negative reviews, then you will probably also have some problems with the Internet after connecting. Among other things, you should always take a closer look at the tariffs and promotions offered by the provider.
- Having chosen a provider, you need to call the company and leave a request for an Internet connection. You won’t be able to install fiber optics around your house on your own, so you’ll have to negotiate with a specialist and choose a convenient time for his work.
- After wiring the optical fiber, you can continue to act on your own, but a technician can help you route the wire through the apartment and connect it to the computer.
- If you are going to connect other devices besides your computer. buy a router or rent it from your provider. If not, then you can simply plug the fiber optic cable into your computer and use the Internet.
This Internet is reliable and fast, but you will have to run a wire around the apartment and hide it so as not to get in the way.
Cable Internet technology options
Conventionally, all options for connecting to the Internet via cable can be divided into several main types.
- Dial-up connection. This is an Internet connection via cable, analog modem or the same telephone line. This access is also used in a digital connection using ISDN technology, when installing the appropriate adapter.
- Dedicated communication channel. It involves the use of a separate line laid from a PC/laptop to equipment owned and maintained by the provider. There are two types of connection: with speeds up to 1.5 Mbit/s and up to 45 Mbit/s. It is considered most effective for large enterprises.
- DSL (Digital Subscriber Line) is one of the broadband access options with which you can connect wired Internet to a laptop. Provides data transfer speeds up to 50 Mbit/s. This is a digital connection using analog telephone lines.
L2TP connection
Step 1.
Follow Steps 1-8 of the “PPTP Connection” section.
Step 2.
In the “Security” tab, in “VPN Type”, set “L2TP Protocol...”, and in “Encryption...” select “optional” from the drop-down list. Click "Advanced options".
Step 3.
Enter your provider key and click OK.
Step 4.
Open by clicking , enter your name and password. Click "Connect".
The Internet connection will be established.
Reference!
You can connect and disconnect PPPoE, PPTP and L2TP by clicking on the network icon in the notification area, selecting “High-speed connection” and clicking the corresponding button. For static and dynamic IP, these steps do not need to be performed.
Setting up a physical connection
So, the agreement with the provider was concluded, the master laid the network cable and crimped the connector on it. First of all, you need to find a special port on the laptop where the cable will be connected. This connector is called RJ-45 and it is present on almost any device of this type.
Step 1.
Insert the Internet cable (Ethernet, LAN cable) coming from the provider into the laptop connector until it clicks.
If you are not connected to the Internet immediately, a yellow exclamation mark will appear on the network connection icon in your notifications (bottom right). This indicates that the network card and cable are connected, but the Internet is not yet configured. A strikethrough on the icon indicates a network card conflict.
Note!
If the network connection does not have any special notifications, go to the "DHCP Connection..." section Step 5 and try to access the Internet. If connection does not occur, go to Step 2 of this section.
Step 2.
Press the key combination “Win+R” (“Win” is located to the right of “Ctrl”).
Step 3.
In the menu, type “control” and click OK.
Step 4.
The "Control Panel" will open. If “Category” is selected, click on “View network status...”.
If “Icons” is selected, click “Network Center...”.
Select “Icons” and click “Network Center...”
Step 5.
Click “Change settings...”.
If there is a corresponding icon in the “Network Connections” folder, then the board is functioning normally.
If the icon is missing, you will need to install or update its driver in Device Manager.
The system will begin searching and installing the device driver.
Setting up the Internet via Wi-Fi network
Applications for controlling Wi-Fi networks and monitoring traffic on Androdi
WiFi is the most modern method of wireless communication. Nowadays, all manufactured smartphones, laptops and tablets are equipped with a Wi-Fi module. When you install a Wi-Fi router at home, the PC is connected automatically. You just need to select your Network and enter the password provided by the provider.
How to connect WiFi Internet on Windows 10:
- Activate the Wi-Fi module on your laptop or computer.
- Click on the Wi-Fi symbol in the notification panel.
- Find the right connection.
- Click “Connect” and enter a password.
After this you can use the Internet. You can turn off WiFi in the same way; you just need to click the “Disconnect” button.
The computer will remember the Wi-Fi connection; you won’t have to configure and establish the connection every time.
If the access point is not detected, it is recommended to reboot the router. You should also make sure that the laptop is in the area where it overlaps.
PPTP connection
Step 1.
In the “Network and Sharing Center...” (
see above
), click “Create...”.
Step 2.
Click “Connect to Workplace.” Click "Next".
Step 4.
Select “Postpone...”.
Step 5.
In the “Internet address” indicate the provider’s server and o. Click "Create".
In the “Internet address” we indicate the provider’s server and click “Create”
Step 6.
Enter the “Name” and “Password” given in the agreement. Click "Create".
Step 7
Click "Close".
Step 8
In the “Network Connections” folder (
see above
), click on the created VPN and select “Properties”.
Step 9
In the “Security” tab, click “Tunnel Protocol...”. Click "OK".
In the “Security” tab, select “Tunnel Protocol...” and click “OK”
Step 10
In "Encryption..." select "optional". Click "OK".
Step 11
Double-click on the VPN connection, enter the password and name, and click “Connect.”
The Internet connection will be established.
Wireless connection
To get wireless access, you need to purchase a Wi-Fi router. Plug it into a power outlet, plug the Internet cable into the designated connector (it always differs in color). Next, enter the settings interface via Wi-Fi or cable. Information about login parameters is indicated on the router itself or in its instructions. Enter the IP address, login and password.
When you first connect, you will be prompted for a quick setup. Select your city and provider name and enter your connection details. If your provider is not in the list, check with them for the type of connection, select it in the network settings, enter the data, save and connect.
On your laptop, check for drivers for the Wi-Fi wireless module. This can be done through Device Manager. If the module works correctly, its name will be displayed in full. If the drivers are missing or installed incorrectly, there will be a yellow exclamation mark next to the name “Wireless Adapter”. You will need to download the driver for the Wi-Fi wireless module from the laptop manufacturer's website.
The Wi-Fi adapter must be turned on; it can be activated by pressing the key combination FN + F1–F12. More details can be found in the instructions for the laptop. In the right corner of the bottom of the screen you will see an Internet icon in the form of an antenna with a yellow star. Click on it, select your wireless network from the available connections, enter the password and click “Connect”.
Connecting to an Internet access point
Cable is a good idea, but sometimes you need to use your mobility to the fullest. In this case, connecting to an access point via the Wi-Fi radio module installed in the laptop will help.
Step 1.
To activate the module, press one of the F1 – F12 buttons on the device keyboard, which has an image of an “antenna”. Sometimes pressing must be done in conjunction with Fn. Wi-Fi can also be turned on with a special switch.
Step 2.
After turning on the module, click on the network icon and click “Connect” to the Wi-Fi network.
Step 3.
Enter the password set for the access point and click OK.
The Internet connection will be established.