Since the Yota company has a large network coverage area throughout the Russian Federation, after the popularity of this provider in the market, it began to produce its own 3G/4G modems. Such modems do not require technical knowledge for installation, since it occurs automatically. But then the Iota router began to be produced, and if for people associated with IT technologies it was easy to figure out how to configure it, then for an ordinary user of a personal computer it was impossible to independently configure the device.
In order to make it easy to understand how to set up devices, we will analyze the setup process on two versions: the Yota router and the 4G modem.
How to connect a Yota router
Setting up a Yota router is a little more complicated. The first step is to connect the router. The standard instructions tell you how to connect the Yota router to your computer. A USB cable is included for this purpose. On the back of the router there is a connector for the cord; we plug the second connector into the USB port of the computer. Next, the installation starts.
The installation must be done automatically. If the installer window does not launch, then you should go to the “My Computer” section and open the router as a system drive. This section contains an auto-installation file, run it and follow the instructions on the screen.
It is also possible not to use wires, but to connect the computer to the WiFi router wirelessly, if the network card allows it. When searching for an available router, the standard name is used Yotarouter, where after the text 5 numbers will be displayed that indicate our device.
Authorization in your personal account
The next action that must be performed after connecting the router to the computer is authorization in the user’s personal account. The Yota website is available even when the funds in the account have already run out - open it, go to your profile and connect the tariff if this was not done when concluding an agreement with the provider or the payment period has already expired.
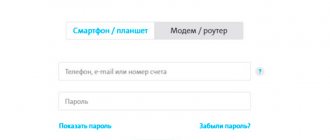
- Go to the official website yota.ru and expand the “Personal Account” list.
- Select the “Modem/Router” authorization option.
- Enter the telephone number, email or account number specified when signing the contract. The password is assigned by the provider, so it must also be specified in the documentation or it can be clarified when contacting technical support.
- If you have not yet registered your device, click the appropriate button to proceed to the next step.
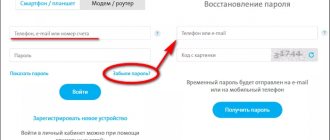
- Click Register New Device for your modem or router.
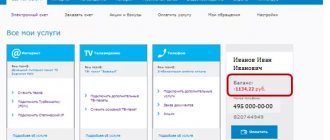
- Follow the instructions displayed on the screen, entering information about the purchased equipment model, and after logging into your account, check your account and, if necessary, top it up to activate the tariff plan.
How to enter the settings of the Yota router control panel
As you know, all routers have their own control panel, thanks to which you can always change the settings of the Yota router. As in the standard settings of all Wi-Fi devices, you can access the control panel by entering the combination 192.168.0.1 or 192.168.1.1 into the address bar of the browser. In order to go into the settings of the Yota router, you can enter the address status.yota.ru specified on the router or 10.0.0.1.
If one of them does not work, then you need to try another. An authorization window should open asking you to enter your login and password. By default, the standard login and password are specified, login: admin and password: from 1 to 4.
After this, information will be displayed according to the device that was connected to the personal computer.
Changing the administrator password
The administration interface may differ depending on the firmware version and connected equipment. In the case of using the Many modification, after successful authorization a status page will open, on which you need to click on the title of the “General” tab.
After this, the section for changing the administrator password will open, where you will be asked to enter its new value in the appropriate field.
After specifying the new security key, confirm the changes by clicking “Apply”.
How to set up a Yota router
In order to enter the control panel, enter the IP into the browser line. After this, information about the device is displayed. When you click on the settings button, parameters that can be changed are displayed. Unlike the modem version, the router for a personal computer has many more parameters, and each setting is in its own subsection.
A unique feature of such devices is that their name can be hidden. In this case, the user must manually enter the network name in order to use the Internet connection. This feature allows you to provide additional protection to your wireless connection and prevent attackers from connecting. You can also change your password when logging in or remove it altogether.
For those who do not use the Internet connection for a long time, but often forget to turn it off, the sleep mode function will be relevant. It automatically switches the device to off mode after a certain period of time.
On the “Channels” tab you can change the router channel. If there are many wireless networks around, some channels may be clogged, which affects the data transfer speed, as well as the quality of the Internet connection and the strength of the Wi-Fi signal. Changing the channel will allow you to distribute traffic over different channels so that surrounding Wi-Fi routers do not interfere with high-quality Internet surfing.
Also in the IP address selection tab there are 2 options: static and dynamic. Static addresses are permanent and do not change, they are used mainly for connecting to remote access or maintaining servers. The dynamic address is not permanent and changes its values every time the router is started or rebooted.
Registration and activation
After logging into the customizer, the first time you connect, you will be prompted with a registration form:
You fill it out, the modem is immediately activated - you can work. At the time of writing, we received a bonus of 24 hours to test any tariffs and speeds - such a promotion from Iota, maybe you will get something.
You don’t have to configure anything else if everything works well - the next section is for owners of a modem with Wi-Fi.
How to reset a Yota router
In order to understand how to reset the router to its original settings, you need to go to the “Advanced” subsection on the website status.yota.ru and then click on ports. Scroll to the bottom of the page and see a button to restore the router to factory settings. After clicking it, the system rollback will be carried out automatically.
If this method does not help, then the Reset button on the router will help you reset to factory settings. It must be pressed for 15–20 seconds. After this, the device will restart, and you need to perform its initial setup on the router.
Interface
Before we tell you how to connect and configure the Yota router and give step-by-step instructions, let’s get acquainted with the interface. This will make it easier to understand the functions of the indicators, buttons and connector; we will look at the images.
LTE/4G network presence indicator:
- blue – the router is connected to the 4G / LTE network;
- flashing blue – network search;
- red – network error or lack thereof.
Wi-Fi network indicator:
- blue – indicates the presence of connected devices via Wi-Fi;
- does not light - accordingly, there are no connected devices.
Battery indicator:
- blue – battery is charged;
- red – discharged.
The logo glows in the corporate color (blue) when transmitting data.
on/off button RESET button and SIM card slot
Setting up a Yota 4G modem
In order to configure the modem, you must first install a SIM card. It is installed exactly under the USB port. Yota 4G LTE models have a switch that can be in three positions:
- Turned off. In this case, the device will not work.
- On (middle). In this case, the device works to transfer data from a SIM card to a personal computer.
- On (extreme position). The device works to transfer data to a personal computer, and also distributes Wi-Fi to related devices.
A maximum of 8 devices can be connected to this model. If the computer also uses an Internet connection, then only 7 additional devices can be connected under Wi-Fi.
Before setting up the Yota modem, you need to charge it. To do this, you need to connect it to a USB port for about 2 hours. After charging has completed, you should turn the indicator to the off position. After this, enable and enter the required combination specified in the instructions into the address bar.
Next, the standard setup of the Yota 4G router will open:
- In the network name field, you can specify any parameter. When trying to connect to Wi-Fi, users will see this name, which can be made unique and different from others. When entering a name, only the English keyboard layout is used.
- In the security type field, it is recommended to select WPA2 - since today this is the most secure connection for wireless networks.
- In the password window, you must enter the password that visitors will use to connect. The password must be 8 characters long. It is highly discouraged to set simple passwords such as 12345678 because they can be easily hacked.
- After that, click on the save button and go to the next window.
- Next, information about the device is displayed, as well as the active tab in which settings can be made. The information indicates the ID, as well as the firmware version of the Yota 4G modem.
When you connect to the modem settings, you can see the full range of settings. Here you can set parameters to automatically turn off the wireless network connection, as well as limit the number of users who can use it at the same time. Even the body of the Yota device is customizable; as standard, it has a backlight that can be turned off.
The description of how to configure a Yota router indicates several IP addresses that can be entered into the address bar of the browser. In the DHCP settings tab, the user is given the opportunity to select the address to which login settings will be made in the future.
For advanced users and system administrators, in the “Ports” tab there is the ability to forward ports, as well as use DMZ options.
Mobile modems often require a factory reset. This is especially often done in case of loss of the login code (password). They cannot be reset via the computer, so the only option is the Reset button. But in order to use it, you first need to switch the device to off mode. Only after this do we press the Reset button and restart the device, performing its initial setup.
Computer connection
The new standard that Iota supports is 4G networks. They are capable of receiving speeds of 178 Mbit/s and upload speeds of 58 Mbit/s. Routers from Yota are capable of high speeds thanks to the power of LTE networks. Testing has shown that the devices can achieve a throughput of 326 Mbit/s per input and 172 Mbit/s per output.
The operator's network equipment allows five users to simultaneously use the Internet while at home or on the road. As practice shows, even a sixth person can be connected without compromising speed. Such offers are tempting for large families who actively use the Internet and need to exchange large amounts of data.
To achieve maximum speeds and ease of operation, the device must first be configured. To do this, they are connected to personal computers and laptops. This is done using a regular USB cable, which comes with the kit:
- Connect the USB port of the router and the computer with a USB cord;
- If autoboot is disabled on the computer, the router opens as a physical removable drive and the autoinstall.exe file is launched in the folder;
- If autorun works, then wait for the window with settings and step-by-step instructions to appear;
- Follow the instructions until setup is complete.
It is also possible to connect over the air using a wireless connection. This is only possible if a network card supporting WiFi b and g standards is installed on the personal computer. This method will eliminate unnecessary wires and free up space on the table or under it.
Important! Typically, Yota routers use something like this “YOTARouterXXXXX” as the name of the network, where instead of the X’s there is the physical address of the router.
Connection
We'll tell you step by step how to connect the device.
- Insert the SIM card into the router.
- Press the power button and hold for 3 seconds until the indicators light up and be sure to wait until 4G turns on.
- Pay attention to the back of the box, the name of the network will be indicated there. Find it in the list of available ones on your PC/tablet/smartphone and connect to it.
- Launch your browser and enter any address, you will immediately be redirected to https://start.yota.ru.
- Here you will be asked to come up with a password to access the Wi-Fi network → “Save”.
Reconnect to the network and enter the password you created, then start surfing the network.