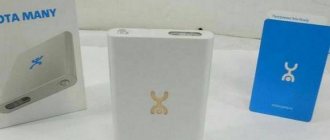
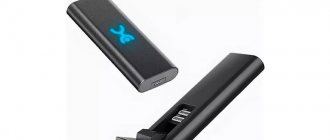
In this manual, I will tell you in detail and show with an example how to enter the Yota Wi-Fi modem settings. To access the Internet using 4G LTE technology, Yota offers its customers a lot of different equipment. Among this equipment there is a Yota USB modem with Wi-Fi, and a Yota mobile Wi-Fi router (Yota Many). The first device can be used as a USB modem or a mobile router to connect up to 8 devices to the Internet via a wireless network. The second router distributes the Internet only via Wi-Fi.
To access the settings of these routers, you can use the address status.yota.ru, or IP address: 10.0.0.1. By going to this address in your browser, from a device connected to the modem, you will be taken to the Yota router settings. Where you can change your Wi-Fi password, network name, set the security type, view the signal strength and other useful information.
I noticed that many people at status.yota.ru are trying to open not the modem settings, but their Yota personal account, and even want to top up their Internet account there. But it's not right. At this address, as well as at 10.0.0.1, you will not be able to enter your personal account. These addresses are used exclusively to access the control panel of the modem or router itself.
Your personal account and the modem settings page are two different things.
Let's take a closer look at both cases.
Content
Cellular operator Yota is becoming increasingly popular among Russians. In almost all regions of the Russian Federation, subscribers use the services of this provider. Yota offers customers quite favorable tariff plans. The quality of mobile communications is constantly improving. In addition, the operator provided the opportunity to use reliable mobile Internet. You can study the tariffs and offers in detail on the official page of the provider. Every year the operator makes new, more profitable offers to its subscribers. Service is constantly improving.
A service was developed specifically for the company’s clients – a personal account. Here users can find out the balance, disable or activate options. To gain access to high-speed Internet, Yota clients buy modems. These are proprietary devices programmed to work only with one operator. To perform configuration settings, you need to log in to the Yota modem. Some subscribers have difficulty coping with this task. Today we will take a closer look at how to log into the Iota router. From this article you will learn how to check the address of the Iota modem. We’ll also talk about the advantages of the Yota personal account.
Yota speed test
Well, the most interesting thing is how fast the Internet will be when connecting a Yota modem? I set the maximum speed in the office and took a measurement. At the same time, I did not make any additional devices to increase speed - the computer stood in the back of the room in its usual place.
The result, to be honest, was not impressive. But since I know that at my dacha the Yota gave a significantly higher speed, I think that the reason is still in the weakness of the signal in the place where the PC was located - for better performance you still need to connect the modem through an extension cord.
Benefits of a personal account
The personal account provided to subscribers by the operator is simple and accessible. The interface is extremely clear and simple. Therefore, users can quickly navigate and find the information they need. Subscribers are given the opportunity to track and control expenses. Depositing funds into your account can be controlled online. It is also possible to activate or deactivate various options. The functionality of your personal account is available to all Yota subscribers. Users only need to register on the site. After the authorization procedure, you will be able to log into the system.
What you can do in your personal account:
- Control cash flow, check balance. You can keep track of your own expenses.
- Top up your account in any way convenient for you. Most often, users choose online payment options by card or through payment services.
- Link an account to a card of any bank in the Russian Federation.
- Receive information on tariff plans.
- Change the tariff, connect additional services.
- Set up service packages.
- Set up an automatic payment function.
- Adjust the speed of your Internet connection.
- Study current information. Through your personal account you can be the first to learn about special offers from the operator.
- Extend limits on minutes, text messages and mobile traffic.
- Activate or deactivate additional commands.
- Block unwanted phone numbers.
This is not the entire list of personal profile capabilities. The company regularly expands the capabilities of its personal account.
Updating the device in the operator's office
Many people think about how to unlock the Yota modem with the help of a specialist, because they are not confident in their own abilities. The operator offers a solution to this problem - to do this, you need to personally come with the device to the contact service and contact a consultant for help.
Next, you will need to write a statement asking to unlock the device to use it with other cards for distributing wi-fi. The response to the request will be received within 1-3 months from the date of submission of the application. If the answer is positive, after the specified period has passed, a consultant will contact the applicant and ask him to come to the office. You need to pay for the service and pick up the finished device.
Once unlocked, the device can be used with any SIM card, but not all consultants inform their clients about this possibility.
Login to your Yota account
You can log in to your personal Yota account through the operator’s official website. Open any browser on your computer. In the address bar we write https://www.yota.ru. We go to this web page by pressing the Enter key.
Next, the system will prompt you to enter the data:
- E-mail address.
- Your account number.
- Login password.
Check that the information you entered is correct and confirm your actions. Now you have access to all the features of your Yota personal account. Check your balance, connected devices, change tariffs.
If the address didn't work
Sometimes the page doesn't load. This can happen when using both address options.
In this case, try the following:
- check that the connection is working (for example, that Yandex opens);
- Check that the computer is using the connection through the operator device. If it is connected to another network, then the addresses will not work;
- use an alternative browser to load the settings page. For example, if it doesn't work in Chrome, Firefox or Opera may work;
- install browser updates. Please note that for the page to function correctly, you must use up-to-date software. In older versions of the browser, functionality is not guaranteed. It is also desirable that the screen accommodate an image of at least 1024 by 768 pixels;
- temporarily disable security programs. Firewalls or antivirus software may block the work. If the connection is established, adjust the protection settings. If not, turn it back on and check for other reasons;
- check if the page opens from another PC;
- The USB modem can be removed from the port and reinserted, or a regular router can be rebooted. Often this is enough to fix the problem;
- For a USB modem, try connecting to its Wi-Fi network instead of the standard mode.
Find out also:
- How to enter TP settings,
- Setting up a router in My.Keenetic.net,
- How to enter router settings from a smartphone.
How to register from PC
All Yota subscribers can register a personal profile. It doesn’t matter what device the SIM card is installed in, an LTE modem or a tablet computer. In automatic mode, the user enters his personal account. The system constantly prompts the user what actions to perform. Thus, you can quickly complete the registration and authorization procedure. What you need to do to start using your online account:
- First you need to install a Yota SIM card in your mobile gadget. Afterwards the subscriber will be immediately redirected to the home page. Please read the service agreement carefully. If you agree with all the stated points, put a digital signature. After this, a new window will appear in front of you asking you to register.
- We open our personal page in the system. To do this, go to my.yota.ru. The username and access key are the ones you received when you registered in the system.
- The final stage is linking the card. You can link any bank card to your personal account. With its help, you will be able to quickly replenish your balance in the future.
Computer connection
The new standard that Iota supports is 4G networks. They are capable of receiving speeds of 178 Mbit/s and upload speeds of 58 Mbit/s. Routers from Yota are capable of high speeds thanks to the power of LTE networks. Testing has shown that the devices can achieve a throughput of 326 Mbit/s per input and 172 Mbit/s per output.
The operator's network equipment allows five users to simultaneously use the Internet while at home or on the road. As practice shows, even a sixth person can be connected without compromising speed. Such offers are tempting for large families who actively use the Internet and need to exchange large amounts of data.
To achieve maximum speeds and ease of operation, the device must first be configured. To do this, they are connected to personal computers and laptops. This is done using a regular USB cable, which comes with the kit:
- Connect the USB port of the router and the computer with a USB cord;
- If autoboot is disabled on the computer, the router opens as a physical removable drive and the autoinstall.exe file is launched in the folder;
- If autorun works, then wait for the window with settings and step-by-step instructions to appear;
- Follow the instructions until setup is complete.
It is also possible to connect over the air using a wireless connection. This is only possible if a network card supporting WiFi b and g standards is installed on the personal computer. This method will eliminate unnecessary wires and free up space on the table or under it.
Important! Typically, Yota routers use something like this “YOTARouterXXXXX” as the name of the network, where instead of the X’s there is the physical address of the router.
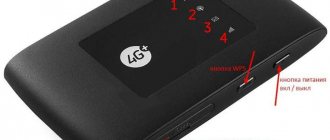
10.0.0.1 and Yota status: login to the control panel
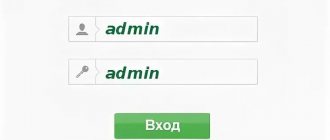
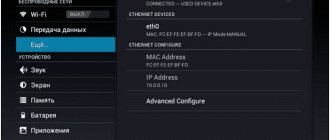
If the subscriber plans to work with a Yota modem or router, you need to go into the device settings. The device must be previously connected. The modem can be connected to a PC via the USB port. We launch any web browser on the computer. You need to write status.yota.ru in the address bar. we confirm our actions. If login fails, enter 10.0.0.1. You should now be taken to your modem's web interface. It contains all the information about the device, Internet speed and connection status. Here you can change your WiFi network settings. To do this, you need to select the category called Device Settings.” To gain access to advanced settings, enter the address https://status.yota.ru/advanced. From the Control Panel, users can install updates for their devices, change their passkey, and more.
Setting up a wireless connection
If the connection is made wirelessly, then Wi-Fi settings are necessary. The process itself is not complicated and requires just a couple of steps:
- In the web configurator settings, select the Wifi tab. It will be possible to change the network name (SSID) so that it is easily recognized in the future;
- Here you can hide the network if it is important that it is invisible to other people. In this case, the name and password will need to be entered manually;
- Set a strong password in the appropriate field;
- You should not touch the sleep mode, as it will put the device into standby when idle and in some other cases;
- Save all settings by clicking on the appropriate button and restart the device.
Login to Yota router
To get into the settings of the Yota router, you need to use the address status.yota.ru. We enter it into the address bar of any browser. If you cannot log in at this address, use another one - 10.0.0.1. All information will be displayed on the page,
which concern the router:
- Yota Internet connection status
- Router specifications
- Connection speed
- Signal level
- Detailed analysis of costs within your tariff plan.
Yota status allows you to perform a variety of actions. Knowing how to log into the Yota modem, you can change the settings at any time. For example, you can change the IP address and reconfigure ports. Advanced users prefer to work with advanced settings. If you do not know which Yota DHCP band to choose, it is better to consult a technical specialist.
Simple problem solving
If you can’t log into the management page of your Yota device, then we will try to figure out what caused this. You must be aware that by gaining access to reconfigure your router, you are opening the most secure part of this device. Information such as the name of the network and the access password for connecting are hidden there. And that's not all: there is information about the signal and routing settings. All clients that are currently connected are displayed here. In most routers, it is possible to configure a firewall with settings for IP groups, virtual servers, DMZ and enabling a MAC filter. Don't forget that some models have support for external modems and storage devices. But all the fine-tuning is hidden behind the thin plastic walls of your router. First, check whether you made a mistake in typing the network address. We advise you to go through the ready-made samples highlighted at the beginning of the article.
Secondly, view your connections by going to Control Panel\Network and Internet\Network Connections (Windows 7) or by typing the command ncpa.cpl (by clicking on the Start icon in the lower left corner of the screen or by pressing the Win + R keys.
If you have selected your network connection, click on its properties. Select Internet Protocol Version 4(TCP/IPv4). Check that it is installed - Obtain DNS server address automatically.
Attention is important. If after these manipulations the Network does not work, you should try to configure it manually. To do this, instead of automatically selecting Yota servers, you need to configure them yourself.
You will have to fill in the network connection data in the columns - IP address, Mask, Gateway and Primary server. To make this task easier, simply enter the data from the snapshot below:
Lack of access: what to do
If you can’t access the site, try to fix the problem yourself:
- Disconnect your modem or router from your computer for a while. Then try to connect again and go to the Yota website for your dacha.
- Check the functionality of the USB connectors on your computer.
- Restart your computer or laptop.
- If a network error occurs, try to access the Yota website from another web browser.
If your Yota device fails, you can always reset it to factory settings. Routers have a special Reset button for this.
USB connection
If you select the connection option via a USB cable, the OS itself will begin installing the drivers. You should not abandon this and wait for the final installation. After this, the device will be detected and ready for operation and configuration. For the yota 4g router, the instructions are as follows:
- Select the tray icon;
- Enter all the necessary parameters for normal operation (network name, password and parameters for turning Wi-Fi on and off).
Important! Such a menu is much easier to set up than configuring through a browser. For most people, this will be enough.
Using Status.Yota.ru
The site's interface is simple and easy to understand. However, before you start setting up, you need to make the correct connection. How to do it:
- Operator modems do not have special drivers, so first you just need to plug the device into the USB connector.
- If the connection is successful, the brand icon will light up:
- Wait for a notification on the screen that the modem is installed.
After this, it is ready to work, you should follow these steps:
- Click the “Continue” button.
- Enter your phone number in the field that opens.
- Enter the code received by SMS message in the web interface.
- Fill in the rest of the device user form.
- Click “create profile”.
Then you will have to wait until the connection occurs. An SMS message will be sent to your phone number confirming that everything was done correctly.
Additional features
Next, the user is taken to a page where he selects the conditions for traffic consumption for the test drive period. The higher the speed of the selected connection, the fewer days of the test period and vice versa.
Is it legal to flash router firmware yourself?
In order for the modem to work without interruptions and transmit a good Wi-Fi signal, it needs special software. Firmware is necessary for stable operation and performance of its functions. Every device requires updates to keep working. The modem from the Yota company is no exception - its software is configured to perform certain functions, and in the case of firmware it changes to allow connection to other operators.
To flash the device, you need to select the appropriate software, which is freely available on the provider’s website or simply on the Internet. Free and paid codes are provided for unlocking, which any citizen can receive. Hence the conclusion that independent router firmware is legal.
note
! When choosing a site from which to download software for updating, you need to be extremely careful. When deciding to download software, you need to make sure that the resource is reliable - it is best to use proven, reliable sites.