Subscribers of the Yota cellular operator who use Internet connection services on their computers are probably familiar with the equipment that the company offers for purchase and further use. One of the most popular solutions today is the Yota Many router. This is a compact device with an attractive appearance, somewhat similar to the currently popular power banks from Xiaomi. And today we want to pay attention to the issues of setting up the Yota Many router so that using it together with the operator’s 3G/4G networks is as simple and comfortable as possible.
I forgot my Wi-Fi password, what should I do?
Forgot your password for accessing the Wi-Fi Internet network, do you need to restore access?
No problem, now we’ll tell you how to get out of this situation. The first thing I would like to advise is to train your memory and don’t forget anymore. And don’t rush to immediately reset your router to factory settings. After all, in this case the user forgot the password, and this problem can be solved.
In order to view the key to the wifi network, just do the following steps.
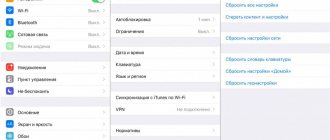
- We point the mouse arrow in the lower right corner on the desktop of the laptop computer to display networks.
- Select your wi-fi network, right-click, go to properties.
- In the window that opens, select Security.
- We see 3 fields in front of us. Security type, encryption type, network security key in which our access password is written.
- We mark the section for displaying entered characters, and our password will be displayed.
- All passwords have been restored, we rewrite them, remember them, and use them.
Yota Many - router settings
Yota Many router setup in 2 minutes! Today you will learn how to configure your Yota router or reset it to factory settings!
One of the reasons for the popularity of the service from this provider is the ease of installation and use. The developers have provided for automatic installation of almost all parameters. But it is always useful to know more about the device.
How to set up a router
The first thing you need to do is move the switch on the case to the left all the way - this will turn on the device. This will activate it and an open Wi-Fi network will appear. At the moment, anyone can connect to it - a random passer-by, a neighbor, etc. You need to perform several steps to block access to other people's gadgets.
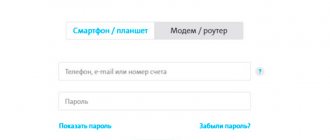
Open your browser and try typing the address of any page. The router interface will automatically open. The Yota Many device is configured at status.yota.ru (or http:10.0.0.1). You may be required to enter a password. Default login/password: admin/admin.
When you first log in, you must register: indicate your last name, first name, phone number, email address, create a username and password, ask a security question and enter the answer.
After which you will find yourself on the main configuration page, where you will already have access to changing Wi-Fi settings. Click the "Device Settings" button.
Please indicate:
- Network name. Think for yourself. If possible, it should be memorable, not “TP-Linkhome”. There are many such names, especially in an apartment building. There is a chance that you will forget which one is yours.
- Password. Should be quite complex. The “12345678” and “qwerty” options are so common that they are the first thing people try when trying to connect to someone else’s network;
- Security type (WPA2).
Save and the configuration will take effect. Now connect to your Wi-Fi network from any device.
In total, the Yota Many router is capable of providing wireless access to 8 gadgets.
Go to the interface again at the specified address and all parameters will become available:
- Wi-Fi – name, password, protection, automatic shutdown (when leaving the LTE coverage area);
- Setting the number of devices connected to an open network and password-protected Wi-Fi;
- Additional: disabling the logo backlight on the case, enabling the start page for an open network, VPN with permission/denial of PPTP, L2TP, IPSec protocols.
Advanced options can be found at: https://10.0.0.1/advanced.
Here you can fine-tune the Yota Many modem. Available to you:
- DHCP. Three ranges for issuing to connected devices: 10.0.0.0, 192.168.0.0., 172.16.0.0. Here you can download the application for your device. In our case, this is the browser;
- Ports. It is possible to set up port forwarding - 10 rules in total. You can also put the IP address in the DMZ;
- Reset to factory settings.
If you do not need to set up a local network with Internet access through a router, or do not have sufficient knowledge, do not change the parameters in the section.
How to return to basic settings?
The question of how to restore Yota Many to factory settings arises quite often. The router is designed in such a way that a reset to factory settings is possible only from the web interface:
- To get to the desired section, go to advanced settings (type https://10.0.0.1/advanced in the address bar);
- At the bottom, click the “Return to factory settings” button.
After about 40 minutes, the router will reboot with the original configuration. In Yota Many, resetting to factory settings is performed automatically, without user intervention.
The need to reset Yota Many settings arises in cases when you changed your login and password and forgot them. Sometimes access is blocked when you try to log in with incorrect data. Also reset if you want to set everything up from scratch.
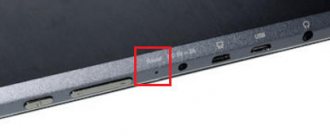
Sometimes it is useful to simply reboot the router. In this case, use the Reset button on the device body. It is visible only when the switch is set to the far left position. Clicking this little blue button will reboot the router without losing the configuration.
Why do you need a password?
First of all, let's find out why you need to set a password on your device. If there are now no questions about how to restore access to your Personal Account, then there will be no delays with this problem either. Protecting a wireless connection is one of the most important tasks that a subscriber must solve. By protecting your connection you get:
- Fast and stable internet
- Protected personal data
- Compliance with the legislation of the Russian Federation
The main reason why people try to hack wi-fi is because they can see free access. You should be especially careful in public places. You should pay special attention when you are roaming. Here, inattention can result in large financial losses.
Equipment
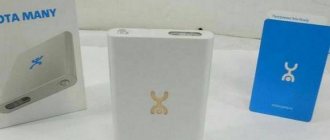
The Yota Many router is packaged in a compact cardboard box. The walls, base and lid of the package are quite strong and are not inferior in rigidity to wooden or plastic packages. The set consists of:
- router;
- USB cable;
- Instructions Yota Many.
If you need to download the instructions, go to the official Yota website. Please note that the charger is not included in the package.
The contents of Yota Many are housed in a snow-white plastic case. The plastic is glossy and pleasant to the touch. The longitudinal sides of the body have rounded corners. There is a USB connector at the bottom end of the case, and a miniature display at the top end. Externally, the Yota Many router looks quite attractive. It fits into the interior of any modern house (apartment), even if it is placed in a prominent place.
How to change and set a password on a wi-fi router uota
The time has come when you need to set or change the password for your Yota router or Wi-Fi modem. Sometimes this happens when the buyer has just purchased a new device. It has an open connection. It also often happens that on “password-protected” devices you urgently need to change the password to the Wi-Fi network.
When purchasing a Yota router, the first thing we recommend is to change (set) the password for the wireless network. You need to do this on something more complex and known only to you.
We previously wrote a fairly extensive article for Yota Many and Yota Many New. To gain advanced knowledge on this particular device, just read this compact and very clear article. It also describes the process of changing the Yota password.
Yota is a provider that can work with different manufacturers of wireless routers. We will try to describe the general recommendation for replacing the iota password. Try to carefully follow our advice.
Activation on Android
Setting up the Iota Internet on Android is the same as on other smartphones. The step-by-step procedure is as follows:
- Enable GPRS channel. “Settings” - “More” - “Mobile network” - “Preferred network type”. Select the "WCDMA (preferred)/GSM" option.
- Create an APN point. In the Mobile Networks menu, click Access Points, then Create. In the “Name” line indicate Internet Yota, in the APN - internet.yota and then “Save”.
For the installation to be successful, make sure that the Type APN column is set to supl or default. Reboot your device.
How to find out the password for a new wifi device
Let's start with a brief educational program. A router or WiFi modem is a special device that picks up the network and transmits it to your gadgets. To prevent any neighbors from “stealing” the network, it is recommended to install a security key on the modem. Otherwise, you will pay for the Internet, and anyone can use it. By the way, the data transfer speed greatly depends on the number of devices connected to WiFi.
Let's say you bought a brand new router, brought it home and connected it. However, you can’t just go online - first you need to find out the password for the Yota WiFi modem, change it to a more secure one, and perform other settings.
So, we told you how to find out the new password for the Yota 4g router, now let’s look at what to do with it:
Setting up Internet on iPhone
Setting up Yota on Apple gadgets is carried out as follows:
- Open the “Settings” section in the menu, click on “Cellular”.
- Then find the subsection “Cellular Data” - “Settings” - “Voice and Data”.
- Select the channel available in your city - LTE/3G/4G. The speed of Yota depends on this.
- Next you will need to provide APN information. The procedure is also carried out in the “Settings” category.
- Go sequentially: “Mobile communications” - “Data transfer”. In the Yota access point line, enter the name internet.yota. The remaining fields do not need to be filled in.
Reboot your iPhone to keep the new device data online.
How to find out the password from a wi-fi router
It’s very easy to quickly find out a new password for your yota wi-fi router. To do this, you will have to reset the new device to factory settings and set new clearance data.
- First of all, press the reset button on the Yota Wi-Fi router for 15 seconds. We remind you that the reset button can be located both externally and internally.
- When you see that the device’s lights go out and then blink again, it means the device has rebooted.
More about Yota: Yota Contact Center
Setting up a Yota 4G router
The Yota 4G router is configured quite often, because it is a pocket router for those who travel frequently. Whether on a business trip, in the country, or on a trip out of town, a modern person needs to always be in touch. Considering the number of gadgets in one family, a regular USB modem is no longer enough. This is where a mobile router helps.
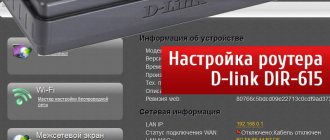
Interface
Before we tell you how to connect and configure the Yota router and give step-by-step instructions, let’s get acquainted with the interface. This will make it easier to understand the functions of the indicators, buttons and connector; we will look at the images.
LTE/4G network presence indicator:
- blue – the router is connected to the 4G / LTE network;
- flashing blue – network search;
- red – network error or lack thereof.
Wi-Fi network indicator:
- blue – indicates the presence of connected devices via Wi-Fi;
- does not light - accordingly, there are no connected devices.
Battery indicator:
- blue – battery is charged;
- red – discharged.
The logo glows in the corporate color (blue) when transmitting data.
on/off button RESET button and SIM card slot
Connection
We'll tell you step by step how to connect the device.
- Insert the SIM card into the router.
- Press the power button and hold for 3 seconds until the indicators light up and be sure to wait until 4G turns on.
Now about how to set a password on the Yota WiFi router.
- Pay attention to the back of the box, the name of the network will be indicated there. Find it in the list of available ones on your PC/tablet/smartphone and connect to it.
- Launch your browser and enter any address, you will immediately be redirected to https://start.yota.ru.
- Here you will be asked to come up with a password to access the Wi-Fi network → “Save”. Reconnect to the network and enter the password you created, then start surfing the network.
WEB interface capabilities
In this section we will talk about the capabilities of the WEB interface, which allows you to change the network name and password, and change the password to access the router. More experienced users will be interested in the following sections:
“System update” - by the way, the update occurs automatically and does not require user intervention; “Advanced settings” - use of DHCP ports and ranges and much more.
First, instructions for logging into the Yota router:
- Enter the address https://status.yota.ru in the browser address bar.
- On the page that opens, select “Device Settings>” - here you can change the basic parameters of the router, including the password and SSID (network name) WiFi, as well as the password for the router input - which is indicated on the box.
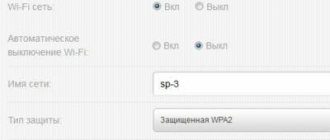
Section "Settings".
- Be sure to check the “Automatically turn off Wi-Fi:” checkbox in the “No” position.
- Enter the desired SSID in the “Network name:” field - replace the one indicated on the box. The next point is for those who do not know how to change the password on the Yota (Eta) WiFi router or create one if the network type is changed.
- Select “Security Type:” from the drop-down list → “WPA2 Protected” → and enter the password.
To go to advanced settings, follow the link https://status.yota.ru/advanced.
As stated earlier, this section is intended for more experienced users and if you are not sure, do not change anything.
Reboot and reset settings
This point cannot be ignored; it is often necessary to reboot the router, and sometimes reset it to factory settings, about each in order.
RESET
There is a saying among IT specialists: “Seven troubles - one RESET,” when any failures occur, the first thing you need to do is simply reboot the device, for this:
- press and briefly (about 2-3 seconds) hold the RESET button on the router - use some thin, sharp object, it could be a paperclip, a needle, etc. This is the answer to the question of how to reboot the Yota router. In addition, there is the concept of “Emergency reboot”; if the above method does not work, resort to it:
- Press and hold the device's on/off button for about 10 seconds, the guideline is to turn off the power indicator.
Reset settings
Resetting parameters to factory settings can be done in two ways.
- By pressing and holding the RESET button for about 10 seconds until the power indication turns off.
- Follow the link to https://status.yota.ru/advanced.
- then go to the already familiar “Ports” section → scroll down to the bottom of the page;
- Click “Restore default settings” - keep in mind that all the settings you previously made will be lost.
Alternative methods of using the Yota 4G/LTE modem
Agree, why buy a router if you already have a Yota 4G/LTE modem. You may say, how to distribute the Internet? There are routers that support 4G modems, one of these is Keenetic 4G, which, as a rule, already comes with pre-installed Yota modem settings. So, let's look at how to configure a WiFi router for a Yota 4G/LTE modem.
- Connect the modem to the Keenetic 4G router.
- In your browser, enter https://my.keenetic.net→ [enter].
- As a rule, the default login is admin and without a password; this data will be indicated on the box.
There is no need to make any additional settings, just indicate that a USB modem is being used. After which all settings will be automatically completed. Further on the screenshots, you will see what settings are indicated.
Stable connection!
How to find out the password you forgot
It is difficult to find out the password for Yota’s Wi-Fi; it will be much easier to reset the settings to factory settings and put in a new combination.
Resetting settings is done as follows:
- There is a Reset button on the back of the WiFi router, sometimes it is hidden deep in the case. Press the key for 10-15 seconds, wait until all the lights on the device go out, and then blink again. If the button is hidden, use a blunt needle.
- As you can see, you were unable to find out the password for the Eta modem, but you can easily set a new security combination.
Did you like the article? Share and rate!
Add a comment Cancel reply
How to find out the current list of connected users on Wi-Fi Modem YOTA 4G LTE (W8)?
Yona Many works great, but the Yota Router....just a nightmare...Seller code 880021 Device ID/SIM card 0102302998 The router is not working, the warranty is one year, but it is 5 months old. Why should I endlessly test in the support chat, and not with an official Yota representative? The connection disappears every 20 minutes..Where is the official representative in Moscow?
Oruzheiny Lane, building 41, office 48 - Iota office.
points:
Zemlyanoy Val 33, Manezhnaya Square 1 bldg. 2, Vavilova 3, Sadovaya-Kudrinskaya 11 bldg. 2, Lyublinskaya 153, Kozhukhovskaya 9 (in Mosaic), Entuziastov 12 bldg. 2, Komsomolsky Ave. 4 bldg. 1, Vernandskogo 86A, Orekhovy Boulevard 22A,
I set up Yota without any problems. Detailed step-by-step descriptions helped.
there may be several reasons:
external battery is faulty,
software failure,
LED is faulty.
A more detailed reason can be determined by the technician by diagnosing possible faults.
Why does the Iota modem not work and does not light up from an external battery or network.
Why do you need root access and what can you do with it?
How can you hide the Yota Many wi-fi network so that connecting to it would only be possible if you knew the name of the network
After updating the firmware and setting up the router, Yota works stably again - there have been no interruptions yet
It really works. The first thing I did was change the passwords
I overclocked it and the speed is completely different. Wow - hold on
Good manual. It helped a lot though. Take off with two bows and everything is fine - the network is plowing
A good router is mobile. Nowadays we just need a pickpocket like this. The only thing that confuses us is the cable on the turn signal
I haven’t gone into the shared settings yet. But I bought it for myself because it’s a very convenient thing. The car has irreplaceable vesch-music + gps and everyone needs to connect to the Internet. And don’t forget that VK and Odnokashniki hang on the smart
us.yota.ru/advanced - are these also advanced Yota settings?
It works stably on the latest firmware, although I had to dig into the router
It is necessary to change us yota to avoid conflicts between existing networks. So that there are no identical IPs
- Uotsssson-Answers: 17 — Date: Apr 23, 2020
- »Today at 19.00 (approximately) the iota began to fail. And now the internet has not worked for more than 2 hours..” What’s wrong with the Yota connection today (not working)
- Alexander-Answers: 11 — Date: Apr 21, 2020
- » Jinsuli 3.7 V 3000mAh Li3730T42P3h6544A2 - for example. Search on Ali for ZTE MF286, t.." Internet center Yota 2 this is a device ZTE ZXHN F680 V9
- Letto-Answers: 5 — Date: Apr 18, 2020
- “If I have such problems with my fiber-optic connection, I won’t even stutter about your Yota..” Yota doesn’t work. From failure to solving major problems
- Lyuba-Answers: 42 — Date: Apr 17, 2020
- "Yota has not worked since 22 pm 04/15/20(((employees, when I write to them, I check the signal.." Yota does not work. From failure to solving major problems
- Rustam-Answers: 42 — Date: Apr 16, 2020
- "The network from the nearest base station periodically began to disappear. And I am there all the time.." Yota does not work. From failure to solving major problems
- Galen-Answers: 42 - Date: Apr 07, 2020
- “I checked it and said it exactly. Sent a couple of messages. No payment yet. .." Yota gave free messages in roaming
- Vlad Amirov-Answers: 5 — Date: Apr 06, 2020
- » You have a 7-day free test drive. In the end, I didn’t like the device - ..” Yota 2 Internet Center is a ZTE ZXHN F680 V9 device
- Anton-Answers: 5 — Date: Apr 06, 2020
- “It’s normal to compare Yota with other operators. And without any problems - like my se ..” Yota coverage map
- Victor-Answers: 59 — Date: Apr 06, 2020
- » No battery included. It's a deception that it works autonomously. Even the battery model is in ..” Internet center Yota 2 this is a ZTE ZXHN F680 V9 device
- Mikhail-Answers: 5 — Date: Apr 05, 2020
- "I tested it, it works fine, but when working in 2 bands (2,4 and 5) at the same time, .." Yota 2 Internet Center is a ZTE ZXHN F680 V9 device
Checking network parameters
Go to “Network Connections”.
Next you need to open the properties of the connection through which you are connected to the Yota modem. If you are connected via Wi-Fi, then this is the “Wireless Network” adapter (in Windows 10), or “Wireless Network Connection” (in Windows 7). If the modem is connected via USB, then it will most likely be a “Local Area Connection 2” or “Ethernet 2” adapter (the number may be different).
Just right-click and select “Properties”. For example, I am connected to a mobile router (aka modem) via Wi-Fi:
Next, we set automatic acquisition of IP and DNS for the IPv4 protocol.
If this does not help, or automatic receipt of addresses was set there, then you can try registering static addresses:
Yota modem: connection, configuration, capabilities
Modern life cannot be imagined without access to the Internet, since it has become not only a source of constant entertainment, but also a working tool with which you can earn money. Yota is one of the leading providers in the Russian Federation, whose services are used by millions of subscribers.
In order to always have access to the network, you need a Yota modem, which is very convenient for everyday use. Such technologies first appeared several years ago, and today they are in demand by many subscribers. There should be no questions about how to connect to Yota, since the whole process is very simple. In addition, you can always turn to the service center for help, where all the necessary work will be done for the client.
About the device
The Yota company performs a large number of engineering works for the modem to maximize the quality of communication. It is a specialized device that provides broadband access to the mobile Internet using 3G and 4G (LTE) technologies. Traffic exchange speeds reach hundreds of megabytes, which is more than enough to solve everyday problems. Moreover, it has a special Wi-Fi module, with the help of which the network becomes open to absolutely all devices within its range. Thanks to this, the functionality of a portable modem is truly invaluable.
Yota Many is a stand-alone modem that works for a long time
The modem has a battery installed, which provides access to the network without any restrictions. Yota 4G is available in almost all regions of the Russian Federation, which is especially convenient for those who like to travel. The presence of a large battery allows the device to work up to 12 hours without recharging.
Equipment and design
All devices are supplied strictly, so if at least one item from the list below is missing, you must ask the seller to provide other products. The standard set contains the following elements:
- modem;
- instructions or user manual;
- power cable and charging;
- technical data sheet of the device.
The design of the modem is minimalistic and is housed in a small black plastic case. There is no need to know how to open the modem, as you only need to press one button to turn on the device and start using it.
Free test drive
If there is no confidence that the Yota Internet modem has the required functionality, or the network access speed is sufficient, then the subscriber can always turn to official sales centers for help. Experienced consultants will answer your questions and also allow you to evaluate all the benefits of using Yota directly on the spot.
How to use the Yota modem
It’s easy to start or turn on the modem for Internet distribution - you just need to press and hold the button for a few seconds to wait for a signal from the indicator light. This is only possible after setting up the device, which sometimes raises some questions.
How to register a device
The device registration process is quite simple. A previously purchased SIM card that has been activated is placed in a special slot. You should make sure that the tariff is set with a sufficient amount of Internet traffic. After the first launch, the modem is automatically registered on the network and linked to a specific SIM card.
How to connect a Yota modem to a computer or laptop step by step
In addition to the fact that you can distribute Wi-Fi to different recipients from the purchased device, it can also be used as a USB modem from Yota. This format is more convenient for individual use, as it is possible to achieve higher speeds.
Installing the necessary software on your computer is very simple. All you need is:
- insert the modem into the computer’s USB port;
- wait for the drivers to automatically download and install the software;
- follow the instructions on the screen.
If the automatic process has not been initiated, then drivers for the modem can be found on the company’s official website in the technical service section. You need to remember that you need to select the exact version of drivers for a specific modem device, since, otherwise, it will not work. Typically, manual installation of drivers is required on computers running Windows XP and other older versions.
How to set up a Yota modem
Setting up a Yota modem, including models that support the 4G (LTE) standard, is a relatively simple process that every user can handle. The developers have created a convenient program with an intuitive menu, which is automatically installed on the laptop after the first start of the Internet.
Questions about how to configure Windows 10 to work with this device usually do not arise. It is necessary to use USB 2.0 as a working port, since the software used works optimally with this connector. More modern ports may not be supported properly, resulting in communication problems.
After connecting the modem to the USB connector, automatic setup on the computer starts, which takes a few minutes. It is important not to interrupt the installation process as manual editing may be required in the future.
Login to settings
If you want to fine-tune the modem, you need to log into its web interface through a browser. In the address bar, enter the address 192.168.1.1, 192.168.0.1 or 10.0.0.1. Usually no additional changes are required - the Internet appears after installing the drivers.
Making settings in this menu can lead to irreparable consequences, so full responsibility for the adjustments made lies with the user. If you need to restore factory settings, you need to use the corresponding function in the menu.
How to update Yota 4g LTE modem
Drivers for the Yota modem are updated automatically, so no additional actions are required. A new version of software is released quite rarely - no more than once a year, so there is no need to worry about this. However, there is a special section in the settings menu where you can check for updates.
Setting and changing passwords for modem and Wi-Fi
If the client wants only him to have access to the Yota 4G LTE modem via Wi-Fi, then he must come up with and set a strong password. An excessive number of users will lead to overuse of Internet traffic and a drop in download and data transfer speeds. The password for modem W8 is set in the “Security” section.
You should also change the standard username and passwords for accessing the modem account, since by default all devices have the same security settings for all. It is important to remember or write down the changes that have been made, since it will be impossible to restore them in the future - only by resetting all settings to factory settings.
How to open ports
Opening ports allows you to gain access to certain Internet tools or resources. The process of opening a port also occurs in the web interface, which is accessible through a browser. In the appropriate section you must indicate:
- port number;
- type of packets transmitted;
- current IP address.
If the configuration is correct, a special icon will appear. After this, you need to save the changes for them to take effect.
Other settings
The profile for the Yota modem is very large, since the use of the device is intended, among other things, for semi-professional and professional purposes. It is recommended that you carefully study all sections of the technical menu to understand the capabilities provided. If you are not confident in the actions being taken, then you should entrust the work to professionals.
It is important to remember that inconsistent settings will lead to device failure and lack of access to the Internet.
How to connect a Yota modem to a router
Connecting an LTE modem from Yota to your home Internet router is easy. With this small device you can significantly expand your coverage area without the use of specialized equipment. If their pairing was done correctly, then the Internet tariff will not be spent at all, which will allow you to save significantly.
The Yota modem can only work if you have a modern router with a USB port. Otherwise, you will not be able to make the settings below. It is necessary to carefully follow the procedure to avoid mistakes. The instructions are valid for the operating system Windows 7 and newer versions.
- Connect the Yota modem to the modem’s USB port. Make sure that the Internet (LAN) cable is installed in the required port.
- In the control panel, find the “Network and Internet” item, and then go to the “Manage network connections” section. To speed up the process, you can use the search utility, which is built into the functionality of the operating system.
- In the window, select “Local Area Connection”, click the “Properties” button in the “Internet Protocol TCP/IPv4” item and indicate that the IP and DNS settings should be updated automatically.
- Go to your personal router management account through a regular browser. To do this, you need to enter the text or IP address of the site, which are indicated on the back of the router. Often such an address is a set of four numbers in the range from 0 to 225, separated by dots.
- In your personal account, select “USB modem” and enter the Yota settings that were provided by the operator.
Thanks to these steps, you can easily use the router as a device that will expand your coverage map for your home needs.
How to connect eta to tablet
It was previously mentioned that the Yota LTE modem is a universal device that provides access to the Internet at high speeds. One of the current ways to use it is to connect your tablet via Wi-Fi.
In order for Yota modems to provide this functionality, you must have a properly configured device, as well as know the configuration data: access point name and password. All these parameters are set in the program on a computer or laptop during setup or changed in your personal account. It is recommended that you write down all the information in advance to avoid performing a factory reset in the future. If the client does not remember the password, then only a reset will help change the situation.
On your tablet, go to the “Communication” section and select “Wi-Fi”. This window will open all available connections. You need to click on the name of your access point, enter the password and get started.
Yota mobile router - always online
According to numerous positive reviews, the Eta Wi-Fi access point is convenient for everyday use for several reasons. This is primarily due to the fact that high-quality mobile Internet is always available, regardless of the device. Many budget smartphones and tablets do not have the ability to connect to the network using LTE technology, which negatively affects connection speed.
Laptops and computers cannot access the mobile Internet at all, which imposes serious limitations on functionality. The purchase of the described modem will pay for itself many times over in a short time, since the client will be able to perform tasks without being tied to a specific workplace.
Moreover, Yota offers a wide coverage map throughout the Russian Federation, which will be especially convenient for those who love to travel. You can forget about such concepts as home region or roaming within the country - cheap mobile Internet is available to everyone.
Yota Internet Center - Internet for home and office
In Russia, home Internet is quite developed in large cities, but in remote regions this often poses a number of problems. One of the main ones is due to the fact that the cost of connection is excessively high, since it requires laying a cable into the building from the server equipment.
Unlimited 4G Internet with appropriate Yota modem models is a universal solution that suits everyone. In regions with good coverage, access speeds can be orders of magnitude higher than from cable Internet.
Thanks to the gradual development of this technology and the introduction of new solutions, the available functionality is significantly expanding. The maximum speed is available to every client of the company, so you should think about the Yota Internet center right now.
What to do if the Yota modem does not work
It happens that the Yota 4G USB modem fails. This requires some troubleshooting steps. There are a number of circumstances that complicate the operation process, but most often the reason lies in incorrect equipment settings, and not in its mechanical failure.
If you connect to ETA at low speed, you should check the quality of the network signal. Sometimes such problems appear after installation, but this happens rarely. In such situations, it is recommended to wait a while, since such a nuisance may be caused by high network load.
If the message “Device is not connected” appears, it is recommended to check whether the SIM card is installed correctly in the modem, and also reboot. Often, such measures are more than enough to normalize the operation of the device.
Improving the signal using an external antenna
A current way to improve traffic loading speed and network signal quality is to use an external antenna. It is a small metal conductor that is designed to improve signal reception. The antenna is inserted into a special connector on the device.
It is worth understanding that any Wi-Fi device, including the Yota 4G LTE modem, may not work well due to the terrain or interference from surrounding objects. Often such situations are observed in shopping and office centers, where a large number of extraneous communication sources are installed.
If the coverage level in the area where the modem is used is low due to the lack of operator equipment, then an external antenna for the modem will not help, since there is simply no signal to receive.
How to reboot or reset settings
Resetting and rebooting settings may be required at the most unpredictable moment, for example, if you lose your password or other unpleasant circumstances arise. The reboot process is accomplished in two ways:
- from the router control room - you can enter it through a browser at the address indicated on the back of the device;
- using a button on the device - to do this you need to find a small hole on the case. The button must be pressed using a paper clip or any other thin piece of metal. All settings will be returned to factory settings.
Alternative Methods of Use
Development engineers are doing everything possible to maximize the functionality of this device. In this regard, some modems are equipped with a specialized card reader, with which you can easily read information from flash cards and memory cards.
A standard type drive is installed in the Yota modem and then connected to the computer like a flash drive. There is nothing complicated or unusual about this, but the capabilities that the device owner receives help resolve a number of additional problems that previously caused serious inconvenience.
Coverage map
The coverage area of Yota 4G and 3G modems is one of the largest in the country. Its area does not depend on the selected tariff plan, so it is recommended to determine in advance the need to purchase equipment. Of course, even today there are areas where coverage is weak, so you should carefully study the interactive map on the official website of the service provider. It will provide comprehensive information about the state of the network in the country.
Speed limits may also depend on the quality of the surface. For example, in small regional cities there is not even 3G coverage, so the speed of mobile Internet will be minimal.
Overall, the Yota modem is an excellent device that will allow you to always stay connected. Already millions of citizens across the country use the services of this company, so you should think about it. High-quality mobile Internet, which is always available, will make life more comfortable.
otarifah.ru
Description of work
Yota Many distributes high-speed 4G Internet simultaneously to 8 users using:
- personal computer;
- laptop;
- tablet;
- mobile phone;
- TV set-top box. The connection speed is enough for everyone.
The manufacturer positions the Yota Many router as a mobile wireless device for providing Internet access on several devices at once. And the manufacturer doesn’t lie. Thanks to:
- compact size;
- light weight;
- powerful battery
Yota Many has received the status of a favorite and reliable portable router among fans of 4G Internet.
Indeed, you can take the device with you to:
- a walk around the city with friends;
- country picnic;
- cottage or village.
We were going on a hiking trip. The yota many mobile router will not become a burden. After all, it won’t take up much space in your backpack, and it can easily fit in your jeans pocket. And in an emergency, it will provide tourists with the opportunity to use the Internet and mobile applications, for example, a navigator or area maps. The main thing is that in this place there is a coverage map of the Yota cellular network.
The battery life is 16 hours with active surfing (continuous transition from one site to another). You can use the Yota Many modem in standby mode for at least 5 days. Moreover, in order to reduce battery drain when the user stops actively using the Internet, Yota Many goes into standby mode. To return to operating mode, just type any address in the browser search engine or follow any of the available links (tabs).
Indicators
The Yota Many router has only 1 indicator. But it’s not quite ordinary: it’s in the shape of the Yota cellular network logo. It is located on the front surface of the router case. The indicator begins to glow with a pleasant blue hue when the battery is fully charged. When the battery is low, the indicator lights up red. The indicator is no longer useful. Therefore, to save battery, we recommend turning off the indicator in the Yota Many settings. How? Read in the “Settings” section.
Control
A metal (chrome) switch is used to control the device. The switch has the shape of a flattened cylinder. It has a ribbed side surface to make shifting easier. The switch is fixed in three positions:
- in the central one, the modem is turned off;
- on the far right, guest WI-FI is turned on;
- on the far left, the WI-FI access point is turned on.
The status of the router and changes related to its management are displayed on a miniature information display. The miniature size of the display can significantly reduce battery consumption, but at the same time it displays all the information necessary to monitor the status of the router:
- current state (while the router is operating, the indicator lights up, if it doesn’t light up, it means the device is turned off or the battery is completely discharged);
- battery charge;
- guest WI-FI distribution activity (displayed as a smiling emoticon);
- number of WI-FI network users at the current time. This information is so complete that the very presence of an indicator in the form of the Yota logo becomes doubtful. Although, it is possible that there will be people who use the luminous logo as a night light. For example, in a children's room, especially since the router operates absolutely silently.
Features of use
If necessary, the device can be used as a modem. To do this, just insert the corresponding connector of the existing cable into the USB port of the router. The same port is used to charge the Yota Many battery. But the router can also be charged with a charger with a 220 V network-USB port adapter.
The Yota Many WI-FI 4g home network is password protected (to use the home network, you must specify the password specified in the settings). The guest network is not password protected. Distributing the Internet by a router allows it to be used by everyone within the coverage area of the device in question.
Important: specify the number of home network users in the settings.
For example, the settings of our distribution device indicate 5 home WI-FI consumers. This means that 3 neighbors can easily use our 4g WI-FI. But no more. Provided that they are within the coverage area of our Yota Many router.
Important: if the settings do not specify the number of home network users, then the members of this family do not have priority over their neighbors. Whoever connects to 4g WI-FI first is the one who uses it.
To correct this annoying misunderstanding, just go into the settings and disable the guest network. Immediately after this, household members can use 4g WI-FI on 8 devices simultaneously. When all 8 users are connected to the network, the smiley face on the information display will change from a smile to a smile.
Tip: write the password on a small strip of paper and stick it with transparent tape on the back of the device. This will allow you to always have the password at hand, including when you are away from home when using a portable version of the Yota Many router.
If the password for a secure (home) WI-FI network is lost, it can only be restored in the configurator by logging into it from a computer or laptop.
Cellular operator Yota for:
- obtaining extensive information about the cellular network;
- manage your profile at an increased level;
- automatic installation of new software
We recommend using the Mozilla Firefox browser. If necessary, software updates are transferred from automatic to manual control. Experienced Internet users can experiment with the DHCP range in the settings.