The Yota provider offers its customers an lte 4G modem and a network device of the same line with Wi-Fi support, which is a mobile router. It is especially convenient in places where cable Internet is not possible.
Before connecting a Yota modem from this line, you do not need to install software. Both devices operate using Plug&Play technology. This means that driver installation and connection are performed automatically when the modem is connected. The kit includes the device itself and instructions.
How to set up a Wi-Fi modem Iota
You can use the equipment setup service directly at the Yota sales point. The cost of consultant assistance varies between 300-500 rubles. Setup will take about 15 minutes. The modem will be connected to the lte 4G network, and the specialist will also set a password.
You can set up a network device and set a password without professional help. After connecting the modem to the computer via USB, the monitor will display that the device has been detected. The drivers will be automatically installed in a few minutes. Once the settings are complete, a notification will pop up indicating that the device is ready for use.
To continue setting up the wifi modem, you will need:
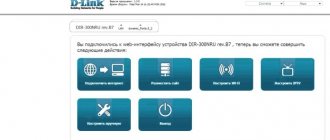
- open the browser and go to https://10.0.0.1 or https://status.yota.ru;
- on the activation page, enter your phone number in the field provided for this;
- wait for the message with the verification code and enter it.
By default, the router creates an open Yota Wi-Fi network. Next, in the same interface, a window will open to configure the wifi network.
- How to distribute the Internet from the Yota operator via an Asus router
You will need to perform the following operations:
- set the Wi-Fi network indicator to the “on” position;
- cancel automatic shutdown (this option can lead to a disconnection);
- enter the name of the network;
- select the encryption type;
- set a strong password.
To start working on a wifi network and distributing the Internet after adjusting the settings, you first need to save them and then log into the network again. If necessary, the password for using the network can be changed. Now wireless communication is available to your tablet and other devices.
When you connect the router to the network for the first time, its firmware is updated. Also, two additional items will appear in the settings window on the laptop: the first is for port redirection, the second is for entering the DHCP server address. It is recommended that only experienced users change the values.
If an error was made when entering data, you can correct it by resetting the settings.
To do this, click on the “Restore factory settings” button.
Yota Many: battery repair and replacement
If Yota Many does not connect to the Internet and the red indicator is on, then there are problems with the battery. For repairs, faulty equipment must be returned to a service point. The device must be fully equipped with all accompanying documents and receipts.
The warranty period for service is 12 months.
If it is not possible to take the router to a service center for repairs, then you can try to fix it yourself.
Disassembling the modem is quite easy. You need to remove the cover on which the on and off slider is located. Then open the USB connector and pull out the battery and microcircuits from the case.
You can proceed to repair or replace the battery, but it is worth remembering that if any parts of the modem are damaged, warranty service will be denied. Therefore, in order to save time and money, it is better not to disassemble the device yourself.
Improving the signal using an external antenna
To obtain maximum connection speed, connect an external antenna. She catches the signal and stabilizes it. The external antenna is connected to the modem itself via a pigtail.
There are two options for connecting the antenna:
- How to connect and configure Yota Internet
- Indoors. This installation method is suitable for rented office spaces. The antenna is simply placed on the windowsill in a special stand.
- On the facade of the building. This is the most common method of installing an antenna and allows you to extremely improve the signal quality. For better results, it is placed on the mast.
A practical solution is the Bester model, which gives a signal amplification of 16 dB.
The pigtail must match the modem connector. Direct connection of an external antenna allows you to minimize signal transmission losses. In the absence of a suitable pigtail, you have to purchase a universal adapter. However, in this case, the reception will be reduced by 2 times or more.
For the Yota lte 4G Wi-Fi modem, the recommended connector is MS168. Two connectors for an external antenna are located under the housing on the board:
How to determine the direction of the antenna? You can try this method.
- Connect the antenna to the modem, connect it to the laptop.
- Having climbed to the roof (or to another high point), rotate the antenna 15 degrees and monitor the signal level.
- If the reception is reliable at several points, measure the Internet speed (the speedtest.net service will help you with this).
- Fix the antenna in the position with the best signal and high speed.
Connecting the Eta modem and setting up a wireless network is not difficult. If problems arise, you can go to the official website of the provider and write to the support service.
Here is an interesting video on how to make an antenna for a Yota modem with your own hands from a satellite dish:
Ways to boost the device signal
The quality of the Internet connection is affected by factors such as terrain, modem location and coverage area.
Working electrical appliances and metal objects have a bad effect on the quality of the WiFi signal.
Instructions on how to strengthen the Yota Many signal:
- Place the modem closer to the window;
- Strengthening the signal using a router in the center of a metal object. For example, a tin can or disk;
- Using a metal antenna.
The best option is to purchase a special amplifier. With its help you can improve the quality of your connection as much as possible. There is an effect even if the signal was completely absent before.
Working conditions
The device does not have its own battery. When the required voltage is supplied via USB, the modem begins to search for a network. For operation, the recommended voltage is 5 volts 1.5 amperes. However, the USB indicator (5 volts 0.5 amperes) is sufficient for the router to operate.
- How to log into your Yota personal account
When connected to a PC or laptop via USB, an additional 7 devices can be connected. When connected to a network adapter, you can distribute the Internet to 8 devices simultaneously. If there are no problems on the modem, the blue indicator with the ETA logo lights up and a Wi-Fi network is created.
Possible problems
Problems may arise when connecting the modem. Below are some of them and possible solutions.
1. The modem was connected to the adapter, but the Wi-Fi network was not created, and the blue indicator on the panel did not light up. Possible reasons are unavailability of lte and automatic shutdown of the wireless network. In this case, you need to connect the modem to the PC via USB and go to settings. The interface is available via the links https://10.0.0.1 or https://status.yota.ru.
2. It is not possible to connect a USB modem to a computer with an outdated operating system. The fact is that operating systems such as Windows XP SP2 do not support WPA2 encryption. To solve the problem, you will need to install a new OS. Another option is to download the RNDIS drivers and connect the network device via USB.
How to update the firmware
On Yota Many, firmware is required if the updates are not installed automatically due to a failure. To update manually, you need to carry out the following algorithm:
- An archive is downloaded from the site, which contains the firmware for Iota Many (it is recommended to download the software from the official portal);
- a file is extracted from the archive;
- the equipment is connected to the computer
- a window will open in which the “Browse” item is indicated; in it, select the already loaded document;
- On the page, click the update item.
Once the flashing is completed, you should reboot the router.
Setting up the Iota lte 4G modem
- connect the modem to a laptop or PC via USB;
- wait for the driver installation to complete;
- open the browser, a window with settings will appear;
- click on the “Activate profile” link;
- Enter your phone number in the field that opens and wait for a message with a verification code.
Once these steps are completed, you can start using the Internet. In addition to the basic settings, three ranges of IP addresses are available:
- 192.168.0.0;
- 172.16.0.0;
- 10.0.0.0.
Found a typo? Select the text and press Ctrl + Enter
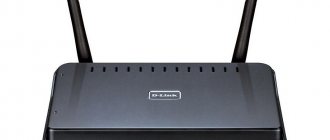
The Yota router with wi-fi and 4G is very popular among mobile routers. This is one of the leading trends in recent years and therefore there is a need to familiarize Yota device owners with more advanced settings.
Let's take a closer look at this mobile router.
Unlock
The procedure is carried out to ensure that the device works with a SIM card of any operator. This can be done officially by asking for help from the ETA contact center staff. But it will take from one to three months while the company reviews your application.
You can use an alternative option and contact a private master. In this case, you can unlock the gadget in ten minutes. If you decide to carry out the procedure at home, then follow these recommendations:
- Download the latest firmware version from the provider's website.
- Connect the router to your computer and open your browser.
- Log in to LC. Make sure your region is listed.
- In the window that opens, select the file downloaded to your laptop.
- Click "Update" and wait for the process to complete.
Getting to know the router
The Eta router is a very compact and convenient device that has a battery reserve of 16 hours of continuous Wi-Fi operation or 60 hours of standby time. To fully charge a completely discharged battery you will need about 2 hours.
Lately, many questions have arisen about the inaccessibility of the base addresses of the management pages of Iota routers. In order to log in correctly, you need to know the list of possibly changed pages of the management interface.
Default-
https://10.0.0.1 or https://status.yota.ru
https://192.168.0.0
https://172.16.0.0
Enabling Wi-Fi with minimal settings
To do this, you just need to move the switch to the far left position - Unencrypted network and after half a minute carry out tests of the Yota 4G network. But this is provided that the Yota router is charged and an activated SIM card is inserted.
If this is all in place then you should see the -YOTA network.
But since very few users try to turn on an unprotected Wi-Fi network, then further:
Router input
To do this, you type in the address bar of your browser - https://10.0.0.1 or status.yota ru.
Preset: login-admin, password-admin (can be changed by intermediary sellers)
Setting up a Wi-Fi router
Type https://10.0.0.1/network in your browser
Next, select: Security type - Protected WPA2 (the most optimally reliable)
Network name (optional)
Wi-Fi password (preferably not 12345678)
Next, don’t forget to click on the Save button.
At this point, the initial setup of the Yota Many router is ready.
Short review
The updated Iota Wi-Fi 4G modem operates at increased speeds of up to 150 Mbit/s and maintains a stable connection to the network. The design of the device has remained virtually unchanged since its first release. The case has a USB connector for connecting to a laptop and charging. The SIM card is installed at the sales office at the time of purchase.
To control the modem, a slider is used, which can be set in three different positions:
- On the far left is activating the WiFi hotspot.
- The far right is to connect wireless Internet distribution without entering identification data.
- When you move the button to the center, the device turns off.
A small monochrome display displays information about the remaining charge level and the number of connected subscribers. The smiley face indicates the activation of an unsecured network.
Introducing 10.0.0.1/status
In order:
- Device name - Yota Many
- Battery condition -??%
- Connection duration - hour, min, sec
- Maximum connection speed
- Current connection speed
- ReceivedSent
- SINR
- Signal Strength(RSRP)
- IP address
- Cell ID
- Firmware version
- Open Wi-Fi network - Yota Share disabled/enabled
Advanced Wi-Fi router setup
Next, from the page -10.0.0.1/status- click the button - Device Settings - and we get into the administrative management of the Wi-Fi router.
Here you can (in addition to the main functions - Network name, Security type, Password) manage - Automatically turn off Wi-Fi.
And just below is a slider that regulates the number of Wi-Fi connected (maximum 
There is control for Logo Lighting, Start Page Display, VPN (protocols) and Reset to Factory Settings.
Reset process
There is a special button on the screen that allows you to reset all installed settings. As soon as the client presses the button, the router will reboot, and after turning on, it will go to factory settings with the Iota network. You can also reset in the modem's web interface.
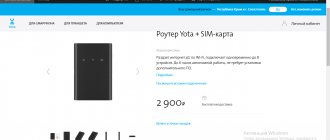
The cellular company Yota offers to purchase a new Yota Many router. Installing the equipment is not difficult; even a beginner can handle it. This modem can be taken on trips, as it has a built-in battery. This purchase will be needed by those people who spend a lot of time on the road.
Obtaining root access to the router
(Attention, be careful, further actions can only be performed by professionals)
Open the management interface https://status.yota.ru/ and execute the commands one by one in the JavaScript console (F12, Console tab in Chrome):
If for some reason the commands did not pass, then we try to disable the protection -
Next, perform Reboot and enable the built-in FTP server:
- rebootDevice(NULL);
- cmsSystem("tcpsvd -vE 0.0.0.0 21 ftpd -w /", NULL); - or- deviceSimpleCommand("tcpsvd -vE 0.0.0.0 21 ftpd -w /", NULL);
We remove the password entry for the yota router
To do this, log in via - ftp://10.0.0.1/
and look for the line - root:your password:root and change to - root::0:0:root.
The Yota operator offers Internet access equipment that supports 3G/4G/LTE networks. The data transfer speed will be quite high, and the routers of this provider are portable and do not require a constant connection to power. However, setting up a Yota router differs from working with other devices.
4G networks are a new standard that supports data reception speeds of 178 Mbit/s and receiving speeds of 58 Mbit/s. Yota routers can also support higher speed access via 4G/LTE. During the presentation, testing recorded speeds of 326 and 172 Mbit per second.
Network equipment from this manufacturer allows you to connect up to 5 users simultaneously (this is indicated in the specifications). In practice, you can connect even six clients. Using LTE networks is suitable if you need to exchange large volumes of traffic.
Review and testing of the mobile router can be found here:
Content
Unlocking the modem
Until recently, it was possible to unlock a router only after contacting Yota with a request to provide an unlock code. The official website contains instructions on how to carry out this procedure correctly.
But in reality, getting this code is quite difficult. Therefore, there are ways to unlock the modem to work with other operators yourself.
To do this, you need to download the necessary software from trusted sources and follow the step-by-step instructions to install it.
Computer connection
Before setting up the Yota router, you need to connect it to your PC via the USB cable that is included in the kit:
- Connect the USB ports of the router and PC with a cable;
- If autoboot is disabled, you will need to open the router as a physical drive and run AutoInstall.exe in it;
- If the function is active, continue following the program instructions to install drivers.
You can connect over the air if your computer has a wireless network card that supports b/g standards. This will allow you to avoid cluttering your workplace with wires. By default, routers use the network name YOTARouterXXXXX, where instead of Xs the last digits of the device’s physical address are indicated.
How to unlock a router
Yota Many uses unlocking, for this the subscriber needs to:
- Pay for the goods and leave your email address.
- You will receive a message by email, which you should open and follow the link. In the window that appears, enter “Yota” and indicate your email.
- Further in the correspondence the code will be indicated.
- Now you need to insert a SIM card into the router and enter the unlock code.
More about Yota: How to get details on Yota - Communications and Internet
You need to unlock the router in order to use it with other SIM cards. The easiest way for users is to contact the company's main office for unlocking, but this procedure takes a lot of time.
The subscriber can also go to any website where codes are sold. But the cost of the code will be paid.
Access to the admin panel
Setting up a 4G Wi-Fi router Yota is possible through the installed browser, regardless of its version and name. It is carried out in the following way:
- Launch your browser and type 192.168.1.1 or 10.0.0.1 in the address bar. This is the router's default IP address. If one doesn't work, another one should open.
- A new window will require you to enter your login information. The login is the word admin, and the password is 1234. If necessary, they can be changed to your own values.
- The main menu of the device will appear in the window, located on the left side. The tabs of any open section will be located at the top.
The main window displays information about the router and all connection parameters.
Setting up a wireless connection
If you connect your Yota router wirelessly, you need to make Wi-Fi settings. The process is not complicated, just follow a few steps:
- In the device settings, among the tabs at the top of the screen, select Wi-Fi configuration. You will be able to enter the name of the network SSID so that it can be more easily recognized in the future.
- Here you can hide the network name if security is important. In this case, the SSID will need to be entered manually from other devices.
- In the same section, you can set or disable the Wi-Fi connection via a password.
- By default, the Sleep mode option is disabled here. It should not be activated, since periodically the device will go into standby mode and the network will turn off.
- If you click the “Save” button, all changes will be saved in the program. However, for them to take effect, you will need to restart the router.
USB connection
When choosing a wired option to connect your computer to a 4G/LTE router for setup, the operating system will offer to install drivers, which you should not refuse. Once the installation is complete, the device will become recognized and support for network access will be available.
Now you need:
- Click on the device shortcut in the tray with the left mouse button;
- in the next window, enter all the data for the work. This applies to the network name and password, starting or turning off Wi-Fi. If necessary, you can specify automatic shutdown.
The direct menu is clearer for a beginner compared to the browser interface. Everything here will be intuitive. However, it is recommended to carry out detailed configuration through the browser, since all options are available in it. This applies to changing the physical address of the device, choosing a different channel, the method of protecting the network, and much more.
Setting up a 4G/LTE Yota router comes down to ease of connection. There is no need to perform complex operations, which is required in devices from other manufacturers. It is recommended to make the first connection directly via a USB cable. You can make all the desired settings.
Often there is a need to set a fixed IP address. To do this, just go online from another device, if the PC cannot connect to the mobile IP, and in the “Network” settings menu, select static IP instead of dynamic. All that remains is to specify the new value.
As soon as the first connection to the Internet is made, the firmware in the router will be automatically updated. This will avoid unnecessary manipulations and save time.
And here you can see a review about operator modems:
Device characteristics
The Yota Many router is a small mobile device that transmits a network signal to several gadgets at once. It has a built-in rechargeable battery that allows the device to operate in autonomous mode. In the old version of the modem, users were provided with a 1430 mAh battery, but now its capacity has increased to 2100 mAh.
- note
- The subscriber can use the router while traveling, but connecting to the Internet is only possible if the area is covered by the Iota network.
Let's look at the main characteristics of this router:
- The weight of the device is 90 grams;
- a maximum of 8 gadgets can be connected to one equipment;
- The kit includes the router itself, instructions for use and a USB cable;
- the body has dimensions 67x97x13 mm;
- the equipment is fully compatible with operating systems such as Mac OS, Windows XP and Linux;
- it will take 2 hours to fully charge;
- the developer is Russia, but the assembly is carried out in China;
- The USB port must be at least version 2.0.
- note
- The kit does not include a charger, so you will have to use a computer to charge the router.
More about Yota: Sets: order to your home in Okinawa
There is a small display on the case; it is based on E-Ink technology and allows you to control the battery and other parameters of the router. Thanks to improved technology, the power consumption of the router has decreased. Additionally, the device has a Yota logo that lights up. But it can be disabled by visiting the modem interface.
Reset to factory settings
Sometimes, after entering incorrect data, the Internet may stop working. However, the network may also disconnect after sudden changes in settings by the provider. You can return the router to its original state via the web interface:
- Go to status.yota.ru/advanced.
- Select the “Ports” section and scroll down the page.
- Find “Restore default settings” and click.
- Wait some time while the system performs the necessary actions.
If this does not help, you can try pressing Reset on the device and holding it for 15 seconds. After the reboot you will have to perform the setup again.