Hello everyone! Most likely you came to us because you got a similar error when connecting to any site. In this case, you can see a similar message in the browser with the inscription: “The DNS address of the server cannot be found,” followed by the website address.
The problem is not new and occurs quite often. As you can see, I encountered it myself and today I’ll tell you how to solve it. Moreover, the error usually appears on all pages that you want to enter. Or some separately. But sometimes it happens that the problem occurs only with a single site. Then most likely the error occurs only with this resource and nothing depends on you.
Therefore, you can try to knock on him a little later. And if possible, connect using mobile Internet or another device. If you manage to reach it, then the problem is most likely in your computer or laptop. And we will solve it further.
Setting other DNS addresses
- To quickly access some points of the system, we will use magic keys (may have a Windows window icon) and the English letter R. Find them on the keyboard and press them at the same time.
- We write a magic spell: “ncpa.cpl”.
- Now go to the “Properties” of your connection. Exactly the one through which you have Internet access;
- Now click once on protocol 4 and then select “Properties”.
- You need to set DNS addresses as in the picture above - these are verified addresses from Google.
You can also try addresses from Yandex:
- 77.88.8.8
- 77.88.8.1
Remedies
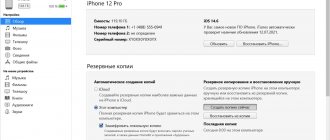
The recommendations presented are relevant for the latest operating systems Windows 7, 8 and 10.
General Tips
Before getting into the settings of the operating system or router, we recommend trying the standard “minimum”. Please use a different browser. We recommend having a standard set of Google Chrome, Opera and Firefox on your computer. This will eliminate incorrect settings of the browser itself. Try clearing the cache in settings. You can get detailed instructions in the help for each browser.
The next steps are to reboot the router (if you have one) and the computer. Minor glitches may occur during operation of the OS. When you reboot, many settings are reset, eliminating various glitches. Check your firewall or antivirus. These programs are capable of automatically blocking access to resources that they deem potentially dangerous. If you are sure that the site is safe (for example, you are trying to log into your social network profile), then disable your antivirus for a while and then try to log in again.
Problems on the provider side
This is the simplest option, because the user does not need to do any action. The only way to influence the situation is by regularly calling technical support. Many providers offer proprietary software for network diagnostics, which shows the presence of a signal and outgoing/incoming traffic. If you have such software, check the functionality of the entire network using it. If there is no traffic, naturally, call the operators.
Changing DNS addresses
You should make a short excursion into the topic of the DNS server to understand the methodology for correcting the error. When a person tries to access a site, he enters its name in the search bar or simply clicks on a link from Google or Yandex. Moreover, each site on the network has a digital designation (IP addressing is used). DNS servers are used to match a site's name with its unique IP address. They store multi-line tables, where each address corresponds to an IP.
When you try to access a site, a request is made to such a server to identify a match. If for some reason the system does not receive a response, the error you are already familiar with appears. The system chooses which DNS server to contact on its own, but not always correctly. Try manual configuration, clearly specifying the desired IP.
In connection properties
You can change the DNS address through the Windows interface. To do this, follow a number of steps:
- Go to the “Network Center” through the Internet icon in the tray (lower right goal).
- Right-click on the active adapter, and then click on the “Properties” line.
- From the list, select the IPv4 line. Click on the "Properties" button. Set the option to enter addresses manually as active and write down the numbers as shown in the image.
Don't forget to confirm your actions by clicking OK. This is Google's standard DNS. It is recommended that you restart your computer after completing the steps. If the installation does not have a positive effect, try setting DNS in the router.
In the router settings
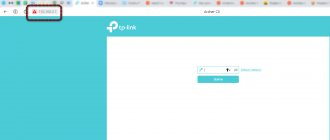
Similar to the Windows interface, the modem has a section for manually setting DNS addresses. We will provide instructions using the example of a TP-Link router:
- Go to the device’s web interface (you need to find out the router’s IP address, login and password on the label attached to the case).
- Find the “Network” section, WAN subsection. Check the box next to “Use the following DNS settings.” Enter the addresses described in the previous subparagraph.
- Click the "Save" button and restart the router.
In this case, there is no need to make settings in the OS.
Restarting the DNS Client service
In Windows, a special service is responsible for the operation of the DNS. If a server search error occurs, it is recommended to restart it. This is done in the appropriate section according to the instructions:
- Right-click on your Computer icon. Click on the “Management” line.
- Open the Services section.
- Find your DNS client in the list.
- Highlight the line and click Restart.
Make sure the service activation is set to "automatic".
Clearing the DNS cache
Many services create various temporary files - caches - during operation. Just like in the browser, the DNS can be cleared. This is done via the command line. Run it via “Run”. You need to type cmd and then press Enter. After that, to clear the DNS cache, enter the command shown in the image.
If the procedure is successful, you will see a corresponding message in the window.
Resetting TCP/IP settings
In rare cases, TCP/IP stack failures occur that affect Internet access. Windows users can perform a factory reset through the console. With Command Prompt running as administrator, run two commands in sequence:
If they were successful, restart your computer, and then try to access the required site again.
Disabling antivirus and firewall
Previously, an option was proposed to disable the antivirus or firewall. We recommend trying it, but when you disable protection, do not visit third-party or dubious resources. Built-in Windows protection will not protect your computer from infection. To deactivate the antivirus, just go to its settings and then disable all levels of protection. The image shows an example of switches for Eset Smart Security.
Disabling the standard Firewall is done through Windows settings:
- go through Start to “Control Panel”;
- find the Windows Firewall section;
- click on the line “Turn on and off...”;
- deactivate the items as shown in the picture.
If you have an antivirus, the firewall can be disabled forever.
Removing viruses
Malicious software can block access to the Internet and even extort funds. It is recommended to scan the entire system for viruses. The free Dr. utility can cope with this task. Web Cure It. You can download it on the official website of the Doctor Web antivirus developers. The software has several advantages:
- portability (does not require installation, can be used directly from a flash drive);
- conducts analysis by comparing suspicious files with a multimillion-dollar virus database;
- There is a choice of scan area (RAM, temporary or system files, a specific logical drive or the entire computer).
Be prepared that scanning large amounts of data may take a day or more. Close all applications and windows first so as not to create additional load on the system.
Checking the hosts file
Some viruses block access or replace addresses with false ones through the system hosts file. We recommend checking it for any extraneous entries. To do this, follow the path indicated in the screenshot and open the file through a text editor (use standard Notepad or another).
The standard file without third-party intervention looks like this:
If you notice other lines, remove them and then save the file.
Uninstalling recent updates
The latest versions of Windows OS regularly receive various updates that improve system stability and security. Some of them do not work correctly on certain hardware. This leads to a wide range of problems. If you know exactly which update is causing the problem, you can remove it as follows:
- Go to Windows Control Center. Click on the update log hyperlink.
- In the window that opens, click the “Uninstall updates” line.
- Select the required update and click “Delete”.
Be extremely careful, as without some updates your programs will not work. It is also strongly recommended not to erase security updates.
System Restore
The last resort when all else fails is to perform a system restore. This procedure rolls back the state of the OS to a certain number (depending on when the “restore points” were created). All settings and options will be returned to the date specified in the restore point. To start the process you need to do the following:
- Go to the recovery wizard.
- Click next until you select a point. After that, click on the one you need.
- Confirm the launch and wait until it finishes by clicking “Next” and “Finish”.
User data will not be affected, but it is recommended to make a backup copy of important documents before starting.
It is also recommended to create checkpoints regularly once a month or once a week. This is necessary so that you have a spread of time. You can create points either automatically after a specified period or manually. The user can also select logical drives for recovery. By default, this is the system drive (C), but you can add any other media to the list. Additionally, configure the amount of space available for the recovery utility. In Windows 10, it is recommended to set the slider to at least 20 gigabytes.
If the DNS server problem is not related to the provider, we recommend trying each of the methods sequentially. Even inexperienced users can follow all the instructions at home. If Internet access does not appear, we recommend calling a specialist.
- Issue:*
- Your Name:*
- Your Email:*
- Details:*
Very often people leave comments on the site, from which I take topics for new articles. Recently, a comment was left on a limited error post in Windows 10, which referred to the error “The server’s DNS address cannot be found.” The Internet disappears, sites stop opening, and an error appears in the browser stating that the DNS address could not be found. After which the Internet stops working, not a single site opens.
If you are looking for solutions for logging into blocked VKontakte, Odnoklassniki, Yandex, etc., then I advise you to use the free, built-in VPN in the Opera browser. Good, safe and working solution. Read more here: free VPN in the Opera browser. Access to closed sites.
There is such a problem, and the error itself about problems with DNS is very popular. The solutions for all versions of Windows will be the same. It doesn't matter if you have Windows 7, 8, or ten. And it doesn’t matter in which browser the error appears, and for which site. I will show the example of Windows 10. Let's try to resolve the error “This page could not be opened” or “Cannot access the site”. Typically, the main error message depends on the browser you are using.
I also advise you to read the article: Some sites do not open in the browser through the router.
DNS client
First of all, let's do the following. Restart your computer or laptop. Also, go to your router and turn it off for 2 minutes. After that, turn it on again and check the connection. If this doesn't help, move on.
- +R.
- We write: “compmgmt.msc”.
- On the left side of the menu, select “Services and Applications” and then go to “Services”. Find “DNS client” and double-click on it with the left mouse button.
- It is necessary that the “Startup type” be set to “Automatic”. Correct it, if it’s wrong, click “Apply” - “OK” and restart your computer.
What to do and how to fix the error (using Windows 10 as an example)
Let me remind you that the tips are suitable regardless of what Windows you have installed. I advise you to follow the recommendations in the same order.
Checking the “DNS Client” service
We need to check if the DNS Client service is running and restart it. To do this, right-click on the “Computer” icon (This PC), and select “Manage”. Or press the Win+R and run the command compmgmt.msc .
In the new window, select “Services” and find “DNS Client” in the list. Right-click on the service and select “Properties”.
Check if the startup status is set to “Automatic” and click Ok.
Then, right-click on the service again and select “Restart”. Restart your computer.
Resetting the DNS cache
If after restarting the service the sites do not open, try resetting the DNS cache. It's very easy to do. Launch Command Prompt. In Windows 10, simply right-click on the Start menu and select “Command Prompt (Admin).” If Windows PowerShell (administrator) is there, launch it. Or we find and launch the command line through the search.
Run the command ipconfig /flushdns .
Restart your computer and check the result.
Registering an alternative DNS from Google
This method almost always helps. By default, DNS addresses are assigned to us by our Internet service provider. And the problem may lie precisely in them. Therefore, we can register our own static DNS in the properties of our Internet connection on the computer. It's best to use Google's DNS:
8.8.8.8
8.8.4.4
They are reliable and work quite quickly. Although, local addresses can process requests faster. But you don’t even have to pay attention to this. A large number of users use DNS addresses from Google. I strongly do not recommend using any other addresses, it can even be dangerous.
Right-click on the Internet connection icon (in the notification panel), and select “Network and Sharing Center.” Go to the “Changing adapter settings” section.
Further attention! Right-click on the connection through which you are connected to the Internet and select “Properties”. If your computer is connected via Wi-Fi, then this is a Wireless network connection (in Windows 10 - Wireless network). If you just connect via a network cable, then click on “Local Area Connection” (or Ethernet in Windows 10). Also, you may have a high-speed connection, with the name of your provider.
Select the “IP version 4 (TCP/IPv4)” item and click the “Properties” button. Next, put the switch next to “Use the following DNS server addresses”, and enter the addresses, as shown in the screenshot below.
If the error “Cannot find the server's DNS address” remains, restart your computer and try opening the site again.
DNS reset
- Go to “Start” (the icon in the lower left corner), enter “CMD” in the search bar. Next, you need to right-click on “cmd.exe” and select “Run as Administrator”.
- Write down:
ipconfig/flushdns;
- Restart your computer.
- If this does not help, then open the command line again and write the commands one by one:
netsh winsock reset netsh int ip reset ipconfig /release ipconfig /renew ipconfig /flushdns
- Additionally, restart the router. It helped me once.
How to fix the problem “Cannot find the DNS Address of the server”
To resolve the DNS address issue, follow these steps:
- Reboot your computer, sometimes this works;
- Check the functionality of your browser. Try to go to other sites, ask your friends (preferably living near you) to go to the required resource, and also try to access this resource from another browser on your PC. If other sites open without problems, then the problem is not with you, but with this resource.
Usually, after some time, the site usually restores its operation (with the exception of situations where the site’s operation was stopped or blocked by administrative methods - Roskomnadzor, blocking of the provider, and so on). If other users open this site without problems, then the reason is in the local settings of your computer, and you need to follow the tips below;
- Check the functionality of the DNS Client service. Click on the Start button and type services.msc there. Find “DNS Client” in the list of services, right-click on it and click “Restart” (at the same time, check if the startup type is set to automatic);
- Reset the DNS cache. Press the Win+R key combination and enter ipconfig/flushdns there. After completing the operation, reboot your PC;
- Set up DNS settings from Google on your PC. Go to network connections (to avoid searching for a long time, click on the “Start” button, and in the search bar type ncpa.cpl and press enter), select the active connection, right-click on it, and select “Properties”. We right-click on the protocol of the fourth version, and again click on “Properties”. Select “Use the following DNS servers” and enter the details of the primary DNS server (8.8.8.8) and the alternate DNS server (8.8.4.4). We confirm our operations by clicking on “Ok”;
- Temporarily disable the antivirus and try to access the required resource; perhaps the question of what to do with the error “could not find the DNS address” will be resolved;
- Check your computer for various malware (Web CureIt!, Malware Anti-Malware and other analogues will help);
- Check the hosts file. Go to C:WindowsSystem32driversetc, open the hosts file with any text editor (Notepad will do) and check the contents. The file must either be empty or include one line 127.0.0.1 localost (all other lines must begin with a hash). If a different situation occurs, edit it as indicated in the picture.
- Reboot your router (just turn it off for 15 seconds) and then turn it on again;
- Remove recently installed updates (if any) in Add or Remove Programs (the “View installed updates” option on the left, look at the time of installation);
- Reset TCP/IP settings. Open a command prompt as an administrator and enter the following commands one by one:
netsh winsock reset netsh int ip reset ipconfig /release ipconfig /renew ipconfig /flushdns
After executing these commands, restart your PC;
- Roll back to a previous system restore point, this may help in solving the problem of how to fix the “DNS address could not be found” error.
Above, I discussed options on how to fix the DNS address could not be found problem. This problem can arise for many different reasons, and among the effective solutions, I would note resetting the DNS cache, as well as using DNS settings from Google. Try the entire range of tools I offer - one of them will definitely turn out to be the most effective for you.
Many users, when trying to access the desired site, were met with an error message stating that “DNS server not found.” If the problem is not with the provider, then you need to look for the source on your computer. Methods for solving this problem will be discussed in this material.
Can't access websites on all devices
If, in addition to your computer or laptop, you cannot access sites from your phone, tablet or other devices. This is most likely a problem either on the router’s side or on the provider’s side. First of all, call your provider and find out if they have any problems. They can also reboot the central router you are connected to and also check the connection to you.
The second option is to register the DNS addresses that we registered on the computer - on the router. To do this, you need to go to the settings of your router. The IP and DNS address that needs to be entered in the address bar are written on a label under the case.
There are a lot of router models and each has its own firmware, but I will show you using TP-Link as an example. You need to find the field where we enter DNS addresses. Usually there are two lines – there’s nothing you can do about it, you just need to search through the menu items. Next, we write down the addresses and apply the settings. Additionally, I would also restart the Internet center.
The main causes of the error
The reason for closed access to the Internet may be the user’s equipment or a malfunction at the other end of the “wire.” It is recommended to conduct an initial diagnosis to determine a plan for further action. There are several options here:
- There is no access only to a specific site. The problem is on the side of this Internet resource. We recommend waiting until the server is restored.
- All sites do not work on a personal computer and mobile devices connected via Wi-Fi. Try connecting the Internet to your PC directly, bypassing the router. If access does not appear, the problem may be with the provider. Call technical support.
- The site does not work only on a computer, but all resources can be accessed from mobile and tablet devices. Here you will have to diagnose your PC using the tips that will be discussed below.
Cleaning your computer
If you have an antivirus program, check your computer for viruses. If it is possible to update the anti-virus database, be sure to do so.
- Download and install the CCleaner program. Launch it.
- Do the cleanup in the first section first. Further in the “Register”. Now go to the “Service” – “Uninstall programs” section. You need to remove unnecessary applications from your computer, especially those that you do not use. Also look - maybe something was installed quite recently, without your knowledge.
- Next, go to “Startup”. Sort by the “Enabled” column. You also need to look and turn off unnecessary programs. Especially those that don't have a publisher.
As a final piece of advice, you can try performing a system restore to the last point. This should help. If this doesn’t help, and the error: “The server’s DNS address cannot be found” continues to appear, then most likely the problem is with the provider, and not with you. But you can ask your questions in the comments - and I will help you right away.
The server stopped responding for providers Beeline and Rostelecom
When you have tried the basic methods, but the system still displays the error message “DNS server is not responding,” it is very likely that the reason is on the provider’s side.
If the Internet is supplied to you by a large operator, this serves as a guarantee of the most coordinated work, and situations where the DNS server does not respond are rare. However, if a failure does occur, you must contact support.
Hotline numbers (for individuals) of the main providers:
- Rostelecom
- Beeline - 8 800 700 8000, for calls from mobile phones - 0611
- Home ru
In the event of an accident on the line or technical work, you will be informed of an approximate time frame for eliminating the problem.