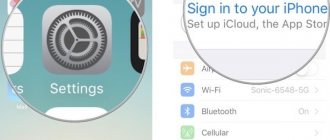
If you have an Apple device such as iPhone, iPad, iPod Touch and Mac, then you definitely know the importance of Apple ID. You can use it to access iTunes, the App Store, iCloud, FaceTime and the Apple Online Store, like a passport to all Apple services. So it will be quite troublesome if you forget Apple ID. But if this really happens to you, what should you do?
In this post, you will learn how to quickly find your Apple ID. We will also provide you with a way to help you completely remove the forgotten Apple ID from your device in order to sign up for a new one.
Forgot your Apple ID email address
- Part 1. Removing a forgotten Apple ID
- Part 2. Simple Steps to Find Apple ID Email Address
- Part 3: Frequently Asked Questions on How to Forget Your Apple ID Email Address
Instructions for setting up mail
- Open settings and select "Mail, addresses, calendars"
- Select add a new account
- Now go to the "Other" section
- And choose to create a new color entry
- A window for entering data will open. Here enter your name, full email address, password, description and click "Next"
- Save the setting
Now try logging into the Mail application and see how everything works. If you see messages, then try sending something. If everything worked out, then the mail was successfully configured.
Video: How to set up mail (Gmail, Yandex, Mail.ru, Rambler) on iPhone, ipod touch, iPad?
Adding a mailbox registered with Google (Gmail), AOL or Yahoo to your Apple gadget is not a difficult task. However, when there is a need to add an account for a Russian-language mail service - for example, Rambler
– the user of a mobile device has to rack his brain.
The difficulty lies in the fact that when setting up mail on an iPhone, it is not enough to enter your username and password - the Mail
requires you to provide information that is usually unknown to the average user. You will learn where to get such information and how to set up mail on iPhone successfully from this article.
If you are the owner of the now popular “ Google Mail”
", you can consider yourself lucky - in the iPhone, the settings of this email client are “hammered” by default, so you can do without “dancing with a tambourine.”
Adding a Google mailbox goes like this:
Step 1
.
Go to the Mail
on your gadget.
Step 2
.
Select " Google
" from the options.
Step 3
.
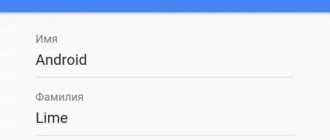
Fill in the fields “ Name
”, “
E-mail
”, “
Password
”.
Gmail
label will appear in the “ Description . You can change the text in this field yourself.
Step 4
.
After entering all the data, click “ Next
” - this will start the information verification procedure.
- After updating, iPad requires a password
Step 5
.
At the next stage, the system will offer to synchronize contacts, calendars and notes between the mobile device and the email client. Move all sliders to the active position and click “ Save
”.
After this, Google mailbox will be added to iPhone. Mail app
" will immediately notify you of an incoming letter, which indicates that Google Mail was accessed from an iOS device.
General algorithm
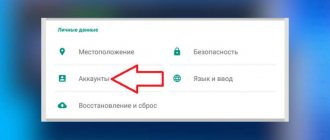
Any interaction with third-party services in the “Mail” tool built into iOS begins from the “Settings” menu, or more precisely, from the “Accounts and Passwords” section, where, firstly, information about logins and passwords saved in the system for authorization, and secondly, a special platform is available for interaction with iCloud and “electronic boxes”.
Immediately after going to the section, you need to click on the “Add account” menu item, and then you will only have to act according to the specified algorithm, depending on the service being added (mail, yandex, gmail).
Sometimes setting up a new work or corporate email takes no more than ten seconds, sometimes you will have to enter a dozen additional values, select servers and nodes, and configure protocols. Even with a strong desire, it is impossible to get lost during setup - even beginners working with the Mail tool for the first time will immediately understand all the nuances and receive a truly multifunctional, and most importantly, completely customizable platform for personal and corporate communication on the network.
What to do if you forgot your Apple ID password?
Unfortunately, it is not uncommon for a user to encounter a situation intended for an attacker. Let's imagine - you have an Apple ID, but it has been registered in all services for a long time, remembered, and you have not entered the password for it for a very long time. And then your iOS gadget caught a system glitch, and you decided to restore it, after which you caught a screen asking you to specify your Apple ID. This screen will appear regardless of whether Lost Mode is enabled or not - the main thing is that the “Find iPhone” option is active.
What to do in such a situation? There's definitely no need to panic. If this is really your Apple ID, the problem can be easily resolved. You simply go to the iForgot website. indicate your Apple ID login (aka the email you specified when registering your ID) and, following the recommendations of the service, reset the old password and set a new one. Specific recommendations depend on what level of protection you specified when creating your ID - you may only need to go to the email address to which your Apple ID is linked, but it is possible that you will also need to answer security questions or indicate a special control phone number.
How to get 3 iCloud mailboxes at once in a minute. It's free
I don't like registering on websites. Not because there is anything secret in my mail. It’s just that small and even large projects are hacked every day. Look, even Adobe was broken.
Everyone has their own reasons for not showing their real email on the Internet, but the result is the same. You either use disposable box services or get new ones every time. Both options have their drawbacks.
There is a better option if you use Apple gadgets. Right now and absolutely free, create as many as three additional mailboxes in the Apple service. You don't need to sign up for iCloud again.
The method is not only very fast, but also incredibly convenient. Because mail arriving in these mailboxes will end up in your main iCloud account . You won't miss any emails, and their senders won't know your main account address or your name. Nothing personal.
Consequences of not having a password
So, you have a gadget from Apple at your disposal. but I forgot my password. And now managing your account is problematic.
- How to verify your apple id on iPhone. About Apple ID email addresses
Account password lost
However, you will not be able to make a purchase or free download:
- Applications and games in the App Store (for iPad or iPhone) and in the Mac App Store (for desktop computers);
- Movies and music in Apple Music or iTunes Store;
- Literatures in the iBook Store.
In addition, there is now no access to your iCloud cloud storage, the password for which matches the Apple ID code. It’s also impossible to remove activation lock on an iPhone or iPad.
How can I get the account of the former owner of the device?
If your gadget has been used and you need the relevant information from the former owner, you can try to do this. Go to the AppStore or iCloud and follow the steps already described earlier. But this is only possible if the information has not been previously deleted by the owner. Otherwise, you will need to contact directly the person who sold or gave you this device, asking you to disable the feature called “Find iPhone” and thus unlink your account.
If the previous owner used this option, then the smartphone, unfortunately, is blocked, and you do not have the opportunity to activate the device under your own account.
Find out Apple ID
It is very difficult to forget your Apple ID, since it is exactly the same as the user’s email account. Therefore, the easiest way to find out your Apple iD is to remember your email address. If for some reason you cannot remember the address of your mailbox, pick up your iPad/iPhone and go to iCloud settings - this is where you will see the name of your account .
How else can you find out your Apple ID? Another easy way is to look at the AppStore. We launch the application, go down to the very bottom and see your identifier here. If you have already deleted your account from the device, it is quite possible that data about it remains in the iTunes program - launch the program, go to the “iTunes Store” section and look for the Apple ID in the upper right corner.
In the same way, you can spy on the Apple ID in already installed programs by using the “My Programs” item in iTunes - call up information about any application, where you will see the name and login of the buyer.
Deleting emails from the server
Until recently (on iOS version 7+), Apple developers made it possible to transfer to an archive any messages appearing on Mail, both on a smartphone or tablet, and directly on the mail service’s servers. After iOS 10, the situation has changed - from now on, users can only choose where exactly to transfer old and unused messages - either to the trash bin or to the archive. This parameter is configured in the “Accounts and Passwords” section in the settings of the selected service.
Immediately after going to the “Additional” menu, in the “Destination for moving unnecessary messages” item, select “Deleted”. Then, within a few weeks (or a month), the trash can will be cleared of accumulated garbage.
How to adjust email on iPhone?
The Apple device leaves the opportunity to customize email to suit the user's needs. It’s easy to find out what options are available to the owner of an iPhone by following the “ Settings”
" - "
Mail, addresses, calendars
" and clicking on the name of the mailbox.
- How to delete an account on iPhone X(s/r)/8/7/6 and change to a new one
At the very bottom of the “ Account”
“There will be a subsection “
Additional
” - you need to go there.
In the " Advanced"
"There are the following mail settings blocks:
Box behavior
.
Through the “ Mailbox Behavior
” block, the correspondence between mailboxes on the iPhone and on the server is configured.
For example, with this configuration, which is shown in the figure below, emails sent to the Trash
from the iPhone will be saved in the
Outbox
on the server.
Where to move unwanted messages
.
Archive mailbox
in this block and not “
Deleted items
”, emails erased via iPhone will be transferred to the archive on the server -
just in case
.
Deleted messages
.
In this block you can set after what period of time letters from the mailbox will be permanently
.
There is an option “ Never
” - for the most cautious users.
Setting up inbox
. This block contains several parameters:
- Use SSL
. If the slider is activated, emails are sent over a secure channel - as a result, you don’t have to worry about confidentiality. - Authentication
.
You can configure the iPhone so that the user is authorized by mail not by entering a username and password, but in other ways - say, through an MD5 Challenge response. It’s better not to mess with the authentication settings: entering a password is the easiest way to access your email. - S/Mime.
S/Mime
option allows you to send encrypted messages.
Let’s note right away: to use S/Mime
, you need to have a digital certificate.
There is no need to change anything in the “IMAP Path Prefix” and “Server Port” fields. The first field does not need to be filled in at all; the second field is filled in automatically when the user adds a mailbox.
How to sign out of mail on iPhone?
You need to delete your account from iPhone as follows:
Step 1
.
Go to “ Settings
” and find the “
Mail, addresses, calendars
” section.
Step 2
.
In the “ Accounts
” block, find the mailbox you want to erase and click on it.
Step 3
.
On the next screen, click the “ Delete Account
” button.
Step 4
.
Confirm your intention to erase your account - click on “ Delete from iPhone
”.
When you delete your account from your mobile device, all information that was synchronized with your account will also be lost. Therefore, before erasing your account, make sure to transfer valuable information to a reliable medium.
What to do if you forgot your Apple ID password - Practical tips
Users of iPhones, iPads, MacBooks and Macs can sometimes encounter the following problem - they forgot their Apple ID password, and there are no recovery options.
This happens due to a special security policy that requires you to come up with a complex account access code - consisting of upper and lower case letters, numbers and other symbols.
It is quite easy to forget, which leads to the need to immediately solve the problem.
If the situation is even more problematic - the user has forgotten his Apple ID login and password, and now cannot even find out his account number. The issue for a mobile device is resolved simply - by going to the iCloud, App Store or iTunes settings.
There you can see the email address specified when registering your Apple ID. Now that the e-mail (which is also the account identifier) is known, you can proceed to one of the ways to recover your password.
has provided three options for users on how to regain control of their “account”.
Mail apps on iPhone
The App Store, Apple's official app and entertainment store, is bursting with feature-rich email clients that make it easier to work with any email account. But, if you really choose the best mail application, then you should focus on three options:
- . Smart sorting of letters, and integration of third-party services (for example, developers allow phone numbers to be immediately saved to the address book, and dates to be transferred to the calendar), amazing optimization and support for the gesture system, as well as drafts, platforms for quick replies and history, where you can save an entire library. If the classic “Mail” has long been boring and changes are needed, then myMail is the best option;
- . And although there are no problems with authorizing a Google email account in iOS, the third-party application, Gmail, from a functional point of view, looks richer and more convenient than what the guys from Apple came up with. Everything here is of the highest standard - quickly, clearly, with gestures and integration. And you don’t have to worry about quick updates for new iPhones and iPads - Google always keeps an eye on new products;
- . Surprisingly, the domestic service copes with all its responsibilities perfectly - it has the same user-friendly interface as its competitors, the same ability to quickly transfer any data to third-party applications. There were even interesting additional technologies - like password-protected addresses and a schedule for sending letters throughout the day. The only thing that spoils the atmosphere is advertising that appears at a completely inconvenient time.
Additionally, it is worth noting the following clients - (interaction with other services of the famous search engine is perfectly configured - here you can search for hotels, call a taxi, and the ability to attach an account directly from your wallet), (simple, but tasteful), (very beautiful, but when working with multiple accounts you will have to pay at once).
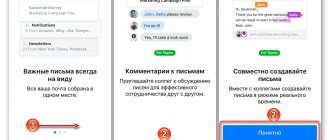
It's very easy and convenient to read and send emails through the built-in application on your iPhone. This way you can always see the important letters that have come to you and easily write a response to them. But this method still has a disadvantage: you cannot send photos from it. To use the built-in mail, you do not need to install any applications on your smartphone, but you will have to tinker a little with the settings for normal operation.
Yandex.ru is considered one of the popular email services among Internet users, so in this article I will try to describe this process in detail. For other email clients the principle is no different.
How to find out your Apple ID password
We already know how to find out Apple ID. But how can you remember the password for your account? To do this, we can offer three solutions at once:
- Sending a request to Apple involves a long wait and the need to confirm that the device was legally purchased;
- Recover your password by answering security questions - these questions are asked during account registration. Answer the questions and you can set a different password;
- Recover your password by email – request a password recovery, follow the link in the received email and set a new password to replace the old one.
The last two solutions are the simplest - they do not require a long wait .
The email address you use with your Apple ID
Your Apple ID uses email addresses to sign in to your account with Apple. With your Apple ID, you can access services like the App Store, Apple Music, iCloud, iMessage, Facetime and more. We use email addresses to send you information about your account, and to help friends and family communicate and share with you.
Apple Email ID This is the email address you use with your password when signing in to any Apple service. This is also the primary email address for your account.
Additional Email Address Add additional email addresses to your account to help people find you on Apple services like FaceTime and iMessage, and find my friends.
Rescue Email Address You have the option to add a rescue email address to your account for greater security. You can see it when you sign in to your Apple ID account.
Before you can use your new or updated Apple ID, we'll send you a verification email to verify that the email address is yours.
Apple Email ID
When you create an Apple ID, you enter an email address. This address is your Apple ID and the username you use to sign in to Apple services like iTunes and iCloud. This is also the contact email address for your account. Be sure to check your email address regularly. We'll send you email notifications to help you manage your account and make the most of your Apple ID.
Follow these steps to change your Apple ID.
Additional email addresses
Many of us have more than one email address for friends and family to reach us. Add the email address you usually use to your Apple ID, so users can easily find and chat with you on Apple services like FaceTime and iMessage, and find friends.
To add an additional email address, follow these steps:
- Sign in to your Apple ID account.
- Click the Change button in the Account section.
- Under can be reached at, select Add more.
- Enter an additional email address and we will send checks to that address. Did not get the email?
- Enter the verification code and click the Verify button.
Make sure you enter an email address that you no longer use as your Apple ID. If you want to remove one of the additional email addresses, click the button next to the address.
Rescue email address
Having a rescue email address is not required, but is recommended. If you forget your security questions, you can use your rescue email address to reset them. We also send any account security-related notifications to your assistance by email.
Follow these steps to add or change your rescue email address:
- Sign in to your Apple ID account.
- Click the Edit button in the Security section. You may be asked to answer one or more security questions before proceeding.
- If you would like to add a rescue email address:
- Under Rescue Email, click Add Email Address, then enter your Rescue Email address. We will send a confirmation to this address. Did not get the email?
- Enter the verification code and click the Verify button.
- If you want to change your rescue email address:
- Select Change email address to the address you want to change, and then enter the new address. We will send a confirmation to this address. Did not get the email?
- Enter the verification code and click the Verify button.
- If you want to remove the rescue email address, click the button next to the address.
If you use two-step verification, or two-factor authentication, you have a notification email address, not a rescue email address. With two-factor authentication and two-step verification, no rescue address is required. If you have a rescue email address when you upgraded to two-factor authentication or two-step verification, you can also use these steps to change your notification email address. If you delete an email notification, you won't be able to add a new one.
Looking for mail on the computer
Autofill forms in the browser
Searches usually begin from the place where the loss left the most traces. For email, this is the browser you use most often. To check if the email you need is in the saved data of Google Chrome, Mozilla Firefox or Opera, do the following:
- Click on the authorization form field (the place where you enter your login) on any site where you could be registered using the email you are interested in. If the data is saved, the browser will display the email address.
- If you remember the first few characters of the email you are interested in, start entering it in the “Login” or “Email” field. If the browser has saved the address in the cache, it will be displayed in full.
By the way, in addition to email, you can view all saved passwords from web resources in your browser settings. Let's figure out how to do this using Google Chrome, Opera, Firefox and Edge as an example.
Google Chrome
To open the authorization data tab on sites, enter the instruction chrome://settings/passwords into the address bar of your browser. Or do the following:
- Enter the browser menu by clicking on the vertical ellipsis in the upper right corner.
- Go to settings.
- In the settings window, select “Autofill” from the menu on the left.
- Select the "Passwords" section.
- Find the email you need in the “Username” column. Here you can also see passwords if you click on the icon with the image of an eye.
Opera
In the Opera browser, you can also go to the page with authorization data through the address bar by entering the request: opera://settings/passwords.
To get to the same section through the menu, do the following:
- Click on the “O” logo icon in the upper left corner.
- In the menu that appears, select “Settings”.
- Scroll down to the AutoFill section and select Passwords. It contains email addresses for authorization on sites.
Mozilla Firefox
In my opinion, the section with saved e-mails in Mozilla is not located in the most convenient place. To avoid getting lost in its cumbersome menus, I recommend using the address bar and the command: about:logins.
And for those who are not looking for simple solutions, I will provide instructions on how to find logins and passwords through the settings:
- Open the browser menu by clicking on the three horizontal lines at the top right.
- Go to the "Settings" section.
- Select Privacy & Security.
- Scroll down the page until you see the “Logins and Passwords” section. Click on the “Saved Logins” button.
EDGE
You can also go to the page with authorization data in Microsoft Edge through the address bar by requesting edge://settings/passwords. And to get there through the menu, you only need to take two steps:
- Go to settings.
- In the new window, select the “Passwords” section.
Remember safety! If other people have access to the computer, it is not safe to save authorization data in browsers. Any user with administrator rights can easily see all your logins and passwords. It is even more dangerous to have the same password for all websites, email and social media accounts.
In the profile on the email site
Another way to find out your mail is to look at it on the mail service itself.
When you are logged in to the account you are looking for
It's simple here - your email address is written somewhere in a visible place.
Gmail mailbox
Click on your avatar icon in the top right (if an avatar is not selected, there will be a letter in a colored circle instead).
The Chrome browser stores every Google account with an email address that you've ever used on it. Even those for which authorization has not been completed
Mail.ru
Everything is even simpler here: your email is listed on the main screen.
If you expand the list by clicking on the triangle next to the address, you will also see all the accounts created on this resource.
Yandex Mail
To find out your email address on Yandex, you need to click on the image of your avatar on the main page (the principle is the same as in Gmail).
After clicking, a window will appear with detailed information, including the email addresses of all your accounts on Yandex services.
When authorization fails
In this case, you can use hints when autofilling forms. The method works on any email service. Let's look at it using Mail.ru as an example:
- While on the mail service page, click the “Add mailbox” button.
- In the window that appears, start entering the first characters of the forgotten address. If you don’t remember it even approximately, then press all the letters and symbols sequentially. If you have logged into this email account at least once, the address will definitely appear (except in cases of preliminary clearing of browser data or reinstallation).
On other sites
You can also find your email on various sites where you used it when registering. Large resources, such as social networks, usually hide its full writing. But to refresh your memory, sometimes a piece of information is enough.
Let's look at how to find out an email address using VKontakte as an example:
- Expand the drop-down list on the social network page by clicking on the icon with a thumbnail of your photo.
- Select "Settings".
- In the settings you will see the half-hidden email address you used to register.
Unlike social networks, forums and smaller sites rarely blur or shorten registration information. If you are a user of such resources, it is quite possible that you still have authorization there. And if you are lucky enough to enter your account settings, you will find your email address there (in the screenshot I myself blurred out the address, in the original it is completely visible).
What should I do to avoid forgetting my password?
Trying to remember a new password for your iPhone 4s, 5s or 6s Plus, so as not to forget it the same way as a lost one, will become easier if you use the following technique:
- A simple word is selected first (eg Mac)
- Using the word "Mac" a more or less complex combination is created - for example, MAC2olya or OLYA2mac.
Nothing difficult to remember - but:
- Firstly , it is quite difficult to select;
- Secondly, it’s easy to enter from the keyboard on an iPhone;
- Thirdly , it fully complies with Apple security requirements (capital and small letters, numbers).
How to recover your Apple ID password
It also happens that you forgot your Apple ID password or completely forgot your password. This is where Apple's service comes to our aid.
' data-post_id=»50987″ data-user_id=»0″ data-is_need_logged=»0″ data-lang=»en» data-decom_comment_single_translate=» comment» data-decom_comment_twice_translate=» comment» data-decom_comment_plural_translate=» comments» data-multiple_vote=”1″ data-text_lang_comment_deleted=’Comment deleted’ data-text_lang_edited=”Edited in” data-text_lang_delete=”Delete” data-text_lang_not_zero=”The field is not NULL” data-text_lang_required=”This field is required.” data-text_lang_checked=”Check one of the boxes” data-text_lang_completed=”Operation completed” data-text_lang_items_deleted=”Objects have been deleted” data-text_lang_close=”Close” data-text_lang_loading=”Loading. ">
Add a comment
Sorry, you must be logged in to comment.
How to set up Yandex.Mail or another Russian-language email service?
Adding Yandex.Mail is easier than other Russian-language service. The setup is performed as follows:
Step 1
.
Go to “ Mail
” and click on the “
Other
” option.
Step 2
.
Proceed to the “ New Account
” section.
Step 3
.
Fill out the same fields as when installing Gmail
.
Step 4
.
Set up synchronization of mail and notes - activate two toggle switches. Then click " Save
".
There is no need to specify anything else - the Yandex mailbox will be added.
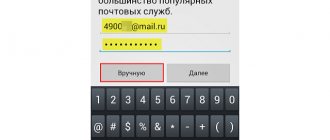
With Rambler
and
Mail.ru
everything is more complicated: after filling out the required fields, the “
Mail
” application asks you to provide data on the mail servers.
Where can you get such information?
How to find out your mail settings through the Apple website?
Get information about servers for Mail.ru
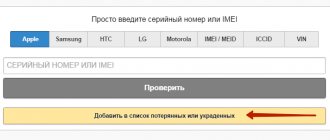
You can use the service on the official Apple website.
The service is called “ Mail Settings Lookup
” and is located at https://www.apple.com/ru/support/mail-settings-lookup/.
All that is required from the user is to “drive” the email address into the (only) field and press the blue arrow button.
Please note the note in small print below. According to this note, Apple may use the data users provide to it to improve the experience. This essentially means that the email address you enter will be saved in the company's database.
After a second of waiting, the service will display all the client data.
Which data is actually useful?
- In the “ Incoming mail server
” block, in the “
Node name
” field, you need to transfer the server host name (
imap.mail.ru
).
In the “ Username
” field you should enter your email address – again.
The password must be re-entered - this is an important point. - In the “ Outgoing mail server
” block, you can fill in only one field – “
Node name
”.
You should copy the server hostname here ( smtp.mail.ru
). The remaining fields do not need to be filled in.
When you have completed the server settings, click Next
"
At the final stage, you need to switch the toggle switches to synchronize notes and mail and click on “ Save
”.
The described method will give results if you are setting up a Mail.ru mailbox - but with Rambler it is more difficult.
The “
Search Mail Settings
” service on the Apple website will not show information about Rambler Mail servers.
When setting up Rambler
you need to do this:
- In the “ Incoming mail server
” block, in the “
Node name
” field, you should enter
pop.rambler.ru
, in the “
User name
” and “
Password
” fields - respectively, the email address and password for it. - In the “ Outgoing mail server
” block, in the “
Node name
” field, you need to enter
smtp.rambler.ru
. Other fields in this block can be left blank.
What to do if you forgot the email associated with your Apple ID?
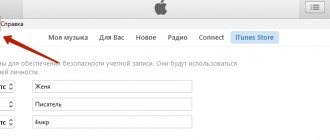
In general, there is nothing complicated in the password reset procedure. But, if you don’t remember the email to which your Apple ID is linked, that’s a completely different story. However, there are ways of salvation in this situation. We mentioned just above that the email to which you link your Apple ID automatically becomes the ID login. This means that if we find out the login, we will also know the mail, and there are not so few places where it is indicated. If you have performed a recovery and you just see a screen asking you to provide an Apple ID, you can view your login in iTunes, to do this:
- Launch iTunes, click “Applications”, then “My Programs”.
- Right-click on any program and select “Information” in the window that appears.
- Open the “File” section and in the “Buyer” column you will see your name and ID.
If you have access to the phone menu, then everything is much simpler; you can look up the Apple ID in a bunch of places, for example, in the App Store, podcasts, the iCloud menu, FaceTime, iMessage, etc.
If standard methods don't work
What should you do if you didn’t specify a backup email in your profile, forgot the answers to questions, and your ID mailbox is blocked? This is an exceptional case, but, as practice shows, such situations are not so rare. A simple example: an Apple ID was created by a seller or another person, but he forgot to tell the owner the password or email. In this case, it will not be possible to restore access using standard methods.
Password recovery will have to be carried out with the participation of the support service. The operator must provide the serial number of the device, as well as provide a receipt for the purchase of a smartphone or tablet. In response, the operator will provide the Apple ID and password.
Two-step verification
If you enabled two-step verification when setting up your Apple ID, use it to restore access to your mail.
- Enter the code generated when you enabled two-factor authentication.
- Select the second device to receive a recovery code.
- Enter the sent code on the first device.
Two-factor authentication is a scary thing. If you turned it on and then forgot the code or lost your trusted device, even the support service will not help you restore access.