MTS Connect Manager is required to connect to the Internet via a computer or laptop. Without them, using modems will be pointless, since a connection to the network will not be established. But the speed of development of modern technologies is so high that without timely updating of the program, visiting your favorite sites and portals will become difficult. Therefore, users should know how software is installed on a computer and what is needed to regularly update the utility. Without this, counting on a constant, stable connection is useless. At the same time, subscribers should remember that not a single difficulty will leave them without high-quality communication. And if serious difficulties arise, they can always turn to the hotline operators for help.
MTS Connect Manager
Program description
mts manager will install the entire set of drivers on your computer, and you can access the Internet using a modem or phone with one click.
Automatically configures MTS Connect (3G) services from MTS, Mobile GPRS-Internet, Hyper.NET, HyperActive.
For work, you are provided with a convenient and personal menu.
You will be able to see the entire report on traffic consumption and connection speed.
You have access to information on the amount of information transmitted and received.
MTS Connect Manager displays the average reception and transmission speed.
With the help of the manager, you can receive and send SMS messages directly from your computer via a connected USB modem or mobile phone.
The program displays signal strength, network coverage, battery charge and network name if you are roaming.
To install MTS Connect Manager you will need-
1) Computer, laptop, netbook or tablet device.
2) Phone or 3G usb modem.
3) MTS SIM card with an activated Internet tariff.
How to update MTS connection manager?
If you want and need to update the installed software, you should use the simplest approach:
- you need to open a page with the program on the official website of the telephone company;
- find a suitable modem model in the list provided;
- see if there is a file with updates (it is in the third column);
- download the utility;
- install it following the recommendations and instructions of the system.
If the described approach is not possible, you should use a simple one. It will require downloading the program and deleting the existing manager. After that, all that remains is to install it again, following the above tips.
Connection procedure
1) Install MTS Connect Manager on your computer, laptop, netbook or tablet device.
2) Connect a 3G usb modem or mobile phone to a computer (or other device) using Bluetooth, infrared connection or cable.
3) Launch Connect Manager. In the case of a singing installation, the program will independently find the modem and install the necessary drivers that are needed to connect the device to the Internet.
4) Select from the list of services - MTS, Mobile GPRS-Internet, Hyper.NET, HyperActive - required for you and connect.
Manual tuning if automatic tuning does not work correctly.
For proper self-configuration, you need to do the following −
1)Connect your mobile phone to your computer using a special cable, via an infrared port or a Bluetooth connection
2) Configure the computer settings in accordance with the operating system of your computer
How to install MTS connection manager on a laptop and PC?
To install connect manager MTS, you will need:
- download the file to install the software;
- start the utility installation process;
- select the folder where you want to install the program and specify the path to the desired location on the PC;
- wait for the process to complete without interrupting or stopping it;
- start using the Internet.
For correct installation, it is recommended to first disable all active processes. This will avoid complications, conflicts and blocking of individual functions.
It is important to emphasize that the software file must be downloaded from the official MTS portal. Downloading it from third-party sources may harm your computer or cause the program to not work correctly. And on the official website there is a guaranteed working utility with all the required updates.
Windows 7 Settings
How to install a modem correctly
When connecting via infrared:
Turn on the infrared port on your phone. Place the phone's infrared port opposite the computer's infrared port at a distance of no more than 10 cm. Wait until the infrared communication icon appears in the lower right corner of the monitor - the connection is established. A message will appear at the bottom of the screen: “Installing device driver software.” Once the driver installation is complete, the following message will appear: “The standard modem via infrared connection is installed.” Proceed to setting up the modem.
When connecting using a PCMCIA card:
Install the software for the PCMCIA card. Insert the PCMCIA card into the special “slot” on the computer. A message will appear at the bottom of the screen: “Installing device driver software.” Wait for the message: “Standard modem installed.” Proceed to setting up the modem.
When connecting via a USB cable, the modem must be installed manually:
Connect your phone and computer using a cable. Open on your computer: Start -> Control Panel -> Phone and Modem. In the window that opens, select the “Modems” tab and click the “Add...” button. In the "Found New Hardware Wizard" window, click "Next". In the “Modem Installation” window, click “Install from disk” and select from which disk (from which folder) your modem will be installed. Specify the path to the modem driver by selecting “Browse” and specifying the folder in which the modem driver is located. Select the required modem and begin setting up the modem.
When connecting via Bluetooth, the modem must be installed manually:
If the Bluetooth modem is built-in and the initial Bluetooth settings have been made, then you need to: turn on Bluetooth in your phone; through the Bluetooth settings installation wizard, search for the necessary equipment (phone); after the equipment is found, you must select it and enter confirmation codes for further installation. To do this, enter the same combination of numbers on the computer and phone (for example: 1234); After connecting your phone and computer, select Start -> Control Panel -> Phone and Modem. The modem will be detected automatically and you can begin setting up the modem. If you are using a Bluetooth adapter to connect (or the built-in modem is not configured), then you must first install the Bluetooth software (from the disk). Next you will need to: connect the Bluetooth adapter to the USB connector and, if necessary, continue setting the parameters. Turn on Bluetooth on your phone. through the Bluetooth settings installation wizard, search for the necessary equipment (phone); after the equipment is found, you must select it and enter confirmation codes for further installation. To do this, enter the same combination of numbers on the computer and phone (for example: 1234); After connecting your phone and computer, select Start -> Control Panel -> Phone and Modem. The modem will be detected automatically and you can begin setting up the modem
How to set up a modem
Before setting up the modem, make sure that the phone is connected to the computer. Open on your computer: Start -> Settings -> Control Panel -> Phone and Modem In the window that appears, select the “Modems” tab (If the “Phone and Modem” section is opened for the first time, the “Location Information” window may appear. You must enter “Telephone area code" - 495, and select "Dialing type" - tone dialing. Click "OK") Select your installed modem and click the "Properties" button In the "Modem Properties" window, on the "General" tab, click the "Change defaults" button Next select the “Advanced communication parameters” tab. In the “Additional initialization commands” field, enter the modem initialization line: AT+CGDCONT=1,”IP,”,”internet.mts.ru” Attention! You must enter all characters without spaces Click “OK” - the modem is configured, proceed to setting up the connection
How to set up a connection
Before setting up the connection, make sure that the phone is connected to the computer. Open on your computer: Start -> Network -> “Network and Sharing Center” -> “Set up a connection or network” -> “Telephone connection settings Connecting to the Internet via the telephone network” In the “Telephone connection setup” window, specify the modem through which connection will be made: In the window that opens, enter: name of the new connection: MTS GPRS phone number: if you have a phone brand: SonyEricsson, Motorola, Pantech, Nokia, LG: *99# if you have a phone brand: Alcatel, Siemens, Panasonic: *99***1# if you have a Samsung phone: *99**1*1# Attention! You must enter all characters without spaces user name: mts password: mts password confirmation: mts Click “Connect” - the connection progress will be displayed. If the connection is successful, the “Internet connection is ready for use” window appears. Close this window. You can start browsing the Internet.
For additional connection settings
Open on your computer: “Start” -> “Control Panel” -> “Network and Sharing Center” -> “Change adapter settings” Select the MTS GPRS connection you created earlier, click on “Properties”. In the “General” tab, disable “Use dialing rules”. Select the “Network” tab and make sure that in the list of “Components used by this connection” only “Internet Protocol (TCP/IP)” and “QoS Packet Scheduler” are selected. Select Internet Protocol (TCP/IP) and click Properties. In the window that opens, check: obtain an IP address automatically; get the DNS server address automatically. Click the “Advanced…” button, and in the new window: check the box “Use the default gateway for the remote network”; disable the “Use IP header compression” option. Click “OK” - the connection has been created, try to access the Internet
How to get online
Connect your phone to your computer Open on your computer: Start -> “Control Panel” -> “Network and Sharing Center”, then click “Connect to a network”. Select the created connection and click the "Connection" button.
Installation to the router
Wi-Fi routers were originally designed to connect to the Internet. However, it is far from possible to supply power via USB from cellular providers. First, study the characteristics of your device to understand whether you can connect a modem to it.
Next we follow the algorithm:
- connect the gadget via USB to a special port;
- In the browser line on the laptop, enter “192.168.0.1” without quotes;
- install drivers in the menu that opens;
- connect to the 4G LTE network;
- configure a new internet access point with the following parameters: phone number *99#, name and address write “internet.mts.ru”;
- establish an automatic connection to the network;
- save;
- update the system.
Windows Vista Settings
How to install a modem correctly
When connecting via infrared: Turn on the infrared port on your phone Place the infrared port of the phone opposite the infrared port of the computer at a distance of no more than 10 cm Wait for the infrared communication icon to appear in the lower right corner of the monitor - the connection is established A message will appear at the bottom of the screen: “Installation device driver software." Once the driver installation is complete, the following message will appear: “The standard modem via infrared connection is installed.” Proceed with setting up the modem
When connecting using a PCMCIA card:
Install the software for the PCMCIA card Insert the PCMCIA card into the special “slot” of the computer. A message will appear at the bottom of the screen: “Installing device driver software.” Wait for the message: “The standard modem is installed.” Proceed to configure the modem
When connecting via a USB cable, the modem must be installed manually:
Connect the phone and computer using a cable Open on the computer: Start -> Control Panel -> Phone and Modem In the window that opens, select the “Modems” tab and click the “Add ...” button in the “Found New Hardware Wizard” window and click “Next” In the “Modem Installation” window, click “Install from disk” and select from which disk (from which folder) your modem will be installed. Specify the path to the modem driver, to do this, select “Browse” and indicate the folder in which the modem driver is located. Select the required modem and start setting up the modem
When connecting via Bluetooth, the modem must be installed manually:
1. If the Bluetooth modem is built-in and the initial Bluetooth settings have been made, then you must: a) turn on Bluetooth in your phone;
b) through the Bluetooth settings installation wizard, search for the necessary equipment (phone);
c) after the equipment is found, you must select it and enter confirmation codes for further installation. To do this, enter the same combination of numbers on the computer and phone (for example: 1234);
d) after connecting the phone and computer, select Start -> Control Panel -> Phone and Modem. The modem will be detected automatically and you can begin setting up the modem
2. If you use a Bluetooth adapter to connect (or the built-in modem is not configured), then you must first install the software for Bluetooth (from the disk). Next you will need:
a) connect the Bluetooth adapter to the USB connector and, if necessary, continue setting the parameters. Turn on Bluetooth on your phone.
b) through the Bluetooth settings installation wizard, search for the necessary equipment (phone);
c) after the equipment is found, you must select it and enter confirmation codes for further installation. To do this, enter the same combination of numbers on the computer and phone (for example: 1234);
d) after connecting the phone and computer, select Start -> Control Panel -> Phone and Modem. The modem will be detected automatically and you can begin setting up the modem
How to set up a modem
Before setting up the modem, make sure that the phone is connected to the computer. Open on your computer: Start -> Settings -> Control Panel -> Phone and Modem In the window that appears, select the “Modems” tab (If the “Phone and Modem” section is opened for the first time, the “Location Information” window may appear. You must enter “Telephone area code" - 495, and select "Dialing type" - tone dialing. Click "Ok") Select your installed modem and click the "Properties" button In the "Modem Properties" window, on the "General" tab, click the "Change parameters" button Next select the “Advanced communication parameters” tab. In the “Additional initialization commands” field, enter the modem initialization line:
AT+CGDCONT=1,"IP","internet.mts.ru"
Attention! You must enter all characters without spaces 7. Click “OK” - the modem is configured, proceed to setting up the connection
How to set up a connection
Before setting up the connection, make sure that the phone is connected to the computer. Open on your computer: Start -> Network -> “Network and Sharing Center” -> “Set up a connection or network” -> “Telephone connection settings Connecting to the Internet via the telephone network” In the “Telephone connection setup” window, specify the modem through which connection will be made: In the window that opens, enter: name of the new connection: MTS GPRS phone number: if you have a phone brand: SonyEricsson, Motorola, Pantech, Nokia, LG: *99# if you have a phone brand: Alcatel, Siemens, Panasonic: *99***1# if you have a Samsung phone: *99**1*1#
Attention! You must enter all characters without spaces
username: mts password: mts password confirmation: mts Click “Connect” - the connection progress will be displayed. If the connection is successful, you are prompted to start browsing the Internet. To do this, in the “Network Location Settings” window, you must select the location for the “MTS-GPRS” network (optional) For additional connection settings Open on your computer: “Start” -> “Network” -> “Network and Sharing Center” Select previously created MTS GPRS connection, click on “Properties” In the “General” tab, disable “Use dialing rules” Select the “Network” tab and check that: in the list of “Components used by this connection” only: “Internet Protocol (TCP/ IP)" and "QoS Packet Scheduler" Select "Internet Protocol (TCP/IP)" and click "Properties" In the window that opens, check: Obtain an IP address automatically Obtain a DNS server address automatically Click the "Advanced..." button, and in the new window: check the box “Use default gateway for remote network”, disable the option “Use IP header compression” Click “OK” - the connection is created, try to access the Internet
How to get online
Connect your phone to your computer Open on your computer: Start -> Connections -> Control Panel -> MTS GPRS
Unlocking programs
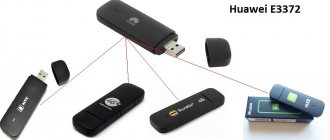
Changing the firmware for the 827f MTS modem requires thorough preparation. First of all, figure out what type you will have to deal with.
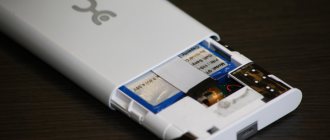
The MTS modem has two variations: E3372h and E3372s. The difference is not only in the letters - the flashing schemes are different.
Finding out which model is easy. Open the cover of the device, look where the S/N item begins. G4P – you have h, L8F – s.
Now about the programs. To reflash a type h device with firmware version 2X.180, you will need to install Huawei Terminal or a special code calculator for later versions. For type s you will also need a Terminal, DC Unlocker, and also a PC-UI Interface package. Now more details.
Windows XP Settings
How to install a modem correctly
When connecting via an infrared port: Turn on the infrared port on your phone Place the phone's infrared port opposite the computer's infrared port at a distance of no more than 10 cm Wait for the infrared communication icon to appear in the lower right corner of the monitor - the connection is established. Then a window with the name of the phone appears - The modem is installed. Start setting up the modem.
When connecting using a PCMCIA card:
Insert the SIM card into a special “slot” on the computer Wait for the message about the successful installation of the “Standard PCMCIA modem” to appear Proceed with setting up the modem
When connecting via cable or Bluetooth, the modem must be installed manually:
Connect your phone and computer using a cable or turn on Bluetooth on your phone Open on your computer: Start -> Settings -> Control Panel -> Phone and Modem In the window that opens, select the “Modems” tab and click the “Add ...” button In the “Found New Hardware Wizard” window » about and click “Next” In the “Modem Installation” window, click “Install from disk” and select from which disk (from which folder) your modem will be installed In the next window, select the desired modem (your phone model) and click “Next” Specify on which port to install the modem (for example, COM 1), click “Next” After a warning about the incompatibility of the operating system and modem, click “Continue Anyway” Wait for the message “Modem installed successfully” to appear, click “Finish” and proceed to setting up the modem
How to set up a modem
Before setting up the modem, make sure that the phone is connected to the computer. Open on your computer: Start -> Settings -> Control Panel -> Phone and Modem In the window that appears, select the “Modems” tab Select your installed modem and click the “Properties” button In the “Modem Properties” window, select the “Advanced communication settings” tab In the field “Additional initialization commands” enter the modem initialization line: AT+CGDCONT=1,”IP”,”internet.mts.ru” Attention! You must enter all characters without spaces Click “OK” - the modem is configured, proceed to setting up the connection
How to set up a connection
Before setting up the connection, make sure that the phone is connected to the computer. Open on your computer: Start -> Settings -> Control Panel -> Network Connections Select “Create a new connection” - the “New Network Connection Wizard” will open, click “Next” O and click “Next” Select “Set up a connection manually” and click “ Next" In the window that opens, about and click "Next" From the list, select your installed modem and click "Next" In the window that opens, enter: the name of the new connection: MTS GPRS phone number: if you have a phone brand: Ericsson, SonyEricsson, Motorola, Pantech, Nokia, LG: *99# if you have a phone brand: Alcatel, Siemens, Panasonic: *99***1# if you have a phone brand: Samsung: *99**1*1#
Attention! You must enter all characters without spaces user name: mts password: mts password confirmation: mts
8. Click "Next" and then the "Finish" button
9. Open on your computer: Start -> Settings -> Control Panel -> Network Connections -> MTSGPRS
10. In the “Connect to MTSGPRS” window, click the “Properties” button
11. In the “General” tab, disable “Use dialing rules”
12. Select the “Network” tab and check that: in the “Type of remote access server to be connected” line the following is selected: “PPP: Windows 95/98/NT4/2000, Internet” in the list of “Components used by this connection” only: "Internet Protocol (TCP/IP)" and "QoS Packet Scheduler"
13. Select "Internet Protocol (TCP/IP)" and click "Properties"
14. In the window that opens, check: Obtain an IP address automatically Obtain DNS server address automatically
15. Click the “Advanced…” button, and in the new window: check the box “Use the default gateway for the remote network” and disable the option “Use IP header compression”
16. Click “OK” - the connection is created, try to access the Internet How to access the Internet Connect your phone to your computer Open on your computer: Start -> Settings -> Control Panel -> Network connections -> MTSGPRS In the “Connect to MTSGPRS” window, click the button “Call” Wait until the “two computers” icon appears on the taskbar - the connection is established. If you want to end the connection, right-click on the "two computers" icon and select "Disconnect". Recommendations for configuring Windows XP to work on a 3G network
MTS recommends creating a backup copy of the registry before making any changes to it.
To optimize data transfer speeds on a 3G network, it is recommended to configure the 'TCPWindowSize' parameter in the Windows XP registry. To do this, you can use one of two methods:
1. Download the file to your computer and run it, then restart your computer. 2. Edit the registry manually. For advanced users only! Make changes to the registry manually by performing the following sequence of actions: 1. In the “Start” menu, select “Run”, type the regedit command and click “OK” 2. Go to the registry branch HKEY_LOСAL_MACHINE'SYSTEM'CurrentControlSet'Services'Tcpip'Parameters 3 In the parameters window, right-click, select “New -> DWORD Value” 4. Enter the name of the parameter TcpWindowSize 5. Right-click on the created parameter, select “Edit” 6. Enter the hexadecimal value faf0, then click “OK” 7 Make sure that the line TCPWindowSize REG_DWORD 0x0000faf0 is created 8. Reboot the computer.
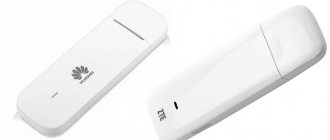
Characteristics of the 827f MTS modem
The 827f model, which appeared on the market in 2015, already claims to be an “oldie”, but it’s a lively oldie and not inferior to others in terms of data transfer speed or technology support.
Being a complete copy of Huawei E3327 (the model supports all operators), 827f is limited to MTS. A logical question arises: shouldn’t it have been worth buying an unlocked modem right away? But promotions and lucrative offers from cellular communication companies are taking their toll...
The technical characteristics of the model are as follows:
- There is a slot for installing a memory card with a maximum capacity of 32 GB.
- Integrated antenna, applicable in large cities. Installing an external antenna increases the reception distance by 2-3 times.
- Supports 2G, 3G, 4G with connection speeds from 500 Kbps to 100 Mbps.
- Standard SIM card.
The package includes a modem, warranty card, and instructions for use. The software and necessary documentation are embedded in the device’s memory. Please note that malfunction of the modem after unlocking will no longer be considered a warranty case, so the official supplier will not provide exchange or repair.
Windows CE Settings for Pocket PCs
How to set up your computer
1. Connect your phone to your computer using infrared, Bluetooth or cable
2. Open on your computer: “Start” -> “Settings” -> “Connections”
3. Select the “Dialing Locations” tab and click the “New” button
4. In the window that opens, specify “New location name: Mobile” and click “OK”
5. In the next window, select “Tone Dialing”, clear the “Area code” and “Country code” fields
6. Select “Dialing Patterns”, delete all codes except “G” or “g” and click “OK”
7. Open the “Connections” tab again and click the “Modify” button
8. On the “Modem” tab, click “New...”
9. In the “Make New Connection” window, in the “Enter name for the connection” line, enter MTS GPRS
10. In the “Select a modem” field, select “Generic IrDA modem, Bluetooth Connection” (if the phone is connected to the computer via IR or Bluetooth) or “Internal modem” (if connected via a cable)
11. In the “Baud Rate” field, select a speed of 57600 or 115200 bps and click the “Advanced” button
12. In the window that opens, open the “Port Settings” tab and check that: Data Bits - 8 Party - None Stop Bits - 1 Flow Control - Hardwar
Attention! Make sure all fields in the Terminal section are disabled
13. Open the TCP/IP tab, enable automatic assignment of an IP address, and disable the “Software compression” and “IP-header compression” items
14. On the “Name Servers” tab, select “Use server-assigned addresses” and click “OK”
15. On the page where you specified the connection name - MTS GPRS, click “Next”
16. In the “My Connection” window, type: in the “Phone number” field: if you have a phone brand: Ericsson, SonyEricsson, Motorola, Pantech, Nokia, LG: *99# if you have a phone brand: Alcatel, Siemens, Panasonic: *99***1# if you have a Samsung phone: *99**1*1# field “Extra dial-string modem commands” enter: +CGDCONT=1,”IP”,”internet.mts.ru” or AT+CGDCONT=1,"IP","internet.mts.ru"
Attention! You must enter all characters without spaces
17. Click the “Finish” button - the computer is configured, try to access the Internet
How to get online
1. Connect your phone to your computer
2. Open on your computer: “Start” -> “Settings” -> “Connections” -> MTS GPRS
3. Select “Connect” and in the new window enter: username: mts password: mts
4. Click the "Connect" button
5. Wait until the “two arrows” icon appears at the top of the screen - the connection is established
If you want to disconnect, click on the two arrows icon and select Disconnect.
More about the application
The MTS Connect application is available in versions for iOS and Android. Almost any MTS subscriber can install it. The program allows you to make calls over the Internet. The connection type (Wi-Fi, 3G, etc.) is not important. This opportunity is especially relevant for customers who often have to travel to other countries where it is quite easy to find free Wi-Fi.
When using the application to make calls to MTS customers, package minutes will not be spent. They are not limited in time. There are no restrictions on call directions, but all calls to numbers of third-party operators are paid according to the terms of the active tariff plan.
Windows Pocket PC 2003 Premium settings for pocket computers
How to set up a computer when connecting a phone via infrared
Turn on the infrared port on your phone Place the infrared port of the phone opposite the infrared port of the computer at a distance of no more than 10 cm Open on your computer: Start -> Settings -> Connections In the “Connections” window, select the “Advanced” tab, and in the next window - “ Select networks" Select "Create" and in the "Provider" window enter the name: IR connections On the "Proxy server settings" tab, check the "This network is connected to the Internet" field, leave the remaining fields blank Select the "Modems" tab and click the “Create” button In the “Create a new connection” window, enter the connection name: MTS GPRS-IR, select the modem: Generic IrDA and click “Next” In the next window, enter the phone number: if you have a phone brand: Ericsson, SonyEricsson, Motorola , Pantech, Nokia, LG: *99# if you have a phone brand: Alcatel, Siemens, Panasonic: *99***1# if you have a phone brand: Samsung: *99**1*1# and open the link “Use recruitment rules" Attention! You must enter all characters without spaces
10. In the window that opens, disable the “Dialing Rules” item, click “OK” and in the next window click “Next”
11. In the new window, check the parameters: user: mts password: mts leave the Domain field blank
12. Click the “Advanced” button and set the following parameters: speed: 115200 or 57600 uncheck the “Wait for dial tone” field (not for all phones) in the “Additional dialing commands” field enter: +CGDCONT=1,”IP ","internet.mts.ru"or AT+CGDCONT=1,"IP","internet.mts.ru"
Attention! You must enter all characters without spaces
13. Select the “Port Settings” tab and check the following parameters: Data: 8 Parity: None Stop bits: 1 Control: Hardware
Attention! Make sure all fields in the Terminal section are disabled
14. Open the TCP/IP tab, enable the “IP address is assigned by the server” item, and disable the “Use SLIP”, “Software compression” and “IP header compression” options
15. On the “Servers” tab, enable the “Address is assigned by the server” option, leave the values in the WINS fields zero
16. Click “OK” and then “Finish” - the computer is set up, try to access the Internet
How to set up your computer when connecting your phone via Bluetooth
Turn on Bluetooth in your phone Open on your computer: Start -> Settings -> Systems -> Bluetooth In the “Bluetooth Settings” window, select the “Accessibility” tab and set: name: any name of your computer, check the “Other devices can connect” box, select the item “Only associated devices” uncheck the “Other devices can see” field 4. On the “Remote network access” tab: enable the options: “Enable service”, “Authorization required” and “Identification required (Passkey)” in the “Speed” field "set 57600 or 115200 in the "Management" item, select "Hardware (RTS/CTS)"
5. Close the Bluetooth Setup window
6. Open on your computer: Start -> Settings -> System -> Bluetooth
7. In the window that opens, select “Set up a connection in the Manager”
8. In the “Setup Wizard” select “New” and in the new window select “Internet via phone”
9. In the “Bluetooth Connection Wizard” window, select your phone model and click “Next”
10. Set up the Bluetooth connection according to your phone's instructions
11. In the next window, select your phone model
12. In the new window, enter the “key” - any numbers (do not specify letters!), enter the same numbers in the phone menu, click “Next”
13. In the next window, check the “Use as a standard Internet connection” box, and in the phone menu, select your computer and click “Next”
14. In the “Bluetooth Connection Wizard” window, enter: connection name: MTS GPRS-BT country code: 7 city code: 495 phone number: if you have a phone brand: Ericsson, SonyEricsson, Motorola, Pantech, Nokia, LG: *99# if you have a phone brand: Alcatel, Siemens, Panasonic: *99***1# if you have a phone brand: Samsung: *99**1*1#
Attention! You must enter all characters without spaces
15. Click Next and then Finish
16. Select the connection icon (two arrows), in the “Connection” window select “Settings”
17. In the Connections window, select Manage existing connections
18. In the “Bluetooth Settings” window, select your connection - MTS GPRS-BT and click “Edit...”
19. In the “MTS GPRS-BT” window, select the “Bluetooth Dialup Modem” and click “Next”
20. Make sure there is no checkmark in the “Dialing Rules” field and click “Next”
21. In the next window, enter: user: mts password: mts
22. Leave the “Domain” field empty, click “Advanced...” and set: speed: 115200 or 57600 uncheck the “Wait for dial tone” field in the “Additional dialing commands” field enter: +CGDCONT=1,”IP”,” internet.mts.ru"or AT+CGDCONT=1,"IP","internet.mts.ru"
Attention! You must enter all characters without spaces
23. Select the “Port Parameters” tab and set: Data: 8 Parity: No Stop bits: 1 Control: Hardware
Attention! Make sure all fields in the Terminal section are disabled
24. Open the TCP/IP tab, enable the “IP address is assigned by the server” item, and disable the “Use SLIP”, “Software compression” and “IP header compression” options
25. On the “Servers” tab, enable the “Address is assigned by the server” option, leave the values in the WINS fields zero
26. Click “OK” and then “Finish” - the computer is set up, try to access the Internet
How to get online
Connect your phone to your computer Click on the connection icon (two opposing arrows with a cross) and select the link with the name of the connection - MTS GPRS-BT Wait until the arrows become stationary without a cross - the connection is established If you want to break the connection, click on the "two arrows" icon " and select "Disable".
What tariffs does it offer for modem owners?
MTS provides tariff packages that, in addition to tariffs, also include 4G USB modems for connecting to the Internet. This allows users to immediately have everything they need to access the World Wide Web.
The MTS Connect 4 package works only with 4G networks and includes 100 GB of Internet traffic on the first day of connection. The option is automatically disabled when the allocated amount of Internet traffic is used or one day after activating the kit. After this, 60 GB is provided for a period of 14 days. The tariff only works in Russia
Starting from the fifteenth day, Internet access is suspended . When trying to connect to the Internet, the user is redirected to the web page internet.mts.ru, where you can top up your account and activate any of the following tariffs:
- “Internet Mini” - 7 GB per month at a price of 500 rubles;
- “Internet Maxi” - 15 GB per month, 30% discount on MTS TV, unlimited Internet at night for 800 rubles;
- “Internet-VIP” - 30 GB per month, 50% discount on MTS TV, unlimited Internet at night at a price of 1,200 rubles;
- “Internet for a day” includes 500 megabytes of Internet traffic at a price of 50 rubles per day for those users who use a 4G USB modem periodically.
The tariff plan is selected based on the required Internet traffic and the time of Internet use
All tariffs provide unlimited connection speed until the provided traffic is fully used.
Settings for Palm handheld computers
First, try setting up your computer using the example of setting up Palm OS. If you are unable to access the Internet (an error about an incorrectly dialed number or Error: PPP timeout will appear), select the Palm VS setup method.
In the case of a plug-in Bluetooth module (for example, Compact Flash Bluetooh adapter), you may need to install external device drivers.
Palm OS
How to set up a modem
On your computer, open the “House” icon and select “Prefs” from the list. In the “Preferences” window, click on the triangular arrow in the upper right corner and select “Connection”. In the list of connection selections (via modem, via IR communication, etc.), click “New” In the “Edit” window, in the “Name” line, enter the name of your connection: GPRS-IR-Modem-57600 Next, from the drop-down lists, select: in the “Connection Method” field: IrCOMM to Modem in the “Dialing” field: TouchTone in the field “Volume”: Off 6. Click the “Details” button: in the “Speed” field set the value to 57600 or 115200, and in the “FlowCtl" select Automatic or On
7. Close the “Details” window by clicking the “OK” button
8. In the “Init String” field, enter: +CGDCONT=1,”IP”,”internet.mts.ru”or AT+CGDCONT=1,”IP”,”internet.mts.ru” Attention! You must enter all characters without spaces
9. Click “OK” - the modem is configured, proceed to setting up the connection
How to set up a connection
On your computer, open the “House” icon and select “Prefs” from the list. In the “Preferences” window, click on the triangular arrow in the upper right corner and select “Network” Click “Menu” and select “New” In the new window, fill in the fields: Service: MTS-GPRS User Name: mts Password: mts Connection: GPRS-IR-Modem-57600 (previously created connection) Phone: if you have a phone brand: Ericsson, SonyEricsson, Motorola, Pantech, Nokia, LG: *99# if you have a phone brand : Alcatel, Siemens, Panasonic: *99***1# if you have a phone brand: Samsung: *99**1*1# Attention! You must enter all characters without spaces
5. Uncheck the following items: “Dial prefix”, “Disable call waiting” and “Use calling card”
6. Click the “Details” button and set the following parameters: Connection type: PPP Idle timeout: Power Off about the “QueryDNS” and “IPAddress” fields
7. Click “OK” - the connection is configured, try to access the Internet
How to get online
Connect the phone to the computer In the “Preferences” window, click on the triangular arrow in the upper right corner and select “Network” Click the “Connect” button In the “Service Connection Progress” window the connection status will be shown, wait until it says “Established” - the connection is established If you want to disconnect, click the “Disconnect” button in the “Network” window.
Palm Vx How to set up a modem
On your computer, open the “House” icon and select “Prefs” from the list. In the “Preferences” window, click on the triangular arrow in the upper right corner and select “Connection”. In the list of connection selections (via modem, via IR communication, etc.), click “New” In the window that opens, in the “Name” line, enter the name of your connection: IR-PC-57600, and in the “Connection Method” field, select IrCOMM to PC Click the “Details” button: in the “Speed” field, set the value to 57600 or 115200, and in the “FlowCtl” field select Automatic or On Click “OK” - the modem is configured, proceed to setting up the connection
How to set up a connection
On your computer, open the “House” icon and select “Prefs” from the list. In the “Preferences” window, click on the triangular arrow in the upper right corner and select “Network” Click “Menu” and select “New” In the new window, fill in the fields: Service: MTS-GPRS User Name: mts Password: mts Connection: GPRS-IR-Modem-57600 (previously created connection) Phone: if you have a phone brand: Ericsson, SonyEricsson, Motorola, Pantech, Nokia, LG: *99# if you have a phone brand : Alcatel, Siemens, Panasonic: *99***1# if you have a phone brand: Samsung: *99**1*1# Attention! You must enter all characters without spaces
5. Click the “Details” button and set the following parameters: Connection type: PPP Idle timeout: Power Off about the “Query DNS” and “IP Address” fields
6. Click the “Script” button and in the “Log in Script” window enter: Send: ATZ Send CR Send: AT+CGDCONT=1,”IP”,”internet.mts.ru” Send CR Send: if you have a brand phone : Ericsson, SonyEricsson, Motorola, Pantech, Nokia, LG: ATD*99# if you have a phone brand: Alcatel, Siemens, Panasonic: ATD*99***1# if you have a phone brand: Samsung: ATD*99** 1*1# Send CR End
7. Click “OK” - the connection is configured, try to access the Internet
How to get online
Connect the phone to the computer In the “Preferences” window, click on the triangular arrow in the upper right corner and select “Network” Click the “Connect” button In the “Service Connection Progress” window the connection status will be shown, wait for the message “Established” - the connection is established If you If you want to disconnect, click the “Disconnect” button in the “Network” window.
Restoring a modem after unsuccessful firmware
At the beginning of the article, they warned about the need to enter commands accurately. If the installation went wrong and the device does not work, be prepared to say goodbye to it, because you will not be able to restore the software. If the modem works, but incorrectly, there are chances, but each case should be examined separately.
Before updating the firmware, or even better before purchasing a modem, consider purchasing a model designed to work with all cellular communication companies or for two SIM cards. Yes, the cost of such equipment will be higher, but when you change operators (frequent business trips, relocation, increased service prices), you won’t have to rack your brains over ways to solve the problem and spend money on a new modem.
Settings for Windows Mobile 6 Professional
Settings for accessing WEB sites via GPRS
Click Start to enter the menu. Select Settings and select the Connections tab. Select the Connections icon and make the following settings: In the My ISP section:
Select the item “Add new modem connection”. Enter the connection name: MTS. Select a modem: Cellular Line (GPRS)
Click Next on the display. Access point name: internet.mts.ru <when using Real IP: realip.msk>; Click Next on the display. User name: mts; Password: mts; Domain: not filled in
Press the Advanced key on the display. Select the TCP/IP Protocol tab and make the following settings: Use server-assinged IP address: check the box Use software compressxions: uncheck Use IP header compressions : uncheck the box Select the Servers tab and make the following settings: Use server-assigned addresses (mark with a dot)
Press OK on the display. Press Done on the display
To access the Internet
Click Start to enter the menu. Select Settings and select the Connections tab. Select the Connections icon. In the My ISP section, select Manage existing connections. Press and hold on the MTS connection and select Connect from the submenu that appears. Then you can open Internet Explorer.
Settings for accessing WEB sites via Mobile Office
Click Start to enter the menu. Select Settings. Select the Connections tab. Select the Connections icon and make the following settings: In the My Internet Provider section, select Add a new connection via modem Enter the connection name: MTS; Select modem: Cellular line;
Click Next on the display. Dial number: 0885;
Click Next on the display. Username: mts; Password: mts; Domain: leave blank.
Click Finish
Utility features
Having found out that users will need the program to connect to the World Wide Web, you should pay attention to the remaining functions and capabilities of the software. The utility installed on the laptop will allow subscribers to:
- maintain equipment (modem) in working condition;
- automatically find a USB modem and start it up;
- select the optimal connection mode (3g, 2g);
- control the amount of traffic consumed and keep track of used gigabytes;
- send SMS messages without using phones and smartphones.
With the appropriate technology and computer capabilities, users are able to make standard voice calls. That is, the program contains almost all the standard functions of a SIM card.
Connecting and disconnecting
The client can independently activate the “Internet calls” option, which includes the ability to make calls through the “MTS Connect” application. There are 3 activation options available:
- in your personal account;
- in a smartphone application;
- via USSD command – *111*6#.
You can disable the service via USSD request *111*6*01#.
Calls through the MTS Connect application are a great option to save on communications. This is especially true for those who communicate a lot on the MTS network or subscribers who often travel abroad.
How to use the application
To start working with Connect Manager MTS, you will need to log into the application. A window will open in front of you where you will need to enter your data: login and password. After you click “Connection”, you will immediately be taken to the manager menu. There will be quite a few different windows presented here. The main menu of the program is called “Connect”. Here you can track the dynamics of Internet speed, connect or disconnect. The “SMS” section is necessary so that the subscriber can read the text of the SMS sent to his number. The operator usually notifies subscribers in advance that funds will soon be debited from the account in accordance with the terms of the tariff plan. Therefore, you need to top up your balance. You can check and replenish it in the corresponding section called “Balance”. If you have chosen unlimited Internet, then you will not have to monitor your traffic and bill; you just need to regularly pay the subscription fee specified in the tariff. In the “Calls” section you can make voice calls directly from your computer. To make changes to the application settings, you need to go to the “Settings” section.
Advantages
The MTS Connect application allows you to significantly reduce communication costs when traveling to other countries. Finding Wi-Fi is usually not a problem, and calls in the program will be charged the same as at home. More details about the advantages:
- Saving on communications at home. All conversations with company subscribers will be free and unlimited in time. The package of minutes from the tariff will be spent only when calling third-party operators.
- Possibility to expand network coverage. A client using the application can stay connected even without operator network coverage by simply connecting to the Internet via Wi-Fi.
- You can call any phone number. The receiving subscriber does not have to install anything.
Restrictions
Calling through the application helps reduce communication costs. But the subscriber must take into account the following service limitations:
- The service is not available to clients from all regions. The list of subjects of the Russian Federation where the service is already available is constantly updated.
- For the service to work, you must have the “Internet calls” and “Mobile Internet” options connected. If necessary, you can activate them in your personal account.
- Call forwarding after installing the program can only be configured on the website. Setting it up in the smartphone menu will not do anything.
- Corporate clients with the M2M manager service will not be able to activate the service. They are incompatible.
Tariffication
Table 1. Price conditions for trips within Russia and international roaming.
| Option | Cost, rub. |
| Within the Russian Federation | Intl. roaming |
| Incoming calls | |
| Outgoing calls to MTS numbers | |
| Dr. operators | According to the terms of the tariff plan used |
Within the home network and when traveling within the Russian Federation in the MTS network, www traffic used by the application is paid in accordance with the client’s tariff.
If the application is used via mobile Internet in an international roaming zone, www traffic is additionally subject to payment - according to roaming tariffs. To save money, it is recommended to activate the “BIT abroad” service.
Note 2.
Internet traffic. remains unlimited within the borders of Russia and does not consume the package for those subscribers who have connected the option. “Services X” (for tariff plan “X”) or optional. "Online". To make calls from the application from abroad at the same cost as in Russia, you must enable the Internet option for roaming or connect to Wi-Fi.