Due to file garbage and the usual lack of memory, the tablet computer may start to work slowly and even freeze. In order for the device to start working faster and stop slowing down, you need to know how to clean the tablet from unnecessary files and debris.
The process of how to clean a tablet without slowing it down is quite simple and includes several methods, but it is also important to understand why such clogging occurs and how often you need to clean the tablet. This and additional details are discussed below.
What programs clog up your tablet?
Lack of memory is the most common reason why a device starts to perform poorly.
Various instant messengers, social networks, email clients, and many others leave a lot of unnecessary stuff on the tablet, causing it to slow down over time. To prevent this, you need to regularly clear the memory of garbage from such applications.
Cleaning the tablet from debris
Garbage refers to data that is no longer needed and stored in the cache. The software creates and stores this data in the device's memory so that it can be accessed faster next time. Often this data is not deleted when the program is closed, but accumulates in the main memory of the device, thus slowing down its operation. The history of browsers and search queries is also garbage. And after removing the software, residual files may remain on the tablet, which are also unnecessary. For the gadget to work correctly, this data must be deleted in a timely manner.
There are several ways you can clean your tablet from such debris.
Why you need to clear your cache
There is no way to prevent the so-called cache clog. Essentially, the cache is the working files necessary for the functioning of programs at the moment. But, after some time, these files cease to be used and remain in memory, while applications continue to create new ones, increasingly loading RAM.
Cache is divided into three main types:
- Dalvik. These are in fact files created by the operating system itself. They represent a kind of action algorithms for launching applications. There is no need to delete them, since they are an important component of the tablet’s operation, and you won’t be able to do this - to prevent such “accidents”, the dalvik cache files are stored in a hidden and protected part of the device’s memory.
- Systemic. Its contents speed up programs. The user also does not have access to them, since their presence is necessary for the rapid functioning of the software.
- Application cache. Data necessary for the operation of user-installed applications. Over time, they accumulate and form “garbage” in memory in the form of unused files. They take up an increasing part of the RAM, which significantly slows down the tablet.
Attention! The phrase “clear cache” should be understood specifically as clearing cache files from applications.
Standard methods for cleaning your tablet
One of the most common methods for cleaning a tablet is the manual method. Often users optimize the performance of their devices in this way.
First you need to clear your messenger folders. Gadget owners usually use at least one messenger, often more. All incoming photos, videos, and other files remain on the device and clog its memory. Periodically, these files need to be deleted from the device.
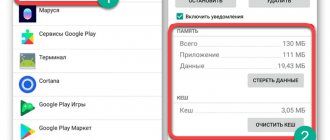
After this, you can clear the application cache. To do this, you need to go to the settings, find the application manager (it is called differently in different devices). Select the desired program from the list, open information about it and clear the cache.
Built-in app removal
Also, if possible, it is better to move some programs to the memory card. This way, the internal memory of the device will remain free longer and the device will work faster.
If the tablet starts to slow down after installing a certain program, then you should start cleaning it with this application. To do this, you need to go to the application manager, find this recently installed program there and clear all its data. In the same list, you can immediately find unnecessary programs that have not been used for a long time and immediately delete them, thereby further clearing your memory. This is necessary because many programs store their data in RAM even when they are not in use. And the more RAM is occupied, the more the device will slow down.
It is also worth clearing your browser history and cache in a timely manner; this can be done in the settings of the browser itself.
What programs are there for cleaning your tablet?
It is not necessary to deal with numerous settings to clean and optimize the operation of your device. You can install a special application that will do this instead of the owner.
Clean Master Logo
One of the most popular applications that allows you to clean your device of unnecessary things is Clean Master. This program has many functions, it allows you not only to clean your device of unnecessary files, but works as an antivirus, cleans RAM, system cache, apk files, and even speeds up games using special algorithms. Plus, the program has a function to protect personal data, and also has an application manager that allows you to remove unwanted software. There is an advanced garbage cleaning function in which you need to independently select files to delete. But at the same time, you need to make sure that the program does not hook the necessary applications, long audio recordings and other files that are important to you.
The App Cashe Cleaner program has only the most necessary functionality. It can be used to delete all temporary files, as well as clear the application cache. It shows a list of programs installed on the device and offers to clear their entire cache in one click. You can set up deletion automatically, manually, or at a specific time.
Smart Booster Interface
Another popular program for optimizing the performance of mobile devices is Smart Booster. You can select several cleaning methods and levels. The aggressive level will clear most applications with low priority, the powerful level will close even those applications that use memory slightly below average, the medium level will close applications that consume memory above average, the soft level will close only those applications that use a lot of memory. Like Clean Master, it has a program manager and also has the function of disabling system applications.
There is an application called History Eraser, which allows you to immediately clear SMS, search history, download history, call log, application cache, and clipboard. At the same time, it has different types of filtering for the data to be cleared.
Solo Cleaner logo
Solo Cleaner also allows you to clear the cache, delete temporary and residual files, and slow down battery drain. It can detect and remove duplicate photos, and also scans all files on the tablet to manage memory and clear it if necessary.
When working with third-party programs, you should not install all cleaning applications at once, this can only do harm and make the system slow down even more. It is better to limit yourself to one specific one, which will be most suitable for the device.
How to clear the clipboard on an Android tablet
The clipboard is the amount of memory in which saved information is stored. As a rule, it contains text or an image that the user saved using the copy function. The clipboard is also part of the RAM, so saving large objects in this way greatly slows down the tablet.
Fortunately, there is no need to clean it “forcibly” - it does an excellent job of removing unnecessary files on its own. In some cases, small files are saved, but their size is insignificant.
Understanding the need to regularly clear the cache, choose the best method for yourself. It should be remembered that manual is more of a temporary option than a permanent one. Therefore, either understand the internal functions of the tablet, or download a specialized program, the operation of which is understandable to everyone.
Reset
The most radical method that can be used if none of the listed methods helped is resetting the settings. Important: before the reset procedure, you need to save all important data from the tablet on another medium.
System reset menu
A full reset allows you to restore the device to its factory state. After this procedure, the user will lose all his data, installed programs, photos, videos, audio recordings, and contacts. In this case, all settings are reset to factory settings, that is, the tablet returns to the same state in which it was when it was purchased.
To perform a complete reset, you need to go to settings, find the “Backup and reset” item and select “Reset settings”. After this, a warning will appear stating that all data will be lost, and below is a “Reset” button. The names of menu items and their location may vary depending on the tablet model, operating system and firmware version.
Memory types
Types of memory The performance of tablets/phones is affected by the fullness of the permanent or random access memory devices.
- ROM/ROM – This type of memory retains information until it is deleted by the user. This is where the application cache or files located in the internal memory remain.
- RAM/RAM – stores information that is used when the phone operates. Part of the RAM is spent on programs that are turned on, tabs open in browsers, or games running.
Filling both types of memory leads to uncomfortable operation of the device. You can quickly fix this if you know how to clear your smartphone’s memory.
Cleaning up junk and unnecessary files
First you need to look at the amount of occupied memory (go to “Settings”, then “Memory” or “Storage”). After scanning, information by category (applications, images, music, etc.) will appear.
If no more than a few tens of MB are free, you should think about cleaning it up. Applications can weigh a lot, so you need to review your installed programs and games, removing those that have not been used for a long time. When cleaning, search for unnecessary files in all categories.
File manager on your tablet
How to delete history and cache
History - a list of visited sites, arranged in chronological order. This makes it possible, if necessary, to easily find and return to one of them.
Cache is a storage for frequently used data. Clearing the cache will speed things up and may help refresh some information on the pages you visit.
To clean, just open the browser, go to “settings”, the “history” tab, select the cleaning period, check the boxes if you need to delete the cache, passwords, logins and click clear history.
Important! You can clear the application cache in the device settings in the “applications” menu or using third-party programs.
Freeing up internal memory
It's not just applications that can take up internal memory. The device can also save:
- created photos and videos;
- files attached in instant messengers;
- recordings from a voice recorder;
- objects received via Bluetooth or downloaded via the Internet.
When deleting or transferring files (to a flash drive, PC or cloud storage), it is recommended to pay attention to the following folders:
- DCIM;
- Download;
- Media;
- Movies;
- Music;
- Video.
Important! When you delete files from your tablet, they will be lost forever, since there is no recycle bin on the devices.
Storing files online
Storing files on the Internet, thanks to various cloud storage services, allows you not only to clear your internal memory and free up your memory card, but also to access your files from any device with the Internet through a browser or special applications, you just need to enter your username and password. If you are interested in this topic, we discussed it in detail using the example of the most advanced cloud storage - Google Drive in the article: Online Documents or Google Drive.
So, in this article, you learned how to clear the internal memory of your Android phone when the internal memory is full. We solved this problem by analyzing the questions: how to move files on Android (pictures, videos, music, documents), how to transfer applications to a memory card, how to clean your device of garbage, and learned about storing files on the Internet - Cloud storage.
There is also a way for the “lazy”, if you urgently need to clear all personal data and delete applications with their settings - try Hard Reset. This will completely clean the device and format it.
Was the article helpful? Tell your friends using the social media buttons below!
Virus removal
If you actively use the Internet and download files from unreliable sources, there is a high probability of contracting a virus.
It’s worth thinking about how to clean your tablet if you have some “symptoms”:
- sudden reboots;
- heating even in rest mode;
- uncontrolled installation of applications, activation of Wi-Fi or camera;
- constantly pop-up advertisements;
- malware detection information;
- rapid battery drain.
The simplest solution is to install an antivirus on your tablet. After running the scan, follow further prompts to correct or delete files.
Another option for removing viruses is through a computer. To do this, connect the device to a PC, run an antivirus on it and scan and clean it.
Antivirus for tablet
Cleaning RAM on Android Phone and Tablet
Clearing RAM on an Android phone and tablet To clear the memory of an Android smartphone, you will need to go through several steps: 1. Press the “Menu” item on the device or swipe up 2. Press the button with the image of a broom in the window that opens (a cross may be drawn depending on the devices)
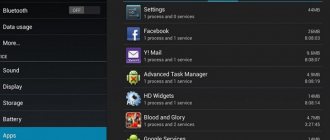
Another way: 1. Open the “Settings” section 2. Go to the “Applications” item 3. Select the “Running” sub-item
4. It remains to select those programs that can be stopped without losing the functionality of the tablet or smartphone 5. And click “Stop” 6. The operation must be done with all irrelevant programs 7. Next, go to the list of cached applications, the corresponding icon is in the upper right corner of the screen, select and stop all unnecessary programs.
Not enough memory Android: what to do to clean the system
So, we have dealt with the main causes of the problem and you can probably already guess which one is your case. Now let's figure out what to do if Android doesn't write enough memory.
Clean Android memory using an app
The first thing you should do if you don't have enough space on Android is to use a special program to clear memory.
New versions of Android already have a program for optimizing the mobile device by default. Its shortcut can be found on the desktop of your smartphone or tablet.
If you are using an older version of the operating system or the application is missing for some other reason, then if the remaining space allows, you should install the application:
How to clear Android memory:
Launch the cleaning wizard by clicking the corresponding shortcut on the desktop; The application will instantly show the size of junk files that can be deleted without any consequences for the system; Click the “Clear” button to start the process; After performing this operation, a certain amount of free memory will appear, large or small - it all depends on the clutter of the device. But it’s too early to close the application, since in addition to basic cleaning, there is also a deep cleaning, which is launched by pressing the corresponding button; By going to the deep cleaning tool, you can see the data that can be deleted from the phone. Cleaning is not done automatically, but manually, since deep cleaning affects not only junk files, but also: photos, videos, applications, data files
Particular attention should be paid to the “Data Files” and “Large Files” sections.
Cleaning RAM on iPhone and iPad
Cleaning RAM on iPhone and iPad
The operating system of these devices usually allocates system memory efficiently on its own and does not include a process for collecting unnecessary files. Background and main tasks are stored in separate areas. But some applications may not free up space when requested by the operating system, thereby reducing the performance of the smartphone or tablet. You can clear iPhone memory by simply restarting the device. But there is a way that does not require a reboot to free up space (suitable for devices that have a Home button).
You can clear the iPhone memory like this: 1. Unlock the device 2. Find and press the “Power” button 3. Hold it for a few seconds until the “Power Off” slider appears 4. There is no need to turn off the phone 5. You need to hold down the “Home” button for a few seconds 6 .Return to main screen
The procedure restarts SpringBoard, the application that is responsible for the home screen. It frees up space occupied by programs running in the background. The procedure does not delete files from the operating system task manager. This is explained by the fact that tasks that have recently been used and are in pending mode are placed here. It is recommended to reboot smartphones and tablets at least once every 7 days. A simple procedure will free up space and remove debris. Performance gains are guaranteed. Junk files are stored in the “Other” section; they can take up several gigabytes.
When you force a reboot, the phone's memory is cleared of temporary files. It is especially important to carry out the procedure for those who have never done it. To reboot the device, you will need to simultaneously press the “Home” and “Power” keys. They must be held until the manufacturer's logo appears on the screen.
does not work? 7 Tips to Fix Touch Screen Problems
We've all been there. Whether you're tapping, swiping, or zooming, there's often a time when your tablet's touch display won't respond. How to overcome this and achieve zen while working with a tablet?
Why is my tablet's touch screen unresponsive?
As the primary method of interaction between you and your apps, your tablet's touchscreen is vital. Any damage done—bumps to the device, scratches, or anything else—will result in poor touchscreen performance. If you don't pay for a replacement, you'll need to make sure the display is intact and not damaged.
What can cause a touchscreen to become unresponsive? Consider the following:
- Impact may dislodge the touch screen digitizer
- Dropping or shaking the tablet can affect the cable connecting the digitizer to the motherboard, causing display and performance issues
- Dirt, dust, hair and other debris can confuse the touch screen
- Scratches and cracks reduce touch screen reliability
There are a few things you can do to help with this.
- Putting a screen protector on is easier than you think.
- Using a tablet case with a soft interior is also a good idea - it may cost a few extra dollars, but it's worth it in the long run
- Do not place your tablet face down on a hard surface, as even the smallest dirt can cause damaging scratches to the display.
The following tips—also applicable to smartphones—will help you resolve tablet touchscreen sensitivity issues. We have developed this guide for all touchscreen tablets running iOS, Android or Windows.
Make more RAM available
Perhaps the best place to start troubleshooting screen responsiveness issues is to make more RAM available. This may take some time, but should give you an idea of how serious the problem is.
Android users have many options to free up space on their tablets, such as clearing the app cache or using third-party apps. Our guide to spring cleaning your Android device should come in handy here.
Memory problems on your iPad can cause the touch screen to respond slowly. The best way to deal with this is to close any apps you're not using:
- Double click Home
- Swipe up on each unnecessary app to close it
Once you close all the apps you no longer need, your tablet should be more responsive. Meanwhile, jailbroken iPads can run task management apps that can help you close any running processes you don't need.
On Windows 10 tablets, close as many desktop apps as possible before switching to the Start screen. Then:
- Hold WIN + TAB to display task switching view
- Tap X on each app to close
If freeing up some RAM helps improve the responsiveness of your touchscreen tablet, then that should be all you need to do.
Touchscreen not working? Reboot your tablet
Further troubleshooting can be done by restarting your tablet. Once your device restarts, most applications will be closed.
Restarting your tablet isn't just a matter of pressing the power button to turn off the screen. Instead, the entire device must be turned off and on again.
For Android users, this shouldn't be a big problem. Just hold down the Power button and select Restart .
Owners
iPads must close every open app before holding the Sleep/Wake and dragging the slide to turn off . If closing apps is not possible, your iPad model will determine how to restart.
For iPad Air:
- Hold Power and Home until the tablet restarts
- Release when you see the Apple logo
On iPad Pro:
- Press and release the Volume Up button
- Repeat with Volume Down button
- Press and hold Power until the tablet restarts
Windows tablet owners can restart their devices by pressing Start , then Power > Restart . If the device is unresponsive, hold down the Power button for 10 seconds to restart.
Using system apps to detect unresponsive touchscreen areas
Often, when a tablet's touchscreen is unresponsive, the problem may be localized to part of the display.
Knowing which area(s) of the touchscreen is not responding correctly can be helpful in diagnosing what's wrong. This information will be useful to any engineer who ends up repairing the tablet.
A useful means of testing which areas of the display are working and which are not is to use multiple applications.
With the calculator you can test simple touches on the display. Use the screen rotation feature to test your tablet in all orientations.
You can use the Maps app to identify problems with dragging and pinch-to-zoom.
Calibrate your tablet's touch screen
Calibrating your tablet display can solve many touchscreen detection issues.
For iPad, the calibration tool is not available or required. However, if you are using a jailbroken device that is not registering your touches and swipes correctly, perform a hard reset. This will undo the jailbreak, but your device should work again.
Free calibration and testing apps are available on Android. Touchscreen calibration can help you identify issues with touchscreen responsiveness. Meanwhile, Touch Screen Test is designed to help you find specific areas where input is not being detected.
Windows 10 users can calibrate their tablet for touch or stylus.
- Tap Start and type "control panel"
- Click Control Panel > Hardware and Sound
- Click Tablet PC Settings
- Select Screen calibration for pen and touch input
- Select the display then click Calibrate
- Select Pen input or Touch input
- Follow the instructions to calibrate the display
5.Call an engineer to repair the tablet touch screen
As you can imagine, there are problems so serious that you will need an engineer.
For devices covered by warranty, this means contacting the manufacturer and arranging for return or return to the store. iPads, for example, can be taken to Apple Stores; Samsung tablets can be taken to Samsung stores. In some cases, doorstep repairs are possible, where the device is repaired in a mobile repair shop parked near your home.
Visit your device manufacturer's support pages to learn how to properly arrange repairs. Explain what steps you took to resolve the touchscreen issues.
Align your tablet display
It's a risky option that sometimes pays off. However, only do this if you have a device that is not covered by warranty and cannot afford professional repairs. It's more suitable for cheaper Android tablets than for high-end Samsung, iPad or Windows tablets.
This basically involves removing and resetting your display settings to improve touchscreen responsiveness.
Before you pick up your tablet, check to see if you can find tools and instructions for disassembling the device. YouTube is a great source if you can find videos for your device.
However, don't take this step lightly; Do as much research as possible before you hack your tablet.
Replace your cracked tablet screen
As noted above, if your tablet's screen is cracked, it can reduce reliability. Regardless of how large or small it is, a cracked tablet screen will always stop working.
Having your tablet inspected by an engineer under warranty is a reasonable option, but not always.
If your tablet is out of warranty and the screen is cracked, you have two options:
- Pay for repairs
- Repair it yourself
Paying for repairs shouldn't be too expensive. Repairs can often be done the same day - repair shops in the city center can do this while you wait. However, this depends on the tablet model and parts available.
Ready to replace your display yourself? Check out our guide to replacing a cracked smartphone display to get started.
Restore your tablet's touchscreen functionality
We've covered all the bases here, giving you the most effective ways to fix your tablet's touchscreen problems:
- Free up more RAM
- Reboot your tablet
- Use apps to detect unresponsive areas
- Calibrate your touch screen
- Call an engineer
- Reconfigure your display
- Replace your cracked tablet touch screen
Are you having another problem with your tablet?
Here's how to save a tablet or phone that has fallen into water. Vue Lite Glasses: Stealth Smart Headset
Smart glasses are back in fashion. Vue Lite glasses are a sleek alternative to a wireless headset for occasional video or voice calls.
About the Author
Associate Editor for Security, Linux, DIY, Programming and Technical Issues. He also produces The Really Useful Podcast and has extensive experience supporting desktop computers and software. A contributor to Linux Format magazine, Christian is a Raspberry Pi tinkerer, Lego enthusiast, and retro gaming fanatic.
More about Christian Cowley
Subscribe to our newsletter
Sign up for our newsletter to receive tech tips, reviews, free eBooks, and exclusive offers!
One more step...!
Confirm your email address in the email we just sent to you.
.
Transferring applications to a memory card or deleting them
Transferring applications to a memory card or deleting them
If applications are installed in the device memory, it is advisable to transfer them to a memory card. Here's how you can do it. To get started, go to your device's settings (Settings app).
Next, find the “Applications” section.
We are looking for third-party applications in it. For example, in our case it is the game Cut the Rope. Click on the application icon.
Once in the settings, click “Move to SD card” (in our case, “Go to SD card”, which is basically the same thing).
The game will be transferred to the memory card. This may take some time depending on the size of the application.
If you do not use the application, then delete it by clicking on the button of the same name.
How to quickly clear Android memory the easiest way
An important point to keep in mind: if your device is running Android 6 or newer and has a memory card formatted as internal storage, you will always receive a message indicating that there is not enough memory ( during any action, even when taking a screenshot) until you reinsert this memory card or click on the notification that it has been removed and click “forget device” (please note that after this action you will no longer be able to read the data from this memory card).
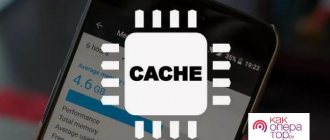
As a rule, for a novice user who first encountered the “insufficient space in device memory” error when installing an Android application, the simplest and often successful option would be to simply clear the application cache, which can sometimes take up precious gigabytes of internal memory.
In order to clear the cache, go to settings - “Storage and USB drives”, then at the bottom of the screen pay attention to the “Cache data” item. In my case it’s almost 2 GB
Click on this item and agree to clear the cache. After cleaning, try downloading your application again
In my case, it's almost 2 GB. Click on this item and agree to clear the cache. After cleaning, try downloading your application again.
In a similar way, you can clear the cache of individual applications, for example, the cache of Google Chrome (or another browser), and Google Photos takes up hundreds of megabytes during normal use. Also, if the "Out of Memory" error is caused by updating a specific application, you should try clearing the cache and data for it.
To clear, go to Settings - Applications, select the application you need, click on the "Storage" item (for Android 5 and higher), then click the "Clear cache" button (if the problem occurs when updating this application, then also use "Clear data" ").
By the way, note that the occupied size in the application list displays smaller values than the amount of memory that the application and its data actually occupy on the device
Transfer video, audio, photos
Transfer video, audio, photos
In many cases, free space is taken up by video or audio recordings, and often by a huge number of photographs. There are two ways to transfer these files: using File Explorer or using a computer. In the second case, connect the device to the computer using a USB cable and transfer files from the internal memory to the memory card manually.
For the first case, you will need a file manager, for example, ES Explorer. Launch the application, find the folder with the file, click on it and copy.
Next, select a location to transfer and insert the folder.
That's it, she was moved.
Clean your device of outdated and unnecessary data
Clean your device of outdated and unnecessary data
To do this, you can use various applications, and some devices have proprietary cleaning utilities. We will use the SD Maid application, which has proven itself to be excellent. Download it from Google Play Market, install and run. Click on the “Garbage” button and wait for the system to collect all the data.
Then click "Clear" to clear the data.
In our case, the volume of garbage is very small. Sometimes, however, garbage can accumulate over several gigabytes of memory. So that.
By the way, unnecessary files can be stored in cloud storage. Many cloud storage services are completely free, so you can use this service to store, say, unnecessary photos.
Antivirus installation
In addition to checking the system for pests, the tasks of the antivirus are also to clear the memory of garbage, cache and other unnecessary files. Using this method, it will not be possible to achieve global results, since the program performs a superficial check and does not go deeper so as not to damage the user’s data and files.
The most popular and frequently used application for the stated purposes is 360 Total Security. Just open it and click on system scan. It does not take much time and literally after 5-10 minutes the display will show a list of all identified problems and unnecessary files that interfere with the correct operation of the system. To get rid of them you need to click on the “Fix” button.
Return to factory settings or hard reset
This method should be used only in the most extreme cases, because ALL data will be . The device will be returned to factory settings. That is, it will be like new - no personal data, which can be very useful when selling. This method will also help if you installed a pattern key on your tablet as protection and forgot it.
- General reset (without removing the pattern)
Go to the “settings” menu item. Next, depending on the tablet, you need to find the “general data reset” item. It will be located in the “security” or “confidentiality” sections. Select it and confirm the reset.
- Complete cleaning (removing the pattern)
Let's look at it using the Lenovo Tab 2 tablet as an example. To do this, turn off the tablet.
- Press the “Volume +”, “Volume -” and “On” keys simultaneously. nutrition"
- After a short time, the Lenovo logo will appear. Release all buttons
- We are waiting for the Android icon to appear with the door open at the top, then press “On” once. nutrition."
- By pressing “Volume -” we go down the menu to “wipe data/factory reset”. Confirm your choice by pressing “Volume +”
- Continue using the same method: “Volume -” to the item “Yes - delete all user data” and select “Volume +”
- Finally, after the yellow text “Data wipe complete” is displayed, the initial menu will return. In the same way, select “reboot system now”.
The tablet will reboot itself with factory settings. See the video for more details.
Sources
- https://TechnoSova.ru/cifrovaja-tehnika/planshety/ochishhaem-planshet-ot-nenuzhnogo-musora/
- https://sddhelp.ru/articles/ochistka-pamyati/
- https://technosovet.ru/czifrovaya-tehnika/planshety/kak-pochistit-planshet-ot-nenuzhnyh-fajlov
- https://androidnik.ru/kak-ochistit-vnutrennyuyu-pamyat-na-planshete-ili-telefone-android/
- https://allcleaners.ru/soveti/kak-pochistit-planshet-na-android.html
Additional ways to fix the error: There is not enough memory on the device
The following methods for fixing the “insufficient memory” error when installing applications on Android, in theory, can lead to something not working correctly (usually they don’t, but still, at your own peril and risk), but are quite effective.
Removing updates and data from Google Play Services and Play Store
- Go to settings - applications, select applications "Google Play Services"
- Go to the “Storage” item (if available, otherwise on the application details screen), delete the cache and data. Return to the application information screen.
- Click on the “Menu” button and select “Uninstall updates”.
- After removing the updates, repeat the same for the Google Play Store.
Upon completion, check whether it is possible to install applications (if they inform you that you need to update Google Play services, update them).
Clearing Dalvik Cache
This option does not apply to all Android devices, but try:
Go to the Recovery menu (find on the Internet how to enter recovery on your device model)
Actions in the menu are usually selected using the volume buttons, confirmation by a short press of the power button. Find the Wipe cache partition item (important: under no circumstances Wipe Data Factory Reset - this item erases all data and resets the phone). At this point, select “Advanced” and then “Wipe Dalvik Cache”... After clearing the cache, boot your device in normal mode
After clearing the cache, boot your device in normal mode.
Clearing the data folder (Root required)
This method requires root access, and it works when the “Insufficient memory on the device” error occurs when updating an application (and not only from the Play Store) or when installing an application that was previously on the device. You will also need a file manager that supports root access.
- In the /data/app-lib/application_name/ folder, delete the “lib” folder (check if the situation is fixed).
- If the previous option did not help, try deleting the entire /data/app-lib/application_name/ folder
Note: if you already have root, also look at data/log using a file manager. Log files can also eat up a significant amount of space in the device's internal memory.
Untested ways to fix the error
I came across these methods on stackoverflow, but I have never tried them, and therefore I cannot judge their performance:
- Using Root Explorer, transfer some applications from data/app to /system/app/
- On Samsung devices (I don't know if they are all), you can type *#9900# on the keyboard to clear log files, which can also help.
These are all the options that I can offer at the current time to fix Android errors “Not enough space in device memory”. If you have your own working solutions, I will be grateful for your comments.
And maybe this will be interesting: