Analogue television, which previously had no alternative, is gradually becoming a thing of the past. Today, the digital age is upon us, offering users better quality and reliable, uninterrupted experience. Since 2021, Russia has switched to digital.
The advent of digital television has caused considerable excitement in our country. Moreover, any Russian citizen can receive 20 free digital channels absolutely free of charge. But to do this, you still need to connect them to your TV.
Today there are a huge number of companies that offer installation and configuration of digital channels, but their services cost money. You can set up free digital channels yourself - you just need to first purchase the necessary equipment.
- How to install channels?
Connection equipment
- Antenna
- Receiver
- Equipment installation
- Setting up digital channels
Auto search
- Manual setting
- Setting up channels using Smart TV
- Setting up via cable TV
- Installation via satellite dish
- Connecting a digital TV to an old TV
- Installing channels without a receiver
- Checking the signal quality
- Main problems and ways to solve them
- Setting up local channels
Advantages of digital TV
First, a few words should be said about the advantages of digital TV. These include the following advantages:
- High quality visual and audio channel. They are not affected by any interference.
- Convenience and ergonomics. Installing digital broadcasting does not require bulky and complex equipment.
- Wide selection of channels. Today, users are offered 20 free channels, and their number will increase in the future. Those interested can connect additional paid resources, their number is huge.
- Easy to connect. Installing digital TV does not require any special skills; you can actually do it yourself.
Using this technology you can access the Internet. The new technology also has disadvantages. For example, it is not possible to install digital channels on most old TVs - you need to buy a special receiver. Residents of many areas will have to buy a new, more powerful antenna.
There is a special program for low-income citizens, thanks to which they can receive compensation for the purchase of a digital receiver. This issue is being dealt with by social protection authorities.
What are they offering Russians?
Currently, Russian citizens are offered 20 digital channels, which are divided into two packages or multiplexes. The first contains information and news channels, and the second contains entertainment channels.
Now the third package is being launched, also consisting of ten channels. It can already be connected in Moscow. It is not yet available in other Russian regions, and the second multiplex does not work normally everywhere. The digital broadcasting system is just being tested.
RTRS has a special map that displays the channels available in each region. You can also see the location of the nearest repeater towers to better tune the antenna.
What channels are available for viewing?
When connecting on-air digital broadcasting, the user will have access to twenty channels, as well as three radio stations. Broadcasting is provided free of charge. At the same time, the list of channels includes: NTV, Karusel, Channel One and Channel Five, MATCH, TNT, MUZ TV and others. The available TV channels can satisfy the TV viewing needs of different age groups.
If you use cable or satellite equipment to watch TV, you will need to pay an additional fee for the selected channel package.
How to install channels?
To set up digital television, you need to prepare tools and equipment, and strictly follow simple instructions.
Connection equipment
To install digital television, you need a special antenna, a separate tuner or a TV with a built-in decoder. To connect these elements, a special cable is used, which can be included in the kit or must be purchased separately.
Antenna
To receive a digital signal, a special antenna is required. Digital channels cannot be received with the old antenna, which was previously used to “catch” the analog signal. Their frequency ranges do not match.
Antennas come in different types: indoor, outdoor or amplified. The choice of device depends on the following factors:
- the distance of the home to the television tower;
- location of the apartment or private house: floor, direction of window exit;
- distances from large enterprises or other industrial facilities;
- the ability to connect to a collective antenna.
If the distance to the repeater is less than 5 km, then a small indoor antenna is quite suitable. At a distance of about 20 km, you need to install a standard street device. If the tower is from 20 to 80 km away, then you will have to take an antenna with an amplifier.
The closer the receiver is to the tower, the better the signal will be. Sometimes in a remote dacha the picture on TV is better than in the city. Antennas are either active or passive. The first option provides high signal quality, but requires connection to a power source, which is not always convenient. Practice shows: a passive antenna is also suitable for an ordinary residential area.
By design they are spatial, flat, unidirectional. The purity and strength of the signal largely depends on the correct selection of the antenna.
Receiver
A receiver, also known as a decoder or tuner, allows you to decipher the incoming digital signal. This device is connected according to a very simple scheme: antenna – receiver – TV.
The receiver is a small box with a dashboard on the front side and connection connectors located on the back. It comes with a remote control. It should be remembered that such devices are different. There are receivers for cable, terrestrial and satellite broadcasting. Each of these types has its own letter designation.
Receiver example
Typically, receivers for receiving terrestrial digital television broadcasts are capable of working with two signal formats: mpeg-2 and mpeg-4. For these devices, HDMI and “tulip” connectors are considered classic. They are capable of receiving a small number of channels.
The receiver allows you to watch not only free channels from two state packages, but also many others. However, in this case, you need to additionally purchase a CAM module, which will allow you to select channel packages to your liking.
Modern decoders have USB connectors and a built-in control program with which you can configure TV channels and switch them. More expensive models allow you to access the Internet via Wi-Fi or cable.
New TVs already have built-in decoders, so there is no need to buy this device. Owners of older TV models will have to fork out more.
Digital TV connection diagram
Antenna selection and installation
To receive a high-quality digital signal, you will definitely need to use an antenna. When making a choice, the natural preference will be an indoor antenna. But this option is not suitable for everyone. This is due to the presence of a weak signal from the TV tower, which is not able to pass through the barriers created in the form of walls.
The most suitable option would be to use an outdoor antenna. This will allow you to get high-quality image and sound. There are two types of outdoor antennas: passive and active. The latter provide for the installation of an additional amplifier for the received signal.
They are important to use when there is a significant distance between the TV and the antenna. If the length of the connecting cable is short enough, then a passive antenna will suffice.
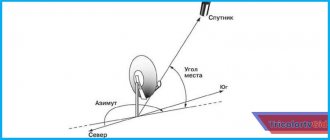
How to determine the location of a TV tower
The most rational option would be to use Internet resources. To do this, you will need to find a digital TV coverage map on the Internet. Then, by the name of the locality, determine the range of the nearest television tower.
Reliable reception area
It represents the path from the transmitting to the receiving antenna, which runs in a straight line. At the same time, reliable signal reception is considered to be the receipt of a high-quality digital image, regardless of weather conditions and time of day.
Cables and accessories
To connect a TV tuner you will need a cable. As a rule, the device comes with a cable with a plug connection. Its use allows you to obtain images exclusively in analog format. To view high quality images, you will need to purchase an HDMI cable. This will allow you to watch TV shows in HD quality.
You will also need to purchase a coaxial cable to connect the antenna to the tuner. In this case, you will first need to measure the required cable length.
Equipment installation
It is extremely important to install the antenna correctly. The signal reception sector of these devices is small, so it must be accurately directed. If we are talking about an indoor device, then it needs to be placed on the windowsill and directed towards the nearest tower. It is advisable that there are no other emitting devices, such as a router, nearby.
It is much more difficult to install an outdoor antenna. It is better to secure it at the highest possible point: on the roof or on any high structure. In this case, there is less chance that the signal will be blocked by some obstacle. The antenna should be pointed at the nearest TV tower.
The antenna, receiver and TV are connected using coaxial cables. After connecting them, you can turn on the TV and start searching for channels.
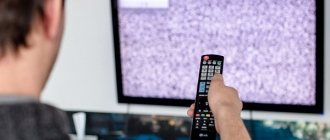
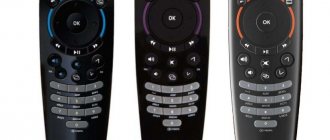
Remote controller
The designations of the remote control buttons are standard. There are few buttons on the remote control and switching channels only using a list, there is no dial. The organization of the interface is very similar to other Smart remotes. Voice search is also available, to activate which you need to press the microphone. Alice will help you find the content you need.
Setting up free digital channels
Auto search
You can configure digital channels automatically or manually. This can be done on the TV if it has a built-in tuner, or directly on the receiver.
Searching for channels in automatic mode is extremely simple. For it you need:
- open “Menu” with a special button on the remote control;
- indicate the type of signal source: cable or antenna (for terrestrial TV);
- activate the auto search function;
- give the receiver time to scan the frequency range.
Once the search is complete, you need to confirm the results by clicking the “OK” button. After this, the found channels will be recorded in the TV memory.
Manual setting
Setting up channels manually is more difficult, but sometimes you can’t do without it. Often the auto search does not produce results or cannot detect the required 20 digital channels.
All TVs have a manual search function. First, the user must check the channel frequency for his region. This can be done on the RTRS electronic service. Usually the signal parameters for the two nearest television towers are indicated there. After this, you need to do the following manipulations:
- go to “Menu” on the remote control and select the “Settings” option;
- in the “TV” item select manual tuning mode;
- indicate on-air signal sources (“Antenna”);
- enter the found frequencies and start the search;
- After finding the channels, save them in the TV memory.
In the same way, automatic and manual tuning occurs through the receiver. First you need to make sure that all cables are connected correctly. The algorithm of actions may differ slightly depending on the device model.
Many modern TVs support automatic updating. The problem is that during this procedure the results of manual channel tuning are reset. Therefore, it is better to disable this function. It is located in "Settings".
How to connect an antenna cable to the television signal line at the entrance of a house
Typically, a television cable is laid along the roof of a house and then, after being amplified by a main amplifier, it branches out along the entrances of the house. Since there are different packages of television programs, at the entrance to the entrance the cable is branched using a filter crab, which is a crab with two outputs. From one output the signal comes out unchanged, and from the second output it is cut off by a high-pass filter. Thus, the ability to watch all television channels is limited for those who buy cheaper social packages. Therefore, two cables run down the entrances.
If you examine the walls in your entrance, you will definitely find on each floor a metal box from which television antenna cables go to the apartments. In modern houses, boxes are no longer installed, but everything is placed in wall cabinets, in which case you will see a metal door with a lock. These boxes house TV signal subscriber taps. If you remove the lid from the box or open the cabinet door, you will see something like this. In the photo on the left is a coupler for subscribers of the full package of television programs, and on the right is for subscribers of the social package.
According to the rules, taps must be secured and grounded, but cable technicians do not do this to simplify their work. Perhaps this is better, since if the grounding is poor, then such grounding can create interference.
Taps installed in junction boxes are not fundamentally different from crabs for connecting several TVs, but they work somewhat differently. One F connector is used to connect the cable coming from the IN trunk. The second OUT is designed to carry the signal to the next tap installed on the floor below. The remaining F TAP connectors, there can be from one to five, are intended for connecting subscribers, that is, for connecting television cables going to apartments.
There should be no unconnected subscriber connectors. In case of disconnection of one subscriber, for example for non-payment, it is allowed to install an F-connector with a load resistance of 75 Ohms instead of the cable. If you need to connect a new subscriber to a cable television network, then the splitter for two subscribers, as in this example, is replaced with a three-slot one.
Thus, to connect a TV to a cable network, a piece of television cable of the required length with antenna F-connectors installed at the ends is sufficient. One F-connector of the antenna cable is connected to the subscriber tap in the entrance, and the second to the TV.
Setting up channels using Smart TV
Digital television can be set up using the Smart TV function, which is found on almost all new TV models. To do this, you need to go to the “Menu”, then select the auto-tuning option and run it. This procedure usually takes less than ten minutes.
After scanning is completed, you should save the found channels in the TV memory.
Receiver selection
When selecting a digital TV receiver, first of all you will need to decide on the planned types of viewing digital television. They are divided:
- Broadcasting - for this it is enough to purchase the simplest set-top box. If your TV has a digital signal reception function, you can do without a set-top box.
- Cable TV - in this case, you will need to determine how the signal is transmitted in a particular region. In most cases, operators use DVB-C and IPTV standards. Accordingly, receivers should be purchased in accordance with the specified standards.
- Satellite TV - here you need a receiver that reads the reception signal from the corresponding satellite.
Setting up via cable TV
Free digital channels are available through your local operator's cable network. To do this, the user must have a special receiver and access module.
New TVs are usually equipped with similar receivers; for older models you will have to buy them. The content access module is provided by the provider.
What you need to connect
Setting up a network connection on TV requires:
- Internet access;
- TV with LAN connector;
- TV instructions.
The user should also first determine his own IP address, which may be needed in the future. Instructions:
- Open your computer's control panel.
- Go to the “Network and Internet” section.
- Go to the “View network status and tasks” subsection.
- Click on "Local Area Connection".
- In the “Status” window, click on the “Details” button.
Features of connecting a wired Internet to a TV are also determined by the type of connection - dynamic IP or PPPOE. It is also better to check this point with your provider in advance. When everything is prepared, you can proceed to setting up the connection.
Connecting a digital TV to an old TV
Digital channels are successfully installed on old TVs. To do this, you need to buy a receiver and connect the antenna to the TV through it. In 2021, you could purchase this device for 1 thousand rubles.
Connection diagram for a digital set-top box to an old TV
When people talk about old TVs, they usually mean models released from the early 2000s until about 2012. However, it is possible to connect digital broadcasting to old Soviet technology, although this is not easy to do. To do this you need:
- remove the insulation from the antenna cable in an area of 1.5-2 cm;
- remove the shielding braid;
- remove the insulation of the central vein in an area of 1-1.5 cm;
- Connect the resulting wire to the tuner and TV.
To successfully perform these manipulations, you need to have some experience working with electronic devices. You should also understand that even a digital signal on devices like “Record” or “Rubin” will not provide decent quality. The picture tubes of Soviet televisions are simply not capable of displaying images in high resolution.
Which antenna plug is better?
The answer is clear: the best of the three considered plugs for television coaxial cable is the F-plug. This is easy to see in the photographs above, even without special knowledge.
As you can see, the antenna plug of the old design and the Soviet antenna plug have a small section of the central core of the cable that is not covered by the shielding braid. This disrupts the uniformity of wave impedance, which leads to minor losses of the television signal.
The F-plug does not have an open section of the central core of the antenna cable. Another advantage of the antenna F-plug is ease of installation. With a minimum set of standard tools and no skills, almost anyone can correctly attach the antenna F-plug to the cable.
Installing channels without a receiver
People often ask how to set up 20 free digital channels without a receiver? Alas, there is no magic way here. You can not use a receiver or decoder only if it is already built into the TV.
Finding out whether your TV has such a device is very simple - just carefully review the technical documentation. If there is a plus in the column with DVB-T2, then the TV has a built-in decoder.
To receive the signal, you can use cable TV, satellite dish or Smart TV.
Which router is suitable for a TV?
In order to have access to all the delights of Smart TV, the user will need a router, and it can be the most ordinary one; the router can also be the most ordinary one. No need for additional ones. Connecting a router and a router is not such a serious issue.
In order for the TV to show in the future without any freezes, you need to connect to the Internet at a normal speed of at least 50 Mbit per second or to your home network. All providers offer plans with higher speeds, so there will be no problems.
You can choose any router model, including a router. No need to look at the manufacturer and other characteristics. These characteristics, according to experts, are not particularly important.
The only advice when choosing is not to use budget models, because the device may not withstand the load and burn out.
Checking the signal quality
After installing and connecting the equipment and setting up the channels, you should check the signal strength level. This can be done using a receiver.
To do this, press the INFO button on the device three times. After this, information about the signal frequency, its encoding and reception quality should appear on the screen. If it exceeds 60%, then everything is done correctly and the equipment is working normally.
If the level is less than the specified value or constantly “dances,” then it is necessary to look for and fix the problem, because otherwise the picture will be unsatisfactory.
How to set up a router for Smart TV
Before understanding how to connect a TV to a router via cable, the user needs to properly configure this router for smart TV. It is done using a web interface. It can only be opened in a browser, which is why the sequence of actions is as follows:
- The router must be connected to a power adapter, but the adapter itself does not need to be plugged into a power outlet. Connect the LAN port of the router to the network card on the computer, connect the cord;
- Now you should correctly configure the network card on your computer;
- Turn off the router and restart the computer.
As soon as the computer boots, the user can open the browser and go to the address indicated in the instructions on the router, go through authorization, enter the username and password and set up a connection with the provider.
Main problems and ways to solve them
Problems can arise both at the setup stage and after it. Most often, users complain about the following problems:
- The message “No signal” appears on the screen, there is no picture. There may be several reasons for this problem: damage to the antenna or incorrect connection of one of the connectors. You need to check all possible options and fix the problem. You may have to look for a new place to receive the signal or raise the antenna higher.
- The image quality is poor or there is a delay. In this case, the problem is most likely with the antenna. It may be oriented incorrectly or simply not have enough power to receive the signal properly. If the reception quality deteriorates significantly, it is recommended to go to the RTRS website and once again check the direction to the nearest relay towers. It is possible that the signal is blocked by a barrier between its source and the antenna.
- Only one multiplex works - 10 out of 20 channels. In this case, you need to check the operation of the second repeater. It may have stopped broadcasting in the region or the antenna is too weak to pick up its signal. In this case, you can try connecting to another tower. The receiver could simply not add non-working channels to memory. In this case, they need to be configured again and saved.
- One or more channels have failed. This problem rarely occurs. The reason may be the operation of the TV, the antenna, or a problem at the transmitting station. The channels should be reconfigured; if failures occur regularly, check the serviceability of the antenna or TV.
How to connect multiple TVs to a cable network or antenna
Connecting several televisions to a cable network or antenna transmitting an analog or digital television signal is no more difficult than one, except that you will have to put not one F-plug on the cable, but several. For this purpose, there are television signal splitters, popularly called “crabs”, they are also called “splitter”, “splitter” or “divider”.
The crab has one connector for connecting a signal from an antenna or a splitter in the entrance, marked IN (input), and several connectors for connecting televisions, marked OUT (output). If there is no marking, then usually the crab's entrance is on one side of the body, and the exits are in a row on the opposite side. All outputs for the crab to work properly must be connected to TVs.
If there are two outputs, then to two TVs, if there are three outputs, then to three, and so on. There should be no loose connectors on the crab. If the output remains unconnected, then it must be loaded onto a resistor with a resistance of 75 Ohms. Or, as they say, put a plug. But in this case, part of the useful signal will be lost; it is better to use a crab, in which the number of taps is equal to the number of connected TVs.
The design of the splitter is a thin-walled casing made of silumin or brass, which also contains connectors for connecting F-plugs. The divider circuit is usually a transformer, one turn of enameled wire with a diameter of 0.2–0.4 mm, threaded through ferrite rings or tubes. Installation of transformers is carried out using a hinged method. The case is hermetically sealed with a metal lid and sealed or fixed with glue.
Eyelets are provided for mounting the crab on the wall. The housing also has a thread with a screw for grounding, although it is not clear where to get the ground wire in the vast majority of apartments. They are usually not grounded, so on some channels there may be interference from electrical wires, the Internet, and a telephone running next to the television cable. Whenever possible, such proximity should be avoided when laying cables. For a more detailed look at the design and electrical circuit of the crab, you can visit the page “How to connect a television antenna amplifier to a power supply.”
If you wish, you can make a crab, which is not inferior in technical parameters to expensive samples from well-known companies, with your own hands.
When connecting TVs through a crab, the level of television signal reaching each TV connected to it, regardless of whether the TV is working or not, will be reduced due to losses in the crab and the additional cable length. When connecting two TVs - by 30%, three - by 60%, four - by 90%, and if the analogue or digital television signal coming to the crab is already weak, then the image quality on all connected TVs may decrease significantly. Usually the signal in cable television is quite powerful, and its level is sufficient for the normal operation of all televisions connected to the crab.
Advantages of digital television
Compared to analog television, digital technology benefits from a longer list of advantages, significantly expanding the capabilities of TV users. The main advantages of digital television:
- improved sound and picture quality;
- expansion of the number of channels in the same range;
- the ability to record television programs and create archives;
- no need for powerful transmitters;
- choice of broadcast language and subtitles;
- the ability to add a radio to the multiplex;
- ability to receive EPG signals.
Digital television has very few disadvantages:
- During a thunderstorm and other adverse weather conditions, the signal may be poorly transmitted;
- if the signal weakens (often this depends on the choice of antenna), individual fragments of the image or the entire picture as a whole partially freeze.
Setting up a router for IPTV
You have connected your TV to the Internet via a router and now you must set up the IPTV feature to watch digital channels over the Internet. How to do it? To go to the web router interface, you must use the settings at 192.168.1.1 or 192.168.0.1.
The further procedure depends on the router manufacturer. For example, in the new TP-Link operating system, the IPTV (multicast) function is automatically enabled - no additional debugging is required. If you have Asus, you need to enable multicast routing on your local network.
If you have a Zyxel Keenetic router, you need to do the following:
- To combine the Internet and IPTV, create a pair of interfaces and connect them to the WAN. For example, IPTV is provided through VLAN 10, Internet access is provided through VLAN 100 (you may have different details - contact your supplier or check your contract for information).
- To create a new IPoE connection to VLAN 10 (IPTV port), go to Internet - IPoE, and add a new interface with VLAN ID 10.
- Check the two checkboxes below the blue connector image. Configure the necessary interface settings. Similarly, we create a VLAN with ID 100 for the Internet.
- Enter the VLAN ID. Go to Home Network - IGMP Proxy and select Interface Allocation.
Connection using a set-top box
You can also connect using a set-top box. This method is perfect for those who do not have a set-top box with a smart TV, that is, they do not have the opportunity to use the Internet. The set-top box connects all the functionality of a smart TV, and users can try it all before purchasing a device with Smart TV technology. Connection is very simple, all you need is:
- Connect an Ethernet cable to the router connector called WAN;
- We connect the router to the set-top box using a LAN cable;
- We connect the set-top box to the TV via an HDMI cable.
After this, you can use all the functionality of the device, including using the Internet.