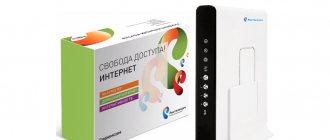
Convenient “Velcom” service. To the global network without problems!
Many modern providers are developing special services to simplify manipulation of their service packages.
Such is the Belarusian one, whose developers came up with the “Settings Wizard” of the network. Now every client of the company can use this convenient and extremely simple tool. Setting up the Internet from Velcom does not look easy, but it is very simple. For example, if you have an Android phone, you can use one of the following methods:
- By automatically sending an SMS to the provider. The master will do it himself. But he does not do this in all possible cases. So if the configuration is not updated automatically, then you need to use one of the methods below.
- Using USSD request. Entering the “magic” code *135*0 and then calling will help.
- It is possible to update the configuration via the Internet. To do this, you need to go to the address: https://internet.velcom.by%2C/, go through authorization and follow the interface prompts.
- By manually sending an SMS to number 512. Moreover, the text of the message is different for connecting and updating different services. Here is a small table with examples:
- If any difficulties arise, call the information service at 411. As a last resort, visit the company’s service center. But, I think, things will not come to such an approach due to the variety of other alternatives.
After completing these steps, it is better to turn off the device and turn it on again. This is what the Velcom Internet setup looks like as a first approximation.
How to disable unlimited Internet on a smartphone
Traffic packets are deactivated using the same methods as in the case of connection. This:
- personal account or mobile application;
- call the operator at 411;
- special team *135*7#;
- operator sales offices (you must take your ID with you to disable the service).
Velcom unlimited Internet traffic packages provide subscribers with access to various services and platforms without charging. This allows you to save on watching and listening to your favorite content, audio and video calls, communicating on social networks and instant messengers.
0 0 Votes
Article rating
Some important nuances
How to set up the Internet after changing the SIM card? In the same way, only everything needs to be checked visually. Make sure that the settings are exactly what you need. In some cases, it makes sense to play it safe and clear all the profiles on your phone.
Sometimes the firmware of the device can negatively affect the operation of the listed services. Then call 411, and the company’s specialists will help you.
The connected phone may refuse to work with Java. In this case, go to the “Configuration” menu => “Personal configuration settings” and create an access point with the parameters from the contract. That’s probably all - now you know how to connect internet from Velcom.
Source
Cellular trends
It’s no secret that today the Internet is emerging, and probably has already taken a leading position among the ways of people’s communication. Today, even the simplest push-button phones, not to mention smartphones and tablet PCs, are almost never produced without the function of accessing the Global Network. The Velcom operator has not remained aloof from modern trends and for more than 10 years has been providing its subscribers not only with voice communications, but also with access to wireless Internet.
The quality of the service is quite high and is positively assessed by new and existing Velcom subscribers. Setting up the Internet in the case of mass access devices is quite simple and should not be difficult even for novice users of phones, smartphones and tablets. Let's talk about this in more detail later.
How to set up your phone
If we are talking about a simple push-button telephone, but with support for Internet access and used in the Velcom network, setting up the Internet does not bring any problems to the owner at all, everything is done automatically in 99% of cases. This approach is provided by a special service called the “Settings Wizard”. To gain access to the Internet, the user just needs to register for the first time in the Velcom network - the Internet will be configured automatically, the phone will receive the necessary data for GPRS/MMS work directly from the cellular network.
If the settings do not arrive automatically, you can use USSD requests - dial the combination *135*0# on your phone keyboard and press the call key. PRIVET prepaid subscribers have a different way here - the combination *126*0# and the same call key. In addition, any subscriber can use Velcom’s Internet subscriber service system. Setting up the Internet using this system is literally two clicks of the mouse on the necessary items.
How to set up a smartphone or tablet
Most modern solutions running on Android are also able to automatically configure themselves to gain access to the Internet. If this does not happen, you need to follow several steps of the instructions “Setting up Velcom Internet on Android”.
- Turn off your smartphone (tablet PC).
- We insert the Velcom SIM card into the smartphone (tablet PC).
- We turn on the smartphone (tablet PC).
- When the smartphone (tablet PC) boots up, the SIM card is detected and the user is prompted to change the settings. You must accept the offer by clicking on the “Change” button.
- Go to “Settings” and select “SIM Management”. Next you need to find a menu like “Data Transfer”.
- In the window that loads, select the Velcom operator. Then an automatic download will occur, the process of which may last about one minute.
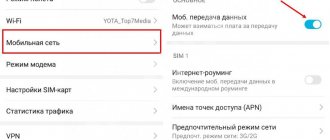
- Perhaps the most important thing: the Velcom Internet settings on Android must contain the correct access point. We find the corresponding item in the “Mobile network” menu, add a new APN and enter the following values. It is mandatory to fill out four points:
- Name - value should be Velcom.
- APN—value of vmi.velcom.by.
- Proxy server - value 10.200.15.15.
- Port - value 8080.
We save the entered data and reboot the device. This completes the setup. Now you can enjoy all the benefits of access to the Global Network.
Source
Settings for using your phone as a modem
General settings for a computer with a Windows operating system installed for accessing the Internet using .
Step 1: Installing the Modem
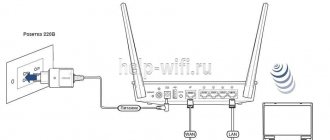
When connecting using the infrared port you must:
- Turn on the infrared port on your phone.
- Place the phone's IR port and the computer's IR port opposite each other.
- The IR communication icon will appear in the lower right corner of the monitor - the connection is established;
- then a window with the name of the phone will appear - the modem is installed. If this does not happen, you must use the modem drivers included with the phone or contact the phone manufacturer's support center on the Internet to download the necessary driver.
- After waiting for the message “Modem installed successfully”, click “Finish”.
When connecting using a PCMCIA modem, you must:
- Insert the PCMCIA modem with the installed SIM card into a special “slot” on the computer.
- Install the modem driver using the software included with the PCMCIA modem.
- After waiting for the message “Modem installed successfully”, click “Finish”.
When connecting via cable you must:
- Connect the phone and computer using a cable (use only the cable included with the phone or the cable recommended by the phone manufacturer).
- Use the included software to install the driver for your cable and modem.
- then a window with the name of the phone will appear - the modem is installed. If this does not happen, you must use the modem drivers included with the phone or contact the phone manufacturer's support center on the Internet to download the necessary driver.
- After waiting for the message “Modem installed successfully”, click “Finish”.
When connecting via Bluetooth you must:
- Turn on Bluetooth on your phone and computer.
- Using Bluetooth software, connect your phone and computer by selecting the Dial up service.
- The computer will ask for a Bluetooth pin code to connect - you must enter an arbitrary number (code). Then a request for the phone will be received and the same number will be entered in response. After this, the devices are connected via Bluetooth. If the entered codes do not match, the connection will not occur.
- A Bluetooth connection icon will appear in the lower right corner of the monitor - the connection is established;
- Next, the Windows operating system will install the standard driver for the modem (Standard Modem over Bluetooth). A window with the name of the phone will appear on the computer screen - the modem is installed. If the driver is not found, you should use the driver included with the Bluetooth package.
- After waiting for the message “Modem installed successfully”, click “Finish”.
Step 2: Setting up the modem
If you are connected, you need to register the modem’s Internet access point by entering the modem initialization line into the modem properties.
In Nokia and Sony Ericsson phones you can also use another (alternative) method for registering an access point (see “Attention”, points 1, 2), but the modem initialization line must be blank!
Make sure that the phone is connected to the computer (there should be a connection icon in the lower right corner of the monitor screen).
- In the “Control Panel” window, select “Phone and Modem”.
- In the window that appears, select the “Modems” tab.
- Select your installed modem and click the Properties button.
- In the “Modem Properties” window, select the “Advanced communication parameters” tab.
- In the “Additional initialization commands” field, enter the modem initialization line:
- AT+CGDCONT=1,"IP","vmi.velcom.by" for velcom subscribers
AT+CGDCONT=1,"IP","wap.privet.by" for subscribers of PRIVET and Communication tariff plans without obligation.
- Click “OK” - the modem is configured, proceed to setting up the connection.
All characters must be entered without spaces. The text of the access point must be typed in capital letters only.
After installing the modem, you need to check its functionality. To do this, open on your computer: Start->Settings->Control Panel->Phones and modems. Next, select: Installed modem->Properties->Diagnostics->Poll the modem. After this, the modem will issue the commands that it supports - this means that the modem is indeed installed correctly and is ready for use. If this does not happen, it means that the modem is not installed correctly, or the data cable is not working and the device cannot be used.
Step 3: Create a remote connection
Make sure that the phone is connected to the computer (there should be a connection icon in the lower right corner of the monitor screen)
- Open on your computer: Start -> Settings -> Control Panel -> Network Connections;
- Select “Create a new connection” - the “Network Connection Creation Wizard” will open, click “Next”;
- Oh and click “Next”;
- Select “Set up a connection manually” and click “Next”;
- In the window that opens, click “Next”;
- From the list, select your installed modem and click “Next”;
- In the window that opens, enter:
- The name of the new connection, for example, velcom (can be any name)
- “Dial-up number” *99# or *99***1# (see “Attention”, point 2)
- Username and Password: empty
- Click "Next" and then the "Finish" button;
Step 4: Go online
- Connect your phone to your computer
- Open on your computer: Start -> Settings -> Control Panel -> Network connections -> velcom Internet
- In the “Connect to velcom Internet” window, click the “Call” button
- Wait until the “two computers” icon appears on the taskbar - the connection is established. If you want to end the connection, right-click on the "two computers" icon and select "Disconnect".
Attention!
When using an alternative method of registering an “access point” or “Internet connection entry point”, using a Nokia telephone as a modem, you need to register it in the phone (usually a menu item called packet data in the connection settings) according to the selected tariff plan:
Source
Automatic Internet settings on Velcom
What it is?
- "Internet without settings" allows you to use
- with incorrect mobile phone settings
- with settings of other operators
- for some phone models even with no settings at all.
Using the “Internet without settings” functionality, you can open any website and access any resources!
Rates
“Internet without settings” is provided free of charge, you only pay for actual traffic consumption according to your package.
For whom
“Internet without settings” is automatically provided to the company’s subscribers (except for PRIVET subscribers) with basic Internet access connected, packages: Light, 250, 250(arch.), 350, 750, 1500, 3000, Mobile Internet services; TP services: a1 wap, a1 web, a1 web plus, as well as subscribers of TP lines Non-stop, Telemetry, WEB.
How to connect/disconnect
“Internet without settings” does not require a connection and is active for the company’s subscribers (except for PRIVET subscribers).
If you do not want to use this opportunity, simply contact the help desk or the information center of the company / PPO attorneys and set a ban on accessing the Internet without settings.
How it works
“Internet without settings” is provided only on the company’s network if there is an Internet profile in the phone settings (with incorrect, and for some phone models, empty fields).
It will not be possible to use the Internet without settings while roaming; to access the Internet outside the A1 network, you will need to configure your mobile phone correctly.
When accessing the Internet with incorrect settings, a notification SMS is sent to the subscriber. The message is sent the first time you access the Internet without settings, as well as when you move the SIM card to another mobile phone (if it is not configured to work with it, it does not affect mobile devices that have the correct settings.
Source
detailed information
Service capabilities
Mobile Internet is a service of high-speed data transmission and reception using a mobile communication device: phone, tablet or modem. The operation of the service in the company's network is based on GPRS/EDGE and UMTS/HSPA/HSPA+ technologies. To use the service in the company’s network, it is enough:
- Have a mobile phone or modem that supports GPRS/EDGE/UMTS/HSPA/HSPA+ technology. Our online store has a huge selection of phones, tablets and modems;
- To plug ;
- Configure your phone/modem to work with the service.
Peculiarities
- included in the set of services of the subscriber's tariff plan, available to new subscribers upon concluding a contract, and to existing subscribers (if the service is disabled) - upon connecting to a package or changing the tariff plan.
- The package is changed automatically within 24 hours, subject to a positive balance and active subscriber status. Before the service package is actually changed, subscription fees and traffic fees will be charged in accordance with the original package.
- When you disable/change the Mobile Internet service package, the unused balance of prepaid traffic is reset to zero.
To whom is it provided?
The service is provided to all A1 subscribers.
How to manage the service
Management is performed by the subscriber in one of the following ways:
- USSD request *135# call (for subscribers of tariff plans with a subscription fee);
- Personal Area;
- in the voice menu 150.
Settings
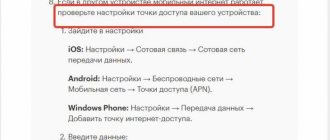
For A1 mobile Internet to work, you need to install settings on your mobile device in one of the following ways:
1. Automatically using the Settings Wizard
Settings are sent automatically when registering for the first time in the A1 network, when replacing a device or SIM card, or when updating the device software.
The Settings Wizard sends the necessary settings configurations, which you should save and then turn the device off and on.
2. USSD request *135*0# call
3. Personal account (Settings menu item)
4. Send an SMS with the word “internet” to number 512
During the setup process, please follow all prompts in the device menu.
After saving the settings, we recommend rebooting the device.
There is no charge for receiving settings using any of the above methods. SMS and USSD requests are free of charge.
The exception is when sending SMS while roaming.
Settings are not automatically sent while roaming. If, while roaming, the subscriber independently sends a request to receive settings via SMS, USSD, or Personal Account, correct receipt of settings is not guaranteed.
5. Configure the device manually
If your device does not support automatic settings, you can configure it yourself using standard settings, having previously specified information about the connected access point.
Typical settings for mobile devices:
Menu item names may differ depending on the manufacturer, model, and operating system version of the device.
Depending on the connected APN:
vmi.velcom.by or internet
| Profile name/Connection name: | A1 (any name is possible) |
| Homepage: | https://m.a1.by |
| Data channel | GPRS/Packet data |
| Access Point (APN) | |
| Authentication type (authentication type) | PAP |
| APN type | default |
| Username and Password | Not filled in |
| Proxy server address and port | Not filled in |
After saving the settings, we recommend rebooting the device.
Source
Automatic Internet settings on Velcom
Settings Wizard is a service that will allow you to independently obtain mobile phone settings for working with services based on GPRS/EDGE and UMTS/HSPA technologies. Thanks to this, you can comfortably use other additional services.
The service is provided to all subscribers of the company.
You want to comfortably use services based on GPRS/EDGE and UMTS/HSPA technologies! You need an easy way to customize your mobile phone! You can do this anywhere on the A1 network without any help! Use the Settings Wizard!
“Settings Wizard” is a service that allows you to independently obtain mobile phone settings for working with services based on GPRS/EDGE and UMTS/HSPA technologies. Provided to all subscribers of the company.
How it works
The following methods for obtaining settings are available:
1. Automatically:
- after concluding an agreement and first registration in the A1 network when connecting and/or MMS;
- when connecting and MMS, as well as when changing the package;
- when replacing a phone with a phone that supports auto-configuration;
- after changing the phone software version that supports auto-configuration;
- settings are not sent automatically when roaming;
- If a roaming subscriber independently sends a request to receive settings via SMS, USSD, ISSA, correct receipt of settings is not guaranteed.
The “Settings Wizard” will send you the necessary settings configurations, which you should save in your phone, then turn it off and on.
2. USSD
You can get settings for connected services based on GPRS/EDGE and UMTS/HSPA technology using a USSD request:
- for company subscribers (except PRIVET subscribers) - a request of the form *135*0# and a call key (in USSD, the name of the service is displayed as the MobiNet abbreviation).
- for PRIVET subscribers - a request of the form *126*0# and a call key.
3. Internet subscriber service (ISSA).
To receive the settings, you need to log into the ISSA section on the website https://internet.a1.by using your password. By selecting the “Settings” menu item, order the settings following the system prompts.
4. SMS
You can get the settings by sending an SMS with a keyword to the short number 512:
- internet - settings
- privet — settings for PRIVET subscribers
- mms—MMS service settings
- vse — settings for all services based on GPRS/EDGE and UMTS/HSPA technologies connected to the subscriber.
After receiving the settings, save them to your phone, then turn it off and on.
5. At A1 branded centers or through the reference and information service 150.
If you have not received the settings yourself, please contact the A1 company center or the help desk at 150. The company’s specialists will help you obtain/set up the settings for your mobile phone.
Attention!
The Settings Wizard service is compatible with phones from leading manufacturers. Compliance with the following recommendations will help you use the service:
- When changing the SIM card in some phone models (in particular, Nokia smartphones), check that the settings used are correct. If necessary, request and install new settings.
- To correctly install settings in some phone models, we recommend deleting all existing settings profiles and then requesting them again.
- If your phone's software has been modified and you are not receiving settings, we recommend contacting the sales and service center, the help desk at 150, or setting up the phone yourself. Also, for the service to work correctly, we recommend that you have the latest version of the software used on your phone. The updated version can be obtained from specialized service centers.
To organize access for java applications to the Internet in Nokia phones (Series 40), go to the menu section “Settings” - “Configuration” - “Personal configuration settings” and add a new access point with the necessary parameters according to your package, and then enable this access point . The same access point settings for java applications are required in Samsung and Siemens phones (in the application or game settings).
Please follow all prompts in the phone menu during the setup process.
After saving the settings, we recommend turning your phone off and on again.
“Settings Wizard” is not only convenient, but also does not require any costs! There is no charge for receiving settings using any of the above methods! SMS and USSD requests are free of charge. The exception is when sending SMS while roaming. The company does not guarantee the correct receipt of settings in the networks of foreign operators.
Source
How to set up Internet from Velcom on Android
Velcom Internet settings on Android
If you are a client of the Velcom mobile operator, then this article is intended for you, for those who want to set up the Internet on their Android smartphone.
As we know, the operator provides the population with GSM mobile communication service. Also, thanks to the wireless Internet connection service, users of Android devices can fully use applications and the browser.
As a rule, when purchasing a new SIM card with a network connection service, the settings are set independently. But it happens that the device does not register the connection automatically. In such a situation, you will have to set the Internet settings manually.
This instruction is standard for almost all models of smartphones and tablets running the Android operating system.
On devices with the Android platform, it is not at all difficult to set up an Internet connection yourself. This process will not take much of your time, you do not need to expend much effort. All you need to do is carefully follow all the steps described in the instructions below.
Please check first whether your tariff package includes a network connection service. If one is not connected, this is quite easy to do by finding out the information on the operator’s official website.
1) First you need to open the settings menu in the normal menu. Then go through the following points: “menu” - “settings” - “wireless network”.
muskos
We will need a modem, usb_modeswitch, network manager.
So, I had a Huawei e173 modem. But it doesn't matter, in principle. I spent four days on everything about everything) Having collected all the information together, I finally screwed up this **** modem)
Read to the end and try to start from the last point. In some cases, network_manager grabs the modem on its own. But I installed it as the last step and I don’t know for sure whether it’s correct, maybe I shouldn’t have configured usbmodeswitch.
The first thing we do is install usb_modeswitch from the Linux disk (any other repository). As a last resort, you can download the latest version of the application from the Internet and then install it on your computer from a flash drive, but I couldn’t do it, I don’t yet know how to install the package on the system. I use the application Synaptik.
1. So. It is best to configure it from under root, or rather, only from under it you can configure it. Log in to the console as root. We write - lsusb.
All your equipment will be identified there (the modem, of course, should already be turned on). We look at the modem id. Mine is 12d1:140s. Let's remember the numbers.
2. Now we need to make a change to the /etc/usb_modeswitch.conf file. We open it in graphical mode, if there are problems, then Linux has an editor in the console - vi. We write in the console: vi /etc/usb_modeswitch.conf. First enter man vi to read the editor help so you know how to edit. The only way I can help is to describe the steps in order:
— press i
- enter the required text
- click escape
- now press the colon - :wq (this command will write the file and exit)
This means what changes need to be made to the usb_modeswitch.conf file:
All other lines (and most likely there are none) are commented on.
The lines where you need to enter the data that we wrote down are highlighted in bold. Don’t change the italics, these are modem data.
The bottom line is that your modem is initially defined as a removable storage device, because... Inside it are wood for Windows. But we need to divide the definition of a modem into removable media and modem.
3. Write in the console /etc/usb_modeswitch
no extension. And we read what he writes in English. I couldn’t find any drava, but I found on Google that it doesn’t matter.
Source
How to set up your phone
If we are talking about a simple push-button telephone, but with support for Internet access and used in the Velcom network, setting up the Internet does not bring any problems to the owner at all, everything is done automatically in 99% of cases. This approach is provided by a special service called the “Settings Wizard”. To gain access to the Internet, the user just needs to register for the first time in the Velcom network - the Internet will be configured automatically, the phone will receive the necessary data for GPRS/MMS work directly from the cellular network.
If the settings do not arrive automatically, you can use USSD requests - dial the combination *135*0# on your phone keyboard and press the call key. PRIVET prepaid subscribers have a different way here - the combination *126*0# and the same call key. In addition, any subscriber can use Velcom’s Internet subscriber service system. Setting up the Internet using this system is literally two clicks of the mouse on the necessary items.
READ Unified Internet MTS how to connect via SMS
Settings for using your phone as a modem
General settings for a computer with a Windows operating system installed for accessing the Internet using .
Step 1: Installing the Modem
When connecting using the infrared port you must:
- Turn on the infrared port on your phone.
- Place the phone's IR port and the computer's IR port opposite each other. The IR communication icon will appear in the lower right corner of the monitor - the connection is established;
- then a window with the name of the phone will appear - the modem is installed. If this does not happen, you must use the modem drivers included with the phone or contact the phone manufacturer's support center on the Internet to download the necessary driver.
- After waiting for the message “Modem installed successfully”, click “Finish”.
When connecting using a PCMCIA modem, you must:
- Insert the PCMCIA modem with the installed SIM card into a special “slot” on the computer.
- Install the modem driver using the software included with the PCMCIA modem.
- After waiting for the message “Modem installed successfully”, click “Finish”.
When connecting via cable you must:
- Connect the phone and computer using a cable (use only the cable included with the phone or the cable recommended by the phone manufacturer).
- Use the included software to install the driver for your cable and modem. then a window with the name of the phone will appear - the modem is installed. If this does not happen, you must use the modem drivers included with the phone or contact the phone manufacturer's support center on the Internet to download the necessary driver.
- After waiting for the message “Modem installed successfully”, click “Finish”.
When connecting via Bluetooth you must:
- Turn on Bluetooth on your phone and computer.
- Using Bluetooth software, connect your phone and computer by selecting the Dial up service.
- The computer will ask for a Bluetooth pin code to connect - you must enter an arbitrary number (code). Then a request for the phone will be received and the same number will be entered in response. After this, the devices are connected via Bluetooth. If the entered codes do not match, the connection will not occur. A Bluetooth connection icon will appear in the lower right corner of the monitor - the connection is established;
- Next, the Windows operating system will install the standard driver for the modem (Standard Modem over Bluetooth). A window with the name of the phone will appear on the computer screen - the modem is installed. If the driver is not found, you should use the driver included with the Bluetooth package.
- After waiting for the message “Modem installed successfully”, click “Finish”.
Step 2: Setting up the modem
If you are connected, you need to register the modem’s Internet access point by entering the modem initialization line into the modem properties.
In Nokia and Sony Ericsson phones you can also use another (alternative) method for registering an access point (see “Attention”, points 1, 2), but the modem initialization line must be blank!
Make sure that the phone is connected to the computer (there should be a connection icon in the lower right corner of the monitor screen).
- In the “Control Panel” window, select “Phone and Modem”.
- In the window that appears, select the “Modems” tab.
- Select your installed modem and click the Properties button.
- In the “Modem Properties” window, select the “Advanced communication parameters” tab.
- In the “Additional initialization commands” field, enter the modem initialization line: AT+CGDCONT=1,”IP,”,”vmi.velcom.by” for velcom subscribers
- AT+CGDCONT=1,"IP","wap.privet.by" for subscribers of PRIVET and Communication tariff plans without obligation.
All characters must be entered without spaces. The text of the access point must be typed in capital letters only. - Click “OK” - the modem is configured, proceed to setting up the connection.
After installing the modem, you need to check its functionality. To do this, open on your computer: Start->Settings->Control Panel->Phones and modems. Next, select: Installed modem->Properties->Diagnostics->Poll the modem. After this, the modem will issue the commands that it supports - this means that the modem is indeed installed correctly and is ready for use. If this does not happen, it means that the modem is not installed correctly, or the data cable is not working and the device cannot be used.
Step 3: Create a remote connection
Make sure that the phone is connected to the computer (there should be a connection icon in the lower right corner of the monitor screen)
- Open on your computer: Start -> Settings -> Control Panel -> Network Connections;
- Select “Create a new connection” - the “Network Connection Creation Wizard” will open, click “Next”;
- Oh and click “Next”;
- Select “Set up a connection manually” and click “Next”;
- In the window that opens, click “Next”;
- From the list, select your installed modem and click “Next”;
- In the window that opens, enter:
- The name of the new connection, for example, velcom (can be any name)
- “Dial-up number” *99# or *99***1# (see “Attention”, point 2)
- Username and Password: empty
- Click "Next" and then the "Finish" button;
Step 4: Go online
- Connect your phone to your computer
- Open on your computer: Start -> Settings -> Control Panel -> Network connections -> velcom Internet
- In the “Connect to velcom Internet” window, click the “Call” button
- Wait until the “two computers” icon appears on the taskbar - the connection is established. If you want to end the connection, right-click on the "two computers" icon and select "Disconnect".
Attention!
- When using an alternative method of registering an “access point” or “Internet connection entry point”, using a Nokia telephone as a modem, you must register it in the phone (usually a menu item called packet data in the connection settings) according to the selected tariff plan: vmi. velcom.by for velcom subscribers
- wap.privet.by for subscribers of PRIVET and Communication tariff plans without obligation;
- When using an alternative method of registering an “access point” or “entry point for Internet communication”, using a Sony Ericsson telephone as a modem, you must determine the account number intended for Internet communication, which is subsequently entered into the dial-up number of the modem. To do this, select the “communication, data transfer” icon in the phone menu, after which the CID (external identifier) parameter, which is the account number, will appear in the properties of the created (or already existing and configured) account. Based on the received data, the dial-up number will be as follows: CID=1, dial-up number *99***1#;
- CID=2, dial-up number *99***2#;
- CID=3, dial-up number *99***3#.
Etc. - When setting up PDAs (personal digital assistants), you must enter the following parameters depending on the selected Internet service tariff plan. For velcom subscribers: Access point vmi.velcom.by Username and Password: empty
- For subscribers of TP PRIVET and TP “Communication without obligations”: Access point wap.privet.by Username and Password: empty
22 comments on the topic » Tested in practice: which 3G modem is the fastest? "
All modems with a built-in antenna are of poor quality. The modem has an input to an external antenna. I soldered two telescopic antennas and outside the city where there was zero signal. I got from 50 percent to 80 90 and 96 percent it fits. I'm looking for a repairman mobile phone
no. tested in practice.
triji - bottom
I checked the MTS and Beeline modems, one is the other. Beeline does not provide the speed specified in the contract. MTS is generally a complete hat. Not only is traffic limited to 25GB per month, but also the speed of 0.1-0.8 kb for receiving traffic. So take the iota, even if it’s a little more expensive, but the speed is normal and the traffic is unlimited. And the coverage area is larger than that of all other operators. I personally settled on it.
Hmm, I checked my 3G life modem on speedtest, the results are disappointing: receiving speed 1.28 Mbit/s, transmission speed 0.36 Mbit/s. It doesn’t even reach the screenshot above. But I live in the city center.
wow, it’s just not in megabytes, but megabits
My nerves have already run out from such a speed - 0.00 kb.
Good article, thank you.
why is it so expensive for this unlimited service they tell us like unlimited diesel for 500 rubles per month speed 1 megabyte per second
And I read here and followed the link there - in Orel it’s normal https://zhizn.zarinet.ru/?page_id=129. 3G MODEM E1750.
In fact, the e1550 is designed for 3.6 Mbps.
I wonder how the MTS e1550 overclocked and transferred 1.2 megabytes/sec if, according to the specification, it has 3.6 Mbps download / 384 kbps upload
well done, the article is actually relevant, it was useful to me)))
gee) congratulations, boy))))))
Smiled emoticons at life ????
The publication is not bad, but:
— the style is heavy (“registered and licensed”, “is”, “an important parameter”, “this operator”, etc.);
— the beginning is boring and boring;
- about the most important thing (which modem is faster) is written at the very end. The inverted pyramid rule does not seem to apply to this publication;
— I wonder how the test itself went (where are the photos of students with a laptop?). Of the illustrations for the material, only dull maps of the Republic of Belarus, modems and screenshots are available;
— the principle of “NEP” (who knows, will understand) is, alas, not applicable to this publication;
— the authors of this opus about 3G modems came to study at the journalism department for a reason =)
As well-versed people said, you can manage to use Unlim without using your phone. You just need to configure the modem and Opera (regular) correctly.
about unlim... they stated that it was completely unlim) And the details in the fine print are in the contract, technical passport, etc. always learned as you use them. ) and not only from MTS.
“If you are interested in 3G unlimited, then MTS will help you.”
The MTS company provides Unlim only for Opera Mini users - this is a browser for mobile phones, you are talking about using 3G Internet on PCs and laptops.
And even then, this is not anlim at all, but just a marketing ploy. There is a limit of 20 thousand rubles and 15 megabytes per downloaded file.
Smart girl))) This article was definitely useful to me, since I planned to connect to 3G Internet)
You will practice 100% on onliner.by ????
)) this promotion ended recently. it was the case. they even extended the promotion for 4 days. The salon said that this promotion has already ended.
There is information on the Velcom website that, upon signing a one-year use agreement, the modem is issued with a payment of 10 rubles per month. Does this no longer fall under the definition of “free” or does the number “10” have hidden zeros?
Source
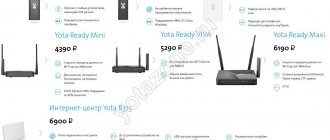
Mobile Internet packages
How to connect/change the Mobile Internet service package: Packages 500 MB, 1 GB or Turbo button - 10 GB (you can buy additional traffic only after using up the included traffic of the tariff plan or previously purchased package), as well as
Unlimited Internet or Unlimited Internet for a day:
- when redirecting to a special page;
- USSD request *135*7# call;
- Personal Area
Other packages:
- USSD request *135*1# call;
- Personal Area;
- in the voice menu 150;
- at the company's sales and service centers or at the office of official attorneys on the basis of an identification document.
For subscribers of PRIVET tariff plans, the service can be activated in one of the following ways:
- USSD request *126*1# and call key.
- In USSD, the name of the service is displayed as an abbreviation MobiNet;
- Personal Area.
How to disable the Mobile Internet service package: Unlimited Internet for a day, 500 MB, 1 GB or Turbo button - 10 GB packages are automatically disabled upon expiration. For 500 MB, 1 GB and Turbo Button packages, the validity period is until 23:59 of the last day of the current tariff plan provision period.
Unlimited Internet package:
- USSD request *135*7# call;
- Personal Area;
- at the company’s sales and service centers on the basis of an identification document or Access Code;
- in the office of official attorneys on the basis of an identity document;
Other packages:
- USSD request *135*1# call;
- Personal Area;
- in the voice menu 150;
- at the company’s sales and service centers on the basis of an identification document or Access Code;
- in the office of official attorneys on the basis of an identity document;
- by calling the contact center 150 based on the Access Code.
How to check the remaining traffic for subscribers of tariff plans with a subscription fee For packages of 500 MB, 1 GB or Turboknopka - 10 GB:
- USSD request *100*1# call;
- Personal Area.
Other packages:
- USSD request *100*1# call key;
- Personal Area;
- in the voice menu 150.
How to check the validity period of a package: For 500 MB and 1 GB packages:
- USSD request *141*2*3# call;
- Personal Area.
For other packages:
- USSD request *135*3*2# call;
- Personal Area.
How to request settings for your phone for subscribers of the Privet tariff plan line:
- USSD request *126*0# call.
- In USSD, the name of the service is displayed as an abbreviation MobiNet;
- Personal Area;
- send an SMS with the keyword privet to number 512.
Using ADSL technology
The subscriber's telephone line is used for connection.
Pros:
- no need to install additional cables or pay for connection;
- You can use your phone at the same time without any problems;
- low cost of packages and a solid set of bonuses;
- you can connect remotely and receive a contract for the house.
Minuses:
- limiting incoming and outgoing data transfer speeds to 10 Mb/s and 1024 Kb/s, respectively.
| Rate | Data transfer rate, Mbit/s | Bonuses | Cost, BYN/month |
| Premium | to 10 | Dr.Web anti-virus software; Internet radio; internal resources. | 29 |
| Must Have 5 | up to 5 | 23 |
With ADSL service, the user uses his own modem.
How to connect:
- Complete the online application.
- Wait for the manager's call.
- Get a contract for the house.
- Pay for the appropriate tariff plan.
- Wait for the manager to call about the successful activation of the service.
- Set up your modem and all your devices to work.
- Use the Internet for your own pleasure.
You can get a certificate about the availability of the service in your locality and street by calling 150. Or through the online application form, but this will take longer.
How to connect unlimited internet for a day
If you wish, you can connect to unlimited for a day. This option will be useful for people who only need unlimited Internet access for one day. The function is available for phones running Android, IOS and Windows. The option can be connected to Comfort, as well as Super WEB and Light tariffs.
To connect to Velcom Belarus unlimited internet, you need to send a request to *135*7#. You can also configure it through your Personal Account if you have access to the World Wide Web. In addition, you can contact a mobile phone store to get help from employees. Velcom unlimited internet will be activated for exactly 24 hours, after which it will turn off. The cost is 2.98 rubles. This is a one-time fee that is debited at the time of connection. During the day, a person will be able to use unlimited Welkom Internet from his mobile phone or via a modem.
Using USSD commands, you can receive reference information about the services of the Velcom mobile operator, connect and disconnect them. To do this, you need to perform a simple action - dial a certain combination of characters on your smartphone.
(2 ratings, average 4 out of 5)
Tariff plans with unlimited internet
Often, mobile Internet packages provide a certain number of MB (megabytes) or GB (gigabytes), within which the subscriber can connect. And when they expire, he has to order a new option to extend access. Unlimited traffic means that the operator does not set a limit on the volume, but can limit the speed.
The operator provides connection to the phone within the 3G level. This means that via the mobile Internet the subscriber will be able to view various content and communicate with contacts through audio and video calls. The “unlimited” mode in this sense saves a lot of money, since the user only pays for the package itself, traffic is not charged.
TP with included unlimited packages
On what tariffs can you activate unlimited:
| Name | Included in the tariff (traffic) | Available unlimited packages | Cost (in Belarusian rubles/month) | Control and Connectivity |
| Unlim S(tablets and modems) | 8 GB | YouTube, 1 Mbit/s | 11,90 | *135*7# |
| Unlim M(tablets and modems) | 15 GB | YouTube, 2 Mbit/s | 16,90 | |
| Unlim L(tablets and modems) | 30 GB | YouTube, 2 Mbit/s | 23,90 | |
| Comfort S | 1 GB + storage | Social networks, instant messengers, music, YouTube, 512 kbit/s and 2 Mbit/s | 5,95 | |
| Comfort M | 7 GB + storage | Social networks, instant messengers, music, YouTube, 512 kbit/s and 2 Mbit/s | 9,95 | |
| Comfort L | 15 GB + storage | music, YouTube, 512 kbit/s and 2 Mbit/s | 25,90 | |
| Comfort XL | 30 GB | music, YouTube, 512 kbit/s and 2 Mbit/s | 37,90 | |
| Starting | 500 MB | Unlimited for a day | 7,90 | |
| Victory | — | Unlimited for a day | 1,00 |
Features of tariff lines:
- Unlim - this line is designed for tablets and modems and provides exclusively Internet access with a certain amount of traffic. There are several options - S, M and L, which differ from each other only in the amount of the Internet package. Some unlimited options can be connected to these tariff plans (information is listed in the table below).
- Comfort - service packages that combine most of the necessary options. For example, calls, SMS and Internet access. Available Internet traffic starts from 1 GB. Comfort L is considered the most profitable, since it gives unlimited use of social networks and instant messengers, in addition to providing 15 GB and unlimited outgoing calls within the network.
- Starter is a tariff for those who are just starting to use a smartphone and have not yet figured out its additional functions, but have mastered the basic ones, that is, SMS messages, calls and Internet connection. The package provides 500 MB of traffic and an unlimited number of minutes for outgoing calls within the network. Without connecting to an unlimited package, Internet traffic is charged at 0.01 rubles. for 1 MB.
Tariffs with full unlimited internet
In addition to tariff plans for which it is possible to connect traffic packages, there are two more options that provide full unlimited access to the mobile Internet - “Business Class” and “Smart Infinite” for 115.40 and 57.64 rubles per month, respectively.
Smart Infinite includes:
- Unlimited internet, calls and SMS\MMS within the network;
- 1000 minutes for outgoing to other networks + 79 VOKA TV channels;
- Cost - 57.64 Belarusian. rub/month
Business class includes:
- Unlimited internet, calls to all networks in the country and SMS within the network;
- 300 min. for international calls (CIS, Europe) + 79 VOKA TV channels + silver and bronze numbers free of charge;
- Cost - 115.40 Belarusian. rub/month
Promotional offers
New subscribers who want to connect to Velcom for the first time receive a promotional discount on one of the tariffs:
| Rate | Standard price (RUB/month) | Promotion price (RUB/month) |
| Comfort S | 11,90 | 5,95 |
| Comfort M | 19,90 | 9,95 |
| Comfort L | 25,90 | 12,95 |
| Comfort XL | 37,90 | 18,95 |
| Starting | 7,90 | 5,90 |