Previously, Yota was only a high-speed Internet provider and one of the first companies in Russia to provide access to fast mobile 4G LTE Internet. Today it acts as a full-fledged mobile operator. A distinctive feature of Yota in comparison with other providers is that it provides the opportunity to manage your tariff plan and your funds on your balance using your personal account on the official website or in the application on Android and IOS OS. Often in the case of applications and mobile devices, it is not possible to set up the Internet from this provider. Today we will talk about how to connect the Internet to Yota and how to set up Eta for an Internet connection, as well as what to do if Yota Internet does not work on Android.
Basic Steps
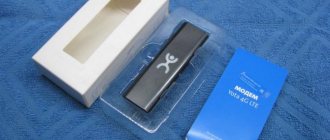
Before setting up an Eta modem, you need to decide on the model and purchase it. When you get home, you need to insert the device into a free USB port (if you have a USB modem from Yota). It is interesting to note that the Many model can be connected using Wi-Fi without directly connecting via USB to a computer.
As soon as you connect the Iota modem to your laptop or PC, driver installation will begin automatically - this process should not be interfered with. An important advantage in the process of setting up a Yota modem or router is that it does not require installing any additional programs or applications, because its operation will be carried out through a browser.
After installing the drivers, you will need to see the new available network in the list. To complete, you need to connect to this network, open a web browser and go to any site - the user will immediately be redirected to the new profile registration page. After registration, you will need to select a tariff plan and top up your account to start using fast and unlimited Internet.
Internet connection from the company Iota
Internet connection is mainly carried out automatically. An icon on the screen informs you that data is being exchanged. But sometimes you need to configure apn yota manually, using the data that the provider sends to each new subscriber when activating the SIM card. If for some reason an SMS from the operator did not arrive or was lost in the Spam folder, you need to call the support service and ask them to resend the settings. The received data will need to be saved after opening the message.
Please note: How to activate Yota SIM card on all devices
After connecting to the network, you should launch a special application from iota (without it you will not be able to start using the World Wide Web), previously downloaded to your smartphone or tablet. All that remains is to choose the appropriate tariff and connect it.
Types of Iota modems
Before understanding the connection and configuration rules, it is important to decide on the type of equipment for accessing the network.
You can choose any one, depending on your need and frequency of Internet use. Some people need to use desktop options for their home PC, while other people need a portable device that can be used anywhere in the city or country.
Among the possible options, the Yota operator offers the following modems:
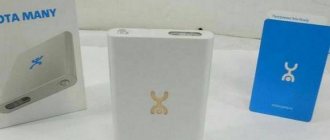
- Wi-Fi modem called Yota Many. Such a device is capable of distributing the Internet to other devices while being in your pocket. It does not require power, charging is carried out from any USB input, and the battery is enough to operate for about 15 hours. Access to the Internet appears after using a SIM card, but it is impossible to use cards from other operators, only Iota.
- 4G USB modem. This device can only operate via USB ports. Working with such equipment is easy; installation does not require special programs or drivers. You can use both a stationary version and a portable one to work with a laptop anywhere.
- USB Wi-Fi modem. A device that operates via USB and, once connected, can distribute the Internet to other mobile devices. It works on a 4G network and can distribute the Internet to 8 devices at once.
Knowing about possible modems, you need to understand the settings and connections in detail.
USB 4G modem
The technology for setting up and connecting the other devices described above is the same.
To configure you need:
- Install equipment into the port.
- Go to the Network and Sharing Center, where the new connection should appear.
- Next, you need to open your browser, where you will be automatically directed to the official Yota page. On it, the client needs to fill out a registration form.
- At this point the setup is complete, you can use the Internet.
As for the connection, it starts automatically when the device is inserted into the port. In this case, a small window will appear on the monitor on the right, notifying the user that operation is normal.
In some cases, automatic startup does not work. To do this, you need to connect manually.
- In the “My Computer” folder you need to find the disk image, go to the folder and click on the “Autoinstall” file.
- Then a window will open where you need to select a language and click on the software installation button.
- When the installation is complete, the modem will be detected and ready to use.
Yota modems work with different modern operating systems. If you can’t install and configure the device yourself, you can use the help of a company specialist.
Help from specialists
All possible problems can be solved by contacting the technical support service of the Iota provider (Figure 8).
The Yota company boasts an excellent, well-coordinated team that provides assistance in setting up and using Internet services quickly and efficiently.
The operator will ask you what operating system device you are using and will provide complete information on setting up the device.
Figure 8. Yota technical support service
Possible problems
After connecting and setting up, certain operational difficulties may arise.
In some cases, after the manipulations have been carried out, the modem does not show any signs, or it simply cannot connect to the network, the reason may be:
- Computer problems or disabled ports. In this case, the modem will not be visible in the device manager or a yellow exclamation mark will appear next to the modem name, indicating that the software was installed incorrectly. To solve the problem, you need to enable the ports or update the drivers or reinstall the operating system.
- Weak signal or lack of Iota coverage. To determine this, you can look at the modem's LED, which should be blue. You can also find out about the signal by the status on the computer. If the network in your home has poor reception, it is recommended to use special extension cords that allow you to place the modem in a place with a good signal.
- The old operating system, when the modern modem cannot be detected, does not support encryption. This combination can cause characteristic difficulties. If problems arise that you cannot solve on your own, then it is best to contact Iota technical support. Operators will help you connect and configure the modem remotely or point out possible problems and ways to resolve them.
The Yota provider is one of the largest providers of wireless high-speed Internet services. To use the services of the Yota mobile operator, you must purchase a proprietary modem (router).
Many Yota subscribers, after purchasing a router, encounter problems setting it up. Let's find out how to go into the Yota router settings to set parameters and change the password.
Automatic setup
The operator is trying to improve the comfort of using mobile communication services for subscribers. To do this, the company has created a special configuration algorithm in which all parameters are registered automatically.
How the procedure is performed:
- The client buys a SIM card.
- Inserts it into the device and turns on the phone.
- The SIM card is registered on the network.
- It receives automatic settings.
- The subscriber can fully use the Internet in the future.
If automatic configuration of the Yota access point was not performed when entering the network, then you should contact the operator. Ask the specialist to send the parameters to your number again. You will need to confirm their saving in the system and reboot the device.
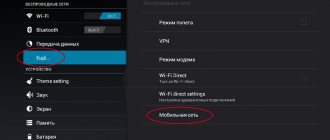
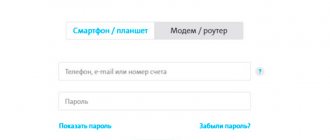
Managing Yota modem settings
To go to settings:
- Insert the Yota modem into the computer's USB port
- Wait for the LED indicator to turn on
- Launch an Internet browser, go to the website https://start.yota.ru
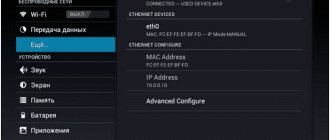
Changing settings and checking the connection status are available at the IP address 10.0.0.1 and the web interface address status.yota.ru.
The status.yota.ru/advanced page allows you to change the DHCP range of the device and return to factory settings. Change the values on this page only on the advice of a Yota Contact Center specialist.
Resetting the settings can be done using the reset button next to the SIM card slot. Briefly (within a few seconds) press the button with a thin object (a paper clip or a toothpick) to return to the default settings.
By logging into the Yota device administration panel, you can:
- Reset settings to factory settings
- Check and update software version
- Change Wi-Fi password
- Change password and access parameters in the admin panel
- Change the parameters for distributing IP addresses to connected devices
An example of setting up a Yota router via the web interface
We remind you once again that for a successful connection, the Yota device must be connected to the network connector of the computer with a cable. If the router does not have a network connector, then it is configured via Wi-Fi. Below are examples for the Yota Internet center.
Resetting the Yota modem to factory settings:
- Go to the web interface at https://10.0.0.1 or https://status.yota.ru.
- Open the “Management” tab and go to the “Wi-Fi Settings” section.
- Uncheck the box next to “Enable Wi-Fi” and click the “Apply” button. The wireless network indicator will turn off.
- Open the “Restore and save user settings” tab.
- Select the folder where to save the text file with the settings.
- Open the "Personalization" tab and go to the "Factory settings" section.
- Check the “Restore device to factory settings” checkbox.
- Click Apply.
- After the reboot, you need to restore the settings from the file and turn on Wi-Fi.
Changing the Yota router Wi-Fi password:
- Open the “Management” tab and go to the “Wi-Fi Settings” section.
- In the Wireless Settings section, specify a name for the Wi-Fi network and click the Apply button.
- In the “Security” section, enter the required password in the WPAPSK2 field and click “Apply”.
Changing the Yota administrator password:
- Open the “Personalization” tab, then the “Device Settings” section.
- To enable the password request, check the “Allow password protection” checkbox, enter the password twice, then click “Apply”. The default login is always admin.
Yota settings that need to be enabled: how to configure Yota to the maximum
The correct Yota settings allow you to work with the operator to the maximum and we will tell you how to set up Yota on your device quickly and easily!
Immediately after the SIM card is inserted into the device, the system will automatically configure the Yota network for the smartphone. This happens in most cases, so new subscribers of the telecom operator do not need to perform any additional actions - just insert a SIM card and turn on the phone.
After the device boots up, you will be able to see the carrier icon. As soon as the SIM card is recognized by the network, you need to launch the company’s previously downloaded proprietary application, which is required to activate the services. You must download the application, because you won’t be able to set up Iota on your phone without it.
Immediately after launching the application, the subscriber will need to select the most suitable tariff plan:
- As soon as the application starts, a window will appear in which you need to click on the “Select connection conditions” link.
- In the list that appears, you should select the most suitable one from the proposed options.
It is also necessary to decide on the tariff in advance so as not to click at random. You can view the current tariff plans on our website or on the official portal of the telecom operator.
SIM card activation
To activate the Yota SIM card, you just need to insert it into the gadget and turn on the device. After loading the software, the operator logo should appear on the screen. If this does not happen, then you should restart the device again or try contacting support. The reason may be the lack of coverage in your region (in 2021, the coverage boundaries have expanded significantly compared to 2015), so before purchasing a SIM card, you should find out all the nuances in advance. Coverage maps can be viewed on the official portal of the mobile operator.
Windows phone.
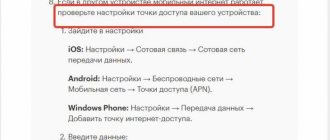
- Find “Settings” and select “More”.
- Open the section called “Access Point”.
- In this section, you will need to click the “+” symbol, which will allow you to create a new access point.
- After you press the “+” symbol, a window will open in which you need to enter the following data: name – “Yota”, then APN – “internet.yota”.
- We save all the changes made.
- After the changes are saved, you will need to repeat the same procedure again and make sure that the status for this access point is set to “active”.
As you can see, setting up APN for any operating system will not take much time and does not require any specialized knowledge. And, if everything is done correctly, it will not cause any particular difficulties. If something does go wrong, you can always contact technical support specialists and they will clearly explain what exactly went wrong and what exactly should be done about it. You can write to consultants on the official website in the “Support” section (https://www.yota.ru/support), call or send an SMS with a question to the short number 0999.
YOTA was previously a high-speed Internet provider. But now it acts as a full-fledged mobile operator. Its main feature is tariff and balance management using a special mobile application, which must be downloaded to your phone. Therefore, many users are unable to set up the Internet right away. Don’t panic and throw your SIM card into the far corner of a dusty closet. You should study the connection algorithm in detail and eliminate possible problems.
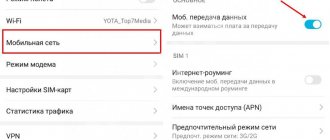
Configuring apn yota parameters for the Android operating system
Let's look at how to set up access to the World Wide Web on Android:
- Go to the “Settings” menu and select the “More” sub-item.
- Next we find “Mobile networks”.
- Select “Access point apn” (in a phone with two SIM cards, select iota);
- For the Internet to work correctly, delete existing apn access points and create a new one by clicking on “+”.
- Enter the parameters: name “yota”; apn "internet.yota";
- Make sure that the “Enable/disable apn” setting is checked.
- Save and begin activating the access point.
If network access does not appear, you need to restart your smartphone or tablet. You can also select the “Only 2G networks” item in the settings, check the box next to it and quickly remove it. Then the phone will automatically connect to LTE.
Devices running Android OS tend to disconnect from the apn access point on their own when there is no coverage. The chance of such an incident is negligible, since in 2021 the mobile network of the yota operator is available in almost any region of the Russian Federation. To connect to the Internet, you need to turn off and turn on the gadget again and repeat the procedure with checking and unchecking the box described above.
How to activate on Windows
How to set up an Iota access point on an Android smartphone
Internet from ETA is also available on smartphones running the Windows Mobile operating system. To access the settings, you need to swipe down from the phone status bar. This will bring up a toolbar in which you should select the “Communication” section. If mobile communication is disabled, then you need to activate it with a special slider.
Next, an access point is created:
- Go to the path “Network and wireless network” - “SIM card” - “APN access point” - “Add a new access point”;
- The “Name” field is filled in as “Internet Yota”, and the access point is “internet.yota”;
- Don’t touch anything else, apply the settings and reboot the device.
Why there is no access to mobile Internet apn yota
Setting up on a tablet
There are a number of reasons why there may be no connection to the World Wide Web:
- If the signal is unstable (when it appears and then disappears), the operator recommends changing your location. It is necessary to move to another room or move away from iron structures that may affect the signal. It should be remembered that in basements, especially with thick concrete walls, the quality of signal reception deteriorates significantly.
- The complete absence of mobile Internet may be the result of a settings failure, when in the APN column, instead of the internet.yota command, yota.ru or any other name is automatically written. After entering the correct settings, the connection usually appears again.
- Some devices do not support 2G/3G/4G networks, so the Internet from iota does not work on them. These could be old mobile phones or tablets. Models produced in 2015-2016 support the LTE standard.
- If you cannot log into your personal account on the cellular operator’s website, but you can go to any other page, then it is recommended to disable the antivirus and firewall for a while. You can also try using a different browser to log into the official website.
In the most severe cases, when the above methods do not bring results, you can always contact technical support by calling, writing support on the official website or on Twitter.
I would like to note the following point: Iota works on Megafon networks and during the day there is a very heavy load on them. Internet speed can drop from 9 to 22 hours, and at night it can increase significantly. But this is more of a problem in large, densely populated cities. In places where the coverage is good, the Internet from Yota can easily outperform Beeline or MTS. But in populated areas with poor signals or overloaded base stations, one cannot expect a miracle.
Basic rules for setting up Internet iota on all devices
In some cases, difficulties arise with data transfer or network connection. It doesn't work if you don't take into account some nuances:
- The SIM card must be activated only in the region where it was sold;
- Before purchasing a SIM card, you need to make sure that your phone or tablet supports 2G/3G/4G formats (support for the LTE standard, as well as the USIM chip);
- Before purchasing a SIM card, it is recommended to find out in advance whether there is iota coverage in the area where you live (this is especially true for regions significantly remote from Moscow);
- When connecting from a tablet, you will need to register on the provider’s official page by filling out a profile;
- Before setting up any gadget manually, the operator advises waiting 10-20 minutes after the operating system has fully loaded.
- Make sure that Wi-Fi is turned off and Mobile Transfer mode is turned on before setting up.
3Ginfo
Often, after unlocking the modem, the modem sees other operators, but does not connect to the Internet. One of the reasons is incorrect operator settings. Tele2: APN: internet.tele2.ru Access number: *99# or *99***1# Beeline: APN: internet.beeline.ru or home.beeline.ru Access number: *99# or *99*** 1# Username: beeline Password: beeline Megaphone: APN: internet Access number: *99# or *99***1# Username: gdata (optional) Password: gdata (optional) MTS: APN: internet.mts .ru Access number: *99# or *99***1# User name: mts Password: mts Yota: APN: yota.ru (for modem) APN: internet.yota (for phone) Access number: *99# Name user: (empty) Password: (empty) U-Tel (Rostelecom) Access point: internet.usi.ru Username/password: empty Dial-up number: *99***1# Smarts: APN: internet.smarts.ru Number access: *99# or *99***1# Username: internet (optional) Password: internet (optional) Kyivstar: APN: For prepaid subscribers - www.ab.kyivstar.net For contract subscribers - www. kyivstar.net Access number: *99# or *99***1# Beeline Ukraine Access point (APN): internet.beeline.ua Access number: *99#, *99***1# or *99**1 *1#for some phone models User: optional parameter - can be left blank; Password: optional parameter - can be left blank. MTS-Belarus Access point/APN: mts User name: mts Password: mts Velcom (Belarus) Access points/APN: velcom WAP wap.velcom.by velcom WEB web.velcom.by velcom WEB PLUS plus.velcom .by TP PRIVET, TP “Communication without obligations” wap.privet.by Basic Internet access web1.velcom.by Package 25 Package 250 web2.velcom.by Package 250(arch.) web3.velcom.by Package Light lite.velcom .by Package 350 Package 500 Package 750 Package 1500 Package 3000, TP “Non-stop”, TP “Non-stop 2.0”, TP WEB Light, WEB 900, WEB 1800, WEB 3600 vmi.velcom.by Username, password, authentication: Not filled in Life