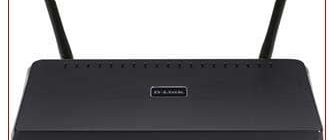
Hi all! Today we will talk about setting up and a brief overview of the DSL 2740u modem. This device has several hardware versions, but in general they all work about the same. Also, in addition to the hardware version, this model has two firmware versions. They are quite different, so I will talk about both versions. Below I will show an example of the regular version. But there is also DSL-2740U/RA/U1 and DSL-2740U/B - they are slightly different in appearance, but there is nothing different about them when setting up.
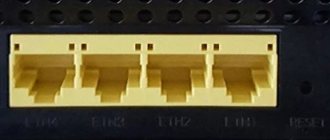
We'll start with the correct connection to the modem. The telephone cable from your provider must be connected to the DSL port. To connect a computer, you can select any LAN port, which is indicated in yellow. You can also connect other network devices there. For setup, I will connect a laptop to the LAN port.
But you can also set it up from your phone or tablet by connecting via Wi-Fi. To do this, we find a network, which we will call the device model. Next, connect to it and enter the password. It is located in the “WPS PIN:” line. Next, from any connected device, open the browser and enter in the address bar: 192.168.1.1. After this, you may be asked to enter your username and password - enter “admin” in both lines.
Description ADSL2+ router D-Link DSL-2740U/RA/U1A
The D-Link DSL-2740U/RA/U1A ADSL2+ router has an ADSL port to provide an ADSL line. The 4-port built-in switch allows you to connect multiple computers or game consoles at the same time. The D-Link DSL-2740U/RA/U1A external non-removable ADSL2+ antenna provides a wide wireless network range that can be used in your home or office. The router will provide a reliable and stable connection to the network, and by pressing the WPS button you can protect your wireless network. There is also a “RESET” button, which when pressed will reboot, and a “WIRELESS ON/OFF” button to turn the wireless network on and off. By purchasing a router, you can create an entire home network. To configure the router, a simple web interface with a set of several languages is used. Software updates are downloaded automatically from official D-Link servers.
Recommendations for installing wireless devices
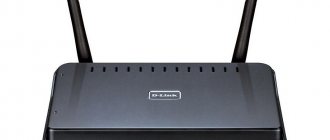
DSL-2740U/NRU
ADSL/Ethernet router with Wi-Fi and built-in switch
User guide
Recommendations for using the router
Recommendations for installing wireless devices
The DSL-2740U/NRU wireless router allows you to access your network using a wireless connection from almost anywhere within the range of the wireless network. However, it should be taken into account that the number of walls and ceilings that the signal will overcome, their thickness and location can reduce the range of the network. Network coverage range is highly dependent on the types of material and the level of associated RF noise in the home or office. To maximize the range of your wireless network, follow the recommendations listed below.
1. Position the router so that the number of obstacles (walls, floors, etc.)
etc.) between the router and other network equipment was minimal. Each obstacle reduces the range of the wireless network by several meters (from 1 to 30 m).
2. Mentally draw a line between the router and the network device.
It is recommended to position the devices so that this line runs perpendicular to the walls or ceilings located between the router and the network device (for a signal passing an obstacle at an angle, the thickness of the obstacle is much greater).
3. Pay attention to the material from which the obstacle is made. Massive
an iron door or aluminum beams placed in the area of a wireless network will reduce its range. Try to position your router, access points and computers so that the signal passes through thin walls or doorways. The signal is negatively affected by glass, steel, metal, insulated walls, water (aquariums), mirrors, cabinets, brick and concrete walls.
4. Keep the router away (at least 1-2 meters) from
electrical appliances or devices that create radio frequency interference.
5. Radiotelephones with a carrier frequency of 2.4 GHz or equipment of the X-10 standard
(wireless devices such as ceiling fans, lighting fixtures, or home security systems) can negatively impact your wireless connection. Make sure that the base of your 2.4 GHz radiotelephone is as far away from your wireless devices as possible. Please note that the radiotelephone base transmits a signal even when the telephone is not in use.
DSL 2750u: installation and configuration of a router from Rostelecom
Having unpacked a newly purchased router model DSL 2740u, DSL 2750u or DSL 2760u, before you begin installing and configuring it for Rostelecom, you will need to check the integrity and contents of the device. The standard set in the box with the device is enough to connect the equipment to one computer via cable and activate a wireless access point.
The router kit includes:
- 12V power supply;
- LAN cable;
- two telephone cords;
- DSL filter;
- splitter
Router connectors, buttons and indicators
Despite the difference in model names, the entire DSL 27XXu line has the same number of functional connectors and buttons. On the rear panel of the case there are interfaces:
- LAN (4 connectors);
- DSL;
- nutrition.
There are also buttons for turning on the equipment and resetting settings.
The front panels of routers in this line are also similar and differ only in design. They display indicators:
- power supply (Power);
- computers connected to the network by cable (1-4);
- USB (optional);
- DSL connections;
- Wi-Fi connections;
- WPS (optional);
- Internet access.
Thanks to their presence, users can easily detect at what stage connection problems occurred.
Installation and connection of equipment
To connect and subsequently configure DSL 2760u, DSL 2750u, DSL 2740u under Rostelecom, you first need to successfully place the equipment. The correct location will allow you to get the maximum quality of connection via wireless technology in all rooms of the office, apartment or house.
Next, you will need to connect the power supply to the outlet and the corresponding connector of the router. After this, you need to connect the DSL and LAN cables. The latter will help you perform the initial software setup. You can also use a DSL filter, which minimizes telephone line interference, and a splitter, which separates the signal.
Now all that remains is to turn on the router with the corresponding button on the rear panel and proceed to setting up the web interface.
Setting up D-DSL-2640U version B1A T3A for Rostelecom
Our branch has received new ADSL modems D-DSL-2640U B1A T3A. The new device comes in a box with the Rostelecom brand. The most interesting thing is that the new product is made in the D-DIR-300 A/D1 case, in the so-called “Scandinavian style”, which in my opinion is generally unsuccessful. Primarily due to the internal design of the Wi-Fi antenna. Initially, this model had a removable RP-SMA antenna. That is, if necessary, it was possible to hook up an antenna with a higher gain. Now we have been deprived of this opportunity, which is never encouraging.
The good old DSL-2640U of the very first revision worked successfully for me for about 4 years and considerable heating was perhaps the only problem. I hope in this revision the heating will be within normal limits. I don’t see any other advantages in the vertical design of the case.
In terms of functionality, this revision is not much different from the previous one: as before, the modem can be used as an ADSL line, or it can be reconfigured into Ethernet router mode by selecting one of the LAN ports as a WAN port. The highlight of the updated model is a new web interface in black colors, familiar to us from the latest firmware versions for D- Ethernet routers.
Connection parameters for DSL 2740u and other Rostelecom routers
In order to access the equipment’s web interface, you will need to open any browser and enter the standard IP address 192.168.0.1 for all D-Link routers. After this, a welcome menu will open in front of the user, where he will need to enter his login and password. By default, both fields are set to admin. After confirming the data, the home page of the interface will open.
Since the firmware of DSL 2740u, DSL 2750u and DSL 2760u are identical, the Internet connection settings for Rostelecom will be performed in the same way. To do this, you will need to go to the “Start” section, and then “Click'n'connect”. At this stage, the software will remind you to connect the DSL cable to the appropriate connector. By clicking the “Next” button, you will need to decide on the connection types.
It is selected depending on the Rostelecom service provided. The most commonly used is PPPoE. After checking this option, you will need to enter the login and password specified in the provider’s contract.
Next, the firmware will display all the selected parameters, which will allow you to check their correctness. By clicking the “Apply” button, you will need to save the changes and reboot the router. This is done on the “System” tab in the top menu under the company logo. Now the Internet connection will be completely ready for use.
Activating Wi-Fi connection
Of course, setting up a router cannot be considered complete without enabling its main function - wireless Internet distribution. To do this, you need to use the “Wireless Network Wizard” tab, which is located in the “Start” group of options.
After going into it, you will need to select the “Access Point” operating mode. Next, enter the SSID (Name) and select the type of network authentication with a security key.
Attention: When setting up Wi-Fi connection security options through the “Start” menu, the system will automatically select the type of network authentication that is optimal in terms of reliability. It will require the creation of a security key of at least 8 characters.
After confirming and saving the settings, Wi-Fi will be ready for use.
Configuring the D-Link DSL 2740, DSL 2750 and DSL 2760 routers for Rostelecom is identical. The differences between the models are only in design, internal structure and minor add-ons that do not affect the process of entering parameters for connecting to the Internet and distributing Wi-Fi.
IPTV for Rostelecom
To configure IPTV digital television on the DSL-2640U B1A T3A, in the WAN subsection, again click the Add button to create a new PVC connection. The following settings must be specified in it:
Connection type - Bridge, Port - DSL (new), Name - TV. In the VPI and VCI fields we indicate the parameters for your Rostelecom branch. Click the Save button. A second line should be added to the WAN connection table:
Connection problem
If you cannot connect via Wi-Fi, for example, there is no such network. Or the password does not match, then you need to reset the device to factory settings. To do this, find the “Reset” hole on the case and hold it for 10 seconds.
If you cannot access the address 192.168.1.1, then most likely you have some data in the settings on your computer or laptop. Press the "Win" and "R" keys simultaneously. After that, enter the command “ncpa.cpl”
You should be taken to the All Network Connections window. You need to select exactly the connection with which you are connected to the router. Right-click on it and go to properties. Next, select protocol 4, click “Properties” and set the settings as in the picture below.
Grouping of ports.
For IPTV to work, you also need to allocate a separate LAN port for the TV set-top box and combine it into one group with a PVC connection. To do this, in the advanced settings, select the “Advanced” => “Port Grouping” section:
By default, all ports and WAN connections are in the same logical group:
Click the “Add group” button. We get this window:
In the Name field, enter the name of the group - iptv, for example. Below, using the arrows, we move one of the LAN ports from the left field to the right. The same goes for the WAN connection: move the TV connection to the right. Click the Save button.
In the grouping of interfaces we get two groups:
Click the Save button.
Settings
D-Link DSL 2740U has two firmware. But they are configured approximately the same.
- To quickly set everything up, select the “Start” menu item, and then “Click’n’Connect”. May also be referred to as "Initial Setup". Check again whether the DSL cable is inserted. Click “Next”;
- In the new darker firmware, you just need to select “Network” on the start screen;
- Now you need to select the connection type that your ISP uses. As you can see, there are quite a lot of them, so this needs to be clarified from the contract. Most often, PPPoE is used in such connections, so I chose it;
- We select the second item “DSL”, but as you can see, this device can also be used for a regular connection via an Ethernet cable. The port used for this is LAN3.
- We enter the data from the contract: VPI, VCI, username and password twice. You can enter any connection name, since it will only be displayed in the router;
- After this, the router will check your Internet connection. Next, the “Yandex.DNS” configuration window will appear. Safe mode provides protection from dangerous and fraudulent sites. Children's mode additionally blocks adult content. Select the mode you need.
- Now select “Access Point” if you want to enable Wi-Fi;
- Next, enter the name of the network, and at the next stage, select “Secure Network” and come up with a password.
If you need to make more detailed settings or change something, you can select certain menu items on the left. “Network” – “WAN” – here you can change Internet settings, delete them or add new ones. In the Wi-Fi section you can make more detailed wireless network settings.
Download firmware for the router
To download the firmware for the D-DSL-2740U, you just need to carefully read the page you are currently on. Don't forget to leave your reviews (the form for adding reviews is at the bottom of the page). If you don't mind, you can share the link to the firmware with your friends. Also, if you have not found the answer to your question, you can ask it using the form at the bottom of the site.
Here you will find the latest drivers for wireless devices. To download the new driver, you need to follow the “Download firmware” link, which is located just below.
| Russian Internet providers | Ukrainian Internet providers |
|
|
Video on how to set up D-DSL-2740U
Source
Personal opinion and short review
In fact, there is nothing remarkable about the device, but this is its feature. It is not expensive, but works stably like a clock. It doesn't need to be restarted constantly like my old device. All ports have a speed of 100 Mbps in a local connection, but aDSL technology does not require more.
Of course, the connection is worse than with a regular connection, but this does not depend on the modem. After all, telephone lines are not designed to transmit the Internet. But not everywhere there is an opportunity to connect differently. It can also be used as a regular router - as I wrote earlier during setup.
User guide
Sources
- https://manualza.ru/dlink/dsl-2740u/bcqz91
- https://www.dns-shop.ru/product/10c00c3e7bb33361/router-adsl2-d-link-dsl-2740urau1a/
- https://technopoint.ru/product/e548670e4238526f/marsrutizator-adsl2-d-link-dsl-2740unrubac5b1t1a-sale/characteristics/
- https://www.xcom-shop.ru/d-link_dsl-2740urav2a_653310.html
- https://o-rostelecome.ru/oborudovanie/d-link-dsl-2740u/
- https://WiFiGid.ru/d-link/dsl-2740u