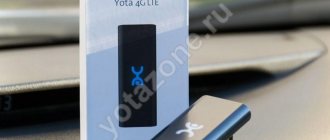
We have already reported that today the Russian operator Tele2 was the first in the country to begin issuing virtual SIM cards, also known as eSIM. Despite a number of features that accompany the connection process, this is a real technology that subscribers of American and European operators have been using for quite a long time. We figured out how to connect to eSIM, where you need to go for this and what to do after connecting so that everything works as it should.
As of April 29, you can connect to eSIM only in six Tele2 communication stores located in Moscow.
The connection was not without problems
Since the service was launched only today, employees do not yet know how to quickly connect it.
To apply for a virtual SIM card, you need to come to the salon with a passport. And already at this moment the first problem arose.
To connect eSIM you need to scan the QR code that is set by the Tele2 program. For about 15 minutes the seller could not set up my tariff , but then the program skipped everything.
In general, it is curious that not all employees know about this technology. In technical support, only a senior specialist was able to tell me the address; other operators did not know what they were talking about and seemed to have heard the word “eSIM” for the first time.
Tele2 has a big minus for this. How can you even allow tech support not to know what they are dealing with?
Well, okay, that’s not about that now.
Important : you can connect eSIM from Tele2 with any tariff, but not lower than “My Online” for 400 rubles per month.
It includes 15 GB of traffic and 500 minutes of calls. When registering, they prepare a physical SIM card for you to bypass the ban on SIM cloning. In fact, they don’t give you the card itself, they simply turn it off and configure it as an eSIM.
Tele2 Internet settings on iPhone and iPad
Among the easiest ways to gain access to the network, you should highlight the request for automatic settings. This option does not work for all mobile devices. If the need arises, you should enter the settings yourself, first clarifying exactly those parameters that are necessary for each specific case.
To enter the necessary parameters, you can use the help of your mobile network operator in person or by calling the customer support service.
Please note that if you do not follow the recommendations for setting up your mobile device, some functions may not work correctly.
How to set up eSIM on iPhone
The whole process takes no more than 5 minutes.
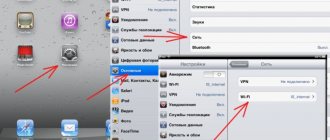
1. Open Settings -> Cellular -> Add cellular plan.
2. We scan the issued QR code.
This card then remains with you if you suddenly need to reconfigure your eSIM
3. We choose what the new number will be - primary or additional. This determines which phone you will use to make calls and use the Internet.
Actually, this completes the setup. Then you can use the virtual SIM card like a regular one.
There is also a small caveat here. eSIM from Tele2 is not certified to work with iPhone, which the device will immediately warn you about:
This may negatively affect call quality and battery life. But the eSIM itself will work.
Automatic settings
Internet settings on Tele2 on an iPhone can be obtained automatically by sending a request to cellular network employees using one of the available methods:
- Call 679 to contact a company employee who needs to be informed of the need to obtain settings for Internet access.
- Place an order for parameters using the self-service center - LC in the system, in which you must first register.
After the parameters are sent to your phone as an SMS message, you should save them and restart your mobile device. After switching on, you should additionally check whether the changes have been saved and only then log into the network.
The operator will automatically install the device model and select the necessary parameters.
For those users who use rare models, you should use the manual setting.
Manual setup
You can set up Internet on Tele2 on an iPhone yourself. To do this, you must first clarify what data is suitable for the version of iPad you are using. In this case, it is recommended to use standard information, which can be found on the company’s official website. They need to be entered in the settings of the iOS, iPad, iPhone device:
- Through the settings, log into the network and register the APN - access point, indicating internet.ru.
- Do not enter the fields with access name and password, leaving them blank.
- In the “Profile name” line, indicate Tele2 Internet.
- Connection type – GPRS.
- The proxy server should be set to ON.
- The home page must match the https://m.teleru parameter.
If you have additional lines, you don't need to use them. In this case, it is not recommended to enter any additional parameters.
After entering all the necessary values, you should restart the device and check if all the data is saved.
Where to connect eSIM in Russia
The media reports information about five connection points, but representatives of the operator clarified that there are actually six of them. Here are their addresses:
- Moscow, st. M. "Pushkinskaya", st. Tverskaya 25/9;
- Moscow, st. Tverskaya, 17;
- Moscow, st. m. "Chistye Prudy", st. Myasnitskaya, 30/1/2с2;
- Moscow, 24th km of MKAD, Vegas shopping center;
- Moscow, st. metro station "Rumyantsevo", business center "Comcity";
- Moscow, pl. Kievsky railway station, 2, shopping center "European".
According to Tele2 representatives, the number of offices where eSIM can be issued will soon be increased to 88.
Russian legislation equates the issuance of eSIM to the cloning of SIM cards. Therefore, in order not to violate anything, you will first have to apply for a physical SIM card, the subscriber profile of which will be recorded on your smartphone. As soon as the profile is recorded on the smartphone, the SIM card itself will become invalid. This is a mandatory step that, unfortunately, cannot be bypassed.
First actions
Perhaps the problem is not global and can be solved using conventional methods. First of all, just open the additional menu - swipe it from bottom to top. Just turn off your mobile connection (or Wi-Fi) and turn it on again.
If you are connected to a WiFi network, then also reboot the router - to do this you need to turn it off and on. You can press a special button or simply unplug it from the socket and then insert it back.
If the problem is not solved, you can reset the network settings. To do this, go to the main “Settings”, then find the “General” item, go to “Reset” and press the corresponding button.
You can simply try restarting your smartphone - sometimes this helps.
If you have a thick case, or it has a mirror metal coating, then simply remove it. The fact is that such materials strongly reflect the signal from the tower and worsen the connection.
You can perform a Hard Reset or a hard reboot - this is discussed in more detail in the video below:
If the operator does not support VoLTE
If your operator does not support VoLTE and uses GSM, you will see one of the following options.
- LTE or 4G: Enables cellular data over an LTE or 4G network when available.
- 3G: Enables cellular data over the 3G network when available.
- 2G: Enables cellular data over the 2G network when available.
Depending on your cellular operator, the 4G icon may indicate a UMTS or LTE connection. If the operator does not support VoLTE and uses the CDMA standard, only the Enable LTE option will be available. It enables cellular data over the LTE network when available.
Source
iPhone loses network - glitches, crashes and iOS settings
Many people believe that:
iOS is always stable and works as it should.
But in reality - nothing like that! “Glitches”, failures, “bugs” - they are all there and there is no escape from them.
Therefore, the following may be to blame for the periodic loss of cellular network signal:
- Some iOS glitches. Unfortunately, there have been too many of them lately, so the first thing you should do is hard reset your iPhone. There is a high probability that after this “the brains of the device will fall into place” and the cellular network signal will become the same as it was before - confident and stable.
- iOS updates. A very strange situation, but the fact remains - as I already wrote in my impressions of iOS 14, after the update, many of my friends encountered uncertain network reception. What to do in this case? Either restore iOS via iTunes (perhaps the update has gone wrong and this way everything can be fixed), or wait for the next version of the software to be released (fortunately, Apple is churning out them quite quickly).
- Operator settings. No, we are not talking about your personal account and other conversations with the cellular network support service. Operator settings are a file that is responsible for the interaction between the SIM card and your iPhone. It (the operator settings file) can (should!) be updated periodically - detailed instructions on how to do this.
These are all the methods that will help in the fight against iOS “glitches” and their impact on the operation of the iPhone’s cellular network.
You ask: “So, what about the settings?”
I will answer: “There are settings, but not many.”
There are only three iOS options that (in this particular case) deserve our (your) attention:
- Settings - Cellular - Network selection. Open this setting and experiment (select the network manually or vice versa - turn on “automatic”) and, perhaps, signal loss will disappear once and for all.
- Settings - Cellular - Data options - Voice and data. Experiments are also necessary here - it’s worth trying all the options (2G, 3G, LTE, VoLTE, etc.) and in each case observing the signal level (sometimes you have to sacrifice fast Internet and choose, for example, 3G, but get a stable cellular connection) .
- Settings - General - Reset - Reset network settings. It sounds scary, but there is no need to be afraid - during this procedure, not all data is erased (photos, videos, messages, applications, etc. will remain), but only those related to network parameters. Of course, you will have to re-enter your Wi-Fi passwords, but... there’s nothing you can do about it - after all, sometimes a reset solves all network problems on an iPhone.
All. There are simply no other special functions and actions that allow you to deal with the disappearing network on the iPhone.
You can’t choose a “magic” setting and fix everything right away - unfortunately, that doesn’t happen.
But it happens that neither the software nor the other “functionality” of the iPhone is the “hero of the occasion” - you can customize the device as much as you like, but in the end the signal will still “jump”. Why? Because often the real reason for all this disgrace is...
Setting up an access point
In order for the mobile Internet to work properly, you should enter the iPad or iOS model in the “Access point name” line. To enter information, go to Settings, general and enter the item about this device, where you enter its name.
Activating mobile internet is not difficult. If you follow all the steps sequentially, without missing a single point. Despite this, most users prefer to use the services of a cellular network operator for these purposes. An experienced employee will better cope with the task and is guaranteed to configure the parameters, which eliminates the possibility of difficulties arising in the process.