The MMS transfer service is not very popular among Yota users. There is a rational explanation for this. Indeed, is it worth paying for the old-school type of communication when all entertainment content is now available through more convenient instant messengers? However, there are conservative adherents of this particular method of communication. It is for such subscribers that we have prepared our material.
Reasons why MMS does not reach/arrive on Android
h2 1,0,0,0,0–>
The main reason for problems with MMS is incorrect settings in the system. This is true for both the sending party and the receiving party. But there may be other reasons:
p, blockquote 3,0,1,0,0–>
- The phone does not support the message format sent by another user.
- The MMS size is larger than the free space in the smartphone memory.
- The feature is disabled or not supported in the tariff plan.
First you need to check the MMS settings on your phone, and if they turn out to be correct, then the next step is to call the operator’s support service.
- How to set up MMS on Tele2 on Android manually or automatically
p, blockquote 4,0,0,0,0–>
Possible problems
Problems may arise if:
- the data for the access point was entered incorrectly - you need to double-check the changed Internet settings;
- technical problems were noticed on the part of the operator - this could be due to breakdowns, weather conditions or temporary shutdown of access points due to technical work;
- zero or minus balance - even if the settings are entered correctly, the Internet will only work after replenishing the account.
If you encounter any connection problems, you must contact your operator. Trying to figure out the situation on your own only makes it worse.
The company’s specialist will very quickly resolve all issues and help the subscriber get the Internet back as soon as possible.
Setting up MMS reception for Android
h2 2,0,0,0,0–>
Any operator, be it the long-running MTS or the relatively new Yota, sends Internet and MMS settings when you first install a SIM card in your phone. But some users ignore the configuration message and do not save the settings. As a result, attempts to use mobile traffic to access the Internet or send/receive MMS fail – Android does not understand what data to use to complete the task.
p, blockquote 5,0,0,0,0–>
How to recover SMS on Android after deletion
p, blockquote 6,0,0,0,0–>
Therefore, in order to figure out why MMS does not load on Android, you need to make sure that the necessary parameters have been added to the system. Each operator has its own identification data, but the procedure for setting up the Internet and MMS is the same for everyone.
p, blockquote 7,1,0,0,0–>
Automatic setup
h2 3,0,0,0,0–>
If you did not receive configuration messages or simply deleted it, or do not know where the MMS and Internet settings are stored, then use the opportunity to order parameters from the operator. Each provider has a special number for calling or sending SMS with a specific text. Example for the Russian Federation:
- How to set up SMS and MMS on MTS: detailed step-by-step instructions
p, blockquote 8,0,0,0,0–>
- MTS – call to 0876 or an empty SMS to number 1234. You can order MMS settings separately by sending “MMS” to 1234.
- Beeline &ndash, command *110*181# or call 060432.
- Tele2 - call to 679.
- Megafon &ndash, send “3” to number 5049.
In addition, each operator has a personal subscriber account on the official website, through which you can manage services, including ordering Internet and MMS settings. Authorization in your personal account takes place using the phone number and password received via SMS.
p, blockquote 9,0,0,0,0–>
Manual MMS setup
h2 4,0,0,0,0–>
If automatic setup does not work (the operator does not send the settings, or they are not saved in the phone), add the settings manually. You can view them on the mobile provider’s website in the “Help and Support” section. To perform manual setup, you need to know where the MMS settings are stored in Android. The following instructions will help:
p, blockquote 10,0,0,1,0–>
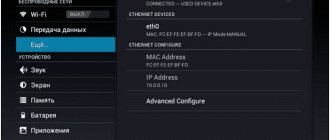
- Open your phone settings and go to the Data Transfer section.
- Turn on mobile data by sliding the switch to the active position.
- Return to the settings menu. Open the "More" section.
- Go to Mobile Networks and select APN Access Points.
- Call up the additional menu and select adding a new point.
Enlarge
Depending on the model of your smartphone, the names of the items may differ slightly, which is due to the Android shell of the manufacturer of your smartphone.
p, blockquote 11,0,0,0,0–>
How to set up MMS on Beeline Android
p, blockquote 12,0,0,0,0–>
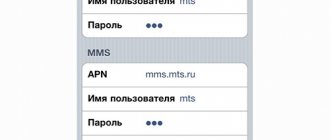
The APN setup menu will appear, in which you need to specify the MMS parameters provided by the operator. They are the same for all versions of Android. For example, to set up MMS on Tele2, you must fill in the following fields:
p, blockquote 13,0,0,0,0–>
- Name &ndash, Tele2 MMS.
- APN &ndash, mms.tele2.ru.
- MMSC &ndash, https://mmsc.tele2.ru.
- Proxy &ndash, 193.12.40.65.
- Port &ndash, 8080.
- Authentication – no.
- APN type &ndash, mms.
Increase p, blockquote 14,0,0,0,1–>
After entering the connection parameters, save the configuration, restart your smartphone and try sending MMS or ask a friend to send you a photo message. To set up MMS for other operators, use the table below or find the settings on the official websites of mobile providers.
Android does not send or download MMS4.6 (91.67%) 24 people.
Access point for mms operator yota
Some preparation will help the user configure their gadget correctly. Before purchasing a Yota SIM card, you need to make sure that:
- the subscriber's device supports 2G and LTE mobile networks;
- the selected tariff works in the user’s region.
If these points do not cause problems, then you can safely buy a SIM card and begin activation, which can be carried out automatically or manually, depending on the model of your smartphone or other device.
It is worth noting that to access 4G, you need a special SIM with a USIM chip. If there are problems with registration in 4G networks, then the subscriber needs to contact the operator’s service office.
Preparation and features
The initial steps before setting up MMS Yota are to determine the model of the mobile phone used to send messages and the operating system. Today there are Android and iOS systems that differ in functionality.
When you have decided on the gadget’s OS, you should only configure the parameters according to the instructions. Any deviations will not lead to the desired result. Time will be wasted, and MMS messages will not be sent to other users.
If necessary, you can contact technical support representatives, who will send settings via service messages. They can automatically detect the phone model you are using with a Yota SIM card, which makes the whole process easier.
Receiving automatic settings
Modern smartphones have an automatic setting function for mms yota. When a purchased SIM card is inserted into the phone for the first time, it receives a special message with automatic Internet and mms iota configurations. More gadgets recognize information from SMS and install it independently, thereby opening access to the Internet.
Important! If a Yota SIM card has already been used and is then activated in another device, then the device usually recognizes it as new.
If by mistake the message with the configurations was deleted, then you need to request resending of the parameters from the iota operator; this can be done in several ways:
- call technical support;
- write to a consultant in an online chat;
- use the mobile application;
- visit the nearest iota salon.
When the device cannot cope with automatic configurations, you can enter them manually.
How to configure mms in Yota if automatic settings have not been received?
Problems related to MMS settings are no longer relevant. This is typical only for older phone models. Most of the installation is automatic. To do this, you just need to install a new SIM card and wait a certain time. Since modern models are equipped with various options, in some of them the parameters are set directly at the manufacturer. Yota also provides automatic settings for mms. But it also happens that you have to do it manually. If you follow certain rules, there will be no difficulties.
When connecting to the Yota cellular operator, before you start using all the features, you need to enter certain parameters. Basically, this does not require much time and effort, but despite this, it happens differently in each device.
How to enter MMS settings manually
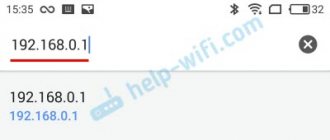
If for some reason the auto settings do not arrive automatically or you cannot install them, you can resort to setting up MMS from Megafon manually. To do this, you need to enter the “Settings” menu and complete the following steps: 1. In the settings section, create a “MegaFonMMS” profile. 2. Set the home page to https://mmsc:8002 and the access point to “mms”. 3. Next, fill in the fields as follows:
- username – “mms” (or any at your discretion);
- password – “mms”;
- Proxy – 10.10.10.10;
- Proxy port – 8080.
4. Save this data, reboot the phone and send a test MMS message.
Following the above instructions exactly, setting up Megafon Internet on your smartphone will not be difficult. In addition to the methods listed in the article, you can set up your phone by contacting any office of the company or by calling 0500 (from a mobile phone), (499) 502-5500 (from a landline).
MMS Yota
Getting settings for sending multimedia messages from Yota is no different from its competitors. There are two options: manual and automatic.
Automatic MMS settings
When you turn on the SIM card for the first time, all the necessary basic settings appear automatically inside the phone after activating the number. If this does not happen, remove the SIM from the slot and install it again. Perhaps you are using an old or non-standard phone, then you will have to resort to manual dialing. Also check that the Wi-Fi function is turned off and the mobile Internet is active. Read how to properly activate your Yota number in the article of the same name on our website.
Manual settings
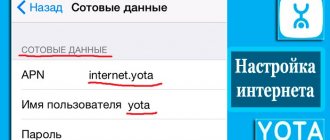
In order to enter the necessary parameters manually, you need to take your smartphone and open the “Mobile Network” menu on Android, or “Cellular Data” on iOS. There you will see the “Access Points” section. You can either check the existing one and change it, or create a new one. If you are simply changing the current settings, be sure to save them at the end. To create a new characteristic, press the required icon on the display. A form with empty lines will open in front of you. Fill in the basic fields:
- Name - MMS.Yota (specified arbitrarily);
- APN: mms.yota;
- Address - MMSC: 8002;
- Proxy: 10.10.10.10;
- Port: 8080;
- APN Type (Type): mms.
After entering the required information, save the configuration and restart your smartphone. Do not touch those columns that are left blank and do not enter any symbols into them. Also, do not forget that the data from the multimedia message is transmitted via the Internet, so check the functionality and, if necessary, enable it in the quick launch menu on the desktop. If you are outside your home region, then in addition to the fee for sending an MMS, you will also be charged gprs traffic with the corresponding roaming tariff.
If the entered parameters did not help, then check whether you have configured the Iota SMS sending server. Perhaps you have never sent an SMS from a number before. Then send any message to the free number 0999.
Receiving settings on Yota occurs automatically only if you have completed the correct number activation procedure. If you are connecting to this operator for the first time, ask the service center specialist to activate your phone. With it, you can also check the functionality of all the main functions. However, even if it was not possible to obtain the parameters automatically, it will not be difficult to enter them again manually, the main thing is not to make a mistake when filling it out. Never forget that MMS is sent via gprs traffic and not via wi-fi. Therefore, once again check the activity of the mobile data transfer mode.
Manual configurations for google android devices
Initially, you need to set up the Internet on the gadget by entering information in the appropriate fields:
- Go to settings on your android.
- Select "Mobile network".
- Next “APN Access Points”.
- In the menu that appears, select the “Change or create access point” section.
- Enter any point name.
- Register the APN item – internet.yota.
- You do not need to enter any information in the “Login and Password” lines.
- In the “APN type” field you need to select default, supl.
- Reboot your device.
The parameters for transmitting cellular network data via mms are set in an identical way, only you need to add another access point by selecting the special “Change/Create” function, and then in order:
- Fill in the APN – “mms.yota”. 2. “MMSC” – https://mmsc:8002.
- “Proxy MMS” – 10.10.10.10.
- "Port" - 8080.
- "APN Type" - mms
- Reboot the gadget.
That's all the configurations that need to be completed to gain access to the Internet and MMS, after completion you should enable the mobile data transfer function, this can be done in the top menu of the device.
Important! Regardless of different versions of Android OS, MMS and Internet settings from Google remain the same, only the names of menu items can change.
Setting up mobile devices from apple
Setting up Internet and mms iota on gadgets from Apple is as easy as on Android, but the information to enter is different. If a yota user has a device running iOS 6.XX, then you should:
- open the “Cellular Data” section;
- enable 3G;
- go to “Settings”;
- select “Basic”;
- hereinafter “Cellular data network”;
- in the “APN” field enter – internet.yota;
- Leave the remaining sections blank;
- reboot the device and go online.
On iOS 7 and higher, the names of the items are slightly different. The following steps must be performed in order:
- go to the “Cellular Data” section
- enable LTE;
- open “Settings”;
- further “Cellular communications”;
- then “Cellular Data”;
- the remaining points are identical to those listed above.
Now you need to configure the MMS settings. To do this, in the “Cellular Data” section, select “Cellular MMS transmission network”, a field will open that needs to be partially filled out.
- In the APN line you need to specify the dot - mms.yota. 2. In MMSC, indicate the address – https://mmsc:8002.
- MMS proxy – indicate in one line, separated by a colon, the IP address and port – 10.10.10.10:8080.
- The remaining fields are left blank.
- Reboot the gadget and make sure that data transmission is turned on (3G or LTE).
After that, you can send mms from the Yota SIM card. Although automatic configurations are much more convenient, there is nothing difficult about entering parameters manually, and anyone can handle it.
Setting up MMS on Yota: for popular OS
The MMS transfer service is not very popular among Yota users. There is a rational explanation for this. Indeed, is it worth paying for the old-school type of communication when all entertainment content is now available through more convenient instant messengers? However, there are conservative adherents of this particular method of communication. It is for such subscribers that we have prepared our material.
Manual Internet setup for smartphones and tablets
Manual settings on the phone are performed in stages and do not require any special knowledge. The main indicator that is worth paying attention to is apn.
You can create a new profile taking into account some data:
- Homepage.
- Profile name.
- Access point.
- Login.
- Authentication.
| Name | Options | Purpose of application |
| Account name | Megafon Internet | For GPRS/EDGE/WAP |
| APN | internet | Also |
| URL | https://wap.megafonpro.ru/ | Also |
| Username | Not required | — |
| Password | Not required | — |
| Proxy | 10.10.10.10 | Also |
| Proxy port | 8080 | — |
On iOS
You can set up mobile Internet access on iOS by paying attention to the following three parameters:
- Password: gdata .
- Username: gdata .
- Line apn: internet .
You can register them manually or order automatic ones from the operator. Once the data has been entered, you need to make sure that the transfer is enabled.
If you can’t log into the network, you can reboot the device and check the connection again. The settings of the iOS operating system can be lost at any time, so you need to know how to restore them again, and this can be done without outside help.
The use of modern applications and instant messengers is not available to all subscribers of mobile operators. Therefore, many people send multimedia messages out of habit. The question often arises: how to watch mms on Tele2?
The company offers several ways to open sent files:
- through a gadget;
- on your computer by following the link.
Any of the above methods is available to every subscriber.
Viewing an attachment using the first option is unofficially considered the traditional method of reading a multimedia message. For this it is enough:
- Enter the menu.
- Select the “Messages” section.
- If the system separates regular messages and multimedia messages, then select the latter.
- Open unread email.
It is possible that the process will take some time - you need to wait until the file contained in the letter is loaded into the device’s memory. As a rule, this takes no more than 5 minutes.
The speed of opening a message depends not only on the device model, but also on the speed of traffic, because MMS is transmitted over the network, so you can view it on Tele2 when connected to the Internet.
You will not always find the resulting picture or audio file in the gallery. The attachment remains in the message itself and can only be viewed by opening the message again. Therefore, it is worth saving mms in the device’s memory by clicking on the picture itself or another file and selecting “Save” in the menu that opens. This function may differ on different models.
To open a message from your Android phone, you need to go to the SMS section and select the letter marked in bold or with a dot. On Android smartphones, files from mms are not saved in the gallery; they remain in the letter, which is not very convenient.
The mobile operator offers its subscribers an alternative way to watch received mms on the Tele2 network via a computer using a link. In order to find out which file has arrived, you need to:
- go online;
- enter the link from the message in the address bar;
- Enter the required password, it comes along with the link.
Support
The Yota organization offers its subscribers automatic settings and technical support. support 24 hours a day. However, most cellular users experience problems with various services quite often. One of them is the inability to send or receive a message.
In some situations, the phone may use specialized services. In them, messages are sent in stages: many in one unit of time.
This phenomenon occurs for several reasons: intentionally or not. When this is done on purpose, such a procedure is called planned SPAM mailing. If not, the program or application was probably installed incorrectly earlier.
In such a situation, the operator will perceive the phone number as SPAM and block it. To remove it, you need to contact the support service via online chat, or call the toll-free number of the Yota SMS center: 8-800-550-00-07.
You can unsubscribe from Iota's mailings. To do this, dial the SMS number *903#. After the program has been entered, a menu of 3 items will appear in the service menu:
- Blocking a number.
- Black list.
- Read more.
To block and unsubscribe from unnecessary mailings, you need to press No. 1 and look at the numbers from which a person receives SMS mailings and SPAM. You need to send the mailing numbers to the “black list” and block subsequent acquisition of mailings.
To find out who is on such a list, it is recommended to select No. 2 in the menu and forward the request. When the mailing needs to be restored, you need to send the service serial number from the list provided. To obtain information about the service, select No. 3 in the main menu.
Basic nuances in connection
Usually, work starts automatically and does not require any effort from the client, except for choosing a tariff that is favorable to him. But in order to avoid problems with the Internet, it’s still worth delving into some of its subtleties:
- The purchased operator SIM card must be activated in the region where it was purchased.
- You should make sure in advance that the connected device (tablet or phone) supports 4G/3G/2G networks. In order for all data to be properly loaded, LTE support is required at the firmware and USIM chip level.
- On the coverage map from the provider, you need to check the places where a person plans to use Internet access.
- When setting up an apn access point on a Yota SIM card, be sure to turn off Wi-Fi and enable “Mobile transfer”. Next, go to the provider’s application and first create an Internet access point, then for MMS.
- After automatically detecting the apn or registering it manually, you need to turn off and turn on the device again. If all procedures are successfully completed, the operator will signal this with an appropriate message.
These are general features of getting started that will be useful to all SIM card owners. If its automatic activation does not occur, depending on the type of device, you can resolve all problems manually in 5 minutes.
Setting up MMS in all options is the same and is done after creating the first point for the Internet. All you have to do is set the name “mms” and enter mms.yota. Proxy – 10.10.10.10.
Preparation before setup
Before you begin entering, you must complete the following steps:
- register the SMS center number;
- set the phone type;
- decide which operating system is installed and its version.
There are situations when owners do not know about the version and type of operating system. In this case, you should turn off and turn on the device again. During the boot process, comprehensive information about the installed system and its name will appear on the screen.
Activating SIM and setting up an access point on iOS
Registration of a SIM card usually occurs automatically the first time it is used, as indicated by the provider logo on the screen. But in cases with Apple iPad tablets, the scheme may be different. To get unlimited access to the World Wide Web at high speed, you will need to activate data transfer when you first connect and wait for the connection to be established. Next, you need to visit any resource, which will automatically redirect you to the official page. Just register your profile and the Internet is already in your pocket. The whole procedure can be schematically represented as follows:
To connect the point, owners of smartphones or tablets from the Apple manufacturer running on the IOS operating system will first need to go to the “Settings” section. Here select “Cellular” and “Cellular Data”.
Manually enter the apn for the operator in the access point field - internet.yota. Leave the remaining lines empty and check two functions in APN TYPE - default, supl. Then click the save button.
Be sure to reboot the device after completing all instructions.
Setting up Yota Internet for modems
Currently, Yota has released various modems and routers that can satisfy any customer wishes. Some models are designed to work with one device, while others allow you to create a wireless zone within which users who understand the password can access the Internet from any device.
Yota Internet settings for modems are also installed on the device automatically, so users do not have to find drivers without the help of others.
After the modem has been connected to a computer or laptop for the first time, all the necessary items will be updated there. Setting up a modem only requires the client to fill in their own data in the profile on the company’s website.
The site will appear automatically the first time you go online. If you become the happy owner of a Yota 4G modem, then you will also need to enter data about the wireless network (name and password) on the website in special fields.
Profile activation is constantly accompanied by SMS confirmation. This procedure involves sending a special code to the phone number that was specified by the subscriber during registration. The purchased numbers must be entered into a special section, after which the user will be given unlimited access to the Internet (in accordance with the tariff plan he has chosen).
Important: after automatically or manually registering the APN, you need to reboot any device.
After completing this act, the operator will send a message that all option procedures have been completed.
Thus, the Yota Internet options are so simple that even if problems arise and they are solved manually, any user, even a beginner, can make virtual networks and MMS work. You can solve the difficulties that arise using various methods, depending on the type of device the Yota client is working with.
This Russian operator has become largely famous thanks to the use of modern LTE technology. Often his newly minted clients wonder: if
yota is not installed, what should I do?
?
Typically, in this case, they are referring to software installation tasks when installing a company USB modem.
Creating apn parameters on Android
Activation of the card is similar to the previous version. Smartphones register everything on their own, but from a tablet you just need to go to the operator’s website and fill out a profile. Below is a diagram of how to gain access.
If after carrying out all the above procedures you still cannot get online, then the yota apn access point requires manual correction of the data. In “Settings”, click on the additional section “More” and “Mobile network”. In the access point field, select “Create a new one” with the name of the provider and make an entry internet.yota. Leave other information fields as empty.
Be sure to turn off and turn on your phone or tablet for the created entries to be activated.
Mobile Internet on Windows Phone
All yota apn settings are easy to carry out yourself if there is a failure in the automatic setup. First, create a new apn by going to the “Access Point” section through “Settings”. Select the plus icon and fill in the field with the internet.yota entry under the appropriate name.
After saving it, select it again and check the status, it should be active.
After adjustment, all operating conditions will come into force and you can start using high-speed (if there are no external influence factors - 20 Mbit/sec) mobile Internet.
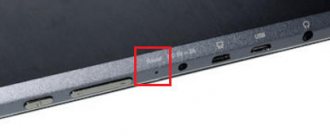
What to do if drivers for the Yota modem are not installed
If the system refuses to install the software, you can try the following. We open the Control Panel on our computer and go to the administration point (it may be called differently depending on the version of the operating system). We are looking for a menu related to system safety.
Open “Devices” in the security settings and look for the option responsible for installing unknown drivers. We mark the item that will allow us to install unknown software after a warning. For the configurations to take effect, we reboot the computer.
It happens that the newly-minted owner of an operator modem is faced with other problems. For example, the signal may be good, but the USB modem still does not connect. The reason may be a breakdown of the base station, or network overload.
If the iota software does not install, we don’t know what to do, and we have already tried the options in the administration section, maybe the problem lies in a faulty USB connector, or even in the lack of compatibility with the operating system of our computer.
For example, the Yota One modem is compatible with any OS that supports CDC/RNDIS. It is worth checking our version of the operating system and checking whether the device is compatible with it.
Let us add that almost all equipment has USB connectors, which, however, can only read flash drives, but do not support data transfer. In this case, it is worth keeping in mind that without CDC or RNDIS support, the system will not even be able to recognize the modem.