Setting basic parameters
To set the basic parameters you need:
- О open the settings section.
- Go to system applications.
- Select the Messages program.
In the window that opens, you can enable/disable the following settings for displaying alerts and notifications about them:
- When receiving a notification in list mode, the photo and data of the contact from whom it was sent will be shown;
- If there is no contact photo, an image (icon) is assigned automatically;
- Show blocked SMS in the dialog list;
- Show a notification about an incoming notification on the lock screen and in the notification shade;
- Enable delivery report for sent SMS;
- Notify you of receipt of a notification with an audio notification. To set the melody, you need to open the “Sound and vibration” section in the settings.
The “Advanced Settings” section is also located here. In it, the user can also configure both sending and receiving SMS on Android:
- Enable read report for multimedia SMS;
- Activate MMS autoloading, including in roaming;
- Set the format for exchanging business cards;
- Allow the application to download content from sites;
- View the SMS center number and SMS on the SIM card.
Attention! Settings regarding MMS will only work if the mobile operator supports this data transmission system.
Tariffication of services
There are no charges for incoming messages, even if you are roaming. Outgoing SMS are paid according to the terms of the tariff package, taking into account the direction of the sent message:
- offers “Turn on”, “Go to zero”, “Per-second” provide for sending messages to your home region, the cost is 1.8 rubles;
- “Warm Welcome” tariff package, when sending a notification to a local number, is 1.5-1.9 rubles;
- tariff plans “Turn on”, “Warm welcome” throughout the Russian Federation, charge 3 rubles per SMS. And the offers “Go to zero”, “Second by second” - 3.9 rubles;
- The “Turn On” tariff provides for sending messages to foreign phone numbers, costing 6 rubles each;
- SMS to short numbers are charged according to the established rates of content providers. You can find this information on the operator’s website, services and options section. Also, the service of sending free messages in the absence of funds in the account is provided; the service is valid throughout Russia.
Quick Alerts
When there is an incoming call, in addition to the option to answer it, there is a function to quickly send a notification to the caller. It contains several text templates. The user chooses one of them at his own discretion. You can change the phrases for answering a call and add your own text. To do this you should:
- Open system applications.
- Click on the “Phone” tab.
- Select the “Advanced Settings” section.
- Click on the “Quick Replies” panel.
In the window that opens, you need to select any answer option and change it by entering new text and clicking the “Ok” button.
Message details
Note : If a member leaves a group, the Message Details will still display complete information for all members, even those who are no longer in the group.
. You can also click More options
The message details screen shows the following:
If the first two methods turned out to be ineffective, then you will have to resort to third-party utilities that can “read” the erased information. There are not many of them, however, when used skillfully they give excellent results. On the other hand, working on your own to recover deleted SMS messages, you may completely lose your data and completely destroy the source of storage of your or other people’s correspondence, therefore, experts recommend contacting services.
You can do the same with WhatsApp
To find the Message Data screen:
Secondary functions
You can additionally configure SMS on Android in the message sending window. To do this, use a long press on the text input panel to bring up the “Frequent phrases” tab and click on it. A pencil icon will appear, click on it and enter your text. You can set several such phrases and paste them into the text field, calling up an additional tab with templates in it. This convenient feature can save you a lot of time.
On the same page you can set the time for sending SMS. By clicking on the “+” button located in the text line, you should select the “Timer” section and set the required date. After this, an additional panel with an image of an alarm clock will appear above the notification text. It displays the specified date for sending the notification. SMS with a timer is located first in the general list. At the set time, the message will be sent automatically.
The alert can be pinned. In this case, it will be displayed first in the list with the appropriate mark. To do this, select the required contact and hold until an additional line appears at the bottom of the window, click on the “Pin” button.
Setting all the necessary parameters allows you to effectively use the program's functions and reduces the time for creating and sending SMS.
How do I know if a message has been received?
Look at the small icon that has materialized under the sent message in the lower right corner: if there is a blue checkmark in a white circle, it means that the message has been sent but has not yet been delivered to the recipient.
In fact, in the case of Viber there is nothing complicated. If you go to Viber contacts on your device, you will see that opposite those subscribers who have Viber installed, there is a corresponding icon. Here it is: Accordingly, as soon as the subscriber deletes the application from his device, this icon disappears.
How to request read confirmation
This icon will let you know that the message has been read. If you see one gray checkmark, the message has been sent but not yet delivered (the recipient may not have opened WhatsApp yet). If you see two gray checkmarks, the message has been delivered but has not yet been read.
Click here if your device is Android 10.9
Problems in case of SMS center failure
The article provides a guide that will allow you to better understand what to do if your Android gadget does not receive SMS or send them. The problem really needs a solution. You can even eliminate it yourself, even if you haven’t had such experience before. Just read the article carefully and act as the algorithm tells you.
If it is discovered that something is wrong with the SMS settings, then most likely you need to replace the incoming and outgoing SMS server. In fact, accessing the message server is not difficult. This can be done by any other person who gets their hands on the phone. You should be careful not to give the device to strangers. Be careful about the settings; you don’t need to make changes to parameters whose purpose you don’t understand. You should not trust your phone to children. They are even reluctant to make changes to the SMS center, which will lead to problems. It is easy to change the number, and therefore the device will not be able to process SMS correctly.
The problem can be easily fixed in a short time on any phone that runs Android OS. After restoring the settings, correspondence with other subscribers will be possible again. The process is similar to that of deleting data using a program called Factory Reset. To make sure the system is working, you should receive a response about SMS.
Fake
There are still plenty of such reasons. And only those that remain are extremely simple to understand for any modern user. But correcting the situation in some situations will be very expensive.
If you are wondering why SMS is not sent from your phone, then be sure to remember what kind of mobile phone you have. A fairly common reason for this behavior is the presence of a fake gadget. This may be a justified and deliberate purchase (if you initially went for a “pirated” version of a cell phone), or it may be the simplest deception of the buyer.
Thus, here you have several options for how events unfold. The first option is when you knowingly bought a fake. In this case, if you have a warranty on the product, you can take it to the store where the purchase was made. There they should help you correct the situation - repair the purchased model or offer a similar new one. Unfortunately, many stores selling counterfeits do not provide any guarantees. In this case, you will simply have to buy yourself a new gadget.
The thief scenario is suitable for those who have become victims of scammers in a normal store. Contact the place where the purchase was made and report it as a counterfeit. You are required to replace it with the original gadget that you wanted to purchase. If employees refuse to correct the situation even if they have all the documents confirming the purchase, they can safely go to court. Quite often, along with the exchange of the gadget, in this case moral damages are also compensated. But everything is not always so good. Let's think about why SMS is not sent from a phone that is original and fully configured.
Restoring the functionality of the SMS center
Before you begin configuration, it is worth understanding what caused the message server failure. The number is an attribute of the mobile operator. Messages include the use of this combination of numbers. This is a gateway for receiving and sending messages. Only one of the numbers will be changed, as the phone will no longer be able to process SMS and receive reports related to delivery to other subscribers.
Follow the procedure below. It is universal for setting up any gadget on the Android OS. Please note that the OS version does not matter in this case.
To configure the server, follow these steps:
- Call the customer service operator and ask them to give you the correct number. This method is the only one, since this number is known only to the operator. Write it down on a sheet, and then enter it manually yourself;
- open the application to send SMS on your gadget. Go to the main menu in the Settings section.
- You should go to the message center. In the menu you need to enter the number indicated by the operator. Check it is correct several times and click OK.
Purpose of sections
When a file is downloaded via the Internet on the phone, they are saved in the cache section
. This also includes over-the-air update files. By the way, they are called “up.zip”
«.
The data folder requires a detailed explanation
. It contains several directories. For example, data app
— games and applications are installed into it.
In app-lib
You can find additional libraries of files and configurations that are designed to run a particular application. Note: most often app-lib
found specifically in new versions of Android.
The operating system has a Java engine called Dalvik. It plays the role of a kind of engine, since it launches applications and monitors their operation. So, for the functioning of the Java machine, the dalvik-cache directory is provided
.
It is interesting and surprising to see another “date” inside the data folder. But don't be alarmed: this directory is used by the system to store individual settings for each individual application.
System section
also stores settings. But already on a global scale. For example, settings for blocking the device, accounts on it, synchronizing data on the device.
In data
There are not only folders, but also individual files. This is gesture.key,
For example. He is responsible for the blocking algorithm.
efs catalog
Not available on all versions of Android OS. It contains single files and folders that are somehow related to the IMEI of the device.
By the way, sometimes the system section
echoes the preload section
, which stores additional folders and files.
Since we touched on this topic, I’ll explain what functions the system directory is occupied by
. We are now talking about what comes separately and is not part of the data section. So, in the system directory
there are several branches.
For example, app
. This is where system applications and programs, as well as services, are located. Note: in new versions of Android they are moved to the priv-app folder
.
Bin directories
and xbin
are responsible for the content of files and links to executing binary algorithms. In general, just like on an ordinary personal computer. Inside xbin
you can find a file called su (from the words Super User). As you might have guessed, this file is responsible for superuser rights (Root rights).
Camerdata
contains assemblies of configurations necessary for stable and correct operation of the camera.
In etc
you can find the files responsible for loading the operating system. They also provide standard services.
Init.t
created to contain scripts that affect the operation of the OS. Speaking of the etc directory
: it has a hosts file
, which has the right to block web address redirects.
For normal operation of the Internet on a mobile device, the system must receive maximum information about access points. On Android this information is stored in the apns.conf file
, located in the etc folder
. There is also a gps.conf file here
. What do you think he is responsible for? Of course, for navigation using the GPS system.
Framework folder
will demonstrate what “processes” occur inside our operating system.
lib directory
and the modules subdirectory
explain which application and service libraries are used in the system, as well as which drivers (note, not modules!) are used for this.
I never had a desire to listen to additional system sounds. But the catalog provides such an opportunity
. The boot animation is stored right there in the bootanimation.zip archive
.
We have already started talking about multimedia files. Then let's figure it out, get this over with. The system's voice engines are stored in the tts directory
.
Of course, system settings are written in a separate file. You can find it in the system section. It's called build.prop
.
Now that we've sorted out the system partition, let's move on. Next up is the proc section. He can tell a cool story about what kernel is running in the device and what configuration settings it has.
To the mnt section
The operating system always mounts memory cards as well as internal memory. Note that they are virtual in nature.
The storage directory does roughly the same thing.
. However, if mnt performs operations with virtual components, then storage
mounts only real memory and real external drives.
Checking the settings
To make sure everything is done correctly, you need to send an SMS to any number you know. You will also receive a report that the recipient has the message. This will allow you to check the operation of the server.
That's all. Having read the article to the end, you are convinced for yourself that there really will be no problems with setting up the SMS center. You can handle this task yourself. Share in the comments whether you managed to do this, and whether additional problems arose and how you solved them. This information will be useful for other readers who are faced with a similar situation.
What to do if messages do not open
It also happens that when opening messages, the application immediately closes. In this case, try the following:
- Start simple and reboot Xiaomi
- If you previously changed the font size, then try returning the old font - sometimes this helps
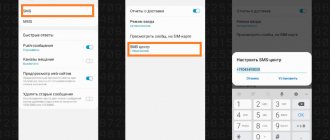
- Change the language to English (United Kingdom). To do this, go to Settings > scroll down the menu to System & device > Advanced > Language & input. Now we open the “Messages” application, after which pop-up windows should appear requiring consent to systematize various data - we agree with them, then change the language back
- SMS can simply be disabled in the settings; to activate them, go to System Applications > Messages and activate the switch as shown in the screenshot below:
- If all else fails, you should do a factory reset or try updating MIUI
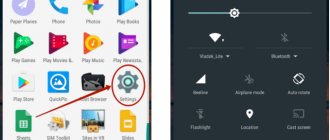
Stage 2: Android Setup
The next step is to set the default application for receiving SMS and configure it. As an example, we will give a sequence of actions on a smartphone running “pure” Android.
- Go to the settings in any convenient way.
Next, use the options “Applications and notifications” – “Default applications”.
Find the “SMS” item and tap on it.
After replacing, a warning will appear asking you to enter a password if you have set up a screen lock.
- Restart your phone - on most devices running Android 10, this requires pressing and holding the "Power" key, then selecting "Restart" from the pop-up menu.
Thus, we have set the default SMS application. Now we will show an example of configuration using the “Messages” client built into Android 10.
- Launch the program, then click on the “More” button (three dots at the top right), where select the “Settings” option.
“Notifications” is a category of options related to receiving and displaying notifications; we will consider them in more detail in a separate article;
To configure SMS, we need the “Advanced” item, go to it.
Of the options presented in this category, the first one you should activate is the “Service messages” switch.
It is also recommended to activate the blacklist: tap on the “Anti-spam protection” option, then use the “Enable anti-spam protection” switch.
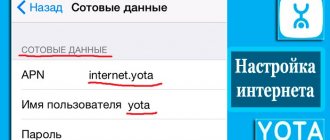
SMS center settings
As for the SMS receiving center options, the situation is as follows: each manufacturer implements access to these parameters in its own way - for example, in the latest OneUI 2.0 interface from Samsung, it is organized through the parameters of the stock application for receiving text messages.
An analysis of all possible combinations deserves a separate article, so we’ll focus on Pixel smartphones.
- To open SMS center options, launch the application for making calls and enter the code *#*#4636#*#* in it.
The verification utility window will appear. Select “Phone Information” in it.
Scroll the list of parameters to the very bottom - there should be a block with the line “SMSC”. Look at its contents - if it is empty or it contains the words “update error”, this means that there is no way to access SMS.
To resolve this issue, manually enter the correct number, then click Update and reboot your device.
Setting this parameter in other shells follows a similar algorithm, only the method of gaining access to it differs.
We told you about setting up SMS on your Android phone. As you can see, everything is quite simple and clear.
How to set up the Beeline SMS sending function on your phone
All settings on modern gadgets are installed automatically when SIM cards are connected to them, but some cases require manual intervention. This is mainly due to the frequent change of SIM cards from different operators. In addition, the reason may be “Individual intolerance” of the device to local settings, since it is not licensed due to its purchase abroad.
Manual configuration of Beeline SMS function
Each configuration of phone functions begins with entering the function menu on the phone. After entering the SMS menu, in the settings section, select the desired item.
In gadgets of various models, the service name may change:
- Beeline SMS service.
- SMS center number.
- Beeline SMS center.
These are popular names, but you should not be confused if the Center is called differently on your phone, since the name does not change the essence of this service.
Having found the required item, you need to check that the entered Beeline center number is correct. The correct number format is indicated in the previous section of the article.
Continuing to configure the correct operation of the messages option in the phone, select the desired format - for this, select the “Text” item from the list. This stage is present only in phone models that are outdated. The need to select a format in new, modern models has disappeared.
To check the functionality of the system, you need to send a test SMS to number 000 - this procedure is absolutely free.
Setting up the Beeline center using the command
In some phones, the Beeline center is configured using special commands. To set up the Beeline SMS center on an IPhone device, enter the command: *5005*7672* then the Beeline center phone number in international format and complete the setup of the # and call button.
The terms of the option provide for the ability to send up to 50 messages per day as part of a dialogue with one subscriber.
To activate the service, you must call 0832, after which the subscriber will receive a notification that they have subscribed to the service. At the same time, the necessary instructions on how to start a dialogue will be received from number 6249.
SMSC number
First of all, it is necessary to mention the SMSC (Short message service center) number - the short message service center. Usually, the SMSC number of the cellular operator is already registered on the SIM card, but in some cases it has to be entered manually in the phone settings. You can check your SMSC number with your mobile operator or here.
- Apple iPhone: there are commands to check (*#5005*7672#), specify (**5005*7672*SMSCNUMBER#) and delete (##5005*7672#) SMSC number
- Android OS: Messages -> Menu -> Settings -> Text messages -> Service Center. You can also change the SMSC number by typing the command *#*#4636#*#* in the dialer, then in the menu that opens go to Phone information -> SMSC settings
- Blackberry OS: Menu -> Settings -> SMS text -> Service center
- Symbian: Menu -> Messages -> Features -> Options -> SMS Message -> Message Centers -> -> Features -> Edit
- Nokia S40: Menu -> Messages -> Message settings -> Message text. -> Message centers -> -> Select Menu -> Messages -> Message settings -> Message text. -> Current message center -> -> Select
- Windows Mobile: Start -> Settings -> Personal -> Phone -> Services -> Voicemail and Text Messages -> Receive Settings -> SMS Center
- Windows Phone 7: Menu -> Settings -> Applications -> Messages -> SMS center number
Character encoding
This parameter is responsible for using 8-bit Cyrillic character encoding (KOI8-R, Windows-1251) instead of 16-bit (UCS-2 [Unicode]). When using such encodings, compatibility problems arise: both the sender’s phone and the message recipient’s phone must be configured in advance for a “reduced character set”; with this setting, it is impossible to send messages using alphabets other than Cyrillic and Latin. If the phone switches to UCS-2 (Unicode), messages stored in eight-bit encoding may be damaged so that they cannot be restored even when switching back. Therefore, even phones that support eight-bit Cyrillic encoding use UCS-2 by default (that is, without changing the settings).
- Android OS: Messages -> Menu -> Settings -> Text messages -> Input mode
- Symbian: Menu -> Messages -> Options -> Options -> SMS Message -> Encoding -> Options -> Edit
- Nokia S40: Menu -> Messages -> Message settings -> Message text. -> Symbol support -> Select
- Windows Mobile: Messages -> Menu -> Options -> Messages -> Use Unicode when necessary.
Delivery period
This parameter is responsible for the period during which the sent SMS will be stored on SMSC if the recipient's phone is unavailable. With its help it is possible to change this period. In addition, the SMSC itself has a standard retention period for undelivered SMS. The sender can reduce the storage period in order to deliver a message that will become irrelevant after a short amount of time - if the recipient’s phone is available to receive the message after this period, the SMS will not be delivered to him.
- Symbian: Menu -> Messages -> Options -> Options -> SMS message -> Delivery period -> Options -> Edit
- Nokia S40: Menu -> Messages -> Message settings -> Message text. -> Message is valid -> Select
Super Backup Restore
Super Backup & Restore is the leader in speed of operation and creation of backup copies of phone contents (calls, messages, bookmarks, calendars). The developers have provided the ability to:
- create a backup on Android manually and on a schedule
- send a copy to the cloud
- record and save voice calls on your smartphone
- generate a table with links to PlayMarket for all applications installed on the device
It is worth choosing Super Backup if you need voice recording or high speed. Otherwise, it is no better or worse than its competitors in any way.
All apps listed in the review for backing up data on your phone have approximately the same rating of 4-4.6 stars on PlayMarket.
Learning to postpone important notifications until later
The most important notifications are important because they must be received and immediately done what the notification was initiated for. But even for important notifications, sometimes the time or mood comes at the wrong time. In this case, the notification can be postponed for a certain period of time and, having received it again, finally responded (or postponed again).
To snooze a notification, swipe it to the side, click on the clock icon and select the time for which you want to snooze the notification. This way, the notification can serve as a reminder to you.
If you have one of the Pixel devices and have installed the beta version of Android Q on it, then you can try a new feature - a bell icon appears on new notifications so that you can distinguish new notifications from those languishing in The status bar has been around for ages.
Changing notification sounds
If you are used to and cannot live without sound notifications, there is a simple way to optimize the way you receive them. By setting a specific sound for important categories of notifications, you can instantly understand when something requires your attention, and when an incoming notification can be safely ignored.
This time we will again need to go to the notification categories, as described in the first paragraph and click on the “Sound” item. Now select any ringtone that you have saved in advance or create your own by clicking on the plus icon at the end of the list of ringtones. Over time, you'll learn to identify notification types based on sound alone, and if you like the concept, you can apply the same settings to incoming calls in the Contacts app.