The functioning of satellite television involves the exchange of data between the receiver and the satellite using special additional equipment. This process may be accompanied by a number of errors and malfunctions, among which “Tricolor receiver does not turn on” is one of the most popular calls to technical support. The main problem in diagnosing this malfunction is the variability of possible causes.
In this material we will pay attention to the consideration of the most common errors that affect the inclusion of the Tricolor prefix. Following the step-by-step instructions will allow you not only to identify the problem, but also to quickly eliminate it.
Reasons why the Tricolor receiver may not turn on
Failure to turn on the receiving equipment may be due to:
- Supply of food;
- Switching the TV to another connector;
- Technical work at the provider;
- Problems with the antenna;
- Signal conversion in the converter has stopped;
- Damage to the cable or F-connector;
- Software failure;
- Technical malfunctions in the operation of the receiver;
- The remote control does not work.
To detect a problem, the user can carry out simple steps that involve diagnosing the equipment. Moreover, it is possible to evaluate the performance of individual links or the entire signal supply chain from the antenna to the receiver.
How to check the Tricolor converter at home?
Based on all the visible signs, you can create an approximate algorithm on how to check the Tricolor TV satellite antenna converter at home for faults. 1. First, you need to visually check the cable that goes from the receiver to the antenna for breaks, kinks, twists, knots, pinched places, and damage to the integrity of the braid. If you have a special device at home called a multimeter, you can use it to “ring” the cable and determine its functionality. 2. So, you have found out that the cable is intact. The next step is to check the satellite dish head for visible damage, the absence of dirt, ice, and snow. You also need to make sure that it is installed as required by the instructions, does not dangle, and is firmly secured. 3. It would be useful to check the contacts at the junctions of the cable, converter and satellite dish. 4. There is a simpler option: if you have a spare working head, you just need to change it and check if the signal appears. Thus, you can understand whether the cause of this problem lies in a faulty converter or in something else.
Familiarization information before self-diagnosis - special symbols
A Tricolor subscriber, if he has certain knowledge and skills in electrical circuits or power circuits, can diagnose a broken receiver with his own hands. This will avoid long-term restoration of the receiver’s functionality in service centers. Having decided to open the equipment, the user must know the special symbols used on internal elements.
Triangle with an exclamation point inside
The meaning of the designation is safety. If this warning is marked on some parts, handling these parts may damage accessories or the receiver itself.
Triangle with lightning inside
The meaning of the sign is a threat. Lightning indicates danger during opening or situations where elements are being handled. Danger involves harm to health or life.
Circle with English letter i
The designation provides information about problems and malfunctions that may arise during work.
How to set up the Tricolor TV antenna yourself?
Forgot password. Lost your password? Please enter your email address. You will receive a link and will create a new password via email. Testing a converter with a multimeter can hardly be called a correct test. Well, probably if you look closely, changing the probes, you will notice a slight difference in the readings. Which also carries little information. Therefore, the best option is to purchase a cheap SatFinder. Moreover, it is very easy to use. Using it, you can track the signal level and, if necessary, adjust the dish.
Nutrition problems and their solutions
Testing of GS series receivers.
The first priority is always to check the power supply:
- Is the plug plugged into the socket?
- Is the power supply OK?
- Correct connection of the power supply to the network;
- Is the wire disconnected from the console, because sometimes children can accidentally remove it;
- The power switch on the rear panel should be in the On position.
Models of older receivers typically have an external power supply. The power problem may be a malfunction of this element. A Tricolor user can buy a new unit and enjoy watching television.
On new models, the power supply system is located inside the case, which complicates the repair task. Power may not be supplied due to lost capacity or defective areas on the diode bridges. Also, a unit that is used for a long time may fail over time. During repairs, you will need to replace the capacitor, which is swollen. Having disassembled the receiver case, you can immediately distinguish the power supply. By disconnecting it from all the boards, a skilled craftsman will be able to replace the failed elements.
Video: how to replace the power supply on the GS8300 receiver
To simply replace a capacitor you will need:
- Soldering iron;
- Screwdriver;
- Soldering flux;
- New capacitor.
The element to be replaced is purchased after opening the case. You should purchase a capacitor of the same capacity that matches the previously installed element.
When opening a part, the location of the element must be observed. When soldering a new capacitor, observe all boundaries.
Repairing the power supply will allow the current to flow again. If power is supplied, the indication is activated. Maintaining the “non-switchable” state in the presence of an indication is associated with other breakdowns.
More details in the video:
Scheme to check
The test circuit itself is very simple and is based on the fact that a modern LED can be connected to almost any voltage greater than 3 Volts, but only using a current-limiting resistor. The voltage that the disc switches is 13 and 18 volts. This means that we only have to choose, or better yet, calculate a resistor for 18 volts.
R = (V total - V Led) / I
I hope the formula is also not complicated and understandable.
- Vtotal is the maximum voltage that the disk drive switches, let’s take 18 volts.
- V Led — LED supply voltage. Most LEDs are powered by 3 Volts
- I - LED current. We take 20 milliamps
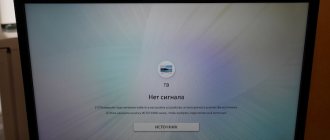
Message No signal on TV
When a message appears, the subscriber first checks the likelihood that it is coming from the receiver and not from the TV. The indicators on the receiver light up, and when you press the buttons, a response occurs. When you call up the Receiver Menu, the device displays the corresponding window. This means that the equipment is correctly connected to the TV, and the error is related to the operation of the receiver.
If the weather is good outside and the provider does not carry out technical work ( information about technical work is presented on the company’s website or displayed in advance on the Info Channel ), then the message may appear due to the following reasons.
Antenna offset
The antenna goes astray under the following conditions:
- Bad weather;
- Poor fixation;
- Long-term operation;
- Fall of a heavy object.
A displacement of 1 cm causes the signal to disappear. The user needs to analyze the rigidity of the fastening. If the fastening is found to be weak, adjustment will allow you to achieve the desired signal range. The signal is monitored on the television display during the period when the “Settings” section is turned on in the receiver Menu.
The location of the antenna changes by slowly rotating in different planes. You should not make turning steps of more than 1 cm. After turning, wait 5-6 seconds until the signal is set.
After the initial adjustment, it is necessary to perform a fine tuning operation so that the corresponding signal parameter scales are filled at the level of 70-80%. The final step involves securing the pole bolts to the antenna.
When a large object falls on the antenna, it leads to changes in geometry, which requires a change of equipment.
Often, changing your position on your own does not bring positive results. A dish installation and setup technician will be able to quickly set up the signal. The cost of services depends on the region and location of equipment installation.
Cable damage
The subscriber should check the cable from the dish to the receiver. If a broken area is identified, the wire should be restored using available tools and an F-connector (if there is only one damaged area). Repair stages:
- Cut the wire in the area to be restored;
- Clean connecting areas;
- Use F-connector on stripped ends;
- After fixing the connection, screw on the electrical tape.
The operation is not performed if the rupture occurs again. A new wire must be used. Some technicians, without visually identifying a break, identify hidden defects in the cable using a tester.
Problems with F-connector
A cable coming out of the connector may cause a lack of signal. It is required to screw it back under force. A damaged connector can be replaced.
Problems with the converter
The converter is one of the connecting links in the signal transmission chain. Being constantly outside, he takes on the weather and the negative influence of the external environment. When purchasing equipment, warranty service is provided for 1 year. In practice, the part is used for 3-6 years.
An ordinary user will not be able to detect a breakdown. If other options for signal deficiency are excluded, the part should be replaced.
A new converter can be purchased at the sales office. Replacement instructions:
- Disconnect the element from the fastening;
- Without moving the antenna, secure the new converter;
- Check the range of signal stability on the corresponding scales displayed using the receiver menu on the TV;
- If the settings are lost, re-adjust the plate.
When you call a support specialist, you will have to pay for the services of identifying the problem and installing a new part if replacement is necessary.
Interference on the way to the satellite
Interference is various objects that appear on the signal transmission line from the satellite to the antenna:
- Tree branches;
- Construction of a high-rise building;
- Snow accumulation.
The method for removing an obstacle depends on the object that has arisen. The subscriber can simply reinstall the antenna to clear the signal path. After the transfer, you will need to configure the signal again.
Checking the serviceability of LNB “heads”
The functionality of the “heads” is determined after the disk drive (several converters) is turned off. After which each one is connected to the receiver.
Device setup
Setting up the converter always begins with the correct installation of the plate itself. Understanding how to do this is not difficult. Another thing is to do all this in practice:
When you achieve an acceptable antenna angle, you can proceed to adjusting the satellite TV converter itself to strengthen the incoming signal:
- if you rotate the satellite converter in one direction or another, you can strengthen the incoming signal;
- It is not recommended to move the device to the mirror, since changing the angle of adjustment will have to be done first.
When you receive the highest quality satellite signal, secure the dish and satellite antenna converter more firmly and begin checking the quality of television broadcasting. The next step is software configuration, which will be discussed later.
The receiver does not turn on from the remote control
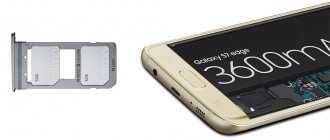
If there is no response to the remote control buttons, you should perform the action using the button panel on the receiver itself. If the actions are performed, then the receiver is functioning. After changing the batteries in the remote control, check the control using the remote control again. Operation did not resume - you need to use a different remote control.
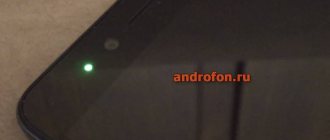
Craftsmen can try to check the functionality of the remote control in another way. A mobile phone camera is used for this. Point the remote control LED at the camera that is turned on.
Point the remote control at the camera.
While looking into the camera and pressing buttons at the same time, monitor the LED indication:
- Steady flashes indicate that the remote control is working properly;
- Unstable lighting intermittently is due to the board not functioning;
- Lack of indication means the remote control is faulty or the batteries are low.
If after changing the batteries the LED does not start blinking, then you should buy a new remote control.
Repairing a device with rare glows is carried out by disassembling the case and cleaning the surface of the board with a damp cloth, soapy water and a dry rag. After all cleaning operations, dry the parts and assemble the remote control. If the flash does not become constant when viewed through the camera, a new device is required.
How to check a satellite converter
You can check the correct installation of the satellite TV converter by trying to find a channel:
Using the instructions described in the article, you can set up the converter for both NTV and MTS yourself. However, do not forget that, despite the fact that in words everything may look very simple, in reality everything can turn out to be much more complicated. And to make it easier for you in your endeavors, we are ready to answer all your questions on this topic in the comments below.
If you are not confident in your actions and think that your actions can somehow harm the final state of the entire structure, then we strongly recommend that you still seek help from specialists who will help you solve this problem.
Technical malfunctions of the receiver
The receiver is the link responsible for receiving the signal and transmitting the video stream. Technical components of the device may break down or software problems may occur. The receiver itself has a warranty period (1 year), during which specialists must repair the device.
If a breakdown occurs after the end of the warranty period, you can carry out independent diagnostics or send it to a service center. Problems that often occur are displayed as errors on the TV screen or the device itself. Please note that the following errors are specific to some models:
- DRE 5000, 7300, 5001;
- DRS 5003;
- GS 7300, 8300, 8300N, 8300M.
For other receivers, the same errors may occur.
When turned on, the receiver screen flashes
A flashing display indicates a faulty power supply. This may be due to a power surge. The use of a surge protector or stabilizer will protect against damage.
When turned on, Boot appears on the screen
The letter combination “BOOT” indicates two problems:
- Software failure, which requires flashing the device;
- The motherboard is not working properly or is broken.
You can reflash the device yourself by finding software for this receiver model. In such a situation, the user loses all warranty obligations of the equipment supplier. If the re-flashed receiver does not start sending a signal, then they resort to replacing the motherboard.
The motherboard is replaced at a repair center. There are brave souls who do it with their own hands. Then you will need to disassemble the receiver and remove the old element. Such actions will void the warranty.
All the symbols on the receiver screen light up and it does not turn on.
The lighting of all indicators and symbols allows us to conclude that there was a software failure. In some cases, the motherboard breaks down. After disassembling the receiver, specialists will be able to determine the true cause of the failure. If the power supply is functioning normally, the motherboard will be replaced. When other boards are also damaged, it is better to buy new equipment, since the cost of repairs can be high.
Receiver motherboard.
The message “Short circuit!” appears on the receiver screen. Check antenna cable!
The message is translated as “short circuit”. The process can occur in several areas. Diagnostic stages:
- If the inscription disappears after disconnecting the antenna wire, then a broken converter, dish or short circuit in the wire may be a cause for concern;
- Inspect the wire for signs of a short circuit by unhooking it from the converter;
- When the wire was pulled out, the message did not disappear - the tuner unit had failed.
The subscriber can diagnose the breakdown himself.
The receiver displays "ER31"
The inscription implies a failure of the motherboard. It is better to replace the part at a service center.
Has the converter failed?
The converter itself, if you purchased it from a reliable store, will serve you for a very long time and without complaints. The device is protected from moisture and dust, and if installed correctly, you should not think about it.
If there is no picture on the TV screen, then the last thing you should think about is the converter malfunctioning (with the exception of cases when the converter has been used for more than 5 years).
First, check the remaining points:
- The weather outside is good. In the event of a storm, rain or other bad weather, temporary interruptions in broadcasting are possible.
- The cable from the antenna to the receiver is not damaged.
- The cable connections are securely fastened.
- The smart card is installed correctly.
- The subscription to the main service is active (no debt).
Only after you make sure that all of the above points have been met, you can check the converter.
The receiver does not turn on after a software update
Updated software may not install correctly. As a result, the receiving device will not turn on. The subscriber must follow the reset steps:
- In the receiver Menu, find and open the “Settings” section;
- Select the “Reset” command;
- After confirmation, wait for the end of the process and reboot the receiver;
- When turning on, you may need to enter an access code - then enter the combination “0000”;
- After logging in, the necessary parameters are set (language, time, location);
- To install TV channels, you need to perform a search operation and save the changes.
Sometimes the problem is simply solved by turning off the receiver for 30-45 minutes and then booting into normal mode. This method can also be used by users who flashed the device on their own.
What to do if none of the methods helped
After diagnosing the equipment and eliminating all possible breakdowns, you can contact the service center. First you need to remember about the warranty, if it is still valid. Typically the period is 12 months. Once you have found the warranty card, contact your nearest service center. After a quick diagnosis, employees will be able to repair the broken part free of charge.
When the warranty has already expired, you will have to take the product for service under normal conditions. Specialists can open the case and identify the cause. After which they will offer to carry out repair work, voicing the cost of spare parts and repair procedures. It is worth considering that a long service life of the receiver leads to the exhaustion of the intended resource. Therefore, for greater savings, it is better to buy a new receiver than to repair an old receiver.