In this article, we will look at the types of Root rights, what types of methods for obtaining a Superuser can be divided into, and we will teach you how to carry out the Rooting process. It is important to note that after obtaining these rights, you lose the opportunity to receive warranty service and may generally turn your device into useless plastic.
Root rights (Superuser mode) - when receiving these rights, the user has influence on various system files and folders, thereby changing program shortcuts to installing modified firmware.
If you want to learn more about Root rights, then read our article, where we described all the pros and cons of becoming a Superuser on the device.
Attention! We are not responsible for your actions. You perform all actions with your smartphone at your own peril and risk!
Types of Root rights
At the moment, there are only 3 types of Root rights:
- Temporary Root – temporary rights that disappear after rebooting the smartphone.
- Shell Root - permanent Root rights, there is only one limitation - you do not have influence in the “ System ” folder.
- Full Root – permanent rights, without restrictions. With these rights you will become a real Superuser.
If you speak English well and want to find out even more information about various programs for Root rights, read an interesting article from joyofandroid
Let's look at the bytecode .apk
So let's take a look at the internals of the .apk . To do this, you can use the tool provided by Android Studio . In the menu, select Build -> Analyze APK the .apk we are interested in .
All compiled bytecode is stored in the classes.dex . Let's select it and take a look at the contents. First of all, we are not in java or androidx files, but in application files. Therefore, we select the first package in the android project file structure, in my case this is the com . Out of curiosity about the contents of each folder, I was triggered by the word rootbeer . After googling it turned out that this is a very popular library for checking a device for root status.
Having studied the documentation and source code of the library, it became clear how to use the library and where the key isRooted() .
Even though most of the application classes have been obfuscated, it is still possible to navigate and find the required file. I don't want to say that obfuscation is useless. After all, if the file I needed was somewhere deep in the application, I most likely would not have found it.
Judging by the source code of the library, the file I need should be located next to the RootBeerNative , and as we see here, there are two a and b . By empirical method, I realized that this is the file b . Right click on file b and select Show Bytecode .
Unfortunately, all method names are obfuscated. Looking again at the source file on github , it becomes clear that the isRooted() is on line 42 . After searching through the bytecode file, I managed to find this method. Only now it’s called a() and for some reason starts working with .line 43 . This is the method I will edit. But not so fast. Unfortunately, there is only Read-only access.
Obtaining Root rights on Android
The process of obtaining Root rights is called rooting.
Rooting (or rooting) is the process of obtaining Superuser on devices with Android OS. The main goal of this process is to remove restrictions from the device for further modifications. An analogue of Rooting for Apple users is JailBreak.
There are several general stages of routing :
- Preparing the device for removing restrictions (it is advisable to remove the memory card before obtaining Superuser).
- Launching special programs on the computer to which you connected the smartphone, or on the device itself (These programs are called exploits).
An exploit is a program code, a set of commands, or a computer program that exploits vulnerabilities in a particular software.
- The SwitchUser executable file is copied to the directory specified in the PATH .
SwitchUser is a Unix command that allows you to switch to Superuser without logging out of your session.
- At this stage, launch rights are set using chmod .
Chmod – using this program you can change access rights to directories and files.
What do we do?
The first thing that came to my mind was to try to decompile and correct the code here and there, and then put everything back together. The main doubt about this approach was that I did not a native Android application , but a flutter application . cannot be found in the form of bytecode in the .apk Or will it work? And do I need the application code itself?
A short digression about how native code , that is, native code for the Android or iOS platform. For example, a flutter developer is faced with the task of not making it possible to work with the application on a rooted device. An analogue of an Android root device is a jailbreak for iOS. To check for rooting or jailbreak, you must use the native tools of both platforms. To do this, the developer writes a plugin that calls the appropriate native methods depending on the platform on which the application is running.
Thus, I concluded that in the existing .apk file there are at least 2 places of interest to me in the form of bytecode. The first place is the native part of the application, which listens to commands from the flutter part of the application to call the corresponding native methods. And the second place is actually those same native methods, and in this case, a library for checking whether a device is rooted.
I decided that I would change the bytecode in the second place. To be honest, at first I worked with the first place, that is, with the plugin. This is because there is much less code and it was more difficult to get confused. Just a method that calls another method is a couple of lines of code. But in this case, the article would be even more tied to a specific .apk , and there would not be such abstractness. Therefore, we will work directly with the library code.
Preparing your smartphone to receive Root
We could already start obtaining Root rights, but first we must tell you how to prepare the device for Rooting.
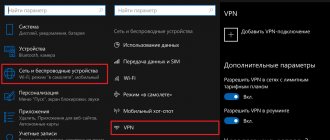
USB debugging mode
If you decide to get Root rights by connecting to a PC (via USB), then without this mode you will not succeed. You should start by turning on the “ USB Debugging ” mode and the algorithm is very simple, literally in 5 taps. Let's take a look (approx. from Meizu):
- First of all, we need to go to the settings of our device.
- Next, go to the “Special” tab. possibilities".
- Tap on “ For Developers ”.
- Enable “ USB Debugging ”.
- Click “ Allow ”.
After connecting the device to the PC via USB, the following will appear on your device (in the notification line):
Allow installation from unknown sources
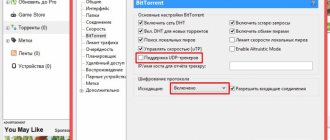
You need to give permission for installation from unknown sources in any case, let you get Superuser via USB or locally. Moreover, this permission may be a violation of the security of your personal smartphone, but the installer on your smartphone will still check the reliability of certain applications, so feel free to give permission. The following algorithm of actions will allow you to do this:
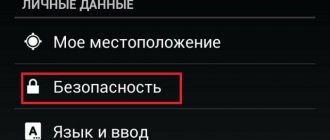
- Go to “ Settings” of your smartphone.
- Go to “ Security ” (for example, Meizu – “ Fingerprints and Security ”).
- Tap on “ Unknown sources ” and confirm your action.
That's it, now your smartphone is officially ready to receive Root rights .
How did it come to this?
They sent me the .apk file of the application. There is a bug somewhere inside the program that I need to reproduce. But I can’t go deep into the application. My device does not pass the root test.
The screen that doesn't let me through
Since I had already spent a lot of effort to finally launch this application (you can find out exactly what kind of efforts we are talking about in the previous article), here too I decided not to give up and try to bypass the check for the device’s root status.
Possible problems after removing ROOT and ways to solve them
A fairly common complaint from users is that the smartphone starts to restart after the logo is shown. It would seem that such a problem can be attributed to the disadvantages of root rights, because sometimes they disrupt the stable operation of the device. But no, it is after they are removed that the operating system refuses to work correctly for many reasons (an important file was accidentally damaged, a virus was not noticed).
Resetting to factory settings will help us . Don't forget to back up beforehand and move important files to external storage. Turn off the smartphone, hold the “Home” key and the volume rocker.
“Recovery” mode appears , in which we go down to the item “Reset to factory settings” . We clean the system and reboot the device. Everything should start.
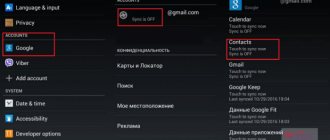
Why root your phone
Obtaining superuser rights, or rooting, is a simple process, the result of which can bring additional comfort to working with the gadget. Initially, after purchasing a device in a store, regular user rights are available. You can remove some applications and install new ones without affecting your overall health. Root rights will significantly expand the user's capabilities.
The main advantages of rooting include the permissibility of any manipulations with the device’s firmware.
After receiving root access, you can remove ads from applications, make edits to standard services and system files, change the appearance of the operating system, and also influence the overall performance of the device. By responsibly making changes to the standardized set of Android 6 Marshmallow software tools, the user can increase battery life, free up additional space on the phone and take the load off RAM, which was previously clogged with support for unnecessary software.
Editing the contents of classes.dex
To do this you will have to decompile the entire . apk using the famous apktool tool. It's quite easy to work with. After installing it, we only need 2 commands:
apktool d appname.apk, which decompiles the specified .apk and apktool b directory_with_app, which will assemble the .apk back (the specified directory_with_app should contain the apktool.yml file).
So, I decompile using the command in the terminal: apktool d app.apk
After executing the command, a folder with application files appears. We are interested in the smali . Smali is a language that describes bytecode (here's a great article on the basics of smali). This folder is the contents of the classes.dex . You can add the parameter –skip-sources or simply -s to the command you just executed, then instead of the smali we will see the same classes.dex .
Next, in the smali we find the file of interest and already known to us b.smali :
Open it with any text editor and go to the place where the isRooted() :
File contents b.smali .method public a()Z .locals 1 .line 43 invoke-virtual {p0}, Lcom/scottyab/rootbeer/b;->c()Z move-result v0 if-nez v0, :cond_1 invoke-virtual {p0}, Lcom/scottyab/rootbeer/b;->d()Z move-result v0 if-nez v0, :cond_1 const-string v0, "su" invoke-virtual {p0, v0}, Lcom /scottyab/rootbeer/b;->a(Ljava/lang/String;)Z move-result v0 if-nez v0, :cond_1 const-string v0, “busybox” .line 44 invoke-virtual {p0, v0}, Lcom/scottyab/rootbeer/b;->a(Ljava/lang/String;)Z move-result v0 if-nez v0, :cond_1 invoke-virtual {p0}, Lcom/scottyab/rootbeer/b;->f( )Z move-result v0 if-nez v0, :cond_1 invoke-virtual {p0}, Lcom/scottyab/rootbeer/b;->g()Z move-result v0 if-nez v0, :cond_1 .line 45 invoke- virtual {p0}, Lcom/scottyab/rootbeer/b;->b()Z move-result v0 if-nez v0, :cond_1 invoke-virtual {p0}, Lcom/scottyab/rootbeer/b;->h() Z move-result v0 if-nez v0, :cond_1 invoke-virtual {p0}, Lcom/scottyab/rootbeer/b;->j()Z move-result v0 if-nez v0, :cond_1 invoke-virtual {p0} , Lcom/scottyab/rootbeer/b;->e()Z move-result v0 if-eqz v0, :cond_0 goto :goto_0 :cond_0 const/4 v0, 0x0 goto :goto_1 :cond_1 :goto_0 const/4 v0, 0x1 :goto_1 return v0 .end method
We can compare it with the unique original:
Very similar. So, we are interested in return , that is, the very end of the method. We see that the method returns some constant v0 , the value of which is determined based on the conditions fulfilled in the method. This doesn't suit us. We always need to return false or, as it would be in smali , 0x0 . To do this, add our own constant v1 with the value 0x0 . Let's do this right above the return :
:goto_1 const/4 v1, 0x0 return v1
And of course, we’ll replace v0 in return with v1 . Let's go to the very beginning of the method and change the value of .locals from 1 to 2 , because that's what we need to do. Save the changes to the file and close the editor.
Putting the .apk back together
To do this, we will use the apktool b app command, where app is the folder with the application in which we edited the smali file. After the command completes, dist directory will appear app . This is where our newly assembled .apk . However, when we try to install it, we will receive the following error:
The APK failed to install. Error: INSTALLPARSEFAILEDNOCERTIFICATES: Failed collecting certificates for /data/app/vmdl164530405.tmp/base.apk: Failed to collect certificates from /data/app/vmdl164530405.tmp/base.apk: Attempt to get length of NULL array
This is due to the fact that after rebuilding you also need to re-sign the application. For this we need any keystore file. Or you can create a new one using the command:
keytool -genkey -v -keystore my-release-key.keystore -alias alias_name -keyalg RSA -keysize 2048 -validity 10000
You can sign an application with a key using one of two tools: apksigner or jarsigner.
I selected jarsigner using the following command:
jarsigner -verbose -sigalg SHA1withRSA -digestalg SHA1 -keystore keystore app.apk cp_key
In this command we specify the path to the keystore , the path to the .apk that we want to sign and the name of the key (alias) from the specified keystore. Afterwards, enter the password from the keystore and the application is successfully signed.
However, that's not all. Now, when we try to install the .apk , we will receive another error:
The APK failed to install. Error: INSTALL_FAILED_INVALID_APK: Failed to extract native libraries, res=-2
This is because after signing the application, you need to optimize the .apk file using the zipalign tool.
To perform optimization, you need to enter the following command: ~/Library/Android/sdk/build-tools/30.0.3/zipalign -v -f -p 4 app.apk rdy.apk
30.0.3 - I chose the most recent version at the time of writing. After completing the command, the output is the rdy.apk , which can be successfully installed! Let's check if we managed to bypass the device's root status check:
And yes, this is a success!