Today we’ll look at a broad topic: how to flash an Android phone. Every user of an Android or iOS device has heard about the concept of “flashing” at least once in their life. This term is usually used by service center technicians, sometimes by advanced users or IT geeks.
Made for:
- Error corrections for developers of younger versions of software,
- If, when checking for updates, the system writes something like “no new software versions were found,” although Android 10 has been released a long time ago.
- Increased security of user data,
- Changes or improvements to software characteristics,
But not every user knows how to do it correctly, especially at home.
Here is a universal instruction for dummies in Russian, and is suitable for all Android models: Alcatel, Asus, Lenovo, Meizu, Philips, Nokia, Oppo, Phillips, Prestigio, Sony Xperia, HTC, Samsung, Xiaomi (Redme), ZTE, BQ, Vertex, Micromax, Umidigi, Oukitel, Texet, Leagoo, Dexp, Doogie, Huawei (Honor), HomTom, Chinese No-Name, sold under the brands Megafon, Beeline, MTS, etc. Including for tablets, TV set-top boxes, car radios.
To start
In this article we will look at algorithms and methods for flashing Android technology. Let's look at the most frequently asked questions and try to avoid mistakes. But first, let’s deal with the preparatory stage so that the procedure is successful.
Data backup
The first thing you need to do is save a copy of the data on external media:
- Save a backup (system snapshot) to a PC or laptop. This will be a complete archive of all applications, OS settings, duplicates of the owner’s files (photos, videos, documents, saves from games, instant messengers, etc.).
- It recommends saving personal data separately from the system archive: photos, music, videos, documents and other files from the internal memory.
Dump the backup to Google Drive, Yandex.Disc or another personal profile to which there is a synchronization link. It is better to transfer data from a flash drive or SD card to a removable hard drive, computer or laptop.
To create a backup on Android, use:
- Titanium Backup (requires root access),
- Super backup,
- Backup - Backup,
- 7-Data Android Recovery,
- Super Backup SMS & Contacts.
It is advisable to install applications from Google Play, and not from third-party APKs.
An easier way is to create a backup from recovery mode on an Android device. You don't need to install any software to do this, but you will have to invest in an SD card.
All actions are performed from a mobile phone:
- Enter the recovery system menu. More detailed instructions about logging in are found below in the article.
- Go to the backup and restore line. In the new window, select “Reserver”.
- Confirm your actions.
Navigation in the Recovery system menu is carried out through the smartphone’s hardware keys: volume down/up. Confirmation of action - button on/off the device.
High quality wire
This is one of the most important elements. It is worth noting that the process of updating (rolling) a new OS is best done through the factory USB cable. Some devices can be updated over the air. But it’s better not to take risks and reflash the gadget via wire.
Take only the original cable! As a last resort, you can use an analogue, provided that it is completely identical to the factory accessory. Usually these are certified products that are recommended by the manufacturer itself as an alternative option.
Which USB cables should not be used:
- Chinese fakes and cheap analogues cheaper than 50-100 rubles;
- nibbled or chewed by a dog or cat;
- broken, torn, broken, melted, with a flooded contact group;
- very old (possible internal breakage or chafing of the copper conductor).
Remember: any wire with an external defect can lead to damage to the device during firmware. Such a malfunction is very difficult to repair at home!
Fully charged battery
Battery charge is critical when performing firmware.
It is important that the battery is fully charged. If there are problems with the battery, it is better to first replace or repair the element.
Modern recommendations for batteries: keep the charge level at 20%-80% of the declared volume for Li-Ion/Li-Pol batteries. For such an important procedure, you can make an exception and increase the charge level to 100%.
The battery must not only be fully charged, but also functional, without rapid drainage in capacity. Otherwise, the battery will run out during the update process, and you will end up with a “brick” with electronic filling.
Another tip is powering your PC or laptop. “Pumping up” a new version of smartphone software is not a quick task, it can take from 10 to 50 minutes. Therefore, we recommend that you play it safe on all sides.
For a desktop computer, it is worth using a UPS (uninterruptible power supply) so as not to be left without electricity at the most inopportune moment.
Remove SIM and SD card
Some firmware versions may not work with the installed SIM card or flash drive. This limitation applies to both original and custom OS updates. In addition, during the memory formatting process, the SD card can be formatted. For a safer update procedure, it is better to remove the tray with the SIM card and flash drive.
Possible problems
- The worst, and perhaps most likely problem during flashing is the “bricking” of the gadget. The smartphone stops working from the word “completely”. It does not turn on and, in principle, does not respond to any manipulation. It is possible to repair the device, but it will take time. In some cases, to restore functionality after unsuccessful manipulations, you will need the help of a technician from the service center.
- A less dangerous situation is cyclic loading. When the device tries to start, but cannot do so: it reaches the stage of displaying the logo, after which it reboots again, and so on cycle after cycle. The situation can be corrected, but it requires time and skills.
- The simplest thing is to disable certain functionality on the device. For example, the Wi-Fi chip falls off or the sound disappears, the display begins to flicker, the backlight does not adjust, etc. Typically, such difficulties occur after “rolling up” custom firmware.
- There is another indirect problem: as soon as root rights are obtained, the gadget will automatically be removed from warranty service.
Risks for Xiaomi owners. Observed when switching from Chinese (China ROM) to global (Global ROM). Less common when changing a stable version to a beta version and vice versa. In addition, it will complicate life:
- To an authorized Mi account (be sure to read the instructions here),
- Locked bootloader
- protection against rollback to the previous software version.
Why do you need to reflash your Android phone?
People make and program gadgets, so no device is completely immune from errors. If a problem occurs in your Android smartphone (tablet), the drastic way to get rid of the problem is to flash it.
Arguments for reinstalling the OS
Thanks to the openness of this operating system, manufacturers are free to improve and customize it to suit their gadget models. Many of their advanced software have already won the love and trust of users. In this regard, owners of smartphones and tablets often take risks and decide to reflash their electronic friend. This is also facilitated by some developers who eventually stop releasing updates for their gadgets. Users from various sources of information learn about new software modifications that can allow optimal use of the device’s hardware capabilities and, of course, wonder how to reflash Android.
Even very well-known companies that produce smartphones and tablets often sin by installing their own software, which for obvious reasons is not suitable for most users. In addition to the unsuccessful external design of the shell, these proprietary software significantly slow down the functioning of the device. At the same time, pure Android, not stuffed with unnecessary marketing tricks from the developer, often amazes with its high performance and stability. Therefore, the answer to the question posed is to install custom software, which does not contain pre-installed “junk” from the manufacturer.
Arguments against reinstalling the OS
If there is a lack of experience or insufficient care, there is a high risk of receiving a non-working and useless piece of microcircuits and plastic after the procedure, or as specialists used to call this failed device, “Brick”.
If firmware is installed with software taken from unofficial sources, the warranty on the device will be void.
Not all drivers included in the software package from a third-party developer work correctly with the gadget’s components. It happens that after flashing the GPS module refuses to search for satellites, and the camera takes low-quality images. Also, not optimally selected software can cause the battery to drain quickly.
Basic methods
There are several basic ways in which you can update your operating system. Some involve the use of special software and a PC, others allow you to flash the device directly, from the smartphone itself. We recommend using the wired method as it is the safest.
A.D.B.
ADB (Android Debug Bridge Utility) is a PC debugger utility for flashing and changing many Android settings. For correct operation, you will need a USB cable and access to the Windows command line with administrator rights.
Download the archive with the firmware in ZIP format in advance (read below for how to choose the version). It is worth taking only proven options: from the official websites of manufacturers or that have been installed by other users on similar smartphone models.
Instructions for reflashing:
- Download and download the Java Development Kit from the official website. Choose the JDK version that matches the operating system bit depth (x86 for ancient computers or x64 for modern ones) on your PC or laptop.
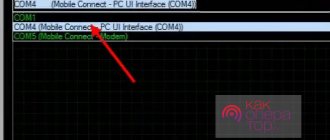
- Connect your smartphone to a PC with ADB utility installed. Check for ADB drivers on your PC. If they are not there or they are installed incorrectly, reinstall them manually. Drivers are looked for on the official websites of the brand companies that produced the equipment. You can also use an alternative driver installer.
- Enable “USB debugging” by activating developer mode and open root rights. Instructions are a little lower in the article.
- Check the visibility of the utility for your smartphone and allow authorization. In the folder with the installed ADB program, press the right mouse button and the “shift” button at the same time. Select “Open a command window” or “Open a PowerShell window here” (for Win 10 version). Now type “adb” and press enter. The utility will launch via the command line.
- Check the visibility of the gadget, as well as its authorization. Enter the command “adb devices”. The phone will display a window for authorization. Confirm the command with “ok”.
- Upload the ZIP archive to the folder with the utility.
- Enter the command line (Win + R), then enter the command: “cd”. Drag the folder icon (in the directory path input field on the left side) to the path to the specified ADB location directly into the command line.
- Put your phone into recovery mode. This can be done by entering the command: “adb reboot recovery”, or using hardware keys.
- From the recovery menu on your phone, go to the “apply update from ADB” item and confirm the action using the lock button. This way you run the ADB sideload bootloader command.
- Go back to the command line and write in it: “adb sideload”. Hold the ZIP archive with the left mouse button and drag it into the command line field. It will contain the path to the specified archive. Press "enter".
The utility will show the process of downloading data from the network, after which the installation of the operating system will begin automatically. Important: all specified commands must be entered without quotes.
Fastboot
Fastboot is a utility for fine-tuning the Android system. Comes with an SDK and is downloaded in the same way as ADB. Unpack as a single archive along with the debugger.
Simply put, Fastboot is a cellular operating mode in which the gadget is visible to the PC not as a flash drive, but as a working terminal. In this state, you can manipulate the phone at a low software level. That is, this mode is suitable for developers and people who own code.
Usually, through firmware using this method, individual image files of the “img” format are replaced or installed. They are taken for each OS partition separately. We do not recommend using this method if you are not confident in your own abilities!
Instructions:
- Start fastboot mode.
- Enter the command line (Win + R), then write the commands one by one: “cd /” (press enter), followed by “cd adb”.
- Connect your mobile phone to your PC using a USB cable.
- Now put your cell phone into bootloader mode. To do this, enter the command: “adb reboot bootloader”. Sometimes you need to unlock the bootloader. Read about this below in the article.
- Check if the PC sees the smartphone. Enter the command: "fastboot devices". If everything is correct, the gadget model will be displayed in the command line.
After these steps, you can proceed to flashing. Usually the phone is sewn in sections, or one full file is uploaded. Each section is first formatted, after which the image is uploaded in “img” format. Commands for removing/installing an image:
- cache (Cache): “fastboot erase cache/fastboot flash cache name.img”;
- date (Data/UserData): “fastboot erase userdata/fastboot flash userdata name.img”;
- systems (System): “fastboot erase system/fastboot flash system name.img”;
- Recovery: “fastboot erase recovery/ fastboot flash recovery name.img”.
First, the first commands are executed, then the images are uploaded step by step (they go through a slash “/”). Instead of “name”, use the real names of img files.
It is important to respect the letter case when writing the firmware name, otherwise the system will generate an error!
Another command allows you to upload the OS from one zip file: “fastboot update name.zip”. Before flashing the system via fastboot, download all update images (.img or .zip) to the folder with the previously installed utility.
Using RECOVERY
Recovery is a system menu with a set of specific routines that allow you to configure the software at the “hardware” level; it can be compared to the BIOS system on a PC. Typically, Android devices have stock recovery, which is not always convenient to use. To expand functionality, users install custom versions, such as:
- C.W.M.
- TWRP Recovery.
You can flash your phone using these bootloaders. It is assumed that the gadget already has one of the versions of the specified recovery.
CWM Recovery
CWM (ClockWorkMod) is a modified recovery. The interface is similar to many stock Recovery, but with more functionality.
Update algorithm for CWM bootloader:
- Connect your smartphone to your PC or laptop in Data Transfer (MTP) mode.
- Move the .zip file to the root section of the gadget, or to an SD card.
- Put your phone into recovery mode.
- Find the “install zip” item in the main menu.
- Select the firmware file from the list and install the update.
Control in CWM is carried out in the same way as in the stock version of the recovery - through hardware buttons on the case.
TWRP Recovery
TWRP (Team Win Recovery Project), another recovery option. Unlike stock programs and CWM, this version has more convenient navigation through the sensor. All functionality is displayed as a tile on the desktop. The action is confirmed by swiping to the right side of the slider at the bottom.
Firmware algorithm via TWRP:
- Connect your smartphone to your PC or laptop in Data Transfer (MTP) mode.
- Move the zip file to the root partition of the gadget, or to an SD card.
- Switch to Recovery mode.
- In the menu that opens, tap on “Wipe”, then select “Advanced Wipe”. Oh, “Internal Storage”, “Data”, “System”, “Dalvik Cache”. Confirm the action with a swipe. The gadget's memory will be completely cleared.
- Go back one step and click “Reboot recovery”.
- In the main recovery menu, click on the “Install” button.
- Select the zip file of the same name and confirm the action by swiping.
- When the process is finished, click on the “Wipe cache/delvik” button, then “Reboot system”.
The software download procedure is not demonstrated on the screen in any way. The user learns about the result of the procedure only after rebooting the smartphone in normal mode. For some gadgets you need to first unlock the bootloader (instructions below).
From phone
The easiest way is to use a special application for firmware. One of the most popular software at the moment is the ROM Manager program. The application was developed by the creators of CWM Recovery. You can download the program on the official page in the Play Market.
Before you start, you will need to get root rights and install CWM Recovery on your smartphone. Otherwise the program will not start. Also, the phone's SD card should already contain an archive in zip format. You can download it in advance via an adapter or USB cable from your computer.
Work algorithm:
- Install the application, setting all the permissions that it will require.
- In the main program window, tap on “Install ROM from card”.
- Specify the path to the firmware file and confirm the action.
The firmware is installed automatically. If everything is done correctly, the smartphone will reboot and start with the updated OS. In the free version of the application, the user searches for and selects the file himself. In the full edition, you can click on the “Download ROM” button and the program will download a safe and verified version of the updates for your model.
What is firmware?
Phone firmware is the process of replacing the operating system of a smartphone in order to fix problems. Often such a measure is extreme, i.e. is used even when other methods of solving the problem do not help. Installing new firmware is also possible when a new OS is released.
As a rule, most major manufacturers of Android gadgets themselves update their products over the air, or simply post the latest firmware version on their website. However, sometimes the phone loses support (this is especially true for Chinese devices) and then the gadget community itself releases custom firmware versions with expanded functionality.
So, you can reflash your smartphone using special software:
- CWM Recovery;
- TWRP Recovery;
- ROM Manager;
- Using a computer and a special set of utilities (Fastboot, KDZ Update, etc.).
Before starting the process of installing a new OS, be sure to take care of the safety of the data on the internal memory of the phone - make a backup of important information. Below we will look at several ways to install the operating system.
FAQ
In this section we will consider all the questions asked in the comments, as well as small instructions that are not clear to users.
What is firmware
Firmware is essentially an archived operating system. The installation file is almost always posted in *.zip or *.img formats.
The software can represent:
- “Naked” Android, without additional add-ons,
- shell like MIUI (Xiaomi) or EMUI (Huawei),
- custom version - independent development by advanced users or a team of enthusiasts.
The purpose of the new version is to update the system's security or improve it at the software level. Sometimes an update allows you to slightly overclock the “hardware” part of the smartphone, tweaking the characteristics. But adding more RAM or making the processor much more powerful will not work. To do this, you will have to disassemble the case and resolder the chips on the motherboard. In fact, the new device is simpler.
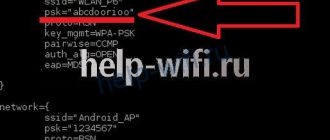
How to find firmware for your model
The most reliable source is the manufacturer’s website, but not everyone will provide the opportunity to download the firmware archive. These resources host stable builds that will not harm your device. For example, Samsung only allows updating, but not installing from scratch. To do this, engineers have released the FOTA utilities (for mobile phones, without using a PC), and Smart Switch - for a Windows computer.
Therefore, to search, we recommend using the 4PDA forum; you can download both a custom version of the operating system and the official one. But be sure to read people’s reviews so as not to run into viruses and rootkits introduced into Android.
Is Google account reset?
Yes. The account will be automatically deleted from the old version of the operating system. After reinstalling the software, you will need to enter a new password and login.
Is it possible to flash it if it doesn’t turn on?
It all depends on the specific model of the gadget and the installed recovery. If the mobile phone is dead or does not turn on, the following outcomes are possible:
- No impossible. If the phone does not turn on due to serious physical damage. For example, due to a problem with the battery or motherboard.
- Maybe. If the phone has a broken display, but the main functionality works and the phone is set to developer mode, and you also have access to root rights. You may need a proprietary programmer to upload the failed bootloader to the non-volatile memory section.
- Yes. If the smartphone is stuck on loading, reboots cyclically, does not behave adequately, and is buggy. Or it automatically went into fastboot mode. The screen and buttons are working. In this case, root rights must be active.
- Partially. If the device died after an update, installation of suspicious “outside” programs, viruses, advertising rootkits, ransomware.
Here are some video instructions on how to “revive a brick”:
Restoring the Android kernel on an emergency MTK USB port
How to install ADB
The latest version of the ADB (Android Debugging Bridge) program included in the Android SDK can be downloaded from the official Google developer website:
- On this page you need to scroll the contents down and download the ZIP archive from the “Command line tools only” section for your operating system.
- Unzip the downloaded folder to the root partition of your PC.
The Android Debug Bridge functions are now available from the command line:
- View system logs.
- Copy files from/to the device.
- Install/Remove applications.
- Delete (clear) the data section.
- Overwrite the data section.
- Implement various control scripts.
- Manage some network settings.
How to enter the Recovery menu
To enter recovery, use mechanical buttons:
- Press the volume down keys and the power button on the case. Key combinations may differ on different smartphone models. See the exact combinations on thematic forums.
- As soon as a dark screen with lines appears, release the buttons.
This is the Recovery system menu. It is controlled via hardware volume keys. Command confirmation – button to turn the gadget on/off.
Recovery can be called via ADB by entering the command: “adb reboot recovery”.
How to open the developer section
The developer section is the removal of some software restrictions. It appears when performing a number of actions in the operating system:
- Open your phone's settings. Go to the “About phone” item.
- Scroll the list down to the “Build number” item; on branded shells, the menu item may be called, for example: “EMUI Version” (Huawei phones), “MIUI Version” (Xiaomi phones).
- Tap on the digital number itself more than 6 times. A message should appear saying “you have become a developer.”
- Return to the main settings menu. The “For Developers” item should appear there.
This item contains more precise system settings, for example, debugging mode, and extended reports on the operation of modules.
In some cases, the item appears in the settings, but you will have to force it through the slider.
Enable USB Debugging
USB debugging is a special mode of operation of a smartphone, which is necessary when flashing the gadget’s firmware via a cable. It is enabled in the “For Developers” item by activating the “USB Debugging” option.
Step-by-step video instructions:
Shows a recumbent Android with an exclamation mark
If, when entering Recovery, you saw a lying robot with an exclamation mark on its belly, do not worry. The system has failed, but it can be fixed.
To restart recovery:
- Press and hold the power button on your smartphone. This must be done as soon as the recumbent robot appears on the display.
- Additionally, press the Volume Down key once.
The system will reset the error and reload the Recovery menu.
How to exit FastBoot
The fastboot mode on a mobile phone is reset by long pressing (for 20 seconds) the power button. As soon as the screen saver with the word “fastboot” disappears, press the key.
How to unlock Bootloader
Not all phones come with an open bootloader. And without unlocking it, it is impossible to work with the fastboot utility. An open bootloader is only available in smartphones from Google: Pixel, Nexus. To remove restrictions from the bootloader, enter the command: “fastboot OEM unlock”.
How to get Root access
Root rights is the activation of a superuser on the phone. This level of access allows you to do almost any manipulation with the gadget at the software level.
To get root rights:
- Install the frame root program on your smartphone. It can be downloaded from the official developer page. Attention, the program is installed from an APK file. You need to set permission in advance to install applications from unknown developers on the Android system.
- After installing the application, open it. Select the root management method in the drop-down box: “SuperSU”.
- Choose one of three methods for obtaining superuser rights (Boromir, Faramir, Barahir). Each individual smartphone model has its own method.
- If a prompt appears that the device has been successfully rooted, restart the gadget.
Sometimes the application crashes, there's nothing wrong with that. Start it again and try to get root rights using another method. You can also get superuser rights from ADB. To do this, enter the command: “adb root”.
How to install ADB and Fastboot drivers under Windows
Installing the ADB and Fastboot driver under Windows is not difficult, the main thing is to follow the instructions:
The most popular ADB/Fastboot commands
How to roll back to old firmware
Detailed video instructions on how to downgrade from Android 10 to 9
Samsung specific
Does it change after flashing the phone?
Depends on the bootloader version. With factory recovery, IMEI does not change, with custom recovery (CWM or TWRP) it is possible. More details here:
Flash Tool Instructions
The SP Flash Tool program is intended exclusively for equipment on MTK processors.
Approximate cost of the service
The cost greatly depends on the region, somewhere you can find a specialist for 1000, and some will not agree for 5000 rubles. A mediocre service center will roll out a price tag of 2000-3000 rubles.
How long does it take to boot Android after flashing the firmware?
Loading Android after updating the software version takes from 3 to 20 minutes, depending on the speed of the processor and the installed amount of RAM.
ROM Manager: detailed instructions for flashing an Android device
This manager is popular because of its functionality. In addition to firmware, it can be used to create a copy of the system. This is necessary so that in case of unsuccessful installation, it is possible to restore the OS and not lose all data. Before starting the firmware, use this function.
The only drawback of the utility is that to work with it you need to be rooted. This will allow the program to gain wider access to system files and codes. You can easily get Root using the “Kingroot” application.
Step-by-step instruction:
- Prepare a ZIP archive by moving it to the device’s memory.
- Launch ROM Manager. Click on the option “Install ROM from SD card”.
- Select the archive in Explorer.
- Click on "Reboot & Install". Be sure to check the “Save current ROM” option.
- Confirm your choice. The installation will begin.
List of programs for downloading
I’ll leave a list of programs for flashing Android, with an active download link:
- ABD tools,
- Odin,
- SP FlashTool,
- Lenovo Downloader
- KDZ Updater,
- LG Flash Tool,
- Sony PC Companion,
- MiFlashPro,
- ASUS Flash Tool
- Qualcomm Flash Image Loader,
- QPST Flash Tool,
- Wileyfox Flash Tool,
- Qualcomm Smartphone Multi-Port Software Upgrade Tool,
- Smart Phone Upgrade Tool,
- FastbootFlasher
- Firmware Factory Tool
- Infinix Flash Tool.
How to flash an Android phone via a computer at home?
If the owner of the device is interested in the question of how to flash an Android phone via a computer, then the following will be necessary:
- Install drivers on the PC to work with the device;
- Download the firmware corresponding to the gadget model;
- Create a backup copy of the current OS in the device;
- Install the firmware application (flasher).
The essence of the actions is the same for different models of devices. Below is an example of working with the “Odin” flasher from:
- Connect the device to the PC in download mode. To do this, you should turn off the gadget and simultaneously press the keys: “Home”, “On/Off.” and “Increase sound.”
- Next, “Odin” will see the device;
- Then, in the “AP” column, indicate the location of the downloaded software;
- Install about and “Auto reboot”;
- Click “Start”;
- Wait for the process to complete.
Flashing an LG Android device using the KDZ UPDATER program
If you have a phone or tablet from the manufacturer LG, then it will be easier and more correct to flash it using the KDZ Updater program. How exactly to do this? 1. First download the KDZ Updater program. Actually, this is an archive that needs to be unpacked into a folder located in the root of the system drive C of your computer.
2. Add the firmware you need to the same root folder. Here is the executable file of the program, this is the only way the firmware will be visible to the program.
3. Make sure to install the action policy file called msxml.msi 4. Now enable USB debugging mode. Exactly how to do this is described above. 5. Switch the device to S/W Upgrade mode. Namely:
- turn it off;
- take out the battery;
- hold down the volume down key and insert the USB cable.
- the corresponding inscription “S/W Upgrade” will appear.
Notes: • if you failed to enter the S/W Upgrade mode, then try doing all the steps described above without removing the battery; • also try pressing both “sound rockers” instead of the volume down key; • in order for the firmware to become possible, you need to disable the LGE Mobile USB Modem program in Device Manager.
6. Now it's time to start flashing. Run the KDZ_FW_UPD.exe program executable file as administrator from the root folder on drive C. Note: point to the program icon and right-click. Select "Run as administrator".
7. Set all parameters as shown in the screenshot and click “Launch software update”.
8. After some time (about 10 minutes), the firmware will be completed. Just reboot your device and enjoy the new interface.
Bootloader check
It is much easier to restore the device's operating system if the bootloader is not damaged. Otherwise, there is a high probability that the device will not be brought back to life.
Checking the functionality of the recovery mode is as follows:
- Press and hold the phone's power button and wait for any response. A screen that lights up, a frozen screensaver, a lying robot with an open panel, etc. is enough. If the smartphone does not respond to the key at all, you should try the second verification method.
- Connect the device to the computer via a USB cable. Press and hold the power and volume down button. The PC should detect the new connected device. If this happens, the smartphone can be restored. Otherwise, you will have to contact a specialist, but there are no guarantees for the rehabilitation of the device.
Thus, if the bootloader check gives a positive result, you can proceed with the firmware.
Possible mistakes
When working with this Recovery mod, various errors often occur. The most common of them are described below.
Error 6
Problems with the updater-script file in the firmware archive (most likely created in the wrong format).
What to do: you need to reinstall this file (change the format to Unix) by opening it in Notepad or NotePad++.
Error 7
It may mean that the firmware version is incorrectly selected (does not correspond to the device on which it is planned to be installed).
What to do: replace the firmware file. You can download it from the official website of the device manufacturer or edit the updater-script file if the first lines contain several device models (leave only the one you need).
Error 7
Error 0
The archive with the firmware does not contain any necessary files.
What to do: reload the archive completely or add the necessary files to it.