When choosing a television operator, it is very important to know what satellite the company uses. This is necessary to ensure a more accurate channel search as well as a high-quality connection.
- Which satellite does MTS use?
- How to determine the direction of the antenna to the satellite using special applications
- Setting up on the MTS website
- Wizard for setting up a satellite dish using a map
- How to determine the direction of the antenna with a special device
- How to install an antenna
What you need to know before purchasing a kit
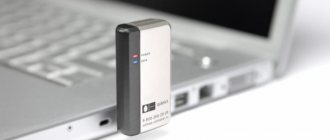
If you entered into an agreement with MTS and purchased a Smart card to access the service, but refused installation, then you need to purchase an installation kit directly at the MTS showroom for setting up your TV yourself.
The satellite TV package includes:
- Satellite antenna;
- TV receiver with a slot for a Smart card and an HDMI cable;
- When connecting to MTS interactive TV, you need a receiver with a slot for a SIM card with unlimited Internet access;
- cable.
The set can be bought at the MTS store for 3-4 thousand rubles, or separately at various television equipment stores. If you need to save money, you can choose the second option.
Equipment setup
In addition to installing the dish and assembling it, the user will need to set up other equipment. Without it, the signal will not be digitized, and broadcasting will become impossible.
How to set up the set-top box
To configure the set-top box, the subscriber should use the step-by-step instructions:
- You will need to turn off the TV from the network, and then install a smart card in the HD set-top box. This card plays the role of a SIM card; it activates the operation of the set-top box. The smart card is included in the installation package; it is provided to the user by the company when the subscriber selects a tariff on the website and presses the “Connect” button;
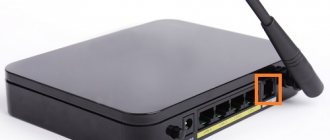
- After installing the smart card in the set-top box slot, the user will need to connect the device to the network. Next, the set-top box is connected to the TV. To do this, you will need an HDMI cable or an AV cable (it is recommended to purchase the first option as it provides high-quality signal transmission). You need to buy the cable in the store yourself, after first checking the ports on the TV body;
- If synchronization via cable is successful, the green indicator on the set-top box will light up. In this case, you will need to turn on both devices using the remote control and the on/off button. If the indicator does not blink and the LED does not light up, then you should check the location of the cable joints;
- After connecting, the user needs to go to the device settings using the remote control. In the settings menu, you should select the mode for receiving the incoming signal, specify the type of connection (via satellite dish and/or cable);
- Subsequent steps depend on the model of the set-top box. Most likely, after connecting, a window will appear in which the user is prompted to make changes to the parameters. He will be able to select the language and set the optimal size of the transmitted image. The user will have the opportunity to set the satellite, transponder and LNB settings;
- After changing the configuration and saving the new settings, the MTS subscriber needs to search for channels, test the quality of image and audio transmission. To search for channels, you need to use the navigation buttons (up and down arrows) and click on the “Search” button. Detection of TV channels occurs automatically; they will be found and saved. At the end of the search, the setup wizard menu will close and the broadcast of the first TV channel found will begin.
Depending on the set-top box and its model, the settings may differ. For example, if the user owns a Catspal gadget, the setup wizard menu is omitted. You can start searching for channels, save found broadcasts, and evaluate the signal quality.
Below is a table showing the pros and cons of purchasing an installation kit with an HD set-top box.
| Advantages | Flaws |
| You can use the remote control for the set-top box for the TV and for the device itself | The console takes up space |
| Easy setup of TV channels | You will need to purchase a cable |
| Good broadcast quality | If there are several devices, then you will need more space for consoles. The user also needs to purchase wires |
How to configure the cam module
To change the module parameters, the user should turn off the TV from the power supply and remove the plug from the socket. Then follow the step-by-step instructions:
- Make sure that the TV body has the required slot and supports Smart-TV and DVD functions. It is also important to pay attention to the port, the user needs to find the slot labeled “SATELLITE”. The antenna cable is inserted into this connector;
- Then you need to remove the module from the installation package and insert it into the Cl port of the TV. Next, the smart card is installed into the module; it is included in the installation package. The smart card chip should be facing the label with the device image;
- After installing the smart card into the module, the user needs to turn on the TV. The device screen will display information about synchronization with the module. You need to select the signal reception mode, transmission type, and then make the settings. All channels also need to be searched using the remote control and navigation buttons. All specified settings must be saved and confirmed.
Below is a table showing the pros and cons of purchasing an installation kit with a CAM module.
| Advantages | Flaws |
| The module is installed directly into the computer case, so there will be free space | The technology is new, so it is important that the TV has the appropriate function |
| Easy setup of TV channels | If the user needs to connect other devices, then another module or set-top box will be needed |
| High quality signal transmission | You need to make sure that the device has a Cl port |
Assembly and installation of a satellite dish from MTS
Especially for its subscribers, MTS took care of those who decided to install a satellite television set. Here are the steps on how to set up an MTS TV satellite dish yourself:
- Use the SatFinder or Protractor as recommended by MTS to make adjustments using your phone. It can be installed on Android and iOS. It allows you to show on the spot the direction from specified points in the apartment to the satellite using a GPS signal.
- MTS TV's satellite is ABS 2. To select it, click on the icon "Search" and select it from the list. Then, with your phone in your hand, stand at the desired point. A red line will indicate which direction from the house you need to point the antenna.
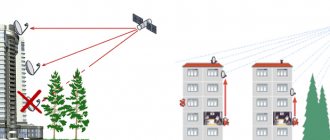
- For many Russians, the direction will be southeast. Additionally, there should be no obstacles in the form of other houses, hills, trees, or power lines between the installed satellite dish and the sky. Their presence will be a clear interference with the signal.
- Try to choose the mounting location so that the antenna is directed in the required direction and points upward.
Which satellite does MTS use?
MTS TV is a popular company that serves many houses and apartments. The company was initially based only on providing cellular communications, but recently decided to try its hand at television.
Like all popular and well-known companies, MTS keeps its face and always does its job to the highest standards.
The satellite on which the company operates is located on a well-known Bermudian cellular operator. This guarantees a high-quality connection without hitches.
A long time ago, namely from October 18, 2021, MTS switched to an ABS-2A type satellite. This satellite is popular because it is a geostationary type and has much better parameters than many competitors.
On this satellite, MTS provides television not only to Russia, but also to the countries of Asia and Africa, and other regions.
The satellite has about 48 transporters that are responsible for accurate broadcasting. Many even modern models have only 40.
Name and coordinates
In order to clearly catch the signal, you need to know everything possible about the satellite and have accurate connection data:
| Satellite parameters | Connection information |
| Satellite name - ABS 2A MTS TV | — |
| Position 75◦ B.D. | — |
| Popularization - vertical linear | Vertical linear |
| Symbol rate - about 43000-45000 Msiv/second | About 10600 Msiv/second |
How to install correctly - step-by-step instructions
Once you have determined where to install the satellite dish, you should begin installing it. Here are the detailed steps on how to install the MTS dish yourself:
- Take a drill or hammer drill and create holes in the outside wall, attaching a bracket support to which the antenna will be mounted. The supports must fit firmly and keep the plate stationary even in strong gusts of wind.
- Do not neglect the instructions for the satellite dish. Use it to assemble the bracket, mirror (plate) and support rod. The instructions also indicate the necessary bolts for the fastenings. See which bolt to use for which mount.
- Place the assembled structure on a support. Position the dish at the angles shown to you by SatFinder or the MTS map. Focus on the indicators: converter position - 26°, antenna tilt -6°, satellite direction degree 134°.
- Place the converter in the rod with its face facing the plate, then rotate it to the desired angle indicated by the card or program.
- Connect the antenna cable and the F-connector so that it fits tightly to the braid.
- Connect the converter to the cable and insulate the connection. You can use sealant or regular electrical tape. To prevent the cable from hanging down, it can be secured to the rod using the same electrical tape.
- Route the cable into the room and connect it to the receiver. In this case, the receiver must be turned off from the 220V network.
Wizard for setting up a satellite dish using a map
You can configure equipment not only using various applications, but also using special websites. There are specialized pages on the Internet that help describe the more accurate position and direction of antenna forks.
This method is less accurate, since the site cannot determine the exact coordinates than the application can do.
In order to properly configure the equipment, you need to go to any of the settings wizard sites:
- geonames.ru
- installsat.tv
Then select the MTS satellite or ABS-2A. It is in the database because it is one of the most popular.
It is necessary to select the location of the antenna that will be tuned. Most master sites show characteristics such as:
- Satellite direction;
- Tilt angle;
- Elevation angle;
- Values that will help you plot your compass direction.
The user will receive a card with which he can select the desired angle for high-quality equipment setup.
Setting up a TV to watch MTS satellite TV
To set up a satellite dish from MTS:
- Using the TV remote control, open the TV menu and select the HDMI (or similar, depending on the TV model).
- Wait a while before the menu starts and select the “Antenna setup” . You should now select using the receiver's remote control.
- Return to the antenna to loosen the retaining bolts. This is necessary to be able to rotate and tilt the rod, converter and the plate itself by 1-2 cm.
- Rotate and tilt the antenna and wait 5 seconds after each change of position. Then check the signal level on the TV in open settings. Help from a friend, neighbor or family member is recommended at this stage. If you are doing the installation alone, you can move the TV closer to the antenna to visually see what is happening on the screen. The signal is most often shown as two parallel scales (signal intensity and quality).
- Once the high signal is caught, secure the antenna with bolts.
- Next, go to Menu – Search – Channel settings and select the “Auto search” .
- Wait for completion and save all channels that the receiver has found by pressing "OK".
- Done, satellite TV on your Samsung TV is finally configured.
Setting up on the MTS website
To make life easier for customers, MTS has created a special program on its website that helps direct the antenna branches depending on the user’s location.
In order to set up an antenna on the company’s website, you need to go to the official website and enter your exact address in a special field. If the setup is done from your phone, the field can be filled in automatically.
The site will show the user the direction the antennas should follow. The most convenient thing is that the site can show the exact location right from the entrance. The functionality of the site allows you to move a special pendulum in order to more accurately position the antenna in the client’s apartment.
Automatic calculation of the angle of rotation in relation to different cardinal directions will help you clearly determine the direction. Setting up equipment using the official website is one of the best options.
Can .
What to do if TV from MTS does not work
If the satellite dish is installed incorrectly (incorrect tilt/rotation angle), the signal will be weak or completely absent, try to point the antenna correctly. Check if you have set the initial parameters correctly. Also, make sure there is no interference in order to catch the satellite TV signal from MTS.
If you think that you are doing everything correctly, but there is no signal, or the receiver, CAM module, or other device in MTS is broken, issue a return.
How to set up an MTS antenna
After installing the antenna on the wall, you need to accurately adjust its direction to the TV satellite. Typically, such adjustment, regardless of the antenna diameter, is carried out in several stages:
- First, the direction to the satellite is set.
- Then the level of inclination of the TV antenna above the horizon is accurately determined.
- After this, the converters for television are configured.
In order to find out the exact direction, special applications are used for MTS equipment. To search for an MTS satellite, you will need to specify certain settings. For example, when using SatFinder, you will need to enter the following data:
- 22K: off;
- Polarity:V;
- Down Freq. 9750 or Down Freq. 11920;
- DiSEqC1.0: off;
- Symbol Rate: 45000;
- LO Freq. 10600.
After confirming the data, the program will begin to determine the desired direction. As a result, the user will know at what angle he will have to install the antenna to ensure the television operates.
After the location of the TV antenna is fixed, the cable must be connected to the F-connectors. To ensure a reliable connection, additional holders are used for fastening.
Related notes:
Setting up a TV to receive a MTS Digital TV signal: 4 comments
- Marina 07/10/2015 at 07:40
Dates for updating digital television software, no. there is no image and shows a connection error on many channels, requires changing the set-top box that supports the HD format
I would like to know everything about connecting MTS digital television and about Wi-Fi
- Alina 03/31/2016 at 19:07
I would like to know everything about connecting digital television, and everything about Wi-Fi. We purchased MTS TV, it’s impossible to install, they don’t answer the phone. People buy the best tricolor, you won’t know any problems.
general information
The MTS operator is better known as the largest provider of mobile communications and the Internet with tens of millions of subscribers. However, its range of services is much wider and among its current offers is satellite television in HD format. The equipment set is considered one of the cheapest, second in price only to Tricolor. It is not surprising that this operator is often chosen due to its availability.
But the low cost of the kit is only one of the advantages. Another advantage of the connection is its simple installation and configuration, which can be done independently and without special knowledge.
Where to download and how to download the satfinder application
The SatFinder application can be downloaded and installed on an Android smartphone. It is available at https://play.google.com/store/apps/details?id=com.esys.satfinder.
To do this, you need to open the specified address from your smartphone and click on the “Install” button on the page. After this, the application will be downloaded and installed automatically.
If for some reason Google Play is not available at this moment, you can use a search engine, for example, Yandex, to search for the program. For example, if you enter the text “SatFinder for a smartphone with Android”, then in the search results you can find pages from which you can download the application.
Error codes for MTS set-top boxes
MTS receivers may display the following errors:
- E06-4. The SMART card is not installed correctly and the contacts are dirty. This error may also indicate that the card is faulty or belongs to another provider. Make sure the card is installed correctly, or carefully clean the contacts.
- E16-4. The error indicates that the funds in your subscriber account have been exhausted or that you have selected a TV channel to which you are not subscribed. Top up your balance or switch to a channel included in the package available to you.
- E33-4. The error indicates that the software installed on the device is out of date. Update the software version by going to the “System Settings” section and selecting “Software Update”.
- E120-4, E30-4, E19-4. The MTS receiver has been restarted and has not yet received the data used to decrypt TV channels. An error may also be displayed if the set-top box was turned off for an extended period of time (it was not used to watch MTS digital TV). Leave the device turned on for half an hour. It must be connected to a TV signal source (antenna).
Knowing how to connect and configure a digital set-top box from the MTS operator, you can easily use this modern device to watch television channels in high quality. There is no need to resort to the help of specialists; all the necessary procedures can be performed independently by any person, regardless of his knowledge in the field of technology. The main thing is to follow the step-by-step instructions given here.
Antenna installation
The antenna comes with instructions that describe the entire installation process. Initially, we tighten the nuts (moderately) so as not to damage the body, but also to prevent the fasteners from dangling from the bracket. There is no need to fasten the wall bracket, and you also do not need to tighten the nuts responsible for turning the antenna angle.
The two-piece bracket must be assembled separately and does not need to be attached to the antenna. At the initial stage, a converter is connected to the dish; cable connections are made later.
To securely fasten the bracket, a perfectly flat surface is required. Place the bracket on the surface and mark the points at the mounting location with chalk or a marker. We drill holes in the surface and attach the bracket using dowels. Then we put the antenna on the installed bracket, select the required angle and carefully tighten the nuts. By “required angle” we mean the vertical limit angle of the mirror.
We install F-connectors on the converter, strip the cable and also connect it to the convector.
Free connection: 8-800-250-0890
Setting up your TV to receive MTS Digital TV signal
Modern home television from MTS is not just a source of information and news, but a real multimedia service on the screen. To be able to watch entertaining TV shows, educational and music channels, we recommend connecting to cable television, which presents a whole range of channels on various topics for the most demanding TV viewers!
The parameters listed below will help you independently make the necessary settings for connecting to any type of TV. It is necessary to configure the DVB-C digital signal receiver by specifying the parameters presented below:
▪ Select network search type ▪ Specify modulation – QAM 64 ▪ Symbol rate must correspond to 6875 Kps ▪ Signal frequency is 298000 KHz.
To successfully set up television equipment from MTS, read the instructions for your home TV, where you will find the necessary information on applying the settings and navigating the menu.
- SD set-top box Coship N5266C.
- SD set-top box EKT DCD3011 (instructions in Russian - DOWNLOAD).
- HD set-top box EKT DCD2204 (instructions in Russian - DOWNLOAD).
- CAM module.
Share “Setting up a TV to receive a MTS Digital TV signal”
Tariff “All MTS”
The screen says “AV” or “NO SIGNAL”
The set-top box is not connected, or is connected to a different input, or the cable is damaged.
The TV does not see the set-top box. That is, he understands that something is connected to him, but the set-top box menu is not displayed on the screen
The lack of a set-top box menu on the screen may be due to the following reasons: – the TV has an output selected instead of an input, – the video cable is incorrectly connected, – the input to which the set-top box is connected is not selected in the TV menu, – there is no signal coming from the set-top box. Try testing the set-top box on another TV. If the signal is output, then the problem is in the settings and connection; if not, then you need to contact the service center to check the functionality of the set-top box.
The screen says “NO CHANNELS”
If a set-top box is connected, reset the settings to factory settings and start searching for channels again. If you are using a CAM module, start auto-search for channels.
The image is rippling, cubed, or blurry
The cable is probably damaged; you need to check its connections, dividers and plug especially carefully. If you are using satellite TV, check the accuracy of the antenna settings; it could have been moved by the wind.
Sound in English
Sound and picture do not match (sound is delayed)
If a set-top box is connected, reset the settings to factory settings and start searching for channels again. If you are using a CAM module, start auto-search for channels. It is also necessary to check the signal quality, and if it is low, there are probably problems with the cable or, in the case of satellite TV, the accuracy of the antenna alignment.
Black screen
The channel disappeared from the list
Most likely, the channel plan has changed. You need to start auto-search for channels if you are using a CAM module, or reset the set-top box settings to factory settings. On satellite television, the channel can be converted to the HEVC encoding system, and if your set-top box does not support it, then only replacing the set-top box will solve the problem.
On some channels the message “reception of the channel is not supported by your equipment” appears.
Appears on satellite TV. The set-top box needs to be replaced with a model that supports the HEVC encoding system. If a module is used, then this encoding system must be supported by your TV.
Some channels are not shown, the inscription on the screen requires a PIN code or the inscription “Blocked by age rating”.
Adult channels are protected by default with a PIN code of 1111. If you wish, you can change it to your own.
On adult channels the message "maximum input exceeded" appears
No sound
Check if all wires of the set-top box are connected, check the volume on the set-top box, check the sound system of the TV. If the set-top box is connected via an HDMI cable, connect it in a different way, i.e. through the tulip connectors.
The screen says “Overcurrent on the antenna” or “High current on the antenna”
Only on satellite TV. Check the cable for damage due to a short circuit.
Two TVs are connected via a divider. On one or both TVs - poor signal, interference, etc.
The divider often leads to a loss of signal quality when the signal is not very good to begin with or the divider itself is not of good quality. If you watch cable TV, call an MTS technician to check the contact in the junction box in the entrance; you may also need to replace the cable and divider in the apartment. On satellite TV, in 99% of cases the problem will be solved if the TVs are connected to an antenna using a converter with two outputs.
The set-top box does not respond to the remote control
The set-top box searches for channels every time you turn it on.
A common complaint from satellite TV subscribers. The fact is that the set-top box is programmed this way; otherwise, when you change the list of channels, they will not show you. To avoid such a reboot, try not turning off the set-top box, but only turning off the TV (in this state, the power consumption of the set-top box is minimal).
The device gets very hot
It is normal for the equipment to become slightly warm. But if it heats up to a hot state, repair or replacement of the equipment is necessary.
The console reboots every 5 minutes
Frequently asked questions when connecting
Installing MTS satellite TV is a labor-intensive process that can cause a number of difficulties and questions among subscribers. Let's look at the most common calls to technical support.
No signal
No signal may be caused by incorrect connection of cables or other components. This factor may also be influenced by bad weather conditions, due to which the antenna cannot transmit a signal to the satellite. Also pay attention to the newsletter from MTS, which may contain information about the work being carried out.
No channels
The lack of channels may be due to:
- incorrect installation of a SMART or SIM card, due to which the system cannot identify the subscriber;
- the end of a subscription to a certain package of services or the occurrence of debt on the personal account balance;
- the device is unable to communicate with the satellite. The reasons are described in the previous paragraph.
Quality problems
Poor picture quality depends solely on the signal level, and the most common cause of interference is incorrect installation of the dish or external physical obstacles (trees, leaves, houses).
What kind of application is this, what is special about satellite finder?
You can set up the satellite dish yourself. To do this, you need to know how to do this and have all the necessary information about the satellite that transmits the signal. Knowing the exact direction based on his coordinates, the user has the opportunity to properly tune the antenna.
The SatFinder application allows you to do the following:
- Sat Finder contains a list of all available satellites with basic data about them.
- By choosing the appropriate one, you can find out the exact azimuth and determine their height and the required tilt of the converter.
- For each satellite you can get a list of available channels.
- Satellite data can not only be presented digitally, but also reflected on maps
- If your smartphone has a built-in compass, this will help you directly determine the direction.
- The principle of augmented reality is used here. By viewing through the video camera, you can see the direction to the selected satellite.
The user can tune in to free channels of any of the available satellites that produce satellite broadcasting. Typically, the subscriber enters into an agreement with the provider and gets access to paid channels. After depositing money, he gets access to view them. In the latter case, he knows exactly from which satellite the broadcast is being made.
SatFinder users can take advantage of the following advantages:
- The program is distributed free of charge.
- Provides high accuracy in determining the azimuth and inclination angle of the direction to the satellite.
- At any time during work, you can take a screenshot, recording the received data.
- Simplicity and thoughtfulness of the interface. Even those who have been using it for a short time can easily learn how to use this application.
- Low consumption of system resources.
- High speed.
SatFinder is one of the most popular offerings for determining the coordinates of broadcast satellites.
Problems and their solutions
On phones with a weak video camera, the data will be poorly visible if you work during the day in bright sunlight. In this case, it is better to carry out setup work in the morning or evening.
If you set the adjustment accuracy parameter to a high level, it may be disrupted due to measurement error. The accuracy must be such that it ensures high signal quality. If you increase it too much, it will not improve it, but will only complicate the adjustment.
Sometimes it is necessary to determine the correct direction of a satellite dish in a location other than where the user is located. The program provides this opportunity. To do this, you need to activate the corresponding item in the settings.
While the program is running, you need to view advertisements. This can be disabled if you purchase the paid version. There are no other differences between these options. The free version is fully functional.