Hello, today we will talk about how to configure the asus rt n10u router. Excellent representative and rt n10. The special feature of this router is a built-in USB port, which allows you not only to use it for 3G modems, but also to connect various USB drives and a printer to it. Like all models from the rt n10 series, it supports all popular types of Internet connections (PPTP, PPPoE, L2TP, etc.). The wireless connection speed reaches 150Mbps, and also has 4 cable ports with an rj-45 connection with a data transfer rate of 100Mbps. This model is suitable for both apartments and small offices. So, I will present you with detailed instructions for setting up this model.
Features of the company's routers
The main difference between Asus routers and competitors is exemplary support. Firmware releases take a long time and are stable, there are many proprietary utilities that complement the functionality of the devices. And the setup program is a paradise for those who like to create a device for themselves.
Main differences from competitors:
- Convenient quick setup wizard.
- A convenient utility for searching for any network device from a company on the network - Asus Device Discovery.
- An excellent application for popular mobile platforms, in which any settings can be made - Asus Router App.
- “Gaming” models – with wireless network optimization for streaming and reducing latency in online games.
- Most modern models are perfectly optimized for the integration of smart home systems.
Support is not limited to firmware and utilities. The company’s website contains a real encyclopedia on all aspects of the parameters of any router, even those long out of production.
The instructions given in the article are universal and applicable to the entire model range of the company. For example, for models ASUS RT-AC51u, ASUS RT-N16, ASUS RT N10 and others.
Cool Features
The very presence of Wi-Fi in ADSL modems is already an advantage in itself, there is no need to reinvent the wheel and hook it up through a bridge in conjunction with a regular router, so here we also have a 5 dBi antenna - it will cover the average apartment headlong:
But this is not the most important thing. The power of transmitters is no longer particularly surprising, any whim for your money, what’s interesting is that you can create up to four access points with different SSIDs and access rights. But this is something you won’t see everywhere even now; ideas with guest networks are just beginning to spread actively:
And under the hood there is still the same good Asus firmware with a convenient graphical interface and a quick setup wizard. And don’t forget about the many buttons – for power, for Wi-Fi, for WPS. I’ve never had any luck with the Wi-Fi switch off button - I didn’t come across it, but the trick may have found its consumer.
Connecting to a computer and logging into the web interface
The initial installation of the device should not cause any problems even for a novice user.
To connect the router you need:
- Connect the router to the outlet using the power cable.
- Correctly insert the cable that the provider brought into your home into the WAN port of the device (mostly colored blue).
- Use a patch cord, which in most cases comes with the router, to connect the LAN ports of the router and computer.
Next, you need to enter the configuration web interface. Details are in the article on how to log into an ASUS router.
In short, just open your browser and write (without quotes) “192.168.1.1” or router.asus.com in the address bar and press Enter.
The following login window will appear:
The login and password are the same here – admin. After entering them, the main window of the setup program appears, which is divided as follows:
Appearance and modifications
Of the main popular modifications of this model, 3 types can be distinguished:
Classic ASUS DSL-N10
DSL-N10 B1
DSL-N10E
Everything is standard here with the rear panel:
- Reset button
- Nutrition
- 4 LAN
- 1 ADSL WAN
- Power off button
- Wi-Fi off button
- WPS
Automatic express setup
The Quick Internet Setup (QIS) button, marked with the corresponding signature in the previous picture, allows you to begin the process of instantly setting up your Asus router.
After clicking on it, the user is taken to the start screen with a description of the model of the connected router and the “Go” button, marked with an arrow here.
The Test Connection tab will help you set up device administrator credentials. The password must meet the reliability criteria - be long, contain both uppercase and lowercase letters, and special characters.
In the “Router Settings” tab, you will need to come up with a name for your access point and also protect it with a password (1). Next, just click “Apply” (2) and the router will be connected to the Internet within just a few seconds.
After this, you need to log in one-time using the data assigned in the previous step. To do this, on the “Network configured” screen, click “Next”.
And then enter the appropriate credentials in the pop-up window and click “Login”:
If your ISP assigns all IP addresses via DHCP (automatically), no further action is needed. But in any other case, manual configuration will be required.
Features Overview
The model is presented in 3 modifications. In addition to the ASUS DSL N10 itself, there are models with the B1 and E prefixes at the end. They differ only in appearance and slight differences in hardware. The latter two have a more modern appearance and a charcoal-colored body with a diamond pattern, while the first belongs to the previous generation models. The body is gray in color without a pattern, has ventilation grilles on the top surface. They are no longer significantly different.
The router has the ability to quickly configure in just a few clicks. A powerful antenna guarantees a stable signal over a wide coverage area. A convenient graphical interface is designed to greatly facilitate the installation and configuration of network parameters. The router is capable of creating 4 wireless networks simultaneously. This is very convenient in small companies or, for example, at home you can organize additional networks for your friends. At the same time, you can flexibly configure the bandwidth for each connection.
This router can be used both as a modem and as a router for a stand-alone modem. EZ WPS technology will set up a connection with just a few clicks of a button. The N10E modification has 72% lower power consumption compared to similar devices from other manufacturers.
Specifications
Before you buy an Asus router, you should decide on the type of connection: the most common one today is Ethernet, and most models work with it. There are also combined Asus routers that can receive a signal not only from the provider’s central fiber optic line, but also wirelessly from a 3G or 4G modem. Another important indicator is the speed of data acquisition. For most devices, it is limited to 100 Mbit/s, which corresponds to the maximum capabilities of the lion's share of providers, that is, this will be enough for a home or office. But for professional e-sports, where even the slightest delay is unacceptable, or for online streaming, it is preferable to choose a device with a maximum speed of up to 1000 Mbps.
Manual setting
If the user is assigned a static IP or the connection is made via the PPPoE, PPTP or L2TP protocols, the QIS wizard will display such a window after futile attempts to set the connection type on its own.
Depending on the information found in the agreement with the provider, you need to select the protocol that is specified there. After this, the user will be redirected to the window for entering credentials, with which you can configure the router.
They are also taken from the contract. If the user has done everything correctly, no other actions are required from him, the connection will be established immediately. If this is not enough, the provider’s support service will help you complete the setup of the Asus router - perhaps some data has already changed and needs to be corrected with the help of the operator.
Internet setup PPTP, PPPoE, L2TP and 3g
Configuring the PPTP connection type - Aist Tolyatti, UfaNet (UfaNet).
To configure this type of connection, go to the “Internet” section and select “WAN connection type” in the “PPTP” menu
Here we need to fill in only three fields:
- Username – Your login with the provider, written in the contract, or find out from your provider’s support.
- Password – also specified in the contract or technical support.
- VPN server – must also be specified in the contract. If there is no contract and you do not know your settings, then call the provider’s technical support.
The rest of the settings are unchanged. After that, click “Accept”.
Setting up the L2TP connection type for Beeline.
Let's consider this type of connection using the example of the Beeline provider:
- Select “WAN connection type” - L2TP
- Enter the Username - Beeline agreement number, the password is the same as when entering your personal account.
- VPN server - tp.internet.beeline.ru.
Then click the "accept" button.
Setting up the PPPoE connection type – Rostelecom
Now let's look at one of the simplest ways to connect to the Internet. Select PPPoE from the “WAN connection type” menu.
Then we only need to enter the Username - login according to the contract, and the password - see also in the contract, if there is no contract, then call technical support.
We leave the remaining settings unchanged. After that, click on the “Accept” button.
Setting up a 3g Internet connection - MTS, Megafon
This router has the ability to configure the Internet via a 3g modem. To set up this type of Internet connection:
- Go to the “USB Application” section
- Select the item “3G/4G”
In the window that opens, you need to fill in the data. We need to select a country (in order for the router to offer us a list of 3g/4g operators). Now in the “IPS” section we will select the operator of our 3g/4g modem. Then we will enter the data that is needed when connecting to this operator (for example: “Dial number”, “User name (Login)”, “Password”). Then click “Accept”.
The figures below show an example of connecting to the Intertelecom operator in Ukraine.
Setting up via mobile application
Asus Router is a very useful program for your phone. It allows you to connect to your Asus router and configure it even when you don’t have a computer or laptop at hand. You can install it on both Android and iOS. It is worth noting that not all routers are compatible with it; it is better to check the official website and check your specific model before installation.
Once launched, the application will report that it has found a compatible device and will offer to set it up immediately.
It will determine the exact model and IP address to enter the settings program.
After this, you can enter your username and password and click the “Login” button - the device will be configured automatically.
In addition, the application has several other quite useful functions:
- Backup router settings for quick transfer in case of an unintentional change or software failure. A “snapshot” of the system is saved in the smartphone’s memory.
- Firmware update via phone.
- Monitoring the distribution of hardware resources - processor and RAM load.
- Network vulnerability test - the most common vulnerabilities are checked and recommendations for eliminating them are given.
- FTP server management. Only for devices that support this function - mainly those with a USB port included.
- Samba is a file sharing client that is located on an external drive connected to USB.
- The “Share connection” item – quickly sends the login and password of the access point via a social network or messenger to a trusted person.
- Incoming and outgoing traffic consumption graph - consumption control, does not recognize encrypted content, and therefore is only useful in numerical terms.
- Experimental WI-Fi ECO function - reducing antenna signal power to save energy consumption. The effectiveness is questionable, since it additionally promises a lower level of radiation influence on the body.
Here you can also set speed limits for each connected client, change DNS addresses to intelligently block unwanted sites and dangerous advertising, and also change the admin login parameters.
The application can be protected with a password or configured to log in using a fingerprint for those devices that support this method of user authentication.
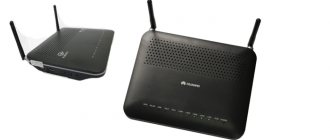
Model description
The manufacturer has equipped the “DSL-N12U” model with a full list of standard functions of DSL equipment, and additionally the router has a USB connector, thanks to which the device can use a backup mobile connection via any modem (3G whistle) from a cellular operator.
It should be noted that a printer can be connected to the port to operate it as network equipment. Also, due to its low cost, it is often used as a repeater to expand the coverage area of an existing Wi-Fi.
What will the user find in the box?
Not only the equipment, but also the box is made of high quality from thick cardboard, which is important, since it ensures the safety of the router and components during transportation. The packaging contains the characteristics of the device and its photograph.
The contents of the box include the following list of items:
- Router;
- Two removable antennas;
- Standard “RJ-11” wire with plugs for connecting the device to a telephone line;
- Patch cord (RJ-45 cable crimped at both ends) for connecting the device to a computer or laptop;
- Block for supplying electricity to the device;
- CD with software;
- Management;
- Accompanying documents and warranty card.
Basic device parameters
ADSL modem from Asus has the following key parameters:
- The power of external antennas is 5 Dbi;
- Equipped with four “RJ45” ports (one of them can be used as a WAN), one “RJ11” connector and one USB;
- The dimensions of the device in centimeters are 17.9 × 11.9 × 3.7;
- The standards “ANSI T1.413 Issue 2”, “ITU-T G.992.3 (G.dmt.bis)” and several additional ones are supported, which are described in the accompanying documentation for the device;
- Modern types of encryption, including “WPA2-PSK”;
- "WPS" function;
- 3 G modems – supported;
- Use as a repeater;
- Wi-Fi 2.4 GHz: IEEE 802.11bgn (up to 300 Mpbs);
- IPTV support;
- Availability of proprietary software for quick setup.
Ethernet WAN support allows you to use the device as a regular router, so the lucky ones who have fiber optics connected to their home can use the device at the highest possible speeds for receiving and transmitting information over the network.
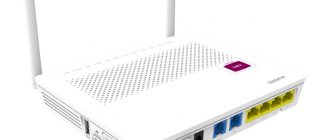
Appearance
The review would not be complete without touching on the appearance of the equipment. The practicality of the device is added by its black finish.
The top cover with special corrugation in the form of many diamonds looks very interesting in the light. The play of color shades changes depending on the angle of incidence of the lighting.
The position of the antennas in space is easily modified, and the owner can, without any effort, place them in a comfortable position.
At the top there are LED indicators for operating modes arranged in a single row. Their backlight brightness is perfectly balanced and will not irritate the eyes even in the dark.
At the back, the developer has placed all the working elements from the switch to the ports.
The bottom cover is abundantly perforated for ventilation, which ensures proper operation of the equipment without overheating.
The device is equipped with four rubber feet for installation on a horizontal surface, but if there is not enough work space in the room, you can hang the router on the wall.
For this purpose, fastenings are provided on the bottom panel. It is recommended to hang the device with the antennas down, since this will prevent all cables connected to the connectors from being bent or deformed.
The router is equipped with an “On/Off” toggle switch.
This should also be considered an advantage of the model, since on many modern routers, manufacturers do not install a button to turn off the device, and in order to de-energize it, users have to remove the adapter from the outlet, which is only in rare cases located in an easily accessible place.
To reset the parameters to the factory state, there is a “reset” button on the rear panel. The ends of the device are perforated for better air circulation when cooling the internal components of the device.
Thanks to the ability to easily dismantle antennas, owners of large apartments, without resorting to the services of a specialist, can independently replace them with more powerful ones.
The ones offered by default provide stable Wi-Fi reception within a radius of fifty meters (provided there is no interference or obstructions).
Wi-Fi network and Internet settings
Inside the web interface there are many options for changing the settings of the internal network and how it communicates with the Internet. Firstly, this is a network map, where its most important properties are visible.
In the middle part is the connection status. As you can see in the picture, it is missing, the system itself is open, without a password, and one client is connected to the access point.
On the right side is the name of the Wi-Fi point, the type of its protection (open) and the address of the gateway that is used to enter the configurator. Here you can also manage bound MAC addresses.
The Administration tab is another source of data about the current connection.
In the “System” tab you can configure several important things:
- Change the login settings for a Wi-Fi hotspot.
- Changing the function of the WPS button, which by default is responsible for instantly connecting new clients to the router. Below you can also set the connection duration using it. By default, the timer is set to 30 minutes.
- Setting the internal time zone is a rather important parameter; in some cases, modern browsers like Google Chrome may not connect to the Internet precisely because of the difference in time zones in one of the gateways.
If the router supports streaming television technology, such an item will be present in its firmware. How to correctly configure the settings of an Asus router for television - later in the article.
Smart home devices that are connected to the device and are fully compatible with it are best controlled from the applications that the manufacturer has written for them.
Their list can be viewed in the mobile application by tapping on the “Devices” tab at the bottom of the screen. Opposite each of them will be its own icon, which will either show the frequency at which the camera or light bulb connects to the hub, or its type - for example, a tablet or a data storage device.
How to quickly connect and configure
- First you need to connect power to the router itself. It is important that the light comes on. If this does not happen, you need to check whether the button on the back of the device is turned on.
Connect the router to power - Next, the user must find the WAN connector where the cable from the network is inserted.
Find the WAN connector and insert the Internet provider cableOn a note! If you do not have this cable or the necessary equipment, you can configure the router via Wi-Fi. But experienced users advise using the cable, since it can be disconnected from your PC.
- When setting up via Wi-Fi, you just need to connect your laptop to a wireless network. If you don't have a laptop, you can use a tablet or phone. This network is called ASUS, and it is not protected by anything; you do not need to enter a password.
Click on the wireless network icon in the taskbar, then click on the “Connection” button
Important! There are cases when the network is called differently. Sometimes it is password protected. This is an indicator that another user has already attempted to configure the ASUS. Therefore, it is recommended to reset all settings before proceeding. To do this, you need to press the button located on the back of the device and do not release it for 10-15 seconds. After this time, the indicators will go out and the router will turn on again.
Setting up IPTV
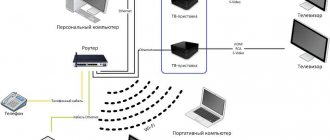
All parameters for this function are located in the “Local Network” menu and the “IPTV” tab.
For this function to work correctly, you need a paid (or included in the package) service from the provider and profile credentials from which the user will receive information about the list of available channels and the video stream from them. In addition, there must be a physical set-top box connected to one of the router’s LAN ports.
Most suppliers of such television warn that it is not advisable to use it with a wireless connection to a router. In other words, it is better to run a separate LAN cable to the TV on which you plan to watch it.
Setting up an Asus router is quite simple and standard:
- Select the provider profile.
- We indicate the port to which the set-top box is connected.
- We configure, if necessary, a proxy server and routes for assigning an IP address.
Then just click “Apply” and install a supported player on the device from which you plan to view it. In it you need to find the Internet television settings and enter data from the provider in the appropriate fields to connect the playlist. When it is completely cached (the correct icon will appear next to each channel), it will be possible to use the service without buffering the stream.
Setting up a network card Windows XP,7
Before you start setting up the asus rt n10u router, you need to make sure that it is correctly connected to the computer. To do this, we need to set the network card settings to receive an IP address automatically.
For Windows XP:
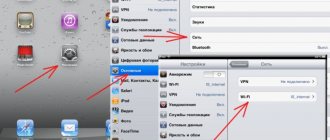
We look for “Network Neighborhood” on the desktop, right-click on it, select the bottommost item “Properties”.
Then we do it as shown in the pictures below.
For Windows 7:
On Windows 7, in the lower right corner, near the clock, there is a small monitor, click on it and select the inscription “ Network and Sharing Center ”.
The monitor can also be located
After that, in the window that opens, find and click on the inscription “Local Area Connection”
Then proceed according to the figures below:
That's it, now we can be sure that the connection will go correctly.
Change Password
As stated earlier, you can change your router admin login information in the “System” tab of the “Administration” menu item.
Let us remind you that the password must be quite complex and not be guessed by trying standard words. You will need to enter the new password twice, and then click the “Apply” button at the bottom of the screen.
In addition, the password can be changed in the mobile application. To do this, on the main screen you need to tap on the “Security Check” item.
Here you need to select the line “Password for wireless access” and change it.
How to connect a 3G USB modem to an Asus router?
If the router is new, just from the store, then take it out of the box, connect the antennas (if they have them, and they are removable), then connect the power adapter and plug it into a power outlet. Connect your 3G modem to the router's USB connector:
If the router has several USB connectors, such as on my Asus RT-N18U, then the modem can be connected to any connector. But, as a rule, one of the USB version 3.0 (it's blue). I recommend leaving it for connecting flash drives or hard drives. And connect the modem to a regular USB 2.0. By the way, on the RT-N18U the USB connector on the rear panel is located very close to the power plug. The modem connects, but the antenna cannot be connected. In the photo above you can see that the antenna connector on the modem is located just opposite the power plug. I connect the modem through a small extension cord. So as not to occupy USB 3.0, which is located in front.
But you can connect it like this:
It doesn't matter. The main thing is to connect the modem to the router and turn on the power to the router. And you can move on to configuration.
Resetting the router to default settings
Firmware corruption is a common occurrence due to cases where a short-term surge in electricity during a software update “bricks” the router. Backup should help you reconfigure.
For the phone app, which again proves to be the best in terms of usability, the procedure is as follows:
- On the main screen in the menu, tap “Reservation Settings”.
- Select “Restore router” (a backup copy must be saved on your smartphone).
- Wait for the data transfer to complete and the router to reboot.
If the device does not respond, you must first reset the settings to default values.
This is done from the first page of the main screen, which displays a colorful graph of the connection status. You need to tap on the “My <router_model>” area and select “Restore factory settings” in the menu that opens. Then wait for the reboot and restore from the backup using the algorithm above.
If the router does not respond to commands from the application, the standard reset method, which is sure to work, is by pressing the “Reset” button on the back wall of the device. You need to hold it until the light indication changes, after which you can safely restore the settings.
The fact is that every modern router contains “double” permanent memory - for the firmware and its previous copy. This makes it easier to roll back to more stable software in case of bugs after an update and restore a “dead” device.
Firmware replacement
It often happens that a router goes on sale whose firmware is already outdated, which is why the device is unstable and has errors. The situation can be corrected by replacing the router firmware. To do this, go to the Asus support website to the page for your router version. You can recognize it by looking at the bottom surface, where the device model will be written on top of the barcode.
Select the version of the operating system, under the “Software” heading, select the item that offers the latest firmware. Download and unpack the archive. Now in the router interface, go to the Administration - Firmware Update tab. Select a file, click "Submit". The firmware will be completed in approximately 3 minutes.
Possible problems during setup
One of the most common problems is the inability to accurately establish the address of your router in a large number of other devices and repeaters. This is especially true for apartment buildings. Although Asus routers themselves are not so often found as household devices, there are always a couple or three in sight.
In addition, a large number of repeaters or routers that imitate their behavior, combined into one local network, makes it difficult to navigate through it.
Device Discovery comes to the rescue - an application for mobile devices that displays its own IP address next to each Asus device found on the local network. After installation, just wait until the scan is completed and open the list of detected devices.
The corresponding address will be displayed below each name.
Content
Checking the router settings for working with a USB modem
First , you need to connect the USB modem to the router and turn on the Asus RT-N10U stationary router using the power button located on the back of the router.
In order to get to the control panel of the router, you need to connect to it with a cable (yellow cable included) or via Wi-Fi. In the browser line, type the address https://192.168.0.1 and press Enter .
ATTENTION! The yellow cable must only be connected to the yellow connectors of the router located on the back side.
In the login window that appears, enter the login: admin and password admin . After this, the WEB interface itself will open. On the left in the blue area is the WEB interface menu. Select the item IP Config .
Next, in the submenu that opens, select the WAN and make sure that USB Modem is selected IP Config .
If everything is done correctly, as in the figure, go to the next tab. If not, set USB Modem and click the Apply at the very end of the page.
Defining a modem in a router
Next, go to USB Network Devices .
Go to the submenu 3G/CDMA Modem . In the window that opens, find the Custom USB device parameters section and click the View button. The modem selection window will open.
ATTENTION! Before performing all the steps, make sure that your modem is connected to a stationary or mobile router.
In this window, you need to left-click on the line with the name of your modem, the window will close. Thus, we will tell the router which modem it will work with.
Now we go to the top of the page for further settings.
Setting up the router to work with the selected network operator
At the very top of the page we find the Modem options .
Depending on the operator with which the modem will work, select the desired item in the Modeme type :
- For PeoleNET and Intertelecom operators – CDMA
- For Kyivstar, MTS, Life and Trimob operators – GPRS/UMTS/LTE
Internet connection settings
Next, depending on the operator, fill in the fields:
| Operator Intertelecom | PeopleNET Operator | ||
| Username: | IT | Username: | 80****@people.net.ua (where ******* is your subscriber number) |
| Password: | IT | Password: | 000000 (six zeros) |
| Operator | APN | Username | Password |
| MTS | 3g.utel.ua | Empty | Empty |
| Kyivstar | www.ab.kyivstar.net | Empty | Empty |
| Life | internet | Empty | Empty |
| 3Mob | www.umc.ua | Empty | Empty |
Checking and saving settings
Now there are a few settings left to check. At the very beginning of the 3G/CDMA Modem , check that there is a checkmark in the Set as WAN Connection type by defaul item . Zero CD Configuration should be set to Auto
If everything is configured correctly, you need to save the settings. To do this, you must first press the Apply , then the Finish key.
In the next window, click Save/Restart .
Option 2. IPTV on a TP-Link router indicating the VLAN ID.
This option for setting up TV on TP-Link is rarely used, mainly in some branches of Rostelecom, Tattelecom and Aist. First, you will need to find out from technical support the VLAN ID for IPTV used on your access switch. Then in the IPTV section in the “Mode” field, select the “802.1Q Tag VLAN” type:
Set the “VLAN TAG for Internet” switch to the “Disable” position. In the “VLAN ID for IPTV service” field, enter the VLAN ID that you learned from technical support. Now below we select the port for the STB set-top box. In my example, this is the 4th LAN port. For it we set the operating mode to “IPTV”. Click the “Save” button.
Note:
1. On some firmware versions of TP-Link routers, you may encounter this difficulty. The developers were a little too clever and tried to take into account all possible configuration options, which caused confusion. The fact is that the switches of the providers listed above are usually configured in such a way that Internet traffic comes to the subscriber without a tag, and IPTV multicast comes with a tag that just needs to be removed on the WAN port. So, there are versions of the firmware on TP-Link routers, on which if you enter a VLAN ID in the “VLAN ID for IPTV service” field, then the router will also require a “Multicast VLAN ID for IPTV service” from you, which you do not have. If you ask technical support this, you will most likely confuse them. The result will be that you will never be able to watch IPTV - the set-top box will receive an address, the interface will load, and multicast TV traffic will not run. Therefore, we make it simpler.
In the “VLAN ID for using an IP phone” field, enter the VLAN ID for IPTV. Then below we set the mode of one of the LAN ports to IP telephone mode. I usually use the 4th LAN port for my TV set-top box. Click the “Save” button.
2. Some TP-Link router firmwares have an “IGMP Proxy” parameter - it is advisable to set it to Enable.
Characteristics
According to user reviews, the model is ideal for an office or small apartment.
Brief specifications of Asus RT N12:
- 4 sockets for connecting wired devices, speed 100 Mbit/s;
- 1 socket for connecting to a provider, 100 Mbit/s;
- Wi-Fi, 1 band (2.4 GHz), speed up to 300 Mbit/s;
- 2 non-removable antennas provide a stable signal within a radius of up to 30 meters.
Firmware features:
- DHCP - the server will automatically provide all the necessary data when any device from the home network accesses the Internet;
- Wi-Fi connection protection that meets modern standards (including wpa2);
- Support for 802.11b, 802.11g, 802.11n standards, allowing the most ancient devices to access the network;
- Port forwarding - access from an external network to internal machines (needed for torrents and similar networks);
- Parental control - restricting access by time and certain resources;
- Possibility of watching IPTV - if supported by the provider;
- Turning the router into repeater mode;
- Creation of several wireless networks (guest networks) using one access point.
Range 8.5
Price 9
Reliability 9
Additional options 9
Convenience and ease of setup 10
Total 9.1
Indicators and connectors
The Asus Rt N12 router is made in noble white tones, the front panel is faceted, and the top cover imitates brushed metal. The indicators are displayed on the top panel and glow in green tones.
There are 7 indicators in total:
- Power supply (220 V);
- Connected Wi-Fi network;
- Contact with the provider;
- Connection via LAN network (4 indicators for 4 ports).
Connectors and buttons on the rear panel:
- 4 LAN ports are traditionally (not only Asus) yellow;
- 1 port for connecting to a WAN network (provider) blue;
- Power button;
- Next to it is a socket for supplying electricity;
- The WPS button allows you to reset the Asus Rt N12 to factory settings (press and hold for 10 seconds).
Guest network
In general, it is a useful thing to divide a group of users into several local wireless networks. Go to the “Guest Network” section. There will be one network in each band. If you click the “Enable” button, it will add another one. By clicking on it, you can make configurations:
- Network name (SSID).
- Authentication method – set to WPA2-Personal.
- Key as password for access
- At the end, you can specify the time for accessing the Internet.
Parental control
Here you can set the Internet usage time, and also protect your child from malicious adult sites.
- This section is located immediately in the left menu or in the “ AirProtection” tab. Turn on the mode with the slider.
- First you need to select a device to which more stringent rules will be applied. Click on the arrow in the “Client Name” field. To add multiple devices, click on the cross (Add/Delete).
- To configure the “Time and Schedule” schedule, and to filter sites, you can go to the adjacent tab. They are both located in the upper right corner of this window.
- There are several modes for blocking Internet content:
- Adults - everything is clear here.
- Instant messages and communication – correspondence on social networks.
- P2P – for online games.
- Streaming and entertainment - various video hosting sites such as YouTube.
I can't log into the admin panel
TP-Link
D-Link
The firmware for these models is different. Therefore, our task is to find a section related to 3G or 4G. Go there and check the box for offline connection. At the end, don't forget to apply the settings.
Zyxel Keenetic
A change in tariff plan with conditions for unlimited use and increased speed makes many Internet users think about buying a router that is more adapted to innovative technologies. In my example, the outdated model RT-N13U B1, which has worked for more than seven years on the tariff plan from the Intertelecom provider, is noticeably behind. The apparent reason for the non-compliance of equipment is that the network connection is often interrupted and at the same time they have to be constantly rebooted in order to be in the Internet access zone again.
To improve my experience on the Internet, I purchased an Asus RT-N18U device. A more advanced gadget that has two USB ports. The peculiarity of the router is that it works perfectly with 3G/4G USB modems, including detecting gadgets running Android. All devices within the radius of influence of the router receive 3G Internet via a wireless connection, including a desktop computer connected via a network cable.
Information about the router of this configuration is described on another page, so here we’ll talk about the process of setting up an Asus device to work with the ability to connect it to the 3G function.
This management guide will be useful for Asus equipment that supports USB modems and has a new firmware version, that is, the latest versions of released samples.
There are more than a dozen Asus routers that support the connection of 3G USB modems, and their number is replenished with the production of each latest model.
A large variety of modern routers allows you to choose one from a large list. The reasonable cost of routers allows you to choose a device that will help distribute the Internet via a Wi-Fi network with a 3G modem.
An important fact in connecting to the Internet is the compatibility of devices; this is also taken into account when choosing to purchase them. It is quite easy to select a modem for an Asus device, since the list of them is quite large. In order not to be mistaken in the correct choice, you can visit a special website - www.asus.com/event/networks_3G4G_support/ and first look at the most suitable configuration. By following the link you can see a table where you need to select the country and the desired provider, after which it is very easy to decide on the modification of compatible modems.
In a specific situation, we will configure the Asus RT-N18U with a Huawei EC 306 modem. The quick setup scheme does not change with any Internet provider and has the following points:
- The modem is connected to the router.
- Next, you enter the router settings section.
- The password for entering the settings is changed to protect the device control panel.
- The modem is configured on the router itself.
- The wireless network is configured and the password is set.