Almost all modern gadgets can be connected to wifi networks. This makes it possible to use the convenience of the Internet at high speed almost everywhere. There is an opinion that this only applies to small devices, such as a tablet, phone or laptop (printer, camera, etc.). Many users are interested in the question of how to connect a computer to wifi, is it difficult, and what devices may be needed for this.
A stationary computer is called stationary because it means connecting all communications to it through various wires to a “permanent place of residence.” The PC can be moved in the future to another location, but this requires a major revision of cable routes, location of sockets, etc.
A novelty in recent years has been the emergence of wireless networks, thanks to which even a PC can be connected to the Internet using wifi technologies.
Below we will figure out what is needed for this, and in what order it is recommended to connect a desktop computer to the Internet “wirelessly”.
The outline of the article will be like this:
Necessary equipment:
- External wifi receivers;
- Internal;
- Router.
Installing devices on a computer and setting them up:
- External receiver;
- Interior;
- Router.
External wifi receivers
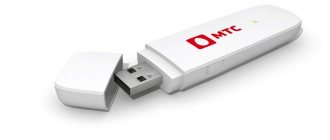
Such devices look very similar to a large flash drive: they are small gadgets with a USB plug at one end (see Fig. 1). In addition, they may have a small antenna to increase the “collected” signal.
Fig.1 External adapter (network card) Wifi from Tp-Link.
This device for connecting a PC to a wireless network is quite inexpensive (can be purchased for 10-20 USD). After purchasing, all you have to do is connect it to your computer via USB, install it from the included driver disk, make the simplest settings and connect to wifi. We will consider all these operations in detail after we get acquainted with another type of wireless network adapters.
Doesn't connect
This can happen if the network adapter settings on your computer or laptop have a static IP. The computer cannot connect to the network because it is on a different subnet. But the solution to this problem is quite easy:
- Press the key combination + R again.
- Enter ncpa.cpl.
- Right-click on the connection and select “Properties”.
- Select IPv4 and click “Properties” . Check the top boxes to automatically search for IP and DNS. Click "OK".
- Just in case, restart your computer.
- If there are still difficulties after this, then there may be problems with the drivers from the wireless adapter. Go to Device Manager and update the driver, as I wrote earlier in this article. If this doesn’t work, review the hardware software installation instructions in the chapter below.
Internal (built-in) wifi receivers
Their name comes from the fact that they are built inside the PC system unit. To connect to the motherboard, they use the PCI interface, through which they are connected to a special connector.
rice. 2 Internal wifi receiver (adapter).
These devices differ little in price from external ones, and installing them on a computer also does not take much time and should not cause any particular difficulties.
So which type of adapter should you choose? External or internal?
- The external one can be quickly disconnected and connected to another PC;
- The internal receiver will not take up free space on the table; in addition, it is less susceptible to damage, since it cannot be touched by the user.
The choice is yours.
Router (router)
A wifi receiver can connect a computer to a network only if it can “reach” it. In other words, the signal source – the router – must be within range.
Fig.3 Router TP-LINK AC1750
It receives a signal from the provider via an Ethernet cable, passes it through itself and “distributes” it to wireless devices (including a computer). Routers are more versatile and easier to use than access points. They allow you to simultaneously connect several gadgets (laptop, tablet, smartphone, PC...) to one network.
Computer
How to easily connect Wi-Fi on a computer? As was said earlier, a regular PC does not have a built-in Wi-Fi module. To do this, go to any computer store and buy an adapter. It can be external and look like a flash drive, or internal - connect directly to the motherboard via the PCI bus.
- Install the module.
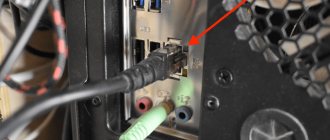
- When connecting for the first time, you should directly connect the cable from the router to the network card. This is necessary for automatic installation of drivers. Everything is according to the standard - one end is in the LAN port (yellow), the other is in the network card.
- If the driver installation did not proceed automatically, then go to the task manager. To do this, press Win+R at the same time. And enter the command “devmgmt.msc”.
- Our adapter will be in the “Other devices” Double-click on it with the left button and in the “Driver” click “Update” . Now we select the search for firewood and installation from the Internet.
- After this, the connection to Wi-Fi is the same as on a laptop.
External wireless network adapter - installation and configuration
As an example, let’s take the TP-LINK TL-WN721N receiver model, which has proven itself to be a reliable receiver. It can be purchased for 13-18 USD, and it is ideal for Windows 7. In addition, it supports all types of data encryption, and it is possible to quickly create a connection. The maximum signal reception speed is 150 Mbit/sec.
rice. 4 External wifi network card TP-LINK TL-WN721N.
Step 1
We take the device out of the box and carefully examine the package, which should include:
- The receiver itself;
- USB cable (can be connected through it and used as an extension cord when searching for a better signal);
- Instructions in several languages;
- Driver disk.
Step 2
We connect the adapter to the PC directly, or through an extension cord (it can strengthen the signal, acting as an additional antenna) to a USB port. Next, ignore any messages about the successful installation of device drivers. You need to install them yourself from a special disk that we found in the receiver box.
Step 3
Insert the driver disk into the computer, and then launch the installation wizard. In the program that opens, select our model and click “Install driver and utility” (see Fig. 5)
Fig.5 Installation program window.
Next, we should go through a series of dialog boxes, where we click “next” (“yes”, “I accept”, “agree”).
Fig.6 Dialog window of the installer program.
During the installation process, the following messages may appear (Fig. 7 and Fig. 8):
rice. 7 Notification on a 32-bit system that the utility cannot be installed. This is not scary, so feel free to click “Yes”.
rice. 8 Windows 7 security may warn you about an unknown driver manufacturer. This is also not critical, click “Install anyway...”
After a minute or two, the process will end, and you will find such an icon on the taskbar (see Fig. 9). It signals that the receiver is ready to connect the computer to wifi.
rice. 9 Icon indicating the presence of wireless networks within the range of the receiver.
Step 4
Now that the adapter is ready to connect the Internet to your computer, all you have to do is click on that icon and select the appropriate wifi network.
Fig.10 Selecting the desired network from the list of available connections.
And then enter the password (security key) and click OK.
Fig. 11 Specifying the network security key (password).
All. Your computer is now connected to the network via an external wifi receiver. You can start using the Internet.
Now let's move on to the next chapter of the article.
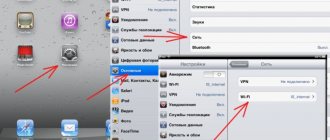
Laptop
- At the bottom right of the screen, depending on the operating system version, there should be a wireless connection icon. Right-click on it.
- After this, a window with available SSID networks will appear. Click “Connection”.
- Enter the password to access the Wi-Fi network.
If you see a red cross, it means that the adapter is turned off. To turn it on on laptops there is a certain keyboard shortcut. At the top of the “F” key group, you need to find the antenna and wave icon. On my laptop this is the F2 key, now press Fn and F2 at the same time. On some models this key is F3 or F4.
If you cannot find a combination of buttons, then proceed as follows:
- Press the and R keys at the same time.
- Enter the command ncpa.cpl and click “OK”
- Right-click on the disabled Wi-Fi adapter and “Enable”.
Installing the Internal Wireless Network Adapter
Step 1
For example, let's take the TP-Link TL-WN751ND model (approximate price - $15).
We take the device out of the box and unscrew the antenna if it is connected to the module (Fig. 12), since with it it will not be possible to install it in the system unit.
Fig. 12 Separating the antenna from the network adapter (by unscrewing).
Step 2
Open the cover of the system unit and look for a slot for the wifi module on the motherboard (one of the PCI slots through which you can connect a wifi receiver is usually located at the bottom, under the sound card) (see Fig. 13)
Fig. 13 Slot for adapter on the computer motherboard.
We connect and, after screwing the antenna back, we get something like this:
Fig. 14 Built-in wifi module ready for configuration at your workplace.
Step 3
Setting up an internal wifi card is no different from setting up an external one: first you need to “install” the drivers, then find a network and connect your computer to it. We discussed these steps in detail in the previous chapter.
Installing and configuring the router
For example, let's look at the process on the TP-Link TL-WR841N model.
Fig. 15 TP-Link TL-WR841N.
Step 1
First you need to connect the router to the computer through which it will be configured. Figure 16 shows the connectors through which the router is installed (blue - for power supply; red - for the Internet cable entering the apartment; green - for connecting to the main PC, from where the network will be managed).
Fig. 16 back side of the router with connectors.
Step 2
We go to the web interface of the router.
Fig. 17 entering the IP address to enter the router settings.
To do this, in the browser, in the address bar, enter the router’s IP address with the https:// prefix (as in Fig. 17). This “set” of numbers varies. It can be read where it is indicated by the manufacturer in 99% of cases - on the back cover of the device.
Step 3
Enter the username/password pair. In 90% of cases this is admin/admin.
Step 4
Once in the settings, look for the “Network” tab, and in it “WAN”. Here you need to specify the network type. To determine which connection is suitable in your case, you can consult with your provider. Click “Save” and move on.
Step 5
We go to “MAC Clone” (in the same place, in “Network”) and click on “Clone MAC Address”, after which we save the changes again (save).
Step 6
We go to “Wireles” > “Wireless Settings”, where we enter all the values as shown in the figure below. The only thing you can think of is the name of the network and indicate your real region. Don't forget to save.
Step 7
Now go to the “Security” tab. Indicate the encryption type and its algorithm as in the screenshot (you can simply fill in everything in the same way as in the figure above). And, most importantly, come up with your own password for the created network.
Save all changes again and complete the router installation by rebooting. To do this, look for the “System Tools” > “Reboot” tab, in which we click the only “reboot” button.
This completes the router setup process. Now you can connect wireless Internet to the computer on which you installed the wifi receiver. You need to go through that PC to “Available connections” (as stated above), select the created network and connect to it.