How to connect a modem to a computer
At the moment there are two types of modems:
- ADSL model - provides access to the Internet via the city telephone network;
- USB model - connection occurs using a standard connector on a personal computer and cellular services.
The ADSL modem version is currently obsolete. There are practically no providers left that provide connection to the World Wide Web in this way. When choosing means to connect your apartment to the Internet, it is not recommended to choose this method. Users are better off choosing the most common fiber optic cable today.
However, if the subscriber is already connected to the Internet via telephony, then you should pay attention to how to properly connect the ADSL modem to a personal computer:
- On the back of the modem there will be several connectors for cables.
- First you need to pay attention to the DLS port. A telephone cable will be inserted into this connector, which in turn provides access to the Internet.
- The user can directly connect the wire to the DLS port, but in this case the subscriber will have to choose: use telephony or an Internet connection.
- Experts recommend dividing the cable into several branches in order to simultaneously use all available communication services.
- The final step is to connect the cable that will run from the ADLS modem to the user’s personal computer.
Usually this wire is supplied with the purchased device.
Connecting to the Internet via a landline telephone connection is a fairly outdated technology and at the moment, when a user hears about a connection using a modem, it is more associated with 4G LTE USB devices.
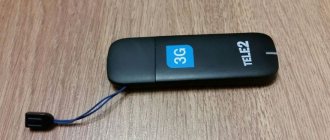
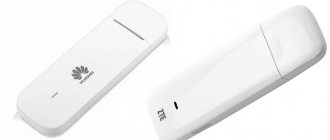
USB modems are used to connect to the Internet via cellular communications. The equipment works from the Internet of any SIM card. Typically, these devices are distributed by mobile operators, offering customers immediately with a tariff plan.
Connecting a USB modem is extremely simple:
- First, you need to select the tariff plan you are interested in from one of the cellular operators.
- Having received a SIM card from the telecommunications company, you need to insert it into a specific slot, which is located at the end of the case.
- After this, you should connect the modem to the USB port and proceed directly to setting up the device.
ADSL modem
Some companies, for example, Rostelecom, provide a special installation disk complete with an ADSL modem. Using it, the user can update the computer software to connect to the Internet, as well as run an automatic setup program.
However, if this disk is lost or the subscriber did not buy the device from the telecommunications company that provides him with communication services, then he will have to configure the connection using an ADSL modem manually.
Before setting up, the user must know special information about his connection. These include:
- client login and password;
- IP address;
- DNS gateway.
The subscriber can check all the necessary data by calling the hotline from his provider.
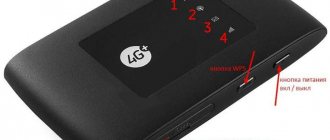
Reset
Before starting the connection, it is recommended to reset the device to factory settings. To do this, you need to find the “Reset” button on the modem. Sometimes it is marked as a small connector.
If “Reset” is represented by a button, then it must be pressed for 30 seconds. If the function is represented by a connector, then you need to find a special key for SIM cards, a small nail or toothpick and insert it into the port. After 10 seconds, the settings will be reset.
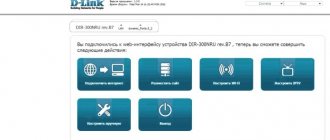
Using the web interface
The next step is to use the web interface. This is a special section of settings on a personal computer, which is responsible for connecting to the Internet connection. You can open it by typing “192.168.1.1” into the address bar of any browser. If the page does not open, it means the user is not receiving an Internet signal to the modem. It is possible that for some reason the provider does not provide communication services, but most likely the subscriber will have to enter the communication route independently.
First you need to go to the “Control Panel”. In the window that opens, you need to go to the following menu:
- "Network and Internet".
- "Network and Sharing Center."
- "Changing adapter settings."
The user will be presented with all available connection methods. The subscriber needs to find a connection via telephony.
Next, right-click on the connection icon and select the “Properties” tab. In the list you should find the “Internet Protocol 4” tab. In the window that opens, the user will need to enter all the data that he received in advance from his provider.
Don’t forget to save all the data entered into Internet Protocol 4.
After this, you can try logging into the web interface again. The standard login and password for authorization in the system is admin / admin.
Settings in the web interface
The next stage is configuration in the web interface:
- First of all, you need to go to the “Net”, “Network” or “WAN” section. The name may vary depending on the model of the device you are using.
- Then you need to open the “Connections” menu.
- Click on the “Add” tab and find “DSL protocol” or “Connection Type” there.
- In the window that opens, select “PPPoE”.
- The next step is to fill in the PVC parameter. Data about this server is provided by the provider.
- Enter the “PPP Username” and “Password” already known from the operator.
- Next you need about and “IGMP”.
- The last step is to enter the value “LPC interval” and “LPC fails”. This data shows how many unsuccessful attempts a device can make before temporarily stopping trying to get a connection. It is difficult to determine what specific numbers are, but installers usually set the values to “20” and “3”.
- Save changes.
- Reboot your device.
After completing the setup, you should restart your computer.
USB modem
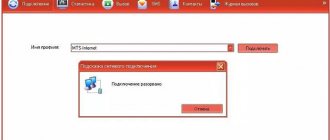
Unlike the ADLS model, the USB modem connects to the network most automatically. Despite this, there are a number of nuances that are also worth taking into account.
The setup after connection depends primarily on the cellular operator whose SIM card is inserted into the device. Each telecommunications company has its own connection manager.
This software is installed automatically by connecting a modem to a personal computer. However, if this does not happen, then you need to download this program using another Internet connection and install it on the desktop computer or laptop of interest to the user.
Next, you should start setting up your Internet connection. Basically, this function is launched in the same way in the connection managers of all telecommunications companies. If the user has any problems with the connection, the subscriber has the right to contact the specific hotline of the technical support service of his cellular operator.
If it was not possible to establish an Internet connection using the connection manager, then you need to try setting up the connection through the router settings.
Registering a SIM card automatically
Activation in automatic mode usually occurs without jambs: the card is purchased, the account is replenished and you can use it immediately. To do this, you need to insert it into the SIM slot on the phone, wait for registration and the network signal from the operator appears.
After a couple of seconds after activation, the name of the operator appears on the smartphone screen and the network is connected. After this, you can immediately use the capabilities of Yota. To manage some parameters and tariffs, you can download an application that allows you to view your current balance and other things on your phone screen.
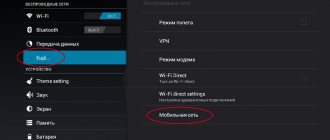
How to set up a wireless Wi-Fi network
Many Wi-Fi routers allow you to create a wireless network by connecting modems to them. However, to set up the connection you need to contact the router. This type of signal installation requires manual input and knowledge of some connection data.
A router is, at its core, a direct path that the user assigns to the Internet signal. However, to configure the modem in this way, the user needs one more device - a router. This equipment allows you to turn a connection using a modem into a wireless connection to the Internet, and also gives access to more advanced network settings than the connection manager of a cellular operator.
When purchasing a Wi-Fi router, you should be more careful when choosing a device. Not all equipment of this kind has a USB connector. Before purchasing a router, you should carefully study its characteristics or consult with a sales consultant.
In addition to the connected modem, the user also needs to know the “route” along which the Internet connection takes place. This information is provided by the subscriber's provider. Therefore, before setting up, the user must call the telecommunication company's hot number.
After the user connects the modem to the Wi-Fi router, subsequent setup will take place on a personal computer.
To connect to the Internet using a router, you must follow these steps:
- Open the Control Panel of your computer and find the Network and Internet tab.
- Go to the “Change adapter settings” menu.
- In the window that opens, find the connection you are interested in, right-click and select the “Properties” sub-item.
- Next, you need to select the “Internet Protocol Version 4 (TCP/IPv4)” tab.
- In the window that opens, you need to enter the data received from the provider.
After setting up the router, do not forget to save the changes made to the protocol.
If your personal computer connects to the Wi-Fi signal from the router, but does not have an Internet connection, you can try setting up the modem through a browser.
For this connection, the user will also need additional data, which he can obtain from his subscriber:
- APN service;
- “Dialed number”;
- "Username";
- "Password";
Next, you also need to open the “Internet Protocol Version 4 (TCP/IPv4)” tab and reconfigure the router to automatically obtain an IP address and DNS server.
Then you need to open any Internet browser. The user needs to enter “192.168.0.1” or other default login information, which can be found on the back of the router, into the address bar.
After this, the device setup menu will appear on the screen. BUT you need to login first. The login and password, if the user has not changed the data himself, is the word “admin”.
After entering the setup system, you should find the “USB Modem” or “USB Application” tab. The name will change depending on the Wi-Fi router model.
In the window that opens, there will be signed lines where you need to enter the information received from the telecommunications company.
After completing this process, you need to save the changes and reboot both the router and your desktop computer or laptop.
Method for registering a Yota SIM card and accessing the network
Review and setup of the D-Link Dir-320 modem
After purchasing a SIM card for use on a smartphone running Android OS, it is recommended to simply insert it into a special slot and wait for registration and connection. Usually everything happens automatically and the user does not need to do anything.
Important! Sometimes, to register, you need to send the first SMS or make a call to a friend whose number is known.
If automatic registration does not occur, then you need to check the “Mobile data transfer” option in the “Settings” phone menu. You can also diagnose the access point, check its name, which should be “internet.yota”, or create a new one according to the instructions.
How to update modem drivers
In addition to the connection manager, when connected via a USB connector directly to the user’s personal computer, special drivers will be installed for connecting to the Internet via a modem.
However, drivers are not always included with the device, so in some cases users have to independently find the software needed for the modem and install it on their personal computer.
You can find drivers on the official website of the company that developed and released the modem. However, this requires an Internet connection, which makes the process more difficult than it actually is.
The user can also update the USB connection drivers. It often happens that the problem lies precisely in them.
You should not blame unupdated modem drivers for all errors when connecting to the Internet. You should think about updating the software only if your desktop computer or laptop does not find the device connected to it.
Possible problems and their solutions
The system for connecting to the Internet using a modem is currently as automated as possible. Companies that develop such equipment are interested in ensuring that the user, by inserting a SIM card into the device and connecting it all to a laptop, immediately receives a connection to the World Wide Web.
Therefore, possible problems only occur when the user or the computer system tries to interrupt this automated process. And in order for the subscriber to avoid possible connection problems, he should make sure that all the latest versions of drivers are installed on the computer, and simply do not turn off the system.
0 0 Votes
Article rating
Operator blocking
Compared to Android, manual activation of Yota on iOS is much faster and easier. To unlock a newly purchased card, you need to place the chip in the device, after which automatic activation occurs. If this does not happen after five minutes, follow these steps: Manually enter the number
How the Yota SIM card is activated
This simple algorithm will allow the owner of a Windows Phone to get high-speed access to the mobile network.
Setting up a network is very simple, but many users do not have a very good understanding of their PC. However, this does not mean that due to the lack of certain experience and knowledge a certain problem has arisen; connection difficulties often arise for the following reasons: