Having a correct and up-to-date phone number is one of the main ways to improve account security.
Changing your phone number
- From the top menu, tap the profile
, then tap
Settings & privacy
. - Click Account
. - Tap Phone number
and select
Update number
. - Follow the prompts to update your phone number using the keypad.
Note: To delete your current phone number, tap Phone Number
, select
Remove number
, and then select
Yes, remove
to confirm the deletion.
Changing your phone number
- The top menu displays a navigation menu icon
or profile icon
.
Tap the icon you see and select Settings & Privacy
.
- Click Account
. - Click Phone number
. - Follow the prompts to update your phone number using the keypad.
Note: To delete your current phone number, tap Phone Number
, select
Remove number
, and then select
Yes, remove
to confirm the deletion.
Changing your phone number
- Log in to your Twitter account.
- Go to Settings & Security: Click the profile icon in the top right corner of the navigation bar and select Settings & Security
. - Open the Phone tab.
- Click Edit
next to the phone number. - Change your phone number and click Continue
. - We will send the code (via SMS) to your phone number. Enter it in the Verification code
and click
Connect phone
. - You will see the message Your phone is activated!
, confirming the number change.
Note: When adding the same phone number to different accounts, it is important to understand that you can only send SMS commands and receive SMS notifications about account actions for the account that was linked to the last phone number
. You cannot change notification settings for other accounts associated with this phone number. For all accounts that have a phone number associated with them, you will continue to receive SMS messages prompting you to change your password and messages related to security features such as sign-in verification. Learn more about linking a phone number to multiple accounts.
What is this data for?
A backup email address and phone number can help you reset your password if:
- you will forget him;
- someone else will change it;
- you will lose access to your account for any other reason.
- On your Android phone or tablet, open the Settings app and select Google Account.
- At the top of the screen, tap Personal Information.
- In the Contact Information section, select Email Address.
- At the bottom of the screen, click Advanced settings.
- Under Additional Email Addresses, select Add an additional email address or Add another address
If you are using a work or school account, please contact your administrator..
- Enter your email address. Click Add.
An email will be sent to the new address with a confirmation link. Open it and go to the URL provided. After this, you will be able to log into your account using an additional address
Please note that the letter may not arrive immediately
If you still haven't received it, read this article.
Transfer data from iPhone to iPhone
For Apple technology users, backup using ICloud is available. The first thing you need to do is log in to the same ICloud on both devices. You can transfer the following data using the method described below:
- Contacts;
- Mail;
- Calendar;
- Reminders;
- Browser passwords and bookmarks;
- Photos;
Open the settings on the iPhone from which you will transfer data. In the ICloud section, activate the switches next to the items you want to transfer. Here you need to open the “Backup” item and click on the “Create a backup” button.
On the second iPhone, log into the same account and activate the necessary items in the ICloud settings.
How to add or remove an account
You can add both @gmail.com and third-party email addresses to the Gmail Android app.
How to add an account
- Open the Gmail app on your Android device.
- In the upper right corner of the screen, click on your profile photo.
- Click Add account.
- Specify the type of account to be added.
- If you check email for your business or school through Outlook on a Windows computer, select Outlook, Hotmail, or Live.
- If your email service is not listed, select Other.
- Follow the prompts on the screen.
How to delete an account
- Open the Gmail app on your Android device.
- In the upper right corner of the screen, click on your profile photo.
- Click Manage Accounts.
- Click on the address you want to delete.
- Click Remove account.
Via computer
Instagram does not have an official program for computers and laptops. You can only access the social network through the website. It does not have many functions of the application: uploading photos, stories, sending messages to Direct. The site has only basic features, such as viewing the feed, commenting, and setting up a profile. You can also edit the linked mobile phone number in the settings menu. This is done this way:
- Go to the website https://www.instagram.com
- Click on the person symbol in the upper right corner of the screen to open your Instagram.
- To the right of the login, select the “Edit profile” button - this will take us to the menu for changing personal information.
- In the first window we find the item “Phone number”.
- We register a new number and click “Submit” so that the data changes.
Ready! You have linked a new mobile phone number to your Instagram through the official website on your computer.
Conclusion
Thus, there are several ways to change your phone number on Instagram. This can be done through mobile applications for different operating systems, as well as through the official website on the social network. The change is very simple, no special codes need to be entered. Simply go to the profile editing section, select the appropriate item, indicate a new number and confirm the data. Immediately after this, another mobile phone will be linked to your Instagram account.
Instructions
How to add a phone number
- Sign in to your Google Ads account.
- In the page selection menu, click Ads & Extensions.
- On the Extensions tab, click the plus button.
- Select the Phone numbers option from the list. The “Add Phone Number” window will open.
- Specify at what level you want to add the phone number. The available options are Account, Campaign, or Ad Group.
- To specify a new phone number, click Create. If you want to use a phone number that you created earlier, select the Use existing option.
- When creating a new extension, please include your phone number.
- If you want to use an existing phone number, select the desired option from the list that appears.
Additional settings
- Specify whether call reports should be generated
To view call reports from Addresses extensions, you'll need to enable reporting at the account level. Learn more about managing call reporting for campaigns.(recommended).
- Choose whether to count conversions (recommended). Google Ads automatically generates a default call conversion type of "Calls from Ads" (and "Calls from AdWords Express Ads" if you have an AdWords Express account). You can create your own conversion type by selecting Manage Conversions from the drop-down menu. Learn more about call conversion tracking
Note. Conversion accounting affects the bids that are automatically assigned.…
- To optimize the Phone Number extension for smartphones, under Devices, select Mobile Devices. This phone number will also be shown on computers and tablets.
- In the Advanced settings section, specify whether to show the phone number only on certain days and times. For example, this could be the time when your company's employees are available to answer calls.
Using multiple Google accounts on your phone
To comfortably use email, maps, etc., you may need several profiles. On one phone you can have an unlimited number of e-mail addresses and YouTube channels. You can change your account to an additional one through the settings and through any Google application.
To do this you need:
The account allows you to synchronize mail, contacts, notes from pre-installed services and makes using your smartphone more comfortable. The data must be well remembered or written down. It is impossible to turn on a locked device without logging into your Google profile.
Source
Fast email processing
Convenient access to main functions
Hover your mouse over the email and immediately perform the desired action—you don't have to open the message.
- Archive
- Delete
- Mark as unread or read
- Postpone
You can postpone the letter until later so you can read or respond to it at a convenient time. Read more…
Quick Reply feature
You can quickly reply to a letter by selecting one of the ready-made replies created based on your correspondence.
Old emails may appear at the top of your inbox reminding you to reply to the sender or contact the recipient you're waiting to hear from. Learn more about turning these reminders on or off.
How to link a Google account to a smartphone and synchronize data?
To use all the features of modern smartphones running on the Android operating system, you must link your Google account. At the same time, different users have approximately the same problems - how to link, how to change and how to synchronize an account on the device.
This problem is often encountered when purchasing a new smartphone/tablet, or if an account was linked by mistake. There are also frequent cases when control over a Google account is lost and it is necessary to delete its data from the device. More details about how to delete an account are written on Smartphonus.com, and the topic of this article will be changing the account.
In what cases is it necessary to change your account?
The first option is that you need to sync some data with your phone. These can be numbers, calendar dates, photographs and much more. For this purpose, you will have to log out of your account and then log into another one that stores all this information.
Another case will be useful when you need to install any paid application. Your friend may have it purchased on his account, so all you have to do is log into his account and then install the desired program on your phone. There are often cases when you simply forgot the password for your old account. If there was no important data on it, it is much easier to create a new Google account and, accordingly, not bother yourself with the password recovery procedure.
How to change email in Google account
This situation is not as rare as it might initially seem. In fact, many people need to change their email address in their Google account. This happens for exactly the same reasons because of which the KM completely changes. For example, when a person has forgotten the password for an e-mail address.
1. To change your email you will need:
2. Open the settings of your mobile device.
3. Go to the “Accounts” section. Select Google.
4. Click on “Personal information”.
5. In the contact information section, select your email address.
6. Click on the icon for changing parameters in the form of a gray pen.
7. Enter a new address and confirm saving the settings.
Email addresses with the default @gmail domain cannot be replaced.
If you encounter a problem that the system does not allow you to set a new e-mail, it is recommended that you first specify a backup address in the account settings. As a rule, after this you can delete the old box and never return to it.
Also, a special procedure for replacing an e-mail applies if the account is provided by an educational institution or other organization. In this situation, Google recommends contacting your manager, who can make changes to your existing account.
Source
Step-by-step instructions for changing your account
So, your phone is currently synced with one entry, but you need to log in to another Google account. This is quite easy to do on Android, but you will have to delete your old account information first. You can do this using the following instructions:
- Go to your gadget's settings.
- Find the “Accounts” section (may be called “Personal Information”).
- It will display all the systems in which you are authorized. You need to select Google.
- You will be taken to the settings window, where synchronization of various data is activated. You need to press the gadget's function key or the three dots icon on the right side of the screen.
- Select “Delete Account” from the drop-down menu. The system will ask you to confirm your choice. Do it.
- If you installed a security system, then before doing this the phone will ask you to enter a password or pattern.
This completes half of the task. How to change account? Now you just need to add a new account. This is done in the same settings section on the phone:
Now you know how to change your account on Android in just a couple of steps. If you need to create a new one, then you can select the “Create account” menu in the mail entry window. You will have to go through the entire procedure again: enter your first name, last name, date of birth, come up with an email and password.
Anyone who uses a smartphone based on the Android operating system knows that many functions of this system are tied to a Google account. For example, without a Google account you cannot download applications from the Google Play Market; standard applications and much more will not work without an account.
Therefore, if you lose access or have any other problems with your Google account, you need to change it on your Android device. In this material we will talk about how this is done using the example of Android 5.0 and Android 8.0.
Transfer Contacts, Calls, SMS, Photos / Videos to a new phone
To ensure you have the most up-to-date data on your new Android phone, here's what you need to do:
On your OLD phone, go to Google Play and make sure you have the new version of the Google Play Service application.
On your OLD phone, go to Andro Settings />
Click the “Start copying” button, after which all you have to do is wait a little while for the backup of your Android data to complete!
Now, after you enter your Google account on your NEW phone, all your basic data will be transferred.
Video instructions for changing your Google Play account
If you have any other options for changing your Google Play account on Android, then we are always happy to listen to it and add it to the existing list.
To install applications from the Play Market, save various kinds of documents on the cloud, and also use many other useful functions from Google, you need to create an account. Most users have only one account, but sometimes it becomes necessary to change the account to log in from another one. Many users are interested in how to change their account on Android. You can perform this task using standard smartphone functions.
Create a new account
As we found out earlier, without a Google account it is impossible to use a smartphone based on the Android operating system. So let's immediately move on to the process of creating a new account.
By default, the operation is performed the first time you turn on the smartphone. That is, if you purchased a new device or it has been reset to factory settings, you just need to turn it on and follow the instructions that appear on the screen.
If a reset has not been performed, creating a new account will be done through the Settings application. Once you open it, you should take several steps:
1. Open the “Accounts” section.
2. Press the button in the form of a plus sign.
3. Select Google from the available account types.
4. Provide your email address.
5. Enter the password.
6. Confirm entry using the one-time code from the response message.
The presented algorithm only works if you already have an email. If it doesn’t exist, it won’t be difficult to create a new one. We recommend using the Gmail app. It just invites users to create a Google mailbox. When the program opens, select “Add a mailbox” and follow the instructions.
When creating a new email, the system will require you to provide personal data, create a username and password, and also link a phone number to increase the level of security. When the email is done, you can proceed to adding a Google account. The operation is performed according to the instructions presented above.
How to change personal information
You can change your personal information, such as your date of birth and gender, as well as your email address and phone number.
- On your Android phone or tablet, open the Settings app.
- Select Manage Google Account.
- At the top of the screen, tap Personal Information.
- In the “Profile” or “Contact Information” section, select the desired item.
- Make changes.
Additional Information
Name
You can change your name as much as you like, but no more than three times per minute. This restriction does not apply to accounts created less than two weeks ago.
Nickname
If a name is not specified, the previously created alias is used instead. If you delete it, you won't be able to create a new one. This is not the same nickname that you can enter on your About page. Go to the About page to change the nickname listed there.
Date of Birth
The date of birth you have on your Google Account cannot be deleted. However, you can change it and choose who can see it.
Note. Your date of birth may be used to protect your account and personalize Google services.
Who can see your date of birth
By default, no one can see your date of birth. You can change this setting in the About section of your Google Account page.
Why do we need information about your date of birth?
Google uses your date of birth for the following purposes:
- To determine whether Google's services and content apply age restrictions to you. For example, some videos on YouTube can only be watched by adults.
- To display a holiday theme on your Google Search page on your birthday.
- To offer personalized recommendations and ads based on your age. You can turn off ad personalization.
Floor
In the Gender section of your Google Account page, you can:
- indicate your gender;
- refuse to provide information about your gender;
- add your own version of gender and appeal to you.
Why do you need information about your gender?
This data allows us to personalize our services, namely:
- Use correct address when talking about you. Those who can see a user's gender can "Message" them or see who is "In Her Circle."
- Select the most relevant content for you, such as advertising.
If you do not indicate your gender, Google services will use neutral phrases in relation to you (for example, “Send this user a message”).
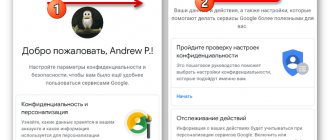
Few people know how to change a Google account on a smartphone and why it is needed
Every Android smartphone is sold with Google services already installed. This happens due to the fact that an American corporation at one point became the owner of a popular operating system. In turn, the Google account combines all the company’s services, allowing smartphone owners not to have to worry about constantly entering account parameters.
Why do you need to change your Google account?
Creating a Google account occurs immediately after turning on your new smartphone for the first time. This is a mandatory item, without which it is impossible to imagine the further use of a mobile gadget. To register a UZ, you only need to provide a phone number and fill out fields with personal information. Next, the user is assigned an email address, which will be used for further login to the account.
As a rule, an account is created once and forever. Responsible users always write down their email addresses and passwords. Then, when you purchase a new smartphone, you only need to press a couple of buttons for authorization to occur. However, in some cases there is a need to change the account.
Thus, there may be several reasons for changing your account. Perhaps yours is not on this list. But this will not prevent you from replacing your account according to the instructions, which we suggest you read below.
By the way, also read:
What is a phone account and how to create one
How we use your backup number and address
This data helps protect your account and restore access to it.
Backup phone number
We may use your number to:
- send you a code to log into your account if it is blocked;
- block access to your account for strangers;
- make sure that the account belongs to you;
- notify you of suspicious activity on your account.
If the backup number matches the number you added to your account, it can be used for other purposes.
Backup email address
We may use your recovery email address to:
- obtain confirmation of your username when registering an address;
- help you log into your account, for example, if you forget your password;
- notify you that your storage space is running low;
- notify you of suspicious activity on your account.
How to change your phone number on Instagram
Mobile phone number and email address are two contacts that should definitely be linked to your Instagram account. This will protect your personal data - if you need to confirm your identity, a special code will be sent by email or phone. The second verification method is more convenient because it does not require the Internet to confirm. If you have changed your current number, you can change it in your profile settings. We will tell you below how to change your phone number on Instagram.
Changing Google account on Android 8.0
On smartphones running Android 8.0, changing your Google account is a little easier. First, you need to open Android settings and go to the “Users and Accounts” section.
After this, you will see a list of all accounts on your Android smartphone. Here you need to select the Google account that you want to change.
After opening the desired account, click on the “Delete account” button.
And we confirm the deletion of the selected account.
After this, you can change your Google account to a new one. To do this, return to the main Android settings page, go to the “Users and Accounts” section, click on the “Add Account” button, select the “Google” account and follow the instructions that will appear on the screen.
At this point, the change of Google account to Android 8.0 is completed, the old account is deleted, a new one is added, you can continue to use the smartphone.
Keep in mind that you won’t be able to switch between active accounts on your device with one click, unless of course you have a tablet with built-in User Account Control running Andoid Kitkat. If you do not delete your existing account, you will then have to log into all applications that use your Google account and select the active user. This applies to the Gmail email program, the Google Play store, the Google Keep notes service and other Google services.
To delete an existing account
, use the second point. Then, after you connect your tablet to a new account, all your applications, contacts, etc. will be synchronized with it, and you will be able to use all Google services under the new account (username).
To avoid deleting an existing account
, you just need to go to the tablet settings, find the “Add account” item, and select “Google”.
And if you just want to change your first and last name
, unfortunately, this cannot be done without changing the Google account that is linked to your tablet PC through the settings menu. To do this, you need to open your account settings in your browser. I recommend Google Chrome for these purposes. We launch the browser, and it immediately prompts you to log in using your username.
Click the “Login” button. Then we need to force the browser to launch the full version of the sites, because the mobile version will not have the functions we need. To do this, go to the browser settings and select “Full version”.
Your name and avatar will appear in the upper right corner. Click on your avatar and select “Settings”.
In the process of using the Play Market, owners of mobile devices need to change, delete their Google account, log out of it, or restore access (reset their password). This article will tell you in detail how all these operations are performed.
Via phone
The easiest way to change the link to a cell phone number is through the phone, because the mobile version of Instagram has wider functionality than the computer version. Below we will describe step by step the process of changing the number in modifying the application for different operating systems.
Android
In Android-based gadgets (both smartphones and tablets), to change your mobile phone number, you must proceed as follows:
- Let's launch Instagram.
- In the bottom menu bar, tap on your avatar or person icon to go to your profile.
- In the new window, under the number of publications, subscribers and subscriptions, select the inscription “Edit profile”.
- Scroll down and get to the “Personal Information” section.
- Go to the item “Phone number”.
- Enter your new number that you want to link to your Instagram page and press the confirm button.
Ready! The number has been changed and notifications will now be sent to it.
Video:
Iphone
To change the number associated with your Instagram account, you should follow these steps on your iPhone:
- Open Instagram.
- On the bottom panel in the lower right corner we find the icon of your avatar or person.
- We go to the data modification menu through the “Edit profile” button, which is located to the right of the avatar.
- Scroll through the menu and go to the “Personal Data” section.
- In the “Phone number” column, enter a new combination by first clicking on it.
- We confirm our actions.
Ready! After this, your number in your Instagram profile will be changed.
How to find your emails in the folders of a third-party account
The distribution of emails among inbox sections in Gmail may differ depending on your email service.
Emptying the Trash
If you delete a message from a third-party account, it will be permanently deleted from your Trash according to your service's policies, but not necessarily after 30 days like Gmail.
For example, if your service stores messages in the trash for 60 days before being completely deleted, these messages will also be available in the Gmail trash for another 60 days.
Transferring messages to the archive
If you archive an email in Gmail, your third-party mailbox will add the same message to an automatically created Archive folder.
To find archived emails in a third-party service mailbox, open the “Archive” folder.
Shortcuts and folders
When you assign a label to a message, a folder of the same name is created in your third-party mailbox. For example, if you assign the “Work” label to an email in Gmail, a “Work” folder containing the same email will appear in your third-party mailbox.
If you assign several labels to one message at once, several copies of the same message will appear in the third-party mailbox, which will be added to folders of the same name.
Note. If the third-party service has limited storage space for messages, we recommend not assigning too many labels to messages from the linked account.
How to change an account on Android - any other service
In the same way, you can change the account of any other service, be it, for example, VKontakte, Skype, Viber, or whatever.
- Email for google play. Free Google Play registration
You can use two or more accounts of the same service - if, of course, the corresponding application allows it.
Ever thought about this question: how to change the Google account on my device? After all, some accounts are linked by mistake, or the owner of the device loses control over the account. In this article, I will describe in detail the entire process of linking an existing account to an Android device.
All steps are suitable for version 4.0 and higher, but there are no fundamental differences in linking a Google account in earlier versions of this OS, so the instructions are applicable to all Android devices.
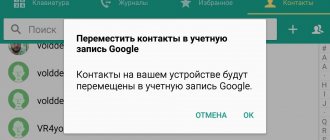
- So, first you need to get to the synchronization menu. To do this, go to “Menu” -> “Settings” -> “Accounts”. After this, you will see a list of all accounts that are synchronized with the device on your screen.
- After that, click the “Add account” button on the top panel:
- Here you need to select the item "". I note that for each user the list of services in this menu will be different, it all depends on the number of installed applications.
- Then we will be offered a choice - add an already created account, or create a new one. We choose the first option:
- After this step, the Android system will ask you to turn on Wi-Fi if it has not already been done. Immediately after successful connection, you will be asked to enter your email address and password for your Google account. Do it:
- After you press the “Login” button, information will appear on the display of your device indicating that you need to wait a little for the connection to be successful. Usually everything is ready in a minute:
- After this procedure, you can link your bank card to your account. We'll skip this step:
- You can then choose which services you want to sync and which you don't. For example, you can unnecessarily disable Drive synchronization if you do not use this service.
- All! The new Google account is linked to your device. It now appears in the list of accounts available to you. At any time, you can turn off synchronization, or even delete your account from the device’s memory. Attention: all information associated with the account will be erased immediately after it is deleted! Be careful!
In fact, there is nothing complicated in the process of changing a Google account. You just need to strictly follow the step-by-step instructions and you will succeed. Good luck!
Every owner of an Android device is familiar with a branded application such as Google Play or Play Market. For authorization, it uses the login and password of your Google account (your account). The first time you log into the application using your personal data, your smartphone or tablet links your Google account to your Play Store account, which makes it possible to automatically synchronize not only your contacts, settings and other data, but also some installed programs with Google Play.
What should you do if you need to log out of your Play Store account on your Android? For example, you just want to log in using the details of another account.
There are at least three methods, which are discussed in detail below. You can use whichever one you think is easiest.
Fields for entering recipients in the letter
Copy
You can specify additional recipients in the Cc field. All these users will be able to see who else the letter is addressed to.
It is generally accepted that in this way you notify these people about the correspondence, but do not expect any action.
Hidden copy
If you want to hide the recipient's name from other recipients, add it to the Hidden field.
How the BCC function works:
None of the recipients will know that you BCCed someone. Each user who receives a BCC will see their name listed in the BCC field and will also be able to see all addresses listed in the To and Cc fields. Note. Users of other email services (not Gmail) may not have access to this information. Recipients listed in the Bcc field won't be able to see each other's names. If someone replies to your email by clicking Reply All, the people listed in the BCC field will not receive that reply... How to send a message to multiple recipients
How to send a message to multiple recipients
Recipients can be specified in the To, Cc, and Blind fields.
To add multiple recipients, separate their names or addresses with commas. You can also click the To, Cc, or Blind field to add or change recipients.
If you need to send a letter to a large number of people, create a group. Note. The group email address can be added to any of the To, Cc, or Blind fields.
Changing your password from your computer
You can change your Google account password not only on your phone, but also on your computer. To do this, launch any browser and go to the main page of the Google search engine using the link.
Android without a Google account functions at best at a quarter of its capabilities. You can’t download any apps from the Play Store, you can’t enable contact synchronization, and you can’t use other services from the “good corporation.”
However, a “foreign” account on Android is even worse than not having one. And this is often what happens - you buy a second-hand smartphone or tablet - and everything is already set up and working. And the Play Market opens, and Gmail email, and everything else too.
However, if you have already managed to purchase a device on which a Gmail account is already set up, then first of all you need to get rid of it. Not from a smartphone or tablet, but from an account. You need to change your account to your own.
How to change the password in your Google account and Gmail on your computer and laptop? Option two
Let us repeat once again that the Gmail password
is the same password you use to sign into your
Google
.
Therefore, you can change the password for these services in Gmail itself ,
which will be the second method, which you personally may find most convenient. Otherwise, you can use the previous method.
So, let's follow the instructions:
- Login to your Gmail
How to change the password in your gmail account and mail on a computer, in Android
- In the upper right part of the site, click on the star icon, after which a menu will appear in which you will need to click on the settings item.
How to change the password in your gmail account and mail on a computer, in Android
- Then we will be transferred to a page where in the top menu we will need to click on “Accounts and Import”. Once in this section, the first line will immediately ask you to change your password.
How to change the password in your gmail account and mail on a computer, in Android
- After you click “ Change Password
”, you will be taken to the same page that we indicated in the previous instructions.
Here you will need to enter the password for your Google
.
How to change the password in your gmail account and mail on a computer, in Android
- Then, just like last time, enter the new password twice and completely change your password
How to change the password in your gmail account and mail on a computer, in Android
Restoring access to your account
Step 1:
The first thing you need to do is go to the gmail mail page.
When you log in, you will likely see the following information. If you can't remember your password, click on the "Need help?" link. To go directly to the password recovery page, you can use the direct link google.com/accounts/recovery/.
Step 2:
If you suddenly forget your login username, immediately click on the second option. To reset your password, click on the first option and in the line enter the email address for which you want to reset the password. Click continue.
Password recovery
Step 3:
At this step, Google will prompt you to remember any of your previous passwords (if you have ever changed it, of course). If you don’t remember or have never had to reset, click “Difficult to answer.”
Step 4:
If you are the owner of an Android phone and your account is connected as an account on the phone, you can send an alert to your Android smartphone. Google should automatically detect that you have such a phone and a connected account and offer to use this procedure. There will be a corresponding message about this “Confirm resetting the password on your Android phone...”. To send a message, click on “Send message”.
Step 5:
The corresponding instructions will appear on the monitor screen, and a message will be sent to your phone to confirm the password reset. If the message does not arrive, click on “Send another alert”. Confirm the reset on your phone by clicking on the “Yes” button. After this, you will be able to enter a new password on your computer.
Send an alert to your Android phone to recover your gmail password
Step 6:
To recover your password via SMS message (this is if you indicated your existing phone number during registration), at one of the recovery stages, click one of the “I can’t use the device” links on the confirmation screen via an Android phone or “Another way” on other screens .
Step 7:
Check the last digits of the phone number to which the password reset code should be sent and click “Continue”. Receive the code to your phone via SMS and enter it in the code field. After this you will be able to change your password.