The capabilities of standard firmware sometimes do not satisfy the user's requirements, so it becomes necessary to update the router software. The firmware of the router occurs both by updating the installed program and by changing to new software. The Rostelecom router is updated in several cases: in case of unstable operation, device errors or periodic loss of communication.
Reflashing a router is unsafe, especially for inexperienced users. An incorrectly selected version or a sudden power outage can damage the router.
Firmware update
It is possible to flash the modem automatically or using a computer. When flashing a router from Rostelecom, you should follow all steps sequentially.
Automatic
Some devices are equipped with an automatic software update system. It is important that you have an Internet connection. To automatically flash the device you must:
- Go to the Rostelecom modem configurator.
- On the page, find the lines “Basic version” and “Update”.
- If there are updates, the message “Available” will appear, click on it.
- A page with basic system data will appear in the window.
- Click "Update".
The installation will start automatically.
Flashing via computer
Firmware algorithm for Rostelecom router via computer:
- Download the required version, unpack the archive.
- Check the connection of the device to the network, disconnect the service provider cable from the WAN.
- Open the modem’s web interface by entering 192.168.1.1 in the address bar. or 192.168.0.1 for D-Link.
- Fill in the login admin or set the numbers 1234 (or leave the line blank).
- "System Settings".
- Find "Software Update".
- Click the “Browse” button and select the required file.
- Click "Update".
After this, the update will begin. Upon completion, the Rostelecom set-top box will reboot.
Important! When flashing the firmware, the device cannot be disconnected from the network.
Types of modems
All modems from can be divided into two categories:
- Cable modems : The vast majority of modems supplied by Rostelecom connect to the Internet directly via cable. But in the regions you can still find devices that operate using a telephone line. Regardless of the connection method, cable modems are distinguished by high speed of information transfer, favorable tariffs for the user and stable communication. But such devices can only be used at home or in the office.
- Mobile modems : standard “whistles”, as USB modems are popularly called. Such devices allow you to connect anywhere within the cellular network coverage area. Mobile modems are convenient to use on vacation or on a business trip, when establishing a permanent connection is impractical. But tariffs for data transmission via mobile modems are not very profitable for the user.
Each of these categories presents different device models, and they change regularly - as technology develops, the equipment is replaced by more modern and improved ones.
Firmware download links
Rostelecom has its own program for different types of routers. You can find out the model at the bottom or side of the device sticker. It is recommended to download the firmware from the following links:
- For D-Link, the firmware is obtained from the website ftp://ftp.dlink.ru/.
- For ASUS, go to the official website in the “Support” section https://www.asus.com/ru/support/, write the device name in the search bar, go to the “Drivers and Utilities” section, download the appropriate program and update the router.
- TP-Link: you need to go to the website https://www.tp-link.com/ru/, write the name of the modem and in the “Support” item find the necessary flashing and install it.
- Zyxel: on the website https://www.zyxel.com/ru/ru/ you select a device, in the “Files and Downloads” section in the “Firmware” block the document is downloaded.
- Sagemcom: in the list of devices on the website https://sagemcom.ru/catalog_15.htm, select a model and download its program.
- Linksys: similarly, on the website https://www.linksys.com/ua/support/ you need to select a modem, click on the Download Software link and download the software.
- ZTE: https://zte.ru/enterprise/products/routers/.
How to reconfigure a Rostelecom router to another provider
When changing your provider from Rostelecom to another, it is important to reconfigure the modem. Algorithm for connecting to the provider:
- Reset old settings.
- Login to “Device Management”.
- Entering new parameters.
To reset the settings, the model has a Reset button. It must be pressed and held for 10 seconds, after which the Rostelecom modem must be connected using wires. To establish a new connection, you must enter your login and password, connection type and basic information.
To configure the router to work with a new provider, you need to go to “System Data”, where you enter your login and password. You may need firmware for the device. Internet settings and Wi-Fi connection data (username and password) are also required to change.
Reset previous settings
Resetting the parameters that were entered into the router system is very simple. On any model there is a special “reset” button for this. To prevent the user from accidentally pressing it and resetting the system to factory default, the developers hid the button in a special recess. You can press it with any thin stick, for example, an ordinary paper clip. To reset, you must press and hold for 10 seconds.
The fact that the Rostelecom modem is ready to establish a new connection, and the system has been updated, will be notified by a sound signal or the simultaneous lighting of all lights.
After which you can connect the Rostelecom device to another network using wires.
In order to start installing a new Internet, the user needs to find out the details of the third-party provider:
- login information (login, password);
- connection type (PPPoE, L2TP, dynamic);
- connection basics: whether binding is carried out via MAC, IP address (if necessary).
About the backup
To restore settings, there is a chance to create a backup copy. Backup is one of the most reliable ways to save entered data. The algorithm is similar for different models, only the names of the buttons may differ. The format of the downloaded files also differs: for TP-Link the document will be in binary BIN code, for other models it will be in text JSON.
Saving the settings of the Rostelecom router is done as follows:
- In the “Control Panel”, select the “Backup and Restore” item.
- Click the “Backup” button, then select a file and download the archive with the configuration file.
- Then click “Save”.
The recorded data will remain in the computer's memory, and you can always return to it. To restore the settings, click the “Restore” button and specify the path to the address with the settings file. After this, you need to reboot the Rostelecom router.
Conclusion
Updating the firmware of a router from Rostelecom is an action that requires attention and accuracy. An incorrectly selected version of the router or power surges during installation can damage the device and cause it to fail. By following each step of the router flashing algorithm, you can configure the device yourself without calling a technician.
«Rostelecom
» is a leader in the field of providing access to the Internet via protocols: ADSL, PPPoE, GPON and others.
Setting up the router
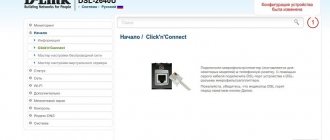
D-Link Dir-320 for
Rostelecom
: device preparation,
firmware
, setting provider connection parameters in auto-i.
Setting up the router
"
Rostelecom
" TP-Link: general information, connection, automatic and manual methods.
Organizing a secure connection, connecting IPTV via a router
. The most common mistakes.
At the moment, Rostelecom is one of the largest Internet service providers in Russia. It provides its users with branded network equipment of various models. The current ADSL router is Sagemcom [email protected] 1744 v4. It is its configuration that will be discussed further, and owners of other versions or models need to find the same items in their web interface and set them as shown below.
Preparatory work
Regardless of the brand of the router, its installation follows the same rules - it is important to avoid the presence of electrical appliances working nearby, and also take into account that walls and partitions between rooms can cause an insufficiently high-quality signal from a wireless point.
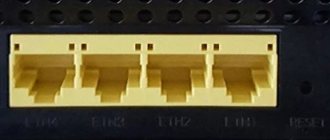
Look at the back of the device. All available connectors are displayed on it, with the exception of USB 3.0, which is located on the side. The connection to the operator’s network occurs via the WAN port, and local equipment is connected via Ethernet 1-4. The reset and power buttons are also located here.
Check the IP and DNS protocols in your operating system before configuring your network equipment. The markers should be opposite the “Receive automatically” items. Read about how to check and change these parameters in our other material at the link below.
Specifications
Smart is a completely standard device, the price of which varies from 2000 to 3000 rubles. To connect a Beeline router to another provider, you should study the device parameters, and then perform the firmware. Characteristics:
| Parameter | Meaning |
| Name | (SSID) default |
| Modes | DHCP client, Static IP, L2TP |
| WiFi | 802.11b/g/n 300Mbps, 2.4GHz and 5GHz Dual Band, Guest Wi-Fi |
| WAN/LAN | Fast Ethernet LAN and WAN ports |
| Connection speed | 100 Mbit/s |
| USB port | 1 USB 2.0 |
| IPTV support | Dedicated LAN port and IGMP proxy |
| Range | 2.4 GHz - 2G; 5 GHz - 5G |
| Status | Current version - 2.0.22 |
| Address bar | 192.168.1.1 |
Setting up a Rostelecom router
Now we move directly to the software part of Sagemcom [email protected] 1744 v4. Let us repeat that in other versions or models this procedure is practically no different; it is only important to understand the features of the web interface. Let's talk about how to enter the settings:
- In any convenient web browser, left-click on the address bar and type 192.168.1.1 there, then go to this address.
A form will be displayed with two lines where you should enter admin - this is the default login and password.
Quick setup
The developers offer a quick setup function that allows you to set basic WAN and wireless network parameters. To enter data about your Internet connection, you will need an agreement with your provider, which contains all the necessary information. The Wizard is opened through the “Setup Wizard” tab, there select the section with the same name and click on “Setup Wizard”.
Lines will appear in front of you, as well as instructions for filling them out. Follow them, then save the changes and the Internet should work correctly.
In the same tab there is a tool “Connect to the Internet”. Here, the PPPoE1 interface is selected by default, so all you have to do is enter the username and password provided by your service provider, after which you can access the Internet when connected via a LAN cable.
However, such superficial settings are not suitable for all users, since they do not provide the opportunity to independently configure the necessary parameters. In this case, everything must be done manually, which will be discussed further.
Manual setting
Let's start the debugging procedure by adjusting the WAN. The whole process will not take much time, and it looks like this:
- Go to the “Network” tab and select the “WAN” section.
Immediately go down to the bottom of the menu and search the list of WAN interfaces. All present elements should be marked with a marker and deleted so that further changes do not cause any problems.
Next, go back up and set the dot next to “Select default route” to “Specified”. Set the interface type and check the “Enable NAPT” and “Enable DNS” checkboxes. Below you will need to enter the username and password for the PPPoE protocol. As already mentioned in the section on quick setup, all information for connection is in the documentation.
Scroll down a little to find other rules, most of them are also established in accordance with the contract. When finished, click on “Connect” to save the current configuration.
Sagemcom [email protected] 1744 v4 allows you to use a 3G modem, which is edited in a separate section of the “WAN” category. Here the user is only required to set the “3G WAN” state, fill in the lines with account information and connection type, which is reported when purchasing the service.
We will gradually move on to the next section “LAN” in the “Network” tab. Here you can edit each available interface, specify its IP address and network mask. In addition, MAC address cloning can occur if this has been discussed with the provider. The average user very rarely needs to change the IP address of one of the Ethernet devices.
I would like to touch on one more section, namely “DHCP”. In the window that opens, you will immediately be provided with recommendations for activating this mode. Check out the three most common situations when you should enable DHCP, and then set the configuration individually for yourself if necessary.
To set up a wireless network, we will provide separate instructions, since there are quite a large number of parameters here and you need to talk about each of them in as much detail as possible so that you do not have difficulties with adjustments:
- First, take a look at the “Basic Settings”, all the most basic things are set here. Make sure there is no checkmark next to “Disable Wi-Fi interface”, and also select one of the operating modes, for example “AP”, which allows you to create up to four access points at a time, if necessary, which we will talk about a little later. In the “SSID” line, enter any convenient name, with it the network will be displayed in the list when searching for connections. Leave other items as default and click “Apply”.
In the “Security” section, mark with a dot the type of SSID for which rules are being created, usually this is “Primary”. It is recommended to set the encryption mode to “WPA2 Mixed”, it is the most reliable. Change the public key to a more complex one. Only after entering it when connecting to the point will authentication be successful.
Now let's get back to additional SSIDs. They are edited in a separate category and a total of four different points are available. Check the box next to the ones you want to activate, and you can also configure their names, protection type, upload and reception speed.
Go to "Access Control List". Here you create rules for restricting connections to your wireless networks by entering the MAC addresses of devices. First, select the mode - “Deny specified” or “Allow specified”, and then type the required addresses in the line. Below you will see a list of already added clients.
The WPS function makes connecting to an access point easier. You work with it in a separate menu, where you can enable or disable it, as well as track information about the key. For more detailed information about WPS, see our other article at the link below.
Let's dwell on the additional parameters, and then you can safely complete the basic configuration of the Sagemcom [email protected] 1744 v4 router. Let's consider the most important and useful points:
- In the "Advanced" tab there are two sections with static routes. If you specify a destination here, for example, a site address or IP, then access to it will be provided directly, bypassing the tunnel present in some networks. An ordinary user may never need this function, but if there are interruptions while using a VPN, it is recommended to add one route that allows you to remove the interruptions.
In addition, we recommend paying attention to the “Virtual Server” subsection. Port forwarding occurs through this window. Read about how to do this on the router in question under Rostelecom in our other material below.
Rostelecom provides a dynamic DNS service for a fee. It is used mainly when working with your own servers or FTP. After connecting a dynamic address, you need to enter the information specified by the provider in the appropriate lines, then everything will work correctly.
Security Settings
I would like to pay special attention to the safety rules. They allow you to protect yourself as much as possible from intrusions from unwanted external connections, and also provide the ability to block and limit certain items, which we will talk about later:
- Let's start with MAC address filtering. This is required to restrict the transmission of certain data packets within your system. To begin, go to the “Firewall” tab and select the “MAC Filtering” section there. Here you can set policies by setting the marker to the appropriate value, as well as add addresses and apply actions to them.
Almost the same actions are performed with IP addresses and ports. The corresponding categories also indicate the policy, the active WAN interface and the IP itself.
The URL filter will allow you to block access to links that have a keyword you specify in the title. First activate the blocking, then create a list of keywords and apply the changes, after which they will take effect.
The last thing I would like to note in the “Firewall” tab is “Parental Controls”. By activating this function, you can manage the time your children spend on the Internet. It is enough to select the days of the week, hours and add the addresses of the devices for which the current policy will be applied.
This completes the procedure for adjusting the safety rules. All that remains is to configure a few items and the entire process of working with the router will be completed.
Completing setup
In the “Maintenance” tab, it is recommended to change the password for the administrator account. This must be done to prevent third-party connections; the devices will not be able to log into the web interface and change the values on their own. After completing the changes, do not forget to click on the “Apply” button.
We advise you to set the correct date and time in the “Time” section. This will ensure that the router works correctly with the parental control function and ensures that network information is collected correctly.
After completing the configuration, reboot the router for the changes to take effect. This is done by clicking on the corresponding button in the “Maintenance” menu.
Today we studied in detail the issue of setting up one of the current branded models of Rostelecom routers. We hope our instructions were useful and you easily figured out the entire procedure for editing the necessary parameters on your own.
Thank the author and share the article on social networks.
Router is translated from English as router. A device with its own operating system is used to connect users to the Internet.
Firmware updating of a Rostelecom router, like models from other manufacturers, is performed when it is necessary to improve its capabilities and performance. The new operating system is installed in the router's persistent storage device.
Internet
There are no particular problems when configuring SAGEMCOM 2804 v7 from Rostelecom. All manipulations are performed through the interface. First, we recommend that you register the route “192.168.1.1” and enter authorization data. For a new product, enter the keyword admin in both fields, and if no changes occur, then click reset.
So, the setup begins with creating a PVC connection. Find the item “ATM PVC Interface”. Having done this, click on “Add” and set the following parameters:
- VPI/VCI - 0/33;
- Encapsulation mode - LLC;
- DSL Link type - EoA.
Then add a connection through the “WAN service” (click on “Add” in this window). It is recommended to set the physical interface to the atm0 position.
Interestingly, the network here can be selected as “Bridge” or “Router”. The system will prompt you to make this choice during setup.
When using a PPPoE connection, enter the following data in the fields provided:
- login/pass — enter the data provided in the agreement;
- To avoid repeating PPP authentication in case of an error, check the box next to this item;
- service name - come up with a name for your network;
- auto authentication.
Also enable Firewall and NAT (these fields may be missing in some firmwares). There is no need to touch other fields, click “Apply”.
Now re-enter the login/pass of the router issued by , and then reboot the device to get started.
Do you need a backup?
Updating programs in Qtech Rostelecom and other brands of routers does not require resetting the settings, and you can do without a backup copy. But there are different situations, and it is better to create and preserve it. To do this you need:
- go to the “Settings” of the router;
- open the “System Tools” folder, select the “Backup and Restore” section;
- select the “Backup” button.
The backup copy is saved in the "Downloads" folder with a bin extension. It is important to have a backup copy of your ADSL modem settings. It may be needed to configure the device after flashing.
Firmware update
Updating the router firmware is an update to the operating system. It is similar to a computer program, but only works with a wired or wireless (Wi-Fi) network. Popular firmware: Linus, Windows 10 ZyXEL and others. There are alternative firmwares.
Router manufacturers, increasing the stability of their devices, release free operating system updates. You can download the updated firmware file from the manufacturer's website. For example, the updated firmware of the Sagemcom 1744 v4 router replaced the earlier versions of Sagemcom 1744 v2 and v2 2. All 3 versions are configured almost identically. The process of installing the firmware is a little complicated, but for beginners there is a special guide called the “Quick Setup Wizard”.
Automatic router firmware update
For routers used by Rostelecom, there is a common set of parameters for all. These include:
- login and password “admin”, in some models this may be “1234” or an empty string;
- connection type PPPoE;
- login/password pair from Rostelecom;
- VPI and VCI.
Some devices have a built-in automatic firmware update system. You need to go to the web configurator and find the lines “Basic version” and “Updates”. If there are updates, click the “Available” sub-item. On the page that opens with a list of components of the base system, click the “Update” button. The router flashing started automatically.
The device's operating system automatically updates and reboots. At the end of the process, the settings are checked and the provider’s cable is connected to the WAN connector.
How to reflash a modem or router via a computer
Updated firmware for Rostelecom routers is downloaded from manufacturers’ websites using the link posted there. The IP address 192.168.1.2 or 192.168.0.2 is registered on the computer. In the web interface you need to find the “Advanced settings” section. It may be called "System" or "Administration".
Select the “Firmware Update” tab from the menu. In the list of buttons that appears, click “Browse”, select the “Firmware” file and click the “Submit” button. The device flashing starts. When the process is complete, the browser will display the interface again. For GPON ONT terminals there is no need to change the firmware when switching to EPON technology
How to reconfigure a Rostelecom router to another provider
You can reflash the Rostelecom router for another provider yourself. The process consists of the following stages:
- resetting the settings of the previous provider;
- finding out information for connecting to the Internet from a new provider;
- Configuring the device using new parameters.
To reset the contents of a file that is not supported by the new provider, you need to go to the router and click the Reset or “Reset” button. It can be found on the back panel. You need to press for at least 15 seconds. We reset the settings and the router will automatically reboot.
The new provider receives the following data:
- connection type: for dynamic IP, information about the parameters is not needed; for statistical IP, PPPoE, PPTP or L2TP, you need to know the IP itself, server address, login, password (this data is in the Internet connection agreement);
- presence of binding by MAC address;
- MTU value.
Setting up the router begins by connecting the cable from the new provider. It is inserted into the WAN connector. The Administration page opens. You need to add data from the contract with the new provider to the appropriate boxes. Next, the Internet network is configured in the WAN tab. Set wireless connection parameters. To do this, set the WiFi password and the value of the standard user.
[edit] Method 1: Using the router's web interface
Reset your router settings to default values. This most likely won't be necessary, but if the router's memory or NVRAM is almost full, updating the firmware may damage it. Thus, it is recommended that you at least get to know the specific device in detail.
Perform a reset in the web interface (Administration → Factory Defaults in DD-WRT) or use an alternative method: Reset 30/30/30
Please note: Some devices cannot use 30/30/30 reset, including all ARM devices.
Reset Button: When the router is operating normally, hold down the Reset button until the lights start flashing (or up to 30 seconds). Be careful when using this method! Read the instructions for your current firmware to avoid problems.
Log in to the router's web interface. Javascript may be required for the web interface to work properly
Try a different browser if you encounter problems.
You will be prompted to enter your username and password. If your router already has a version of DD-WRT since February 28, 2006, the default username is root. In previous versions, the default username is empty. For both stock and DD-WRT firmware Linksys routers, the default username can be left blank or set to any value, and the default password is admin. For other routers, search the Internet for defaults.
Download the firmware. NOTE. When flashing from factory firmware, several flashings in a row may be required. See for more information.
WARNING: Do not interrupt the process while the router is flashing and rebooting. Do not turn off your computer, close your browser, or turn off your router during this process!
This section of the manual is written for the DD-WRT web interface. The factory firmware interface will be different. See section. Go to the Administration → Firmware Upgrade tab.
Optional: Select the Reset to Defaults option to reset the settings to factory defaults after flashing (note: this may cause problems when flashing).
Click the “Browse” button and select the downloaded DD-WRT firmware binary .bin file whose checksum has been verified.
Click the “Upgrade” button and wait for the redirection page to appear confirming the successful download.
Wait at least 5 minutes before clicking the “Continue” button. This depends on the router hardware.
If the firmware is successfully installed, you can now access the DD-WRT web interface at IP address 192.168.1.1.
Reset your router settings to default settings again. Do this only after you have verified that the router is working after the firmware update.
This is required when flashing from factory firmware! See section above.
In the case of upgrading the DD-WRT version, this is only necessary if there are large jumps in the build version, a kernel version change (for example, from 2.4 to 2.6 or from 2.6 to 3.10), or if there are problems. For the latter, reset, retest, and then search the forum before making a new post.
Possible errors when downloading firmware. If the DD-WRT web interface is not accessible after 10 minutes, try clearing the browser cache, updating the IP address (“ipconfig -renew” in the Windows command prompt window), performing another reset, or turning off the power.
Check the connection to the router with a Ping command: a TTL=64 response indicates normal operation, and a TTL=100 usually indicates a TFTP server waiting for the firmware to be downloaded. The TFTP server is typically only available for the first couple of seconds after power on. See Tftp flash article.
The firmware upload process may fail with an “Upload Failed” message if the wrong file type, kernel, or size of the DD-WRT firmware binary is used (or may simply “become bricked”). For example, this can happen if you use the wrt54g.bin file when you should have selected the generic version. Also, some routers may require the Mini build to be flashed before the full version. Make sure you have the correct version as described in the first section.
See the article Recover from a Bad Flash or try a different browser to download the firmware.
If you are unable to log in using the default username and password, please reset again.