With the widespread use of routers, the need to distribute the Internet via wifi from a computer with the Windows 7, 8 or 10 operating system to a phone and other devices has disappeared. However, sometimes the access point function on a PC or laptop may still be needed. For example, when you are outside the city, you access the Internet via a modem from a cellular operator, and you urgently need to connect some additional gadget. Let's try to do without a connecting link in the form of a router and learn how to distribute a wifi signal with the Internet directly from a computer to another PC, laptop or smartphone.
What is needed to distribute wifi from a computer without a router?
First, let's look at the scheme by which we will distribute the Internet via Wi-Fi on the Windows operating system. If previously a router was used to access the Internet, now one of the computers will take over its function - which means it must be constantly turned on. A computer-to-computer wireless network will look like this:
- A constantly switched on computer with a wireless module connected via cable to the Internet, which emits a signal.
- Second computer, laptop or smartphone
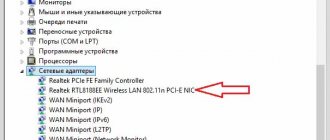
WiFi in modern laptops or netbooks (small laptops) is 99% already available by default. But with stationary PCs there can be difficulties. And if you did not take care of its availability at the purchase stage, you will have to purchase an additional device called an “adapter”. Also note that the main PC that will broadcast the signal must be connected to the provider via cable - that is, in the most common standard way. We do not touch its settings.
Windows 7 or 10 Command Prompt
So, let's try to set up Wi-Fi Internet distribution using the Windows command line. By the way, this option is also suitable for Windows 7 or Windows 8. But before you start setting up the access point, you need to make sure that the wireless module is connected and working properly.
Next, click on the “Start” icon in the lower left corner of Windows with the right mouse button and select “Command Prompt (Administrator)”
enter the command
netsh wlan show drivers
and look among all the text that appears as a result of its execution for the line “Support for a hosted network” - if the computer is ready to distribute wifi through the built-in Windows tools, then the value “Yes” should appear opposite it.
To enable this feature enter the following command
netsh wlan set hostednetwork mode=allow ssid=»wifika.ru» key=»111111″ keyusage=persistent
If you carefully read the text of this command, you have already guessed that the “ssid” value is the name of the future wireless network, I called it “WiFika.RU”, but you can set your own. And we also replace the value of the “key” tag - this is the password for connection.
As a result, we will receive a message about a successful network configuration. Now to launch the access point from your computer, enter the following line:
netsh wlan start hostednetwork
A message appears saying "The hosted network is running"
You can verify this by going to “Network and Sharing Center - Change adapter settings.” A new connection will appear here.
But that is not all. Now you need to give permission for this access point to use the Internet connection through which the computer is connected to the Internet. To do this, right-click on our main connection and select “Properties”
Switch to the “Access” tab and activate the “Allow other network users to use this computer’s Internet connection” checkbox.
Then we stop the Internet distribution with the command
netsh wlan stop hostednetwork
and run again - the one that was given above.
Microsoft Virtual WiFi Router
Making a Windows 7 computer an access point and distributing Wi-Fi from it to other devices is also not difficult, since this mode is already built into the system shell and is called Microsoft Virtual WiFi. This technology turns your computer into a virtual access point and is capable of supporting up to 100 connected clients simultaneously.
So, let's start setting up. To begin, just as in the previous case, you need to activate the wireless network connection. After that, go to the command panel (Start - All Programs - Accessories - Command Prompt) and in administrator mode enter the request to activate the virtual adapter mode:
netsh wlan set hostednetwork mode=allow ssid=”MS Virtual WiFi” key=”123456″ keyUsage=persistent netsh wlan start hostednetwork
Here “MS Virtual WiFi” is the name or SSID of your network, and “123456” is the password for connecting to it. After that, press “Enter” and wait until the system configures it, after which a new virtual device will be detected in the device manager - “Microsoft Virtual WiFi miniport adapter” or “Virtual WiFi miniport adapter”.
At the same time, it must be taken into account that
The driver of the wireless adapter installed on the computer must support Virtual WiFi
Otherwise, the computer will not work as an access point - you will need to update the drivers.
Now let’s go to “Control Panel - Network and Sharing Center - Change adapter settings” and see the newly created wireless connection:
Now your Windows 7 computer has become a real wifi access point with the ability to access the Internet. The network is visible in the list of wireless networks and you can easily connect to it by double-clicking and entering the password we set:
Other commands for managing virtual wifi:
- netsh wlan show settings – show network properties and its status
- netsh wlan show hostednetwork settings=security – display hosted network security settings, including password
- netsh wlan start hostednetwork - start the network
- netsh wlan stop hostednetwork - stop the network
A method for automating this process from Evgeny Bogdanov:
- we do everything as written via the command line,
- create a .txt file and write “netsh wlan start hostednetwork” (without quotes)
- change the file format from .txt to .bat (right mouse button/rename)
- drag this file to autorun, and wireless Internet distribution starts automatically when the computer starts
Possible problems and solutions
During the connection process, various problems may arise. They are usually resolved quite simply.
| Problem | Solution |
| A notification appears stating that the virtual router or Wi-Fi router could not be started. | You need to update the drivers for your computer's Wi-Fi adapter. In this case, you need to take them from the official website of the device manufacturer. |
| A message appears that this network type is not supported. | The solution is the same as in the previous case. |
| The smartphone connects to a new access point, but there is no Internet access. | You need to make sure that the connection being distributed is the one through which the computer receives the Internet. In addition, access may be blocked by an antivirus or firewall. |
You can distribute the Internet from a laptop or computer using any of the methods described, here everyone chooses the most appropriate option. In order not to connect or disconnect traffic distribution every time, it is recommended to create files and add them to startup.
Rate this article
Author
Tatiana
I follow news on the mobile services market. Always up to date with the latest events
Connectify program
The practicality of distributing the Internet from a computer using Virtual Wi-Fi is obvious, but it is inconvenient to use the Windows command line every time you turn on the laptop. In order to facilitate the process, an application was developed - Connectify. It has a free limited version, and there is a full version, which today costs from a thousand rubles. After installation, the utility starts working simultaneously with the launch of Windows 7, and the settings are the same minimal - you just need to set the network name and password.
But before you start using it, you need to check several important settings that may interfere with its operation. In particular, I am often asked the question: “Why do I connect to a Windows hotspot but can’t access the Internet?”
- Make sure your network card is supported by this program. You can find out on this page of the official website of the developer. If you have a card, but the Internet still does not work on another computer, then you may need to update its driver that supports Virtual WiFi technology. You will find the “firewood” on the official website of the developer, and you can find out the version and manufacturer of your network card using the Speccy program, which I wrote about.
- Disable all antiviruses and third-party firewalls, and set the built-in Windows firewall to Auto mode. To do this, go to Win 7: Control Panel > System and Security > Administrative Tools > Services
- Run the program as administrator. To do this, go to “Start”, right-click on the program and select “Run as administrator” from the menu.
- The new wireless connection created by the program must allow access to the Internet connection of this computer. We have already entered this section above: Start > Control Panel > Network and Internet > Network and Sharing Center > Changing adapter settings > Right-click on the new connection created > Properties > “Access” tab. Check the boxes “Allow other network users to use this computer’s Internet connection” and “Allow other network users to manage shared access to the Internet connection” and select this connection created by the program from the drop-down list.
There are two more similar programs that you can use for free if it doesn’t work out with Connectify - Virtual Router Hotspot Manager, which I use myself, and mHotspot. The principle of operation is the same: open the program, enter the SSID and key and start it. It will save the settings and will be launched automatically with the operating system.
In the drop-down list in both programs, you can select which connection you want to share - cable (Local network), Wireless (if the computer is connected via wifi), usb modem or some other.
Thus, using Virtual WiFi technology and using the described utilities, you can easily distribute wifi Internet to any device with any OS.
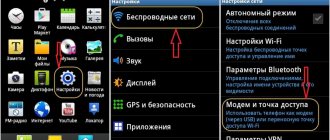
Via mobile hotspot
Relatively new way. Appeared on Windows 10 and is only suitable for it. Fast, convenient, beautiful. Unfortunately, it won’t work to distribute WiFi from a laptop on Windows 7. Let's move on:
Start – Settings (gear) – Network and Internet – Mobile hotspot
All you need to do is turn on the mobile hotspot. The rest is already there, but if you wish, you can change the name and password here.
How to distribute the Internet from one Windows computer to another laptop directly without a WiFi router?
Now let's look at another way to distribute the Internet via wifi, which only applies to those cases when you need to connect only two computers on Windows 7 - it is not suitable for smartphones and other devices.
Go to “Control Panel > Network Control Center > Manage Wireless Networks.” Click on the links “Add > Create a computer-to-computer network.”
Click “Next”, set the SSID, encryption type and password. I called it HomeWiFi. And don’t forget to check the box to save network settings.
Click “Next” again and wait until the network is created and its parameters are displayed on the screen. We look at the connections icon in the form of a graph in the lower right corner, where the clock is located. We left-click on it and see the new connection.
All that remains is to connect to it, enter the password and in the pop-up window select that this connection is the “Home Network”.
Now we go to the second computer and connect to our new HomeWiFi network in the same way.
After this, we return to the “Network and Sharing Center” on 1 computer, which distributes the Internet via wifi. We see that our connection between two computers is displayed there. Now in the left menu, click on the link “Change advanced sharing settings”.
And check the boxes everywhere to enable and allow unhindered use of files and folders. We save, then return to the previous page and select “Change adapter settings” from the menu. Where we see our Internet distribution HomeWiFi. Right-click on it and select “Properties”.
In the new window, select the “Access” tab and uncheck all the checkboxes here, if they are checked.
Close and do the same with all the connections in the list, except for “High-speed Internet connection” or it may be called something else depending on the type - in any case, you need to choose exactly the one that works through the cable that is inserted into the computer and gives access to the Internet on all computers. Mine is called WAN Miniport (PPOE).
What is your opinion: is WiFi harmful?
Yes
22.94%
No
77.06%
Voted: 33410
In it, we again go to “Access” and check the box “Allow other network users to use this computer’s Internet connection” and select “Wireless network connection” as the source. And we remove all the other checkboxes.
After all this, you need to disconnect from the Internet connection and connect to it again on the computer distributing it via wifi and also disconnect and connect again to the wireless connection on the second PC, after which the Internet should work.
Similarly, you can distribute the Internet via wifi from a computer that connects to the World Wide Web not directly with a cable, but through one of the router’s LAN ports. In this case, we will need to share the local network connection, instead of a high-speed connection or PPOE, as I just did.
Starting Wi-Fi signal distribution on Macbook
It is believed that Apple products do not support devices from other manufacturers, and to communicate with the MacBook you will need another device of this brand. However, recently this company has been taking steps towards equipping its gadgets with functions that allow them to be “friends” with mobile devices from other manufacturers. Wi-Fi distribution is included in this list.
You can use the distribution function when your Macbook is connected to the network:
- via Wi-Fi;
- via Ethernet cable;
- via USB modem.
Internet distribution from a USB modem
Important! The presence of only one Wi-Fi module in a Macbook, when a receiving device is connected through it, makes it possible to transmit a signal from it to other Apple devices only via Bluetooth.
To use a MacBook Pro as an access point, open “Sharing” in system settings on the connected computer and select “Internet Sharing.” There you select the connection used for incoming traffic and mark Wi-Fi for outgoing traffic. Wi-Fi settings include the network name, encryption, and password. Next, on the connected device you need to search for this connection and, by entering the password, join it.
Internet distribution via WiFi with Windows XP
To distribute the Internet via wifi from a computer with Windows XP installed on it, you first need to do all the same preparatory steps as on the top ten. After all the devices are installed and ready to work, first of all, turn on the wifi module - if you are using an external device, then launch the software that came with it on the disk and was installed by you.
So, go to “Start > Settings > Network Connections” - for convenience, we will perform all actions in parallel on both computers. You will see icons for wired and wireless connections. Right-click on “Wireless Network Connection” and click “Enable”. We repeat the same thing on the second computer.
After that, in the same drop-down list (which appears when you right-click on the icon), select the last item - “Properties”. And we make settings for our future local network. To do this, go to the item “Internet Protocol (TCP/IP)”
On the host computer connected to the Internet and distributing it via wifi, set the settings:
- IP address: 192.168.0.1
- Mask: 255.255.255.0
On the second computer these are:
- IP address: 192.168.0.5
- Mask: 255.255.255.0
- Default Gateway: 192.168.0.1
- DNS server: 192.168.0.1
The main gateway is the IP of the first computer, which has access to the Internet via cable and through which we will receive it via wifi to the second computer.
OK! Now you need to set up a wireless wifi network computer computer. Namely, allow Internet access to a second device. We return to the first computer, in the “Network connection” section we find a direct connection to the Internet via cable - usually it is called “Local Area Connection”.
Right-click on it, go to “Properties” and go to the “Advanced” tab. Here we check the box “Allow other network users” and click OK.
After that, go to the “Wireless Networks” tab and click “Add” to create a new wifi network.
After that, go to the “Advanced” tab, click on the “Options” button and disable the firewall so that it does not block the distribution of the Internet from the main computer to another computer.
Now we return to the first tab “General”. Take a close look at the image below and copy all the settings. Please note that the “Key is provided automatically” checkbox is unchecked and vice versa is set to “This is a direct computer-to-computer connection.” The key is a password for connecting to wifi internet, which you can come up with yourself and remember. It will need to be entered on the second computer.
- Network name (SSID) – the name of our network.
- Authentication – choose joint
- Data encryption - WEP
- The key is provided automatically - uncheck this box, otherwise you will not be able to set your key.
- Network key – you must enter a fairly long key consisting of letters and numbers.
- Confirmation - repeat the key.
- Check the box “This is a direct computer-to-computer connection, access points are not used.”
After that, go to the next tab of this window and check the box “connect if the network is within range” - this will ensure automatic connection to our signal.
That's it, the network has been created, and now a second icon in the form of two computers will be displayed in the lower right corner of the Windows panel (the first was your connection to the provider).
This means that the first computer has connected and is ready to connect to the second. Go to computer number two, double-click on the icon with crossed out computers
or go to “Start > Settings > Network Connections”, right-click on “Wireless Connections” and select “Properties”
Go to the “Wireless Networks” tab and click on the button of the same name
A list of networks available for connection will appear. If there are several of them, then we find ours, connect to it by entering the previously specified password.
If everything went well, a corresponding indicator will appear in the lower Windows taskbar, and the client computer will be able to use the Internet connection of the first computer.
Now, after we have figured out how to distribute the Internet from a computer, you can follow all the same steps on an unlimited number of client machines and directly connect to it from any device when the basic first PC is turned on. At the same time, the main one does not have to be a stationary desktop PC - distributing the Internet from a computer is also not difficult and there is no difference in this. By the way, I advise you to follow new articles, as very soon I will tell you a lot of interesting things.