Hello! They asked me a slightly strange question here - how to get into the personal account of the MTS router? A little unusual designation for a web interface, but oh well - if you have a question, there will be an answer.
Why might this be needed at all? For example, you want to configure the router yourself, or change the password for the Wi-Fi network. In such situations, you need to access the settings.
If you came to this page by searching for “MTS personal account”, type login.mts.ru in the search bar. A similar service is also available in the “My MTS” mobile application (search in Play Market and App Store).
Where can I find my MTS 4G personal account?
To start getting acquainted with the functionality of your personal account (PA), you must first log into it. There are several options for this:
- if you are currently using an Internet other than MTS, then you will have to go to your personal account page through the company’s official website, and then log in using the SIM card number and the password sent to your phone;
- in the case when you use the Internet from this operator, the connection to your personal account will begin automatically;
- There is also a mobile application that allows you to track all your connection statistics, change tariff plans, and so on.
Before gaining access to your personal account, you need to purchase unlimited Internet on an MTS 4G USB modem. On our information portal you can find an article with all the necessary information about tariffs for the MTS router.
Let's look at ways to connect to a personal account.
Instructions for logging into your personal account for the MTS 4G router
To get into the LC, you do not need registration, as it might seem at first glance. First, connect a modem or router with a SIM card. Before this, the MTS 4G SIM card must be activated. After this, follow these steps:
- open a browser on your PC or mobile device;
- enter the address online.mts.ru into the search bar;
- you will be transferred to LC. Next you need to go to settings;
- in the settings you need to enter and confirm the password that you will use to visit this page in the future;
- After these steps, save the changes.
Now consider the option of installing a mobile application:
- to do this, go to the Play Market or App Store;
- then enter the query mts in the search;
- go to the page with the desired program and click the “Install” button.
Here you can change your tariff plan, track remaining traffic and much more. Please read the proposed conditions and prices carefully, they may vary depending on the region. A very convenient way to manage your Internet, which requires minimal effort on the part of the user.
Mobile 4G MTS Wi-Fi router: brief description, appearance
The user can buy this device on the official MTS website. This router is capable of working exclusively with a SIM card from MTS. It does not support other telecom operators because it does not have the appropriate firmware. Perhaps this problem will be fixed in the future.
Appearance of Wi-Fi router MTS Connect 4G
Important! It is not recommended to reflash the gadget yourself to avoid adverse consequences.
What is included
Router MTS Wi-Fi 4G is supplied in a box with the operator’s logo, inside which there are:
- router;
- SIM card. As a rule, the SIM card is activated directly in the store when purchasing the device;
- power unit;
- USB cable with which the device is connected to a personal or laptop computer;
- instructions for use. Information on connecting the device is also written here.
Note! In some cases, an advertising booklet with a list of MTS operator services is included with the router.
Appearance
This router is a black oval device. The body of the device is made of ordinary plastic, on which marks, scratches and fingerprints are clearly visible. Therefore, you should be careful when operating the MTS 4G router.
Router has several elements on the outside of the case:
- start button. This element has a built-in indicator showing the current battery charge level. This function allows you to control the battery charge;
- Micro-USB port. A wire from the power supply is inserted into this connector, with which it is also possible to connect the router to a PC;
- Wi-Fi network indicator (WPS);
- a key responsible for restarting the device;
- slot for installing a SIM card.
Connector for installing a SIM card on routere MTS
D-Link
A Wi-Fi router from MTS is a device that provides Internet access to several computers, laptops, smartphones, tablets, printers, etc. A good router provides a signal in rooms up to 50 square meters. m.
One of the routers that has earned the trust of MTS home Internet subscribers is D-Link DIR-615. The provider gives you the opportunity to buy the equipment outright, or lease it with the option of further purchase.
Now I’ll describe the entrance to your personal account (but it would be more correct to say the web interface):
- In the address bar of any browser, type the IP address of the device – 192.168.0.1;
- A window will open for authorization in the admin panel, where you need to fill in the “Username” and “Password” fields - by default this is admin/admin;
- Click “Login”.
I would like to note that different firmware may have a different web interface.
If you want to perform the initial setup of Internet access, find the contract - you may need data from there.
Technical support
FAQ
How to connect to the Internet? What to do if the Internet stops working? For those questions, you can call the toll-free number 8-800-250-08-90 Home Internet service Home Internet for those who value reliability! The Internet is provided using Ethernet technology - a reliable and high-speed Internet access technology. Ethernet provides constant Internet access via a separate cable. A network based on a fiber optic communication line provides the most stable and secure operation of the channel. Easy connection - no need to purchase additional equipment Data transfer speed from 10 to 100 Mbit/s Possibility of connecting WIFI equipment Select your Home Internet tariff!
4G Wi-Fi router
The second most popular device from MTS is a mobile router. Naturally, many users are interested in how to get into the personal account of a 4G Wi-Fi router from MTS:
- Model 874FT. Here are the login details: connect.manager/ or 192.168.1.1. On the authorization page, in the “Username” and “Password” lines, you must enter admin/admin. Then click the “Login” button.
- Model 8213FT, 8212FT. IP address – 192.168.8.1, username and password – admin in both lines. To log in, click “Login”.
To access the personal account of the Wi-Fi modem from MTS, type connect.manager/ or 192.168.1.1 in the address bar. If you can't get into the settings, try 192.168.8.1.
Other models
In this section I will provide IP addresses for other routers that can also work with the MTS provider. Here are the login details for the web interface:
- ASUS – 192.168.1.1;
- HUAWEI – 168.100.1;
- PARADYNE – 192.168.1.1;
- ZTE – 192.168.0.1;
- ZyXEL Keenetic – 192.168.1.1 or keenetic.net;
- Acorp – 168.1.254 or 192.168.1.1;
- B-Focus – 192.168.1.251;
- Billion BIPAC – 19168.1.254;
- LA Fonera – 192.168.10.1;
- Linksys – 192.168.1.1;
- NETGEAR – 192.168.1.1;
- TP-Link – 192.168.1.1 or 192.168.0.1, if not suitable – tplinklogin.net;
- TRENDNET – 192.168.10.1;
- INTERCROSS – 192.168.1.1.
In addition to the IP address, of course you will need authorization data - username (login) and password. In most cases this is admin/admin. Sometimes the manufacturer specifies root as the login. There is also a password other than admin. Try - 0000, 1234.
The exact details for logging into the router’s web interface can always be found on the device itself - there is a sticker with information on the back side.
How to find out the IP address of a router is described in the following video:
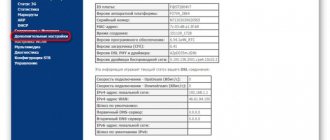
802.1x
Specify “ DHCP Client” .
Scroll to the very bottom, find and check the box “Enable 802.1 x Authentification for WAN” . We set the EAP method as “ MD5” . Carefully enter your username and password and click “Apply”.
Source
How to log into your router’s personal account
Let's look at four options for logging into the router at 192.168.1.1. First, the login page is available. Second - the router is connected for the first time. Third, the Internet works, but does not open the router’s personal account page to make settings. Fourth - the Internet and the router settings page do not work. We will consider these two blocks at the end, where ten possible problems and instructions for solutions are collected.
The router is configured and there is an Internet connection.
Use a device connected to the Internet or local network through this router, otherwise you will not be able to get to the authorization page, except perhaps on another device. To log in, use equipment that supports the network and works with browsers: PC or laptop on Windows, Linux, iOS; mobile phone or tablet on Android, Windows or iOS.
Open your browser and enter the address in the address bar: 192.168.1.1
Figure 1: Browser address bar with the entered address.
In the authorization window that appears, enter the username and password specified in the instructions for the router and on the sticker at the bottom of the device.
Mobile apps are available for modern routers and modems.
The router connects for the first time
To enter the router settings via 192.168.1.1, make sure that the preparatory steps have been completed correctly:
Connect the device to the power supply; Turn on the router with the “ON / OFF”, “On / Off” or similar button, the second indicator should be on;
Figure 3. Router indicators.
Login via Wi-Fi
The web configurator can be accessed via a wireless connection via WiFi using a smartphone, laptop, tablet or PC with a WiFi receiver. You can read more in the article: “Enter the router settings from your phone via WiFi.” Below are brief instructions for logging into your account.
Make sure you have activated Wi-Fi; if not, press the power button and check the indicator. The indicator is shown in Figure 3, number four;
Look at the network name and password (network encryption key) on the sticker at the bottom of the router or in the instructions;
Figure 4. Beeline router sticker with the name of the Wi-Fi network and password.
Connect the device from which you log in to the address 192.168.1.1 to configure the router via Wi-Fi;
Figure 5. Logging into the router network via Wi-Fi
Open your browser and enter the address in the address bar as shown in Figure 1. Log in using the username and password specified in the instructions or on the sticker, for example: admin - admin.
Figure 6. Router sticker indicating IP and login - password
LC, web interface or configurator?!
So what should be the correct name for the configuration interface of a network gadget - the router’s personal account, the web interface or the web configurator?!
Let's look at each option in detail to figure out what is right and what is wrong.
Router personal account - the phrase itself already implies the presence of some personal information. In the Sberbank personal account - this is the account number, card number, availability of money or credit, etc. The taxpayer’s personal account on the tax office website contains data about a specific person, his tax base and information on his taxes. I think from this you understand that “personal” implies the presence of some personal information. But the router settings do not have any such information. This means that calling the interface the Personal Account of the router is fundamentally incorrect and this term cannot be used in this case. And those who call it “Router’s personal account” or “Router’s website” are completely wrong!
The router web configurator is already a more or less correct name for the user interface of the network device. You go to the device page and make changes to its configuration by changing the values of certain parameters - that is, you configure. So this name is quite correct and even some manufacturers use it. An example is Zyxel.
- Login to the Beeline Router - Personal Account 192.168.1.1 or Web Interface 192.168.0.1
The router web interface is perhaps the most correct name for the user interface of the router parameters. In other words, this is the device interface that is accessible to the user through a web browser. This term is also used by network equipment developers. Therefore, this is the most correct option!
Incorrect selection of LAN port on the device
You should also check your network cable connection to see if it is connected correctly. Make sure you use the “LAN” port and not the “Internet” port - otherwise nothing will work and you will not be able to configure the router correctly.
Some routers have two or more LAN ports, however many of them can be used for interactive TV (IPTV), so they cannot be used for our current purpose.
Try to remember the specific port (LAN1, LAN2, etc.) that is used for the TV. If you can't remember, try connecting to each port and logging in with the IP address in your router settings. At the same time, carefully monitor the indicators; if they do not change the light or do not light up at all, most likely you have problems with the router itself. In this case, you should contact your router's service center for additional settings or repairs.
Options not available
The above describes how to access the modem settings through a browser. However, users face a number of difficulties. The treasured panel does not appear and we have to solve the problem.
Options to correct the situation:
- address verification,
- change of subsystem,
- proxy server,
- different network interface,
- eating difficulties,
- lack of port,
- knot is broken.
Incorrectly entered address
The router responds to a specific address. Using the example of WiFiGid, it is clear how developers often resort to non-standard solutions. If the address is entered incorrectly, it is recommended to double-check the IP. This can be done directly from your phone or connect a personal computer.
Important! The gateway is another common problem. It is advisable to log in with automatic settings
The address is in a different subnet
It is impossible to configure the modem if the subsystem is not checked
It is important to go to Internet Protocol and select automatic settings. Using D Link as an example, IP and DNS are set
When changing a subsystem, it is important to save the settings. This way you can use the standard login via the browser line.
Proxy server activated
The proxy server messes up the modem settings, so you won’t be able to log into the service. The same goes for Turbo mode. The PC is suspicious of commands. He knows about problems and suspects the browser (using viruses).
Network interface is deactivated
The network interface is the base without which the modem cannot function. To check the settings, you need to go to your PC using the following path:
- control Panel,
- network connection,
- device Manager,
- available adapters,
- interface update.
Power deactivated
It is very rare that you cannot log into the modem due to deactivated power. When the device is not connected to a power outlet, no signal is sent to the board. The technicians recommend looking at the wire; if necessary, it will have to be replaced.
Using a non-standard port to enter settings
To log into the modem to configure it, you can use non-standard ports. Manufacturers adhere to the standard in this matter so that users can use the browser. If an error occurs, then it is recommended to check the port.
In some cases, the system automatically redirects the user. Before the procedure, the reset button is pressed, the device must be given time. Switching on occurs after a 30 second delay. After this, the settings are updated. Using the Ethernet output, it is easy to connect to almost any modem.
Hardware failure
There are several ways to determine whether the problem is hardware. In the workshop, of course, they use testers, but at home everything is checked at random. First of all, you need to decide on the lack of network sign. The modem checks the status of the light bulbs.
You also need to monitor the device’s reaction when entering the settings. There may be an interruption or failure of the operating system. When the modem does not display a response, this often indicates burnt out contacts.
Manufacturers of devices recommend contacting a service center for an examination. A connected computer will allow you to check the security of the modem and, if necessary, reset the settings. Network equipment can be configured via a tablet or laptop.
Various ways to log into the modem are discussed above. Through your personal account you can check the IP, mask, and other parameters. There are many reasons why users cannot go to settings. The most serious are hardware failures and interface problems.
Login via local network or Wi-Fi
Another important point that I would like to mention is the fact that the connection to the router can be made either via cable or via a wireless Wi-Fi channel. This does not play any role, as long as the computer from which you are trying to log into the router’s personal account is connected to it.
Now that we have made sure that our PC is connected to the router, let's test the connection.
What are periodic services?
Recurring services typically involve paying for the service plan you use. If you want to avoid withdrawals, change your plan. You can find out about the periodic services provided from your operator by dialing 0890 and turn them off or change your plan.
Please note that in the MTS Personal Account there are no periodic services as such in a separate section. This category of services most often refers to a tariff plan and connected options, for which monthly deductions occur. You can disable periodic services and the monthly fee for the MTS tariff if you change it to a plan with charging for the services actually used.
Checking router availability via IP 192.168.0.1
In order to make sure that our router is accessible and we can log into its personal account, we should simply enter the IP in the address bar of the browser. As a result, the authorization form will be displayed; if it appears, it means the connection is established and we can continue.
As you can see, checking the availability of our router is very simple.
Functions and capabilities of personal account home internet and MTS TV
The personal account service is designed so that the subscriber can independently manage service packages, track balances, top up personal accounts and receive qualified assistance from specialists without visiting an MTS office. Therefore, its functionality includes the following features:
- payment service: instant balance replenishment from a bank card or electronic wallet;
- MTS services: information on the connected TV or Internet package, the ability to change the tariff plan to a more comfortable one;
- familiarization with current promotions and accumulated bonuses that can be spent on purchasing traffic;
- installation of anti-virus programs;
- additional TV and Internet settings.
The main menu is located on the left and is intuitive, which makes it easier to work with the personal account service.
How to login via 192.168.xx?
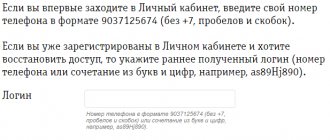
If you know the login and password for the router, logging in will not cause any difficulties. If such data has been lost, we will tell you how to deal with it. So, to log into the admin panel of our router we take a few simple steps:
- Launch any browser and enter the access IP address in the address bar. It could be 192.168.0.1, 192.168.1.0, 192.168.1.1 or even 192.168.2.1. The correct value is always indicated on the back cover of the router.
- As a result, the admin panel of our device will launch and we will be asked to enter a login and password. If no settings have been changed from the factory, the login credentials will be admin/admin or root/root. If the user has set a different password, you will need to enter it.
As a result, the web interface for managing the router will launch and you can make all the necessary settings. We'll talk a little bit about what can be changed here.
Connection
- The Internet center has a built-in Web configurator, so you need to open any browser to access it. We go to the address 192.168.1.1.
- Enter your login and password as admin-admin.
- Internet settings are located in the “Internet Settings” – “WAN” section. Don't confuse it with "LAN".
Further instructions will differ depending on the type of Internet connection. If you have a portable 4G or 3G modem, then you don’t need to configure anything, and you can change the Wi-Fi settings in the “Wireless Mode” section. There you simply indicate the name of the Wi-Fi network and the password for it.
To understand how to set up an MTS WiFi router for home Internet, you need to clarify the type of connection. It is specified in the contract that was given to you upon connection. You can also check this type by calling 8 800 250 0890.
Wi-Fi setup
What might a regular user need in the router's admin panel? First of all, change the password for the wireless network. Using our router as an example, let's look at how this can be implemented:
- Initially, we launch our browser, enter 192. 168. 1.1 into its address bar, then press Enter on the computer keyboard.
- Once in the router’s admin panel, select “Wireless connection settings” on the left side of the window, and select protection in the submenu (see attached screenshot).
- Select the secure connection mode and set a password. When all the settings have been made, save the changes using the button below.
Attention: on less advanced router models there is a text explanation that allows you to understand the purpose of a particular menu item.
Quick setup
All modern routers have a quick setup option - the setup wizard will ask for all the necessary parameters, without focusing on additional settings.
Prepare the following information, which the Quick Setup wizard will likely ask you for:
— the connection type determines the way your provider connects clients to the Internet; it is specified in the contract or in an appendix to it.
— the login and password for logging into the Internet can also be found in the contract. Do not confuse this login and password with the credentials for accessing the router settings or for accessing your personal account on the provider’s website (they can also be found in the contract).
- gateway - for some types of connection, the wizard may require this parameter, which in this case also needs to be obtained from the provider. Typically these are four numbers separated by periods (for example, 88.12.0.88). This is exactly how it should be entered.
— Wi-Fi network name (SSID) — under this name your network will be visible in the list of wireless networks. Here many give free rein to their imagination. In apartment buildings you can find examples like “sosed_s_pianino_dostal” or “Wifi_za_edu” - it immediately becomes clear that the first neighbor does not like loud music, and the second is hungry. No one is stopping you from using the SSID in order to convey some information to others, but you should be careful - it’s not so difficult to find out from which apartment Wi-Fi with a certain name is distributed. The most neutral option for an SSID is a household word that has nothing to do with you and your apartment number. For example, bulavka or tarelka.
— Wi-Fi access password (key) — will be required from any device trying to connect to your wireless network. Try to choose a password more complex than “11111111”, “88888888” or your date of birth - even if you are sure that hackers are absolutely not interested in you, extra “guests” will slow down the connection speed. Set a password mixed with numbers, special characters (*, !, %, etc.), capital and lowercase letters - then it will take young “crackers” two hundred years to guess the password for your network. In order not to forget this jumble of symbols yourself, you need to write the password on a piece of paper, and stick the piece of paper directly to the router. You can still remember this password on each device and not have to enter it every time.
— MAC address — may be required if the provider binds the cable to a specific device. Here you do not need to enter information, but on the contrary - find the MAC address of your device (on its case or in the settings panel) and inform the provider.
It happens that the initial settings of the provider assumed access to the Internet directly from your computer, and now you want to connect a router to the cable. In this case, as the MAC address of the router, you should set the MAC address of the network card of the computer from which you previously accessed the Internet.
Many routers allow you to clone the MAC address of the network card of the computer from which you accessed the web interface - if you previously accessed the Internet from this computer, then the MAC address cloning option can significantly speed up its installation.
Additional Wi-Fi settings
In the wireless network settings section, you can change the Wi-Fi password, network name (SSID) and set some additional parameters.
Please note that if you, while in the administration panel, are connected to the router via Wi-Fi, then after changing the network name or password you will have to connect to it again (to the network with a new name and password).
You can hide the SSID from the list of networks available to everyone, although in order to connect a new device to it, you will have to enter the network name manually. The option is capricious and it is better to use it with caution - not all devices connect normally to the “invisible” network.
Pay attention to the authentication technologies used - the WPA2-PSK authentication standard with AES encryption is generally accepted for home networks today.
You can also configure the radio frequency channel used by the new network - but most routers automatically select the least loaded one.
Inside the wireless network settings section (or separately - depending on the manufacturer) there are two more parameters: WPS and guest network.
WPS is an automatic secure connection setup technology that has been exposed to several vulnerabilities. If you do not want other people to connect to your network, bypassing even the most complex password, this function must be disabled. And don't turn it on.
A guest network is useful if you are willing to share the Internet with guests, but do not want to give them access to your local network (to devices connected by a LAN cable and via Wi-Fi). When you enable a guest network, a separate Wi-Fi point is created, with a separate name and password that you can safely tell guests.
Additional security settings
Pay attention to remote access - it should be disabled by default, but there have been cases where providers supplied routers with remote access configured. This was done, it seems, for the convenience of setting up users’ routers by technical support, but you need to understand that in this case, technical support can get full access to users’ local networks. Make sure that there are no IP addresses listed in this tab and that remote access from external hosts is not allowed.
When remote access is disabled, no one from the “outside world” will gain access to the router, which cannot be said about your local network. If you want only you to have access to the router settings from the local network, then the standard password needs to be changed.
Keep in mind that if you yourself forget the password to the administration panel, you will have to reset the router and do the entire setup again. Surely none of the household members will intentionally “hack” the router, so a particularly complex password is not needed here.
Connecting to the router
To set up your router, you will need to connect to it from a computer, laptop, tablet or smartphone.
If you have a laptop or computer with a network card, it is easier to connect via cable. Look in the box from under the router for a patch cord - this is a piece of cable with two RJ-45 connectors. We connect one end of the cable to the computer, the other to the LAN port.
To connect via Wi-Fi, turn the router over and look at the stickers - there may be the name of the network and the password for it. If they are not there, look in the list of wireless networks for a new one with a name similar to the name of the router. It is possible that you will not need a password to connect to this network.
When connecting with a cable, you don’t need to specifically specify any passwords or networks—everything should work automatically.
Check the network connection status. If suddenly everything is connected, then you are lucky and you can go straight to configuration . But if you can’t connect, a window pops up asking for a password, or a network with the required name is not found, then we’ll look into it further.
How to connect
Let's start from the very beginning, to enter the configurator you need to connect to the router. You don't need to install any additional software. You can connect in two ways:
- Via a network cable, if the model has a LAN port on the back. Just take the wire and plug one end into the network card of your computer or laptop, and the other end into the network port on the router.
- Via Wi-Fi - after turning on, you should see the key for the WiFi network on the screen. After the first turn on, it will work immediately, so you just need to connect from any device: laptop, tablet or phone.
Reset to factory settings
If the router is not new from the store, then probably someone has already changed the Wi-Fi settings, which is why you cannot connect. If you cannot find out the network password, then you need to reset the settings. To do this, take a straightened paperclip and press the reset button with it while the router is turned on.
It is better to hold the button for a few seconds (to protect against accidental clicks on some models, the reset occurs only after 3-15 seconds of continuous pressing). When you reset the settings, the Wi-Fi network name and password will also be reset to the factory settings. Now you can try to connect again.
Can't connect with cable
Special settings of the router itself may interfere with cable connection. In this case, resetting to factory settings will also help. If you still cannot connect after resetting, there is something wrong with your computer settings. Go to the network connections window in the control panel and check the properties of the active network connection (by right-clicking on its icon and selecting “Properties” from the drop-down menu). Internet protocol IPv4 must be configured to automatically obtain an IP address and DNS server.
If you still can't connect, try the same steps from another computer.
Static PPtP, L2TP, Static IP
Specify the type. Next, check the box “Set IP address manually:”. You need to manually enter from the contract: IP, Mask, gateway, server address, login and password (for Static IP you do not need to enter). DNS addresses should also be indicated there. I would also advise you to enter them by clicking “manually enter DNS addresses”. But you can click on automatic detection. If there are problems with any sites, you can always go back and enter this data manually. At the very end, do not forget to save the settings and reboot.
How to find out the router's IP address?
Let's look at the three simplest ways to determine the IP address needed to access the admin panel of our router.
We look at the back cover of the device
The easiest way is to turn our gadget over and look at the sticker on its back cover. Most often, the IP address, login and password required for authorization are written there. Just enter them into the address bar of your browser and get the desired result.
We use system tools
You can also determine the IP address of our router using network management. It works like this:
- Let's go to the Windows control panel. To do this, you can use, for example, a search tool.
- Next, again, using a search, we find “Network and Sharing Center”.
- On the left side of the window, select “Change adapter settings”.
- We find our connection and right-click on it. In the context menu that appears, select “Status”. Then click on the “Details” button and look at our IP address in the window that opens.
It is this address that you will need to enter when logging into your router’s personal account.
This instruction is based on the Windows 10 operating system, however, in other operating systems, including Windows XP, Windows 7 and Windows 8, everything is done in exactly the same way.
Working with the command line
You can find out the IP address of your router using the command line. This option will be useful for those of you who are not satisfied with any of the methods described above. So, let's take a few simple steps:
- First, we launch the command line itself. To do this, enter the three letters CMD in the Windows search and press Enter.
- Enter the ipconfig command and confirm the entry.
- In the list that appears, we find the gateway, which is the IP address we need.
This is how easy it is for us to find out the IP address of any router.
Where and how to download My MTS?
It all depends on the operating system of your device:
In the application store you just need to download My MTS to your gadget.
How to register and log into the application
Just a few simple steps! Just click on the pictures one by one.
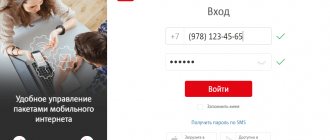
Immediately after launching the application, click the “login” button.
Feel free to enter your number and click the “receive password via SMS” button
Enter the numbers from the picture and click “Continue”
Enter the code from the SMS in the appropriate field and click “continue”
Create your own password and write it twice. Then click “Confirm”
Just click the “continue” button
Now you can use all the functions of the service.
There are also good instructions in video format online:
What should I do if I have a tablet?
Don't worry! If the device does not support receiving text SMS, then there is a way out. Click on the “log in from tablet” button and a confirmation code will be sent to you via the Internet. The following procedure is exactly the same.
How to exit the application
In the left side menu, click on the exit key.
If you don't plan to use the application anymore, simply delete it.
We wish you successful and productive use of the My MTS application.
Sources
- https://4gltee.ru/lichnyj-kabinet-ot-mts/
- https://WiFiGid.ru/nastrojki-routera-dlya-provajdera/mts-router-lichnyj-kabinet
- https://Ok-WiFi.com/192-168-0-1/192-168-1-1-vhod-v-nastrojki-routera.html
- https://19216811.ru/
- https://zagruzi.top/instruktsii/192-168-0-1-vhod-v-lichnyy-kabinet-routera.html
- https://club.dns-shop.ru/blog/t-280-marshrutizatoryi/22123-kak-nastroit-router-bez-pomoschi-spetsialista/
- https://tarifsk.com/voprosy-i-otvety/kak-zaregistrirovatsya-i-vojti-v-prilozhenie-moj-mts.html