On this page you will find information on how to turn on or off mobile Internet on Asus . Also below there will be a link to detailed instructions with pictures on how to switch the Internet to the first or second SIM card on Asus through the settings. If your tariff plan provides you with unlimited Internet or a large package of Internet traffic, then you can use high-speed Internet from your phone, for example, where it is not possible to connect to Wi-Fi. If you have a SIM card or SIM cards with tariffs without Internet or with a small amount of Internet provided, then it is better to disable the mobile Internet on Asus in order to avoid large debits from the account or to use the Internet economically to extend the Internet on the phone. You can also share your mobile Internet with other devices using your smartphone as a Wi-Fi access point, see the link to the article below. We took the information about enabling and disabling mobile Internet from the Asus ZenFone Max Pro; it should also apply to other Asus models and similar Android devices.
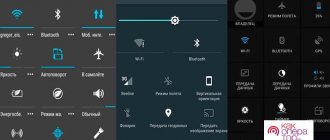
And so, to completely disable the mobile Internet on Asus or turn on the Internet, you need to open the menu for quick access to the most useful functions of the phone. To do this, drag down from the top edge of the screen until the menu opens. If in the menu that opens there is no icon with the caption “Mob. Internet", then you need to open the menu completely, to do this, drag the bottom of the menu down or click on “>” as shown in the first screenshot below. If in the full menu that opens there is no “Mob. Internet", then most likely this icon is on the second page. The presence of a second page is indicated by two dots under the menu as shown in the second screenshot below, to get to the second page you need to pull from the right edge to the left or vice versa. Now the menu should definitely have a mobile internet icon by clicking on which we can enable or completely disable mobile internet on the Asus phone. Look at the third screenshot.
I hope the information helped you understand how to disable or enable mobile Internet on Asus . Don’t forget to leave a review and indicate the model of smartphone or tablet to which the information fits or not, so that others will receive useful information from you. If mobile Internet is connected or disconnected on your device in any other way, then please share the information below in the reviews, perhaps it will be the most useful.
- We'd love it if you added feedback, helpful advice, or additional information.
- Thank you for your responsiveness, mutual assistance and useful advice on the topic of the article!
Without exception, all owners of mobile phones use them from time to time to access the Internet or chat on ICQ. If you are a beginner and do not yet know how to set up the Internet on a smartphone with the Android
, read on. In modern 3G and 2G networks, devices with the Android operating system that connect to the network for the first time receive Internet access point settings from the operator automatically.
But in some cases this does not happen. This is possible if the phone was imported from abroad, it is “gray”, etc. In general, if information of this kind is in demand, then this article will definitely be useful to someone. So, let's take a closer look at the 3G/GPRS settings for the Android OS, if they were not set automatically. Go to “Settings”, then click on “Wireless networks”, then open the “Mobile network” item. Here, try turning on automatic detection of settings. Perhaps you accidentally knocked them down earlier. To do this, you need to click on the “Telecom Operators” item.
The phone will now start searching for cellular network operators available in your area. If you have found an operator whose services you use, select it from the list provided or simply click “Select automatically” (it is better to use the second option). Settings can also be requested from the operator via SMS to a specific number or by calling their helpline (to find out the number, go to the operator’s website). If all the steps described above did not help and the access point settings are still not determined, then you will have to enter them manually.
To do this, click on “Access points (APN)”, then click on the menu button and select “New access point”. Here enter the access point data, having previously found them out on the operator’s website. In most cases, only fields such as “Name”, “APN (access point)”, “Username”, and “Password” are filled in. - Any name can be spelled. — Username: for Megafon and tele2 is not entered; for BeeLine – beeline, for MTS – mts. - APN (access point): for Megafon - internet, for BeeLine - internet.beeline.ru, for Tele2 - internet.tele2.ru, for MTS - internet.mts.ru. — Password: for tele2 and Megafon is not entered; for BeeLine and MTS – exactly the same as “username” (beeline and mts, respectively). If you don't find your operator in the list, look at the settings on their website.
Those who use BeeLine services may need to select CHAP only authorization. Otherwise, the Internet may simply not connect (this is especially true for devices from foreign markets). Go to settings, select “Mobile network”, then “APN”, then “Beeline internet” and “Authentication type: CHAP”.
By following one of the tips above, you will definitely set up the Internet to
Android OS
device . Once you've entered your settings, make sure you've turned on mobile data. If after this you still cannot connect to the Internet, you should try turning your smartphone off and on.
How to set up mobile Internet on an Android smartphone or tablet.
Setting up the Internet on a phone with the Android operating system will not take much time, if the user has detailed instructions on how to connect the Internet on Android. The guide below provides instructions on the basic methods for completing the task. You can connect to the World Wide Web using mobile Internet, for which the owner of the smartphone will have to regularly pay to the cellular operator for the provision of appropriate services.
If the user does not have money on his balance, then he will find instructions on how to set up the Internet on Android using wireless Wi-Fi access points, which are currently organized in almost all public places and provide free access to the global web, for example, train stations, cafes and restaurants, shopping centers, educational institutions, etc.
Of course, a significant number of people have their own Wi-Fi routers at home, so this guide will be useful for both them and their guests. If you have a computer connected to the World Wide Web, then at the end of this article the user will find instructions on how to set up the Internet on your Android phone via a cable connection to a PC.
What's better
The easiest way to connect is to use WI-FI wireless networks - they give the best signal and are the easiest to set up.
Mobile Internet is available everywhere, but connecting to it may cause problems. But access via USB should be used when there is no other choice - for example, there is no WI-FI module, and the selected operator tariff does not include network access services.
Any method of connecting an Android to the network is good in its own way. But, if you suddenly failed to connect, you should not try to use another method, but simply carefully repeat the previous one - most of the errors are associated with inattentive data entry, especially passwords.
Note for ASUS Zenfone 4 (A450CG)
This is the official summary for ASUS Zenfone 4 (A450CG) in Russian, which is suitable for Android 4.4. If you have updated your ASUS phone to a more recent version or rolled back to an earlier one, then you should try other detailed operating instructions that will be presented below. We would also like to suggest that you familiarize yourself with the user’s quick summary in question-answer format.
- 1. Download annotation for Android 4.4 (tip)
- 2. View all annotations
Official ASUS website?
You have come to the right place, as all the information from the official ASUS website is collected here, as well as a lot of other useful content.
How to find out the current Android version?
Settings— About phone :: Android version (a few clicks on Fri will launch the Easter egg) [Out of the box, Droid OS version is 4.4].
How to update drivers on ASUS
How to find out the kernel version
You need to go to Options - About phone - Kernel version
How to enable Russian keyboard layout
Go to Settings—Language and input—Select language
How to connect 4g or switch to 2G, 3G
Settings—More—Mobile network—Data transfer
What to do if you turned on child mode and forgot the password
How to enable voice dialing
Go to Settings - Language and keyboard - section (keyboard and input methods) - check the box next to Google voice input
How to disable auto-rotate screen?
Settings—Display :: Auto-rotate screen (uncheck)
Connecting the Internet to an Android tablet via a USB cable
If it suddenly happens that your smartphone does not have a WI-FI module, then you can always connect the Internet to Android from your computer via USB.
First you will have to install a special program on your phone - for example, Reverse Tether. After this, it will be possible to connect to the network via a PC. After installing the wire on the device, lower the curtain (swipe the screen from top to bottom and get to the quick access menu). In the window that opens, select the “Internet Connection” item, the “USB Connection” sub-item.
Instead, there may only be a “Connecting” message that needs to be confirmed.
Now on your computer you need to go to the control panel and select “Network and Sharing Center”, where you can change the adapter settings.
Photo about: Network and Sharing Center
To do this, select the name of the network, right-click on it and in “Properties” uncheck the first line in the “Access” tab and confirm. Then go to properties again, check the first box in the same tab and select “Local Area Connection” or simply check the box next to this item. We confirm again.
Photo: LAN connection status
After a couple of minutes, the phone will connect. If an error occurs, the algorithm must be repeated.
Important! It's best to disable Windows Firewall, reboot your phone before connecting, and allow root rights when prompted from your phone.
Sometimes you may need to install drivers for your smartphone model on your computer.
The simplest tests
First, we check the balance status. Each provider offers its own method. Read the instructions or dig through your contacts list - usually there is a corresponding number there. To obtain account information, dial *, then a certain three-digit code (unique for each operator), followed by the # symbol and press the call button. In response, the display shows the amount available to pay for calls. If the wallet is empty or there is an overspending of cash, top up your account and the Internet will appear.
We will assume that everything is OK with the balance. What to do next? We look at the network connection indicator. If it is deactivated, it means you are out of range. There is only one cure for this - get away from this place.
All modern smartphone models have a special option. It's called "Data Transfer". To get to this parameter, you need to do the following:
- Go to the connection settings menu.
- Click on the “More” item.
- Click on the “Mobile network” item.
- On the screen that opens. The picture below will serve as a good illustration:
What to do if there is still no Internet? You can try turning off your smartphone and turning it on again. Sometimes it helps. The fact is that 3G networks often stop pinging after leaving the subway and in other cases entering the access zone from places where there is no network. In this case, the machine is unable to connect to the network without rebooting.
3. method: Through a SIM card of a mobile operator
Immediately after installing the SIM card in the smartphone, it is automatically configured and connected to the global network. The cellular company sends special information to the phone, and the parameters are set independently without the intervention of the gadget owner. Unfortunately, in our world there are always exceptions, and sometimes manual configuration is required. To do this, you need to take the following steps:
Note: all companies providing cellular communication services indicate passwords and logins on their official Internet resources, so if in the above examples there is no data to enter, you can find them out by visiting the operator’s website or calling them by phone.
Automatic settings
Typically, the setup process is as follows: we install a SIM card in the smartphone, and it is automatically configured for the desired operator. This is exactly what happens on all normal phones, unless they are made in a handicraft way in Chinese basements (does not apply to handsets of more or less well-known brands). And some Russian operators, after inserting a SIM card into the phone, immediately send all the necessary settings in the form of service messages.
It is also possible to order automatic mobile Internet settings forcibly:
- MTS - go to this page, indicate the number and press the “Send” button;
- MegaFon - automatic order does not work. Previously, you had to send the number “1” (without quotes) to 5049;
- Beeline - just call 06503;
- Tele2 - call service number 679.
On MegaFon, only manual configuration is possible if the phone refuses to configure itself when installing a SIM card.
Internet on Android phone via
Instructions on how to connect the Internet to Android on a phone or tablet differ only in the location of the settings and (sometimes) their name, but the algorithm is exactly the same.
The easiest way to access the Internet is through wireless WI-FI connections.
First you need to turn on the wireless network module on your phone - it is usually located in the quick access widget or “hiding” behind the curtain - just swipe the screen from top to bottom to find it.
The WI-FI module icon looks like three or four curved stripes. To turn it on, you need to pull the slider to change the label to On or simply touch the module icon - it will light up, which means the module is turned on.
Important! Even if all further instructions are completed, but the WI-FI module is not turned on, the Internet connection will not be available!
After turning on the module, the phone should search for all available networks on its own. They can be viewed through the settings - to do this, just touch the WI-FI inscription itself in the settings and the phone will show a list of available connections, and whether they are password protected or not.
Select the network - if it is free (not password protected), the smartphone will connect automatically. If there is protection, a password entry window will appear.
After it is entered, you need to click the “Connect” button and the connection will be completed.
Important! The password includes letters of the Latin alphabet in different cases (large and small), numbers, and sometimes punctuation marks. You need to be careful not to make mistakes.
If all steps are completed and the password is entered correctly, the phone will connect to the WI-FI access box and you can start working on the Internet.
Video: Internet setup
Telecom operator
Connecting through wireless networks of a telecom operator is somewhat more complicated due to the fact that you need to register access points that are different for each operator. If the user has difficulty setting up, you can always contact the operator for help.
In general, the first time you turn on a smartphone with a new SIM card inside, the network settings should automatically appear, after which the connection to the Internet occurs via 4 (LTE), 2 or 3G.
Important! If the SIM card is new and just purchased, the employee of the communication store must activate it; without this, it is impossible to make calls or access the Internet.
Connecting the Internet to Android via 3g is quite simple (all other networks are connected in the same way).
This can be done without WI-FI, anytime and anywhere:
- go to the smartphone settings;
- further – section “Wireless networks”;
- subsection “Mobile communications”;
- in the “Communication Operators” section, enable “Select automatically” or from the list.
Important! If yours is not among the presented operators or the settings are not suitable (have changed), they can always be found on the operator’s official website or obtained by calling or sending a short SMS message with the appropriate team to the technical support service.
If it was not possible to set the settings automatically, you need to go to the “Access Points” or “APN” item in the mobile network settings.
Select the line “New access point” and enter the data corresponding to your operator:
To connect from an MTS SIM card, you need to enter the following data:
TELE 2
If your operator is TELE2, some lines in the settings are not filled in at all.
- APN - internet.tele2.ru;
- Password – not filled in.
All that remains is to confirm and select this access point to connect.
Beeline
Beeline always transmits all settings automatically and manual entry is required only if the settings have been reset.
All that remains is to confirm and select this access point to connect. Sometimes you need to additionally enable CHAP authorization; to do this, in the mobile network settings, go to APN, “Beeline internet” and enable authentication.
Megaphone
Megafon subscribers most often have to connect manually.
To do this you need to enter the following information:
- Name – any, user’s choice;
- APN – internet;
- Username – not filled in;
- Password – not filled in.
All that remains is to confirm and select this access point to connect.
The Ukrainian operator Life requires the following information to connect:
All that remains is to confirm and select this access point to connect.