2500U Model Overview
The D-Link network device does not support many functions, without which new models are not competitive in the market.
The main ones include parameters related to absence:
- built-in WiFi module for creating a local wireless network based on it;
- USB connectors for connecting external drives, mobile 3G/4G wireless Internet modems;
- ports for connecting to high-speed FTTx fiber optic lines.
Appearance of DSL-2500U
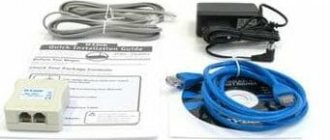
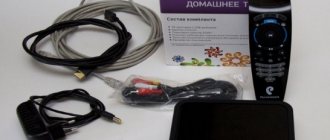
Contents of delivery
The delivery package for the product purchased through the retail chain includes:
- ADSL modem;
- splitter - a device that allows, when connected to an input telephone line, to divide the signal into a low-frequency (analog) signal for a telephone set and a high-frequency (digital) signal used in a modem;
- two cables with RJ-12 connectors, one of which connects the splitter and the phone, and the other connects the splitter output and the DSL modem input;
- patch cord with RJ-45 connectors for connecting the router output to the input of the network card of a computer or laptop;
- modem power adapter from AC mains;
- operating manuals in paper form and on CD.
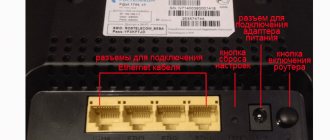
Back panel
The rear panel of the 2500U router contains the following elements:
- DSL connector for connecting the product to the “Modem” output of the splitter;
- LAN connector to which network devices are connected;
- 5V=1A plug connector for AC adapter;
- ON/OFF button (not available on all series);
- Reset button to reset current settings to factory defaults.
Front Panel
The DSL front panel is designed to inform the user about the status of the communication lines of connected equipment and individual components of the 2500U modem. The indicators located on the front panel of the device are as follows:
- Power signals whether the DSL modem's power supply is on or off.
- Status informs you about the operation of the 2500U router or any errors that have occurred.
- DSL shows the synchronization status of the router while working with the provider.
- Internet detects the presence of a connection to the World Wide Web or the presence of critical errors in the line (red light).
- LAN informs about the health of the communication line when connecting devices to the port.
Connecting 2500U and preparing for work
A telephone cable coming from the Modem connector of the splitter or directly from the ADSL telephone line connected to the apartment or house is connected to the DSL router connector. The name “Asymmetric ADSL” is sometimes heard, but is not entirely correct. Asymmetry is already inherent in the abbreviation ADSL in its first Latin letter (Asymmetric). The LAN connector of the 2500U modem is connected using a patch cord to the connector of the network card of a PC or laptop, usually built into the motherboard.
The AC adapter is the last one to be connected. Subsequent setup of the Internet connection is carried out with both devices activated. The splitter does not have a separate power supply. To operate the 2500U router, it is necessary to obtain an IP address, as well as a DNS server address automatically using the TCP/IPv4 Internet protocol.
Connecting a modem to a telephone line
Any ADSL modem is connected to a telephone line using a wire with connectors (plugs) of type RJ-25, RJ-14 or RJ-11, that is, the most common telephone wire. What they look like and which ones are suitable is well described here.
This wire is not connected directly to the telephone socket, as its predecessor did - a buzzing and squeaking, terribly slow Dial-Up modem, but through a special filter - a splitter.
To avoid noise when picking up the phone, so that the Internet works stably and quickly, you need to connect a splitter. This is a box that filters the signal separately for the modem and separately for the telephone. Click on the picture below, where I have drawn two options for connecting the splitter:
As can be seen from the text in the picture, it is necessary to connect the splitter . And not just connect, but connect correctly - both the modem and the phone are connected through it to the appropriate connectors.
A common reason for a slow, unstable Internet is the incorrect connection of this small box.
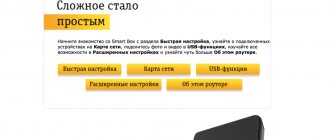
Settings
Connecting and setting up a router from Rostelecom
To configure the D-Link model 2500U modem for any provider, you need to open its interface. This is done using a PC or laptop connected to the LAN port. In the address bar of the web browser you are using, opened on your computer, you must enter the value 192.168.1.1. specified in the attached operating instructions. Then press Enter on your keyboard. In the window that opens, you need to fill in the “Username” and “Password” fields.
By default, for most routers these values will be the login and password admin/admin. After this, you need to click “Login”. Next, go to the main page of the interface; for different firmware versions the software (software) has its own appearance.
Automatic setup
For auto-configuration, the DSL-2500U router requires clicking the “Connect Internet” tab (Quick Setup, Wizard) on the main interface page. The DSL modem is configured by the “Setup Wizard”. It requires data received by the user from the provider. Setting up the 2500U is, in fact, semi-automatic, since at various stages it is necessary to manually enter data from the contract. To go to the next step, click on the “Next” stencil.
There are many versions of the 2500U modem. From here you can see the variety of WAN interfaces. In the first step, you need to select the connection type: PPPoE, PPPoA, IPoA, IPoE, “Static IP”, “Dynamic IP”, Bridge.
When sequentially continuing the DSL setup, you will need to additionally enter the values of the VPI, VCI parameters, depending on the region of the operator providing class=”aligncenter” width=”784″ height=”724″[/img]For connections like PPPoE, PPPoA, a username and password are required provided by the provider. They remain unchanged. They are entered only when setting up 2500U and are saved the next time the equipment is turned on.
Static IP requires entering the Internet address (paid) assigned by the provider, which remains unchanged throughout the operator’s operation area. Dynamic IP does not require any user action when setting up an Internet connection.
Connecting to the Internet manually using the example of some providers
With manual configuration, it is possible to configure the 2500U modem for the user and set all the necessary parameters, without excluding those that are required for the type of connection of each Internet operator. On the DSL modem administration page, go to the “Advanced Setup” tab.
"Home ru"
After entering the advanced settings of the 2500U router, click on the “Network” tab in the top row and enter its menu. Next, select the WAN section and click “Add”. The operator uses the PPPoE type of Internet connection. It must be selected from the list provided.
In the “Username”, “Password” and “Password Confirmation” fields you must write down the data received from the provider and specified in the contract. You must check the Keep Alive box.
Find out the values of the VPI and VCI indicators by calling your provider. They must be entered in the appropriate fields.
This operator additionally uses a binding to the MAC address of the equipment used. This address is the physical device identifier assigned to it during manufacturing. Before you start setting up the 2500U, you must inform your provider. Address information is located on the DSL modem label located on the bottom of the case. It is a sequence of 12 numbers and Latin letters and is designated MAC ID.
If there is no address on the label, the information is available in the extended menu. To do this, click on “Device Info” in the top row of tabs. For router firmware version 1.0.50, the physical address is designated LAN MAC.
After filling in the required fields, click on “Save”. The Internet indicator on the front panel of the device should light up after saving the configuration in an average of 20-30 seconds.
Rostelecom
In the WAN tab, select the Home section, and then click ADD (“Add”). On the connection creation page, enter the VPI data, VCI from the agreement with the regional provider Rostelecom, and in the Service Category column, select UBR Without PCR from the list. To continue, click Next.
On the next settings page, check the PPP over Ethernet box and click Next.
After this, you need to enter information about the username and password from the agreement in the PPP Username and PPP Password fields. And also check the Keep-Alive item. The last action maintains the connection in case of accidental loss of connection and its subsequent restoration. Then click Next to go to a new page.
Check the following items here: Enable NAT, Enable Firewall, Enable WAN Service. In the last paragraph about service maintenance, write Rostelecom.
After clicking Next, you will be taken to a page with summary information. After checking that it matches the previously entered values, click Finish. Now it is possible to monitor connection signaling using the Internet indicator on the front panel of the DSL modem. We discussed the setup details in more detail in the article dsl 2500u setup by Rostelecom.
"Beeline"
This operator assumes that the user has equipment that supports an L2TP WAN connection. The technical specifications of the 2500U modem in question indicate the following types of connections:
- PPPoA.
- PPPoE.
- IPoA.
- IPoE.
- Bridge.
A connection from the Beeline operator is not provided for the DSL router. It is supported in later models, for example, DIR-300.
NetByNet
On the main page of the interface, in its menu, you can go to the connection settings by selecting the WAN tab, and in it, the Home section. The connection is created by clicking on ADD. A new page allows you to select the type of connection from the contract. The 2500U modem in question is available with a PPPoE connection when receiving a network address automatically and PPPoE with a static address received from the provider.
In both options, the subscriber agreement contains a username and password. They must be entered in the appropriate fields. The entered password must be confirmed in the appropriate field.
After this, Fr. is required. In this case, the provider will see the MAC address of the computer with which the DSL modem works. Always is written in the mode selection field. In this case, the connection will be stable in case of possible failures along the communication line. The entry is completed by clicking on the Next stencil.
On the new page you need to check the following boxes: Enable Firewall, Enable NAT.
In the case of a PPPoE connection with a local (static) IP address, you must additionally check the Static IP option.
In this case, after clicking Next, a page will open where you need to fill in the fields with data from the contract: the address assigned by the provider, the subnet mask, the gateway used, the preferred and alternative DNS server addresses.
The entered information is saved after pressing the Save Settings button. On the next page you need to check the data of the created connection reflected on it. If their values are correct, click the Finish stencil. After a while - no more than 20-30 seconds - the Internet indicator on the front panel of the 2500U router should light up, which will confirm the presence of a connection with the provider.
Bridge operating mode
With the listed providers, the DSL modem works only in router and transparent bridge modes. The repeater (repeater), amplifier, adapter or access point modes are not available to it.
If, with the settings set and saved, you need to use the 2500U modem in bridge mode, this will not cause any difficulties. To do this, go to the “Manually configure” tab by clicking on it with the cursor. On the page, go to the WAN section, and in it - the Home subsection. In the created connection, adjust its type: PPPoE to Bridge, leaving the other settings unchanged.
Additionally, “Encapsulation Type” and Service Category are added. For the first parameter, Bridged IP over ATM LLC SNAP is selected, and for the second, UBR is selected.
At the last step, click Finish on the stencil. After such a change, the DSL router only performs the function of transferring information from the telephone line to the computer and vice versa.
In bridge mode, the 2500U router works with only one computer in the general case. But the DSL model in question initially has only one LAN connector. The built-in firewall stops working. The computer takes over the protection against network attacks. Network Address Translation (NAT) and the printer stop working.
IPTV
For the set-top box required for interactive television, you need to allocate a separate LAN port. IPTV receives a stream of information directly from the provider. On other router models, the dedicated port is programmatically switched to transparent bridge mode and can no longer be used for other purposes. The 2500U modem has only one LAN port and the consumer has to decide on the priority connection. The question concerns changing settings.
IPTV requires a Bridge connection to work. It is necessary to set the values of the VPI and VCI parameters from the contract in the WAN section.
In the “Miscellaneous” settings section o. After this, the port is “given” for IPTV.
Parental control
This setting is in addition to the basic functions of the 2500U. On the administration page, click on the “Manually configure” tab. In the top menu of the tabs that open, select “Control” and click on it.
After clicking “Add”, the opportunity to create a new rule appears. The local network for the DSL modem in question consists of only one computer, so only one rule is created.
It indicates the MAC address of the PC, writes an arbitrary name and puts o. After this, a schedule is drawn up, which includes the days of the week, hours, minutes of the beginning and end of the work opportunity.
In the “URL filter” section, you can block/allow the operation of user-specified sites. Port 80 is selected. The settings are completed by clicking on “Save”.
Dynamic DNS
Configuring this parameter in DSL refers to the advanced version of routing settings. Access is made by clicking on the “Advanced” tab. Dynamic DNS (DDNS) operates in dynamic IP mode, allowing each address change—in digital form—to leave a permanent domain name.
Security settings (antivirus, firewall) on the 2500U modem
Access to security settings in the DSL modem is provided from the main menu by selecting the “Firewall” (firewall) tab. Here you create IP filtering rules for dangerous and working addresses. To create a new rule, click on the “Add” stencil. Virtual servers and DMZ zones (virtual server dmz) are also created here. They are capable of redirecting all Internet traffic to a specific IP address on the local network.
IPTV
If the user is the happy owner of a TV set-top box from RTK, then you can set up the broadcast very quickly using the following instructions:
- Enter the “WAN” tab;
- Click “Add”;
- Specify VCI and VPI - to find them out, the user is required to call the RTK support service;
- Specify "Briging";
- In the “Encapsulation mode” column, set “LLC/SNAP Bridging”;
- Next click “Save & reboot”;
- Wait until the device restart process is complete;
- Open the “LAN” tab;
- Enable “IGMP snooping”;
- Restart the router.
Possible malfunctions and ways to eliminate them
Zyxel Internet center: Keenetic Lite router
All problems that arise during the operation of DSL routers model 2500U are divided into the following groups:
- consumer equipment software;
- system hardware;
- faults occurring at the service provider.
In the first case, it is necessary to separate situations when they arise at the initial stage of setup, and failures that appear during operation of the DSL modem. At the initial stage, setting up the 2500U must be carried out in strict compliance with all the requirements of the manual, the sequence of operations, and saving the entered data at each stage. After completing the DSL setup process, you need to check the resulting results.
The causes of failures that occur during operation of the 2500U are often external factors: sudden surges in supply voltage or thunderstorms. In these cases, the use of uninterruptible power supplies (UPS) with an autonomous battery will be of great help. If it is impossible to continue DSL operation, you must reset the 2500U router’s settings to factory settings. And also carry out work to restore previously entered data. Firmware updating to the latest software version will be of great help.
The DSL modem indication on the front panel will help in troubleshooting the hardware (“hardware”). The exception is when the Power LED is not lit. For this option, replacing the AC voltage adapter will be useful. It is necessary to check the serviceability of the wires and measure the voltage using a multimeter. It will be useful to examine all cable connectors for their reliable connection and check the serviceability of the communication lines of the system equipment. Sometimes the PC is to blame for the lack of Internet information. If it is possible to check this version, it can be replaced for a while.
After the verification activities have been carried out, the service consumer must call the operator’s technical support service and report the problem. If the provider's equipment operates normally, assistance from warranty or repair shops is required.
How do I change the default D-Link password?
One of the main security aspects of your router is the password for accessing the administrator section. Therefore, immediately after you have completed the initial setup of D-Link, you need to open the “System - Administrator Password” section
And set a new authorization key in the router system. It is desirable that it consist not only of letters of different case and numbers, but also contain special characters. This way you will protect yourself and your entire local network from scammers as much as possible.
Updating DSL router firmware
Connecting to wireless Internet: what you need and how to do it
You need to update the 2500U router, that is, its software version, if numerous problems accumulate. Before starting DSL firmware, you need to carefully study the stickers on the product body, determine its hardware version (H/W) or revision type. As well as the software version (S/W) at the time of release. S/W version or line type are: annex a, annex b. And the revision is A, C, D.
On the website www.dlink.ru you need to download the latest file with the bin extension from the Firmware folder and save it on your computer.
On the main page of the interface, go to the “System” tab. In it, select the “Software Update” item, and on the new page, click the “Browse” button. After finding the downloaded file, click on the “Update” button to install the new 2500U router software. Once the update process is complete, your computer will automatically restart and return to factory settings. You will have to re-configure the DSL router using the technology described above.
Connecting a modem to a computer
Everything should be simple here. We take the blue cord from the box with the modem, insert one end into the yellow connector of the modem (the color may be different, it doesn’t matter), the other into the same port on the back of the computer. Don't you find it? Very rarely, but it happens. Then you need to go to the store and buy any network card, any cheap one for 10/100 megabits is enough. Then it needs to be installed in the PCI slot of the motherboard. How to do this is written here.
If you have Windows Vista or Windows 7, at some stage a window will appear asking you to select your network type. Select "Public Network". In this case, you do not need to touch the network card settings, everything will be configured automatically. After proper connection, the light on the modem with the inscription “LAN” will light up (or blink). If you encounter problems, read the fourth part of the article; there are solutions to common problems.
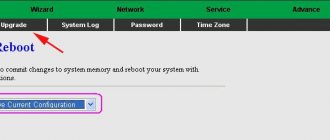
Resetting the 2500U router to factory settings
The DSL modem has hardware and software resets. To return the hardware settings of the 2500U router to factory values, there is a Reset button recessed into a narrow socket. It must be pressed with a thin rod and held for 10-15 seconds. After this, you need to wait for a minute for the blinking to stop. Factory settings will be restored.
To perform a soft reset on the 2500U, after logging into the administration page, click on the “Manual Configure” tab. On the new page, move the cursor over the “System” inscription in the upper right corner, click it and select “Factory settings”. By clicking on the item, start the process of restoring the original values, followed by an automatic reboot of the DSL router.
Using additional options
Setting up IP TV from Rostelecom
To receive IP-TV, you need to create a connection for it by selecting advanced settings and clicking the Add button. When configuring this connection, check the box next to the IGMP parameter (Enable IGMP Multicast). The VPI and VCI parameters will be reported to the user by Rostelecom, for example VPI [0-255] = 2 and VCI [0-65535] = 75.
Set the checkboxes for WAN IP addresses, gateway and DNS server to automatically obtain addresses. Save the settings you have made, and then reboot the modem. It is now configured for 4 connections.
Conclusion
A review of the D-Link DSL-2500U router shows that the model is used where only ADSL telephone lines exist, through which the Internet can be transmitted at a satisfactory speed. DSL is an entry-level budget device. It is impossible to organize a local network on its basis. The principle “one modem - one computer” applies here. The operating history of the 2500U modem goes back more than 10 years. DSL has rightfully earned a “well-deserved pension.”
pros
The positive qualities of DSL include:
- The 2500U has a relatively easy setup process with the ability to quickly return to the original values in case of an error;
- the ability to use DSL in telephone lines with a high level of interference;
- availability of a large database of components for device repair.
Minuses
Negative qualities of 2500U today are considered:
- lack of a wireless communication module or USB connector;
- presence of only one network port;
- outdated element base, leading to frequent failures;
- low speed of data exchange on the network.
Authorization in the router management web interface
To enter the router configuration interface, users need to find out its IP address on the home network. To do this you need to do the following:
- Click on the network connection icon in the Windows tray (to the left of the date and time).
- Click on the “Control Center...” hyperlink.
- Go to the section called "Adapter Settings".
- Right-click on the current network icon and select “Properties”.
- In the new window that opens, you need to click “Details”.
- In the list of network parameters, find “Gateway” - this is the desired device address.
You can also find this information on a label affixed to the bottom cover of the router (“Adress” parameter). Now you can log in to the D-DSL-2500U settings menu:
- Launch your internet browser.
- In the address line, enter the found device address and press Enter.
- A pop-up window will open in front of you, in which you need to enter your password and login to access the router settings. They can also be found on a sticker on the cover of the device. The most common combination is “admin” and “admin”.
- If you have entered the correct values, you will log in to the system and can proceed with the settings.
Appearance, purpose of indicators and technical characteristics
The modem case is made of matte black plastic with ventilation holes on top. On the front panel there are LEDs indicating operating modes, and on the rear panel there are interface connectors and a socket for connecting a network adapter.
The presence of only one LAN port indicates that this device is clearly not intended for the office
Table: purpose of indicators on the front panel of the modem
| Power | Power indicator. Lights up continuously when the device is plugged in. |
| Status | Network activity indicator. Flashes when data is being exchanged between the Internet and the local network. |
| LAN | LAN activity indicator. Flashes when exchanging data with the local network (computer). |
| ADSL | ADSL line status indicator. Flashes when the modem is trying to establish a connection. Lights up continuously when communication is successfully established. |
| Internet | Internet connection indicator. Lights up continuously when a communication session with the provider has been successfully established. |
Modem specifications
Several varieties (revisions) of the DSL-2500U were released, which differ only in the type of processor and flash memory. Their characteristics are almost the same.
Table: comparison of models of different versions
| Model | Audit | CPU | Flash memory size | Flash memory type | RAM capacity | Number of network ports |
| DSL-2500U | A1 | BCM6338 | 2 MB | Parallel | 8MB | 1 |
| DSL-2500U/BRU/C | C1 | BCM6332 | 2 MB | Serial | 8MB | 1 |
| DSL-2500U/BRU/D | D1 | BCM6332 | 2 MB | Serial | 8MB | 1 |
| DSL-2500U/BRU/D | D2 | BCM6332 | 2 MB | Serial | 8MB | 1 |
| DSL-2500U/BRU/D | D3 | BCM6332 | 2 MB | Serial | 8MB | 1 |
| DSL-2500U/BRU/D | D4 | BCM6332 | 2 MB | Serial | 8MB | 1 |
FAQ
Here I will leave a list of questions and answers to the most common problems. If your problem is not here, you can leave your question in the comment. Perhaps he will be the one to add to this list in the future:
- The LAN indicator is not lit. LAN – connection to a local network port (which goes to the computer). If it does not light up, the problem is somewhere in this connection, check the cable.
- Can't connect to address 192.168.1.1. Check if the LAN light is on. If it is on, see if the network connection is displayed on your computer. Next, don’t forget to look at the sticker on the bottom of the router – is that the address there too? If this is the case, most likely your computer simply received incorrect settings from the DHCP modem. The simplest solution is to turn everything off and then back on. Difficult - setting up the network adapter manually. I won’t write about it here, but if anything happens, I’ll give instructions in the comments.
- How to reconfigure the Internet? If your provider has changed and your login, password, VCI, VPI have changed, open the router settings. This changes on the “Advanced Setup - WAN” page. Don't forget to save!
- Still no internet! Check everything again, and then call your provider!
- The Internet light is on, but there is no Internet. Reboot and check your network settings again as in the steps above! There is Internet on the router itself, the problem is somewhere on the computer.
- The DSL light is not on. Or there is a problem with the provider's cable connection, or with the provider in general. Call him.
- When you pick up the phone, the Internet resets. Check the splitter.
- Other problems with the Internet - resets, slow, cuts speed. Call your provider and ask about this. As an addition, I remember my first modem - it got warm and because of this it endlessly rebooted. Simply replacing it helps.
Preparatory activities
Obviously, before you start setting up, you need to connect the device correctly. The procedure is not complicated, and it is almost impossible to make a mistake, since the device is equipped with all the necessary sockets in a minimum quantity, and they have different calibers, which will not allow installing the wrong plug in them.
You only need to do a few sequential steps:
- Install an ADSL wire from the Internet provider, that is, from Rostelecom, into the socket labeled DSL;
- The router comes with a special wire called a “patch cord” that should be used to connect the router to the computer. To do this, install either of the identical ends of the cable into the LAN connector of the router, and insert the other end into the corresponding port of the PC’s network card;
- Use the supplied adapter to connect the device to the mains, supplying power to the device through the round connector labeled “AV”;
- At the final stage, you need to click the “ON/OFF” key and wait for the device to start;
- Ready. Now you can move on to the next step before setting up the modem, i.e., the procedure for opening the router’s web interface.