How to connect a router
The first thing you need to figure out is which Wi-Fi router can be used to connect to the Internet from Rostelecom. On the official website of the presented provider there is the following list of recommended equipment:
- Intercross ICxDSL 5633 NE-02;
- Sagem FAST 2804;
- NEC XaVi 825;
- D-.
After you have selected the necessary equipment and purchased it, you can begin to physically connect the router. This procedure is performed as follows:
- First of all, select the location where the Wi-Fi router will be located. When choosing a location, consider the signal range.
- After choosing a location, run the Internet cable to the router.
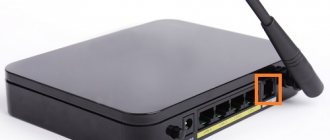
- Connect the cable to the connector marked “Line”.
- Connect the cable from the router to the connector labeled “Phone”.
- Connect the DSL connector with a cable to the connector located on the splitter and called “Modern”.
Firmware
You can update the firmware in the Upgrade Firmware section of the interface in the Admin tab. The procedure looks like this:
- download the file with updated software from the manufacturer;
- By clicking “Browse”, write down the path to the downloaded file;
- Click on the Upload button to start the update.
It takes some time to completely install the firmware. You cannot interrupt the process or turn off the router. Typically, Intercross ICXDSL 5633 is flashed in two to three minutes.
A blog for those interested in IT and more
Configuring Intecross ICxDSL 5633 E/UE/NE modems
With your browser open, enter in the address bar: “https://192.168.1.1.”
Press the Enter key, then the dialog box that I demonstrated above will appear.
and press the Enter key.
Before setting up the router, I recommend resetting all Intecross settings to factory settings; this can be done easily by pressing the “Reset” button on the modem case for 15-30, and then rebooting it.
Appearance and firmware interface
Externally, the Intecross ICxDSL 5633 E/UE/NE models look like this:
Saturday, November 21, 2009
Flashing the Intercross 5633E dsl modem to D-link DSL-2500U
Somehow I came across this product of the domestic radio industry (https://intercross.ru/catalog/xdsl/), which was located in one organization and was provided by the Samtelecom provider))) The modem was single-port. I’ll say right away that I didn’t like the filling and I I decided to look on the Internet for how to reflash this miracle Yudo. The provider's technical support was not working on Sunday, so I had to Google it.
It turned out that the firmware from D-link DSL-2500U was suitable. The only thing you need to make sure is that in the settings on the very first tab of Intercross there is an entry Board >96338L-2M-8M, otherwise you need to look for another firmware, i.e. if you have an Annex A modem, you can safely sew, if Annex B you need to look for another firmware (as far as I understand, this is for example RU_B_1.52 - ftp://ftp.dlink.ru/pub/ADSL/DSL-2500U_BRU_DB/Firmware/RU_B_1.52 /) So, go to the D-link ftp and download the required firmware. And we need 3H00. ftp://ftp.dlink.ru/pub/ADSL/DSL-2500U/Firmware/V.3-06-04-3H00/RU_DSL-2500U_306043H00.zip Unpack the archive, and be careful here! You need to give the unpacked file the bin extension. The result will be RU_DSL-2500U_306043H00_cfe_fs_kernel. bin
That's it, go to the Update Software tab and indicate the path to the downloaded and renamed firmware. We wait 2 minutes for the firmware to install. Well, then we configure it according to the instructions from D-link DSL-2500U))) By default, the address is https://192.168.1.1 admin admin And to get to the admin panel, you need to either set “Obtain an IP address automatically” in the properties of the network card, or manually set settings: 192.168.1.2 255.255.255.0 192.168.1.1
As a result, I configured the modem as a DSL router, plugged it into the switch, and then everyone in the office rejoiced in the benefits of the Internet. I must say that the now flashed router held the pppoe session normally, which I was undoubtedly happy about.
Login to settings
After installing the router to the computer, you need to set the connection parameters correctly. To do this, the user needs to go to the appropriate section. You can do this as follows:
- All Intercross modems have the following default IP address - 192.168.1.1. Therefore, you need to set the subnet address 192.168.1.0 on your computer, and fill in the IP address of the modem (listed above) in the gateway section.
- After that, open any browser installed on your computer.
- In the address bar, enter the IP address of the modem.
- An authorization window will open.
- In the login and password fields, enter “admin” (without quotes).
This way, you can go to the Wi-Fi settings section of the Intercross router. Read below about how to properly configure a router to connect to the Internet from Rostelecom.
What equipment is needed for the Internet from Rostelecom, depending on the type of connection
To connect to the Internet from Rostelecom, you need to purchase and configure equipment. It can also be rented from a provider, with the right to later purchase. Depending on the connection technology, the composition of the equipment also changes.
Equipment for connection via telephone line
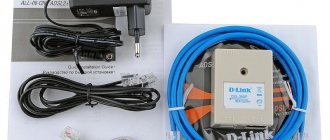
If you connect via a telephone line, you will need an ADSL modem.
Select and connect an ADSL modem to the network
ADSL modems of different types connect to the Internet after installing a special filter called a splitter. It serves to separate the analog voice signal and the digital Internet signal, which allows you to use the telephone and the Internet at the same time.
Connect the splitter to the network in front of the modem
Video: connecting and setting up an ADSL modem
The modem must be equipped with a Wi-Fi device in order to be able to support multiple devices on the network.
Fiber optic connection equipment
When connecting via a fiber optic line, you will need a GPON modem.
Such a modem can combine the functions of Ethernet and a Wi-Fi router. If possible, it is best to immediately install a router to organize an intra-house network.
Purchase and connect a router to the network
It will help divide the Internet signal into several devices, such as a laptop, tablet, smartphone, TV, phone and others. Separation can be done via wires connected to the LAN connectors of the router or via a Wi-Fi connection. You can configure the router through any browser on the standard settings website, for example, 192.168.100.1.
Video: connecting to the Internet via fiber optic cable
Rostelecom uses several types of routers, with the manufacturers of which it has an agreement.
Equipment for connecting via Wi-Fi technology
When connecting via Wi-Fi technology to a private household, you will need a set of equipment.
As a rule, the kit is specified in the contract or on the distributor's website.
Select the necessary equipment to connect to the Internet
The kit includes:
- LTE antenna designed to receive a wireless Internet signal from a long-range access point;
- Wi-Fi router designed to receive and split the signal;
- adapters for wired connections;
- connecting cable for connecting the antenna to the router and internal wiring;
- wall mounts for cables.
Video: operating principle of equipment when connected via wireless technology
To connect Wi-Fi in an apartment, you need a router with a built-in radio module. It will distribute the signal between the user's wireless communication devices. The provider's cable is connected to the router and after configuration, the signal is transmitted using radio waves of a given range.
Equipment for connecting to the Internet using 3G and 4G technology
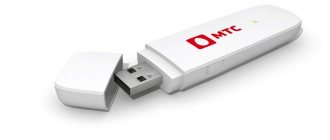
Internet from Rostelecom can also be connected using 3G and 4G technology, if technical conditions allow. For such a connection, the networks of the mobile operator Rostelecom and LTE antennas are used. The connection is made using a special modem, distributed in USB format, equipped with a SIM card with a special tariff, or a portable device with a radio module.
Select 3G modem or 4G modem to connect to the Internet
The 3G modem can support speeds up to 3.4 megabits per second, and the 4G modem up to 30 megabits per second. In the future, the manufacturer promises an increase in speed to 1 gigabit per second.
Video: Rostelecom will provide Russia with 4G communications
Equipment for connecting to the Internet via television cable
If technical conditions in the region allow, then connecting to the Internet can be made using DOCSIS technology, using a television cable as an Internet signal conductor.
Rent a modem from
A modem for connecting via television cable can be rented from. This modem is equipped with a key built into the firmware. It does not require additional configuration and immediately after connecting to the television cable it decodes the television signal into an Ethernet signal.
ICxDSL 5633 E: 263 comments
Good afternoon. My question is this. At 192.168.1.1 it says that the speed is 2047kbps. But when downloading files via torrent, Steam and other launchers, the speed is 180-200kbps. What could be the problem?
Apparently, this is the speed on the port. To be honest, not enough. Try submitting a request to technical support to check the line.
Script in VBASIC.
1.Create a text file with the vbs extension
2. Copy and paste the following text into it:
Set oShell = WScript.CreateObject("WScript.Shell") oShell.Run "telnet 192.168.1.1" WScript.Sleep 1000 oShell.SendKeys "admin" & chr(13) WScript.Sleep 1000 oShell.SendKeys "admin" & chr( 13) WScript.Sleep 1000 oShell.SendKeys “config” & chr(13) WScript.Sleep 1000 oShell.SendKeys “wan interface modify pppoe1 pppsettings username 77740 password PASSWORD connecttype continuous defaultgw on enable” & chr(13) WScript.Sleep 1000 oShell .SendKeys “save” & chr(13) WScript.Sleep 1000 oShell.SendKeys “exit” & chr(13) WScript.Sleep 1000 oShell.SendKeys “exit” & chr(13)
Appearance and interface
After authorization in the Intercross router window, the user will be taken to the main page, where you can find out the following information: DSL connection status, current network connection speed, connection time. The router window will present the following sections, which will later be needed to configure the router:
- us. The main page that opens immediately after logging in. All information about the connection is indicated here.
- Wizard. By opening this section, you can change the basic settings of the router.
- Lan. Information about the local area network is indicated here.
- Wan. A global computer network is configured here.
- Advance.DNS server parameters are set here.
- Admin. This section allows you to set a new password to log into the Intercross router setup system.
- Diagnostic. The last available section in which system diagnostics are performed.
Read more about corporate unlimited VIP from Megafon
How to connect unlimited Internet on Tele2 for a modem and phone without traffic limitation is written here
5 ways to determine location by phone number for free without the subscriber’s consent:
What is ADSL?
xDSL technologies are a method of organizing data exchange that allows you to use a standard telephone line to simultaneously make calls and access the Internet. This is achieved by dividing the frequency band for each type of signal. This type of connection combines several standards under a common name, of which the following are currently relevant:
- ADSL2+ – maximum data transfer speed is up to 24 Mbit/s.
- VDSL is a more modern line that is capable of transmitting traffic at speeds of up to 52 Mbit/s.
High frequencies make it possible to exchange packets with servers much faster when using modern routers.
Internet and Wi-Fi setup
Having opened the router’s web interface, you will find yourself on the “us” tab. Setting up basic functions (Internet connection, Wi-Fi network) is performed on other tabs: “Setup” -> “WAN” and “Wireless” -> “Basic”. And also, there are additional options that are also important. We believe these options include port forwarding and IPTV broadcasting. First of all, let's set up Internet access.
Internet connection settings, setup
Open the “Setup” -> “WAN” tab. Delete all rows (if any) from the table using the Trash icon. Then, click "Add":
Internet connection settings page
Select the type of connection to use, for example "DHCP client":
Internet connection setup option
If a connection of the specified type is used, we select the “Enable WAN” and “Enable NAT” options, and let the rest be by default. To apply the settings, click “Apply”.
Setting DNS addresses is sometimes required explicitly, which is always specified in the contract. To do this, just move the “Domain Name...” selector to the “Manual” position. To configure “PPPoE” we would use the same checkboxes that are selected in our example. But also, it would be necessary to set the subscriber’s login and password. In general, the router in question supports both PPTP and L2TP (“dual access” in both cases). Whether this will work, for example, with Beeline or Corbina, science is silent.
The main thing is that the router considered here provides the ability to combine a WAN port with any of the LAN ports.
Let's say the standard Internet port has burned out. Then, we go to the interface, check the box next to “LAN1” or “LAN2”, and use the port we have chosen to connect to the provider. This “trick” is not allowed for all device models. But Intercross, as we see, is doing fine.
Enabling the built-in access point
Any wireless network is designed according to the same scheme: there is a central element, the so-called “access point”, and other elements (subscribers) are connected to this “center”. Now we must enable the access point, which is located in the router. We will give it a name and set all the parameters of the wireless network:
Wi-Fi network settings page
The values of the main parameters are set on the “Wireless” -> “Basic” tab:
- Check the “Enable” checkbox;
- Select the mode - 802.11 protocol (let it be “BGN” first);
- You must select whether dual-channel mode (40 MHz) is used. Try setting it to "20" and then go to "40";
- Rate – always leave it at “Auto”;
- Transmitter power - let it be 100%, then try to reduce it;
- Country: RUSSIA;
- Channel number - select “Auto” if you do not know which radio channel is free.
Apply the settings by clicking “Submit”.
Let's go to the "SSID" tab. Here you are required to click “Edit” in the first row of the table:
Setting up SSID and encryption
In terms of Wi-Fi networks, the SSID is the name. Set it, and then enable encryption by moving the selector to the “Enable” position. It is better to use WPA2-PSK mode, but if not all subscribers will pass identification, enable WPA-PSK. On the tab you need to set a password and click “Submit”.
Additional options: UPnP, IPTV
For some programs, such as ICQ, Skype and Torrent client, port forwarding is configured in the router. This is done on the “Advanced” -> “Virtual Servers” tab:
Adding a port forwarding rule
At the same time, there is an alternative option when port forwarding is configured “automatically”. To enable it, go to the “UPnP” tab, check the single box and click “Submit”. This option is recommended, but still, some online games cannot use UPnP. Remember the following: you can set port forwarding rules when the “UPnP” option is disabled.
If your provider broadcasts IPTV and you need to watch TV on your computer, then go to the “Advanced” -> “IGMP” tab. There will be a couple of bookmarks, “Proxy” and “Snooping”. Check each of them and click “Submit”:
Enabling IPTV on the network
Having done everything as indicated, you can open the IPTV player or the VLC application. They need to be configured in advance, before connecting the router. Good luck.
Characteristics of the RX-22312 router
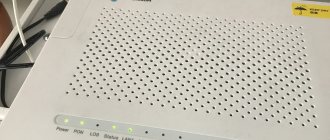
The Rotek WiFi router is made in a horizontal plastic case. Medium in size, with internal antennas.
Representatives of the manufacturing company were unable to obtain any clear information about the hardware of Rotek routers. Here's what I managed to dig up on this model:
- Chip – Realtek RTL8197F MIPS 24Kc
- Frequency - 600 MHz
- RAM 64 MB DDR2
- WiFi 2.4 GHZ – 2T2R 802.11 b/g/n
- WiFi 5 GHZ – 2T2R + 802.11 n/ac
- ac module - RTL8812BR
What does the Rotek RX-22312 have with ports? Almost the same as its predecessor:
1 x WAN 100 Mbit/s 4 x LAN 100 Mbit/s 1 x USB 2.0
The difference is the added USB port, into which you can connect 3G/4G modems as a backup channel. Unfortunately, I don’t have a list of supported modems and haven’t been able to find one yet.
In terms of software, everything is standard. The router can work with PPPoE and IpoE (without VPN). supports IPv6 and VLAN. In principle, it can be used on the network of almost any Russian provider without the need to upgrade to other software.
Setting up an Intercross modem for Rostelecom - instructions
Having connected the router to the computer and having understood the interface of the Intercross router, you can begin configuration.
Setting up the Intercross router:
- First you need to open the router settings window. To do this, launch any browser and enter the following query in the search bar - 192.168.1.1.
- An authorization window will open.
- In the login and password fields, enter “admin” (without quotes).
- Once in the main settings menu, go to the “Wizard” or “Advanced Setup” section (depending on the version of your router).
- Remove factory settings by clicking the “Remove” button.
- Now add your own settings by clicking on the “Add” button.
- Specify the IP address and DNS of the server (this information is provided in the agreement that you entered into when connecting).
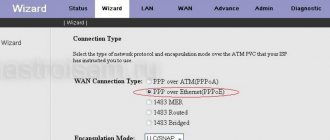
- In the VPI item, set the value to 0.
- In the VCI item, set the value to 35.
- In the Service item, specify “UBR Without PCR”.
- Select the connection type “PPP over Ethernet PPPoE”.
- In the Encapsulation Mode section, specify "LLC/SNAP-BRIDGING".
- Next, enter the username and password from your agreement.
- Check the boxes: Enable NAT, Enable Firewall, Enable Wan Service.
- Specify the name of the connection (you can enter any name).
- Familiarize yourself with all the configured settings.
- If everything is specified correctly, click “Save”.
After completing all the steps indicated above, you can successfully set up an Internet connection through the Intercross router. If you have any problems connecting, then first of all, repeat the connection procedure. If you have any difficulties, ask Rostelecom employees how to set up the Intercross modem.
Video “Configuring an Intercross modem in PPPoE operating mode”
Connecting IP-TV
We need each computer to be able to receive multicast streams sent by the provider to the network. The setup is carried out in three steps: a MER class connection is created, IGMP Snooping is enabled in the local area, then the IGMP proxy server is configured. The first action is performed on the “Network” -> “WAN” tab:
Connection for IPTV
Find out what the parameters used to connect to the virtual channel through which IPTV is transmitted look like. You need to know what VPI-VCI is equal to, encapsulation type (LLC or VC-Mux), IP address (it can be dynamic). All this is in the agreement with the provider.
We combined the last two steps into one sequence:
IGMP option, its configuration
- You need to go to the “Network” -> “LAN” tab
- In the line “IGMP Snooping” you need to set the selector “Enable”
- On the tab click “Apply Changes”
- Having completed the above, go to the “Service” -> “IGMP Proxy” page
- Then, the top selector is set to “Enable”
- Do the same with the “Multicast Allowed” selector.
- Click “Apply Changes”
After completing this setup, you may have to reboot the router. How to perform this action is discussed in the previous chapter. By the way, the router uses IGMP version “1”, but a more modern protocol (IGMP v2) is becoming relevant.