DSL technology is considered outdated, but people still continue to use it, since often there are simply no alternatives (for example, other providers do not work in the house yet and they do not want to connect the line). ADSL requires a special modem to work. Usually it comes immediately with the functions of a router - with Wi-Fi.
- 2 How to choose an ADSL modem: what to look for
2.1 Manufacturers and best models
Briefly about DSL technology itself: its history, pros and cons
DSL technology appeared in 1987, when the American company Bellcore began using it to display interactive TV. The company later closed. Other operators remembered the technology in 1994, because they saw its benefits - it quickly paid for itself.
The modem usually has a gray ADSL output
DSL works over a telephone line. You will be able to use both the Internet and a landline phone at the same time thanks to the splitter, which will divide the signal for two tasks. ADSL (Asymmetric Digital Subscriber Line) is one type of technology. An ADSL modem differs from a regular router in that it converts the telephone signal so that it can be recognized by devices on the Wi-Fi network (PC, telephone, etc.).
The disadvantage of the ADSL standard is its low speed (up to 24 Mbit/s). But at the same time, it is budget-friendly, unlike GPON. The technology is suitable for those who download more from the Internet than upload something to it.
How to choose an ADSL modem: what to look for
What parameters to look for when choosing an ADSL modem:
- ADSL version. There are three options: ADSL, ADSL2 and ADSL2+. It is better to take the latter, since it is the one that will give you the maximum speed of 24 Mbit/s. The first two will provide only 8 and 12 Mbit/s, respectively.
- Annex standard. It determines how the modem will work together with the phone. It is better to take Annex A, which will give a minimum of interference. It is supported by most providers.
- DHCP server. It is required to distribute local IP addresses to devices on the Wi-Fi network.
- Method of connecting to a PC. Between USB and Ethernet, choose the latter option. The number of local ports should be appropriate - it depends on how many devices you want to connect to the modem via cable, and not via Wi-Fi.
- Wi-Fi standard. Take at least 802.11n - it is popular and fast.
- Antennas. For a small room area, one antenna will do. But if you have a large apartment, you need to take a modem with at least two antennas. But at the same time, be sure to look at their power to avoid “dead zones”.
Manufacturers and best models
Popular brands of ADSL modems: TP-Link, D-Link, Asus, Upvel and others. What specific models can be recommended from these manufacturers with ADSL2+ and an 802.11n network:
- D-Link DSL-2650U. 4 LAN ports at 100 Mbit/s, support for 3G modem. The NRU/C version has a maximum speed of 65 Mbit/s. Costs about 1800 rubles.
- Zyxel Keenetic DSL. Maximum speed - 300 Mbit/s, support for 4G modem and USB print server, 4 local ports at 100 Mbit/s. Cost from 1500 rubles.
Zyxel Keenetic DSL has two antennas and USB modem support
- Asus DSL-N14U. Almost the same characteristics as the previous device. The price is about 2400 rubles.
- TP-LINK TD-W8968. The same switch with 4 local ports, speed 300 Mbit/s, but no USB output. Price - from 1600 rubles.
Connecting to a computer and telephone line
Let's look at the setup below using the ASUS DSL-N14U model as an example. Let's start with a physical connection to the provider line:
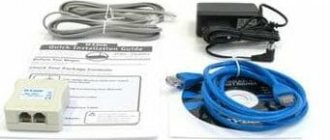
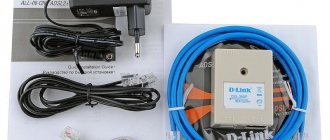
- We take the splitter from the kit (or purchased separately). We connect the telephone cable from the entrance to the LINE connector.
Using a splitter, disconnect the signal for the modem and phone
- We insert the cable from the phone into PHONE, and then connect the ADSL modem to the MODEM socket on the splitter using the network cable included.
- We connect the PC and the ADSL modem via a network port with another cable (on the modem there is a LAN port, on the computer there is a similar network card slot). You can simply go to the modem’s “Wi-Fi”, but it’s better to configure it via cable.
The modem must be connected to the line and PC
- We connect the charger to the modem. We turn it on and wait for the system to boot.
Wireless network
Today, most different devices access the Internet using built-in Wi-Fi modules. This is why most users configure their ADSL modems to work together with Wi-Fi routers.
You can make this connection as follows:
- connect the Internet cable to the LAN port located at the back of the modem;
- in the modem settings via the WEB interface, you need to open the DHCPSetup tab in the Network->Lan section and disable the DHCP server;
- click the “Apply” button to save the settings;
- parameters such as subnet mask, IP address, gateway and DNS server are registered manually;
- set up a secure Wi-Fi connection through the Wireless Lan menu;
- Next, in the network settings of the Wi-Fi router you are using, you need to write down those defined by your provider: subnet mask, IP address, gateway IP address, DNS server.
Many people ask themselves the question: how to configure an ADSL modem and Wi-Fi router in a mode that eliminates the occurrence of various errors? This is quite simple to do; you just need to carefully read the accompanying documentation.
Preparing to configure your computer’s network card and logging into the web interface with settings
What you need to do with the network card settings:
- Launch the “Run” window: hold down “Win” and R and write the word ncpa.cpl - click on OK.
- Select the Ethernet network card with the right button - click on properties.
- Select IPv4 protocol. Open its properties. Specify automatic retrieval of data (IP and DNS) in the settings. Save your settings.
Now go to the modem settings panel itself:
- Launch your browser and write the address 192.16.1.1 or 192.168.0.1 in the line.
- Go to the address and enter the authorization data - the word admin as the password and login.
- Login to the interface. Go to the "Advanced Settings" section in the list on the left.
Click on the “Advanced Settings” section
Setting up a modem in bridge mode
To configure an ADSL modem in bridge mode, you must perform the following steps:
- go to the setup mode via the WEB interface, for which you just need to enter 192.168.1.1 in the address bar of the browser;
- after entering your login and password, check the box in two places (“GotoAdvancedSetup” and “Clickheretoalwaysstart ... .”);
- Next you need to go to the Network->WAN menu. In the Internet Connection tab, set the “Bridge” mode;
- in the “Encapsulation” field you must write RFC 1483;
- Click the “Apply” button.
The setup is complete.
Setting up an Internet connection
Let's start setting up your Internet depending on the protocol your provider uses:
- Let's go to the WAN block. In the first tab for the Internet connection we will configure everything.
- Ask your operator for VPI and VCI parameters for your region. Please indicate them in the appropriate fields.
Specify VPI and VCI
- Set the connection type (protocol). What options may there be: dynamic IP (Beeline, Akado, Online, Rostelecom), static IP (Akado, Lealta), PPTP, L2TP (Beeline, Avelakom), PPPoE (Starnet, Netbaynet, MTS, Rostelecom). In any case, you first need to look at the contract with your provider, since providers in different regions may work with different protocols. The agreement must specify the protocol and the corresponding parameters for setting up your Internet. As a last resort, you can call the provider’s support service - a specialist will explain everything to you and provide you with data.
Set the protocol that is valid for your connection
- If you have a dynamic IP. If necessary, install your DNS server in the DNS WAN and apply the settings.
- If you have PPPoE, L2TP, PPTP, you need to specify the user name and password from the agreement in the “Account Settings” menu. In case of L2TP and PPTP, additionally write the VPN server address in the last menu “Vendor Special Requirements”. Click "Apply".
INTERCROSS
General guide for setting up ADSL modems ICxDSL 5633 E/UE/NE/NE-02
JSC "INTERCROSS"
page 1
Content
INTRODUCTION ...4 Features ...4 Supported Protocols ...4 System Requirements ...5 Front Panel LED Status Descriptions ...5 Rear Panel Descriptions ...6 Safety Instructions ...6 Information You Need to Obtain from Your ADSL Provider ...7 Information You Need on the ICxDSL 5633 E/ NE ...7 Necessary information about the computer ...7 CONNECTING THE MODEM ...8 CONFIGURING THE MODEM ...9 Which connection mode to choose ...9 Setting up the modem in the WEB interface ...9 Main menu ...13 Quick Setup Wizard ...13 Modem settings in transparent bridge mode (Bridge) ... 17 Modem settings in router mode (PPPoE connection) ...18 Service settings ...19 DNS server settings ...20 Dynamic DNS settings ...20 Description of LAN settings ...21 DHCP settings ...21 QUESTIONS AND ANSWERS ...22 Technical support ...23 page
2
Introduction
This family of modems/routers with an Ethernet interface is designed primarily for high-speed Internet connections via ADSL2/2+ protocols with downstream speeds of up to 24Mbps and upstream speeds of up to 1024Kbps.
This guide provides clear and easy-to-understand information on how to install and configure your router. This manual describes the settings of four types of modems: · ICxDSL 5633E with one 10/100 Ethernet port · ICxDSL 5633UE with one 10/100 Ethernet port and one USB 1.1 port · ICxDSL 5633NE with four 10/100 Ethernet ports · ICxDSL 5633NE-02 with four 10/100 Ethernet ports and Wi-Fi interface
Possibilities
The ICxDSL 5633 ADSL Router uses the latest ADSL extensions to provide reliable Internet access suitable for many small and medium-sized offices. ICxDSL 5633 has the following characteristics:
Main characteristics
· ADSL modem with bridge and router functionality · Maximum line length of 5.4 kilometers · High speed: downstream speed up to 24Mbps, upstream up to 1024Kbps · NAT/NAPT support for shared IP use · Video support: IGMP Snooping, IGMP Proxy · DHCP support Server / Relay, DNS relay, DynDNS for your local network Security: NAT, IP filtering, Password Authentication, DOS (Denial of Service) Support for Virtual Server and DMZ Host functions Routing: Static routing, RIP V1 and RIP V2 Capability changing modem software Supports up to 8 Permanent Virtual Circuits (PVC) Compatible with 802.11b, IEEE 802.11g,2.4GHz up to 54Mbps and compatible equipment
Supported protocols
Bridging/Routing · RFC 1483 bridge · IEEE 802.1D transparent bridging/Spanning Tree · Bridge Filtering (MAC filtering) · RFC 1483 Router · RIP v1 & v2 · DHCP (RFC1541) Server, Relay · Network Address Translation (NAT)/ Network Address Port Translation (NAPT) DNS relay IGMP v1 and v2
Encapsulation support
page 3
RFC 1483 bridge/Router PPP over ATM (RFC 2364) PPP over Ethernet (RFC 2516) MER
ADSL
ANSI T1.413 Issue 2 ITU-T G.992.1 (G.dmt) Annex A or Annex B ITU-T G.992.2 (G.lite) Annex A or Annex B ITU-T G.992.3 ADSL2( G.dmt.bis) Annex A, L, M ITU-T G.992.4 ADSL2(G.dmt.bis) ITU-T G.992.5 ADSL2+
Ethernet
· Fully compatible with IEEE802.3/802.3u (auto-negotiation function) · Supports 10base-T, 100base-TX · Supports half duplex, full duplex modes · Supports MDI/MDIX auto-negotiation
Wireless access
· Standards: IEEE802.11b; IEEE 802.11g · Frequency range: 2.4GHz(ISM frequency bands) · Channel speed: 802.11b: 11, 5.5, 2, 1Mbps (DSSS/CCK); 802.11g: 54,48,36,24,18,12,9,6Mbps (OFDM) · Channels: 11: (Book 1-11) – US, Canada FCC; 13: (Book 1-13) – Europe ETSI; 14: (Book 1-14) – Japan ELEC Output power: 802.11b:18.5dBm±1.5dBm; 802.11g:14.5dBm±1.5dBm · Distance: 300 meters in open area; 100 meters in confined environments (indoors) Security: Support 64-bit, 128-bit WEP, AES, TKIP, WPA, WPA2, 802.1x encryption Antenna: One external antenna
Network management
· WEB/TFTP support for remote software update · WEB interface support for management and configuration · Telnet CLI command line support · Saving configuration backup and restoring settings from a configuration file · Support for the ability to change the IP address of the LAN port · System LOG support · SNMP protocol support V1/V2C for remote control (MIB II RFC1213/ADSL line MIB RFC 2662 ATM MIB RFC 2515) Supports TR-069 protocol
Safety
page 4
· Firewall function support · Support for two password classes · DOS (Denial of service) support for protection against certain types of attacks (such as SYN/FIN/RST Flood, Smurf, WinNuke, Echo can, Xmas Tree Scan) · Packet filtering by IP address and port number · Access control based on MAC addresses · Supports PAP, CHAP authentication methods
terms of Use
· Temperature: 0 ~ 40 degrees C (32 ~ 104 degrees F) - Operating · Humidity: 10 ~ 85%, non-condensing (Operating) · Input voltage: AC100-240V, 50/60Hz. Output: 12V DC, 1000 mA(min) · Power dissipation: 10W (max) · Electromagnetic compatibility: FCC class B; CE Mark class B
System requirements
The following system requirements for the computer are recommended: · Processor: Pentium 233MHZ or more · Memory: 64MB or more · CD-ROM drive · 50 MB of free hard disk space (minimum) · Network card 10M Base-T Ethernet or better · Internet Browser: Internet Explorer V5.0 and above, or Netscape V4.0 and above, or Firefox 1.5 and above. Operating system: WIN9X/ WIN2000/ WINXP/ WINME
Description of the status of the front panel LED indicators
On the front panel of your router there are light emitting diode (LED) indicators that show the status and operation of the device.
page 5
Description of the rear panel
On the back panel of your router there are connectors: Line, Ethernet, Reset, Power and the power button. If you use ICxDSL 5633 NE-02, then there is also an antenna for wireless connection (Wi-Fi) on the rear panel
Safety instructions
1• Place the router on a flat, horizontal surface in a room with adequate ventilation.
2• To prevent the equipment from overheating, do not block any ventilation openings on the equipment. 3• Connect your router to a voltage stabilizer to reduce the risk of damage from power surges and lightning. page 6 4• Connect this equipment only to electrical outlets that match the ratings marked on the adapter. 5• Do not remove the protective cover from the equipment. Otherwise, all warranties for the equipment will be void.
• To clean the equipment from dirt and dust, first turn off the power to the equipment. Remove dust from equipment using a damp cloth. Do not use liquid/aerosol cleaners or magnetic/static cleaning devices.
Information you need to obtain from your ADSL provider
After you have entered into an agreement to provide you with ADSL service, the provider (service provider) must provide you with the initial connection data.
(Attention! Without them it is impossible to connect to the ADSL network!). This data must include the following parameters:
Be sure to fill out this table (optional parameters are highlighted in blue, but they can be very useful when setting up).
If your provider offers a non-standard connection method using a static IP address, check the setup procedure with them, since there are several installation options that directly depend on the settings of the provider’s equipment.
Necessary information about ICxDSL 5633 E/UE/NE(02)
Username
This username is required to access the router's management interface. When you try to connect to the device through a Web browser, you will be prompted to enter your username. The default Username on the router is “admin.” The user cannot change it.
Password
You will be prompted to enter this password when accessing through the router's management interface. By default, the password is “admin.” The user can change it.
LAN IP address ICxDSL 5333
You will need to enter this IP address into the Address field of your Web browser to access the router GUI using a Web browser. By default, the IP address is 192.168.1.1. It can be modified according to the user's needs.
LAN subnet mask ICxDSL 5333
By default, the subnet mask is 255.255.255.0, which indicates a class C network. It can be changed later.
Necessary computer information
Ethernet NIC
page 7
If your computer has an Ethernet NIC adapter installed, you can connect the ICxDSL 5633 router to this Ethernet port using an Ethernet cable. When using a four-port modem (ICxDSL 5633 NE/NE-02), you can also use the Ethernet ports to connect another computer or Ethernet devices.
USB port
When using a modem with a USB port (ICxDSL 5633 UE), if your computer does not have an Ethernet NIC adapter installed, you can connect the router to the USB port using a USB cable, and use the Ethernet port to connect another computer or Ethernet device.
Wireless access (Wi-Fi)
When using a modem with Wi-Fi access (ICxDSL 5633 NE-02), and if your computer has an 802.11g or 802.11b access point installed or another 802.11g or 802.11b wireless adapter (for working in Ad-Hoc mode, point -dot), you can use this type of access to connect to the router.
DHCP client status
Your ICxDSL 5633 ADSL router is configured as a DHCP server by default.
This means that it can assign an IP address, subnet mask, and default gateway address to computers on your LAN. By default, the range of IP addresses that the ICxDSL 5633 can assign is from 192.168.1.2 to 192.168.1.254. Your computer(s) must be configured to obtain an IP address automatically (this is necessary to configure them as DHCP clients). After reading the above information, you can proceed to installing and configuring your router. page 8
Please connect your ADSL2/2+ modem using the diagram below and following the steps listed below:
· Connect the modem (LINE connector) and the telephone via the splitter to the telephone socket.
· Using an Ethernet cable, connect the modem's Ethernet port (LAN) to the Ethernet port of your computer.
· Insert the power adapter cord into the power socket located on the back panel of the modem, and connect a nearby power source to the adapter.
page 9
If your computer does not have an Ethernet port, then use a USB connection.
Turn on the modem and your personal computer, check the Ethernet Link indicator to make sure the connection is established. The router will try to establish an ADSL connection, if the ADSL line is turned on and the router is configured properly, this indicator will light up after a few seconds. If you are setting up your router for the first time, you may need to make some adjustments before the router establishes a connection.
Attention:
Use only one interface - USB or Ethernet to connect the modem to one computer. If you use a USB interface to connect:
Connect the USB port of the modem to the USB port of the computer using a USB cable. Please note that different ends of the cable have different connectors. Select the appropriate cable ends for the modem side and the computer side. In order for your computer to be able to correctly determine what kind of device is connected via the USB interface, you need to install additional software (Driver) that comes with the modem.
Setting up the modem
Which connection mode should I choose?
The most commonly used modes when connecting to ADSL are transparent bridge mode and router mode. We will not go into technical details of the implementation of this or that work option; we will only tell you about the main points of the work.
Transparent Bridge Mode
resembles the mode of operation with a regular modem.
You create a new connection and connect to the provider when you need it. But unlike a regular modem, you do not need to call your provider every time. The modem does this after the first setup and is constantly connected. Therefore, the connection procedure takes 1-3 seconds, which is required for authorization on the provider’s server. In this mode, a connection icon also appears, as in the case of using a regular dial-up modem. You can easily break this connection and thus disconnect from the Internet, while maintaining access to the modem management. This is convenient when you are using an internal network and several computers are connected to the modem (for example, your friends or acquaintances). You do not need to worry that someone will connect to the network at your expense, because without knowing the password, it is impossible to connect to the provider in bridge mode. This mode is the most independent of the modem settings, because the latter organizes an end-to-end channel without restrictions.
Router Mode
differs from the transparent bridge mode in that the modem connects to the provider instead of you and opens access to the Internet to all connected computers.
This is convenient when you do not want to create a connection every time (for example, after loading Windows). Having a network connection with a modem means that you are already connected to the Internet. Even if you completely disconnect your computer from the modem, it will not break the connection.
If you are just getting acquainted with this technology, then think about which mode is best for you to use. The safest mode is bridge mode. It is easiest to work with for novice users. Then, once you get comfortable and understand the settings, you can switch to router mode.
Setting up a modem in the WEB interface
Connect your computer to the modem according to the diagram above.
To configure the router's WAN connection, you first need to configure the router using its HTML-based management interface, accessible through a Web browser. The easiest way to ensure that your computer has the correct IP settings is to configure the computer's network interface to use the DHCP protocol.
You can configure the IP configuration of a computer in the Windows operating system as a DHCP client as follows:
In the working window of the operating system, click on the “Start” button, select “Settings”, then “Network connections”.
page 10
page 11
page 12
page 13
Here is a list of the main sections for setting up your modem. There is also an information window in the Status section, which provides brief information about the device.
Quick Setup Wizard (Wizard)
This section describes how to quickly set up your router if your only goal is to gain access to the Internet. To launch the wizard, select the section (Wizard) in the modem menu. Enter the new password, confirm the new password and press (NEXT) to continue
page 14
Enter the values of the VPI and VCI parameters issued by your ISP (Internet Service Provider) Select the Encapsulation Mode for connecting to the Internet in accordance with the information received from your ISP. For each connection type there are different settings that are configured in the Wizard window. Below is an example for connection
Enter the Username and Password received from your provider. To continue, press (NEXT).
page 15
Disable Wireless LAN Interface:
This setting allows you to enable or disable the wireless LAN interface. By default, the wireless connection is enabled.
Band:
The frequency range and mode that the gateway will use to establish connections with wireless devices.
2.4GHz (B): Only 802.11b wireless clients are allowed to connect.
2.4GHz (G): Only 802.11g wireless clients are allowed to connect.
2.4GHz (B+G): co-op mode. Allows 802.11b/g wireless clients to connect simultaneously.
When connecting 802.11b and 802.11g clients simultaneously, throughput may be reduced
SSID (Network Name Transfer):
If automatic detection of an access point using a wireless client is not required, you can disable this feature by selecting Disable. If you disable this feature, the client will not be able to determine the access point. The connection can be established manually by specifying this name in the wireless client program.
None (no security methods are used)
- Any user can access the network. By default, WEP encryption is disabled.
WEP(Wired Equivalent Privacy)
– The simplest and, accordingly, least secure encryption protocol.
When using this method, the router provides 64-bit or 128-bit encryption with four keys, which can be represented in hexadecimal or ASCII format. Each wireless client on the network must use an identical 64-bit or 128-bit key to decrypt data transmissions. To continue, press (NEXT).
page 16
When you have completed all the steps to create a connection, the window will display all the settings you have made.
Check that they are correct and then click on the (Finish) button. Clicking (Finish) will save the settings and reboot the modem.
Configuring the modem in transparent bridge mode (RFC1483 Bridge)
page 17
If you need to change an existing connection, first select it by clicking the mouse cursor in the (Select) column and make the necessary changes in the upper part of the window. You can also create a new connection; to do this, you can immediately go to configure the parameters of the new connection at the top of the window.
1. Select VPI and VCI values; Your DSL service provider or ISP (Internet Service Provider) must communicate them; in this example, the DSL service provider uses 8 and 81.
2. Select the connection type 1483 Bridged as shown in the figure.
3. Select the encapsulation type (LLC or VC) according to your provider's requirements.
4. Click (Modify) if you have changed the parameters of an existing connection, or click (Add) if you are creating a new connection. Also, if necessary, you can set or change the ATM Settings and QoS of your ADSL router.
5. To save all settings, click (save) at the bottom of the window.
Note:
If the provider provides the PPPoE service, you can configure this PPPoE connection either on the local network side (i.e., your computer), or the PPPoE client can be launched on the gateway (which is the modem itself). An example of setting up a PPPoE client for Windows XP is given in the “Setting up a PPPoE client in Windows XP” section.
Configuring a modem in router mode with a PPPoE connection type (PPP over Ethernet RFC 2516)
page 18
PPPoE is also referred to as RFC 2516. It is a method of encapsulating PPP packets over Ethernet. PPP or Point-to-Point protocol is a method of establishing a network connection between end hosts. It is commonly used as an authentication mechanism for Internet users.
To configure the modem in PPPoE mode, select the section (WAN), as a result the Channel Configuration window will appear
If you need to change an existing connection, first select it by clicking the mouse cursor in the (Select) column and make the necessary changes in the upper part of the window. You can also create a new connection; to do this, you can immediately go to configure the parameters of the new connection at the top of the window.
1. Select VPI and VCI values; Your DSL service provider or ISP (Internet Service Provider) must communicate them; in this example the DSL service provider uses 0 and 35.
2. Select the PPPoE connection type as shown in the figure.
3. Select the encapsulation type (LLC or VC) according to your provider's requirements.
4. Enter the Login Name and Password received from your DSL service provider
5. Click (Modify) if you changed the parameters of an existing connection, or click (Add) if you are creating a new connection. Also, if necessary, you can set or change the ATM Settings and QoS of your ADSL router.
6. To save all settings, click (save) at the bottom of the window.
Note:
This guide does not describe setting up a PPP over ATM (PPPoA) connection, as it is done in a similar way to setting up PPPoE.
Setting up the service
page 19
Setting up a DNS server
The DNS service resolves Internet addresses, such as www.microsoft.com, into IP addresses.
On the DNS Configuration page you can choose one of two options for configuring the DNS service: Use automatic DNS assignment - “Attain DNS Automatically”, in this case the router will receive the IP address of the DNS server through one of the activated PVC channels using the PPPoA, PPPoE or MER protocol /DHCP.
Specify the primary and secondary DNS addresses manually – “Set DNS Manually”.
If you selected Set DNS Manually, three additional fields will appear - DNS1, DNS2, DNS3. Enter the required information and click on the button (Apply Changes) and at the bottom of the window click (save) to save the changes made.
Setting up Dynamic DNS
Dynamic DNS is a service that allows you to create a domain name match with dynamic IP addresses.
This allows other Internet users to connect to you without having to track your IP address. In other words, DDNS allows you to assign an Internet name to your router, such as myICrouter.dynDNS.com, so that it can be accessed over the Internet. To do this, you do not need to know the router's IP address assigned by your Internet provider. Check the Enable box to activate the dynamic DNS service. page 20
This window will allow you to add a dynamic DNS address using DynDNS.org or TZO services. First, in the DDNS provider field, select the D-DNS provider—DynDNS.org or TZO—with which you registered your domain name. Enter the hostname in the Hostname field and the Interface to use. Also enter the username and password issued by your DDNS provider. Click the (Add) button to add a new entry to the Dynamic DDNS Table. To delete an entry, mark it in the Select column and click the (Remove) button. To save all settings, click (save) at the bottom of the window.
Description of LAN settings
DHCP Settings
In the (LAN) section at the top of the window, click on the DHCP subsection, as a result a window with the corresponding settings will appear.
If you want computers on your local network to obtain IP addresses dynamically, enable the DHCP server and enter the range of IP addresses that can be assigned to your computer. Turn off the DHCP server if you want to manually (statically) assign IP addresses.
After making changes, click the (Apply Changes) button to apply the new settings. To save and click the (SAVE) button that appears after clicking the (Apply Changes) button,
Below is the DHCP server settings window.
page 21
Questions and answers
1. Question: Why are all the LED indicators off?
Answer: · Check if the power adapter is plugged into the outlet. · Check if the power button on the modem is turned on.
2. Question: Why is the Ethernet LED not lit? Answer:
· Check the reliability of the cable contact between the ADSL modem and your computer or Hub/Switch · Check the readiness of the PC or Hub/Switch. To connect to a PC, use a crossover cable. For Hub/Switch, use a straight cable.
3. Question: Why is the LED Link indicator not lit? Answer: Check that the cable is securely connected to the Line port of the modem.
4. Question: Why is there no Internet access with the LED Link indicator glowing? Answer: Check that the following values are entered correctly: VPI/VCI Username/password
5. Question: Why doesn’t the modem’s web page open? Answer: Follow the following instructions to check the connection with the modem: Click the Windows START button -> Run (enter the ping command) -> Ping 192.168.1.1 (IP address of the modem).
If you do not receive a response from the modem, check the following points: · Type of network cable · Reliability of the connection between the modem and the computer · TCP/IP settings on your computer.
6. Question: How to load factory settings if the modem is not configured correctly?
Answer: The modem can be returned to factory settings by pressing the reset button with a ballpoint pen or paper clip, following the following sequence of actions:
Press and hold the reset button for 5~6 seconds and then release the reset button.
Please note that these steps will erase all settings stored in flash memory, including user accounts and LAN IP settings. The device settings will be reset to factory default settings (IP address 192.168.1.1 and subnet mask 255.255.255.0, Username - “admin”, Password - “admin.”).
Technical support The manufacturer provides free support to customers during the warranty period.
Clients can contact the technical support group of JSC INTERCROSS by phone or via the Internet. Technical support by phone Technical support via the Internet: https://www.intercross.ru email [email protected]
Wi-Fi setup
When the Internet is configured, you must change the password for “Wi-Fi”:
- Go to the “Wireless Network” section.
- We write a new value for the SSID (network name). This is optional, but you can change the default name.
In general settings, specify a new name
- Set the authentication method to WPA2 Personal. Enter the password in the “Shared key” field.
- Apply the settings.
Setting up IPTV
If you bought a set-top box from the operator and, configure the IPTV function on the router:
- Go to the “Local Network - IPTV” tab.
- In the “Select IPTV STB port” drop-down menu, select the number of one or two LAN ports to which the set-top box will be connected. If you choose two ports, you can connect two set-top boxes. Click on the “Apply” button to save the settings.
Select local port from the dropdown menu
- If you have a router with an older, blue firmware, then in the control panel, open the WAN tab, and in the “Select IPTV STB port” menu, specify the desired port. Click on the "Apply" button.
- Turn on the set-top box, TV. Wait until the system boots and check the channels are working.
Router firmware update
How to install the latest firmware version on an ADSL modem:
- Let's download the firmware for the ASUS DSL-N14U model from the official Asus website using the link. If you have a different router, find the download center page for your model on your manufacturer's official website.
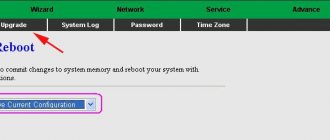
- Open the “Administration” section in the web interface. Click the Firmware Update tab. Click on “Check” so that the firmware itself finds the update for itself.
Run the OS update in the "Administration" section
- If the search is unsuccessful, click on “Browse” and open the previously downloaded firmware file. We launch the update and wait for it to complete. At this time, we do not touch the ADSL modem: we do not disconnect it from the power supply, we do not press any buttons.
How to set up a modem connection
In fact, all settings for a modem connection come down to installing the network card driver, as well as configuring the modem via the web interface. First of all, check that the network equipment is correctly defined in Device Manager. If you notice any alarm icons or other messages about a software error or incompatibility, then uninstall the current version of the driver and install a new version, previously downloaded from the website of the developer of this equipment. Next, you need to check whether DHCP support is enabled on your wired adapter. It is, of course, better to clearly mark IP addresses, but it is easier and clearer to use DHCP, where these manipulations occur automatically.