Today we will talk about how to create an email on your Android phone for free. Using most of the functions in practice on the Android system is only possible with a Google account. During the creation of such an account, email registration occurs. The new box becomes the main one for a smartphone or other device running Android. The same account can be used to install applications from the Google Play store. In addition, you can register your mail on another service. To use it, you will need to install separate applications.
Yandex
Yandex Mail is the most popular mail service in Russia. To create an account on Yandex, you can go to the search engine’s website, but it’s more convenient to do this from a smartphone using the mobile application. The functionality of the program is the same for both iPhones and Android smartphones.
How to create an email on an Android phone or iPhone:
- Download the Yandex.Mail application from Google Play or the App Store.
- Launch the program and click the “Start Yandex.Mail” button.
- Enter your phone number (for Yandex this is a required step) and click the “Next” button.
- In the next window, confirm it using the verification code from SMS (or an incoming call from the service). In the latter case, you will need to enter the last 4 digits of the number.
- Please enter your first and last name. It is not necessary to write real data, but still keep in mind that this information will be visible to those with whom you are corresponding.
- Create a username and password for your new email account (you can use the system prompt).
- Tap “Register”.
- The registration process is completed, you can open the created mailbox using the “Go to mail” button.
The last name and first name of the Yandex account user are also visible to users of Market, Zen and other company services.
Service "Yandex.Mail"
Unlike other popular email services, Yandex.Mail is released on the Russian market and, accordingly, is aimed specifically at Russian users, and not at Western clients.
How to create an account in the browser
How to set up mail in Windows 10 - installing and configuring Outlook
Step-by-step instruction:
- Open any web browser and go to the Yandex.ru page by entering the domain name in the address bar.
- Under the search bar, find the “Mail” block and click on it.
- In the tab that opens, click on the “Registration” button located in the upper right corner or bottom of the screen.
- Enter the data required for registration: first and last name, email, password and phone number. If you don’t want to leave your number in the system, you can click on the line “I don’t have a phone”, after which the service will ask you to select one of the security questions from the list and enter the answer to it.
- Pass the robot test by entering the characters from the suggested image.
- Click on the “Register” button
Note! Creating an account in this system also gives you the opportunity to gain access to space in Yandex.Cloud, music, videos, online maps and many other applications.
How to create a mailbox in the Yandex.Mail application
Yandex.Mail application
For ease of use, you can also download the Yandex.Mail program to your smartphone; it has a simple and pleasant interface and even allows you to change the theme of your mailbox.
To register through the application, you need:
- Download the Yandex.Mail service from Google Play.
- Open the program, select the “Registration” section in the authorization window.
- In the appropriate fields, enter your personal data, email and password, click on “Next”.
- Enter the characters from the picture. After this, the registration of your email account will be completed.
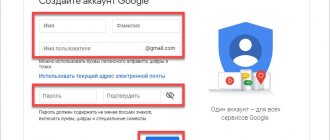
For owners of Android phones, a Gmail mailbox appears automatically when registering a Google account (and without it it is impossible to fully use the gadget). If you need to add another account on Android, also use the proprietary utility from Google.
How to create an email on an Android phone:
- Open the Gmail app.
- Click "Create an account."
- Enter your first and last name and click “Next”.
- Please indicate your date of birth and gender. You can enter any data - no one will check it with your passport, but if you are under 18 years old, then access to the content of YouTube and other services that require this account to use will be limited.
- On the next page, select your account login method and click “Next.”
- Create and confirm a password.
- Google doesn't require you to enter your mobile phone number, but you shouldn't skip this step. Subsequently, it can help you recover a forgotten email password, and is also useful for receiving video calls or messages through the service.
- Accept the terms of the user agreement.
How to create a Gmail email on iPhone:
- go to “Settings”;
- Scroll to the bottom of the page and select the standard Mail application;
- open the “Accounts” menu;
- tap “New account”;
- select Google;
- Click on the line “Create an account”, further configuration of the new email address is carried out according to the algorithm described above.
Standard Mail app
Email is available on any Android device
The Android system provides a separate utility called “Mail” for working with mailboxes, but the application itself is not as multifunctional as programs from leading companies, synchronization in it is much slower, and configuration takes more effort and time.
Mail.ru
To create mail on Mail.ru, you also need to install the program of the same name from the Play Market or App Store. The email client interface will be the same for any mobile operating system.
How to make an email on your phone:
- Open the program and tap “Create mail”.
- Enter personal information (first name, last name, gender and date of birth).
- Create a username and password for the new account.
- Select the domain that will be indicated in the address (mail, inbox, bk or list). You can create an email with any of them - it will not affect anything except the appearance of the address.
- To complete registration, the program will prompt you to enter your mobile phone number, to which you will receive an SMS with a confirmation code.
If you do not want to install unnecessary utilities (or they do not have enough device memory), you can create an account for any mail through a mobile browser.
How to make your email easier?
So, you were able to create an email. How to log into mail?
It would seem that everything is very simple, but you need to pay attention to several important nuances. After all, sometimes it is very difficult to find answers to the simplest questions. After all, the majority takes this for granted, and there are no discussions on such topics on forums for the reason that it is simply indecent to discuss such basic things. Therefore, “just in case,” we will consider this issue in more detail.
It is very important that you do not fall for the bait of so-called phishers (or fishermen), who replace the sites you need with fake ones. Having accepted them as the original, you can tell these scammers your username and password through a special login form. Moreover, this rule applies not only to logging into email, but also to logging onto any sites on the Internet where you are asked to log in, that is, enter your username and password (for example, the same forums). When working with letters via the web interface, remember the following nuances:
- To log in to your email account, create a bookmark in your browser and log in only through it each time. It is better to do this even if you have been sent a letter from the mail service with a link to follow. After all, such a link may also turn out to be a fake, and you will simply “ pick up
” viruses. - You can also use a tab pinned to the browser panel
.
Make sure that the tab has an open web interface for your email. In Google, this is easy to do: move the mouse cursor to the tab and right-click on it. In the menu that appears, you need to select the “ Pin tab
” item, after which the tab will be reduced in width and will be moved to the far left position. Once you close and reopen your browser, the tab will automatically open and you will always have quick access to your email. - If you do not have a bookmark for a particular service in your browser (for example, the cache was unsuccessfully cleared (how to clear the cache in a browser, read the article: " ", the OS was restored from an image, etc.), open the browser and find the official website of this service . All you need to do is write “login to Google mail” in the search engine, and the first link will take you to the required site. Then all that remains is to create a bookmark in the browser or install a shortcut on the desktop. This can be done by left-clicking on the icon located on the left in the address bar, and then pressing Win + D on the keyboard. Now release the mouse button.
- To make working with your account even easier, use (however, in this case you will need to specify the login and password for the “email”). These extensions will monitor all messages arriving in your inbox and notify you about it in various ways (for example, via SMS).
- When working with large volumes of letters or with a large number of accounts, we advise you to use an email client program. For example, you can select “ M2 Client
”, which is built into the Opera browser.
True, there are other options, like “ The bat
” or Outlook.
Both of these options require additional payment. A free extension that is very popular is a program developed by the Firefox browser. It is called Mozilla Thunderbird
.
Yahoo!
Before creating an email on your phone, download the Yahoo mail client from the App Store or Play Store. Next, to add a new account:
- tap on the “Register” button;
- in the window that opens, enter your first name, last name, phone number, date of birth, as well as your desired login and password (gender is not required);
- click “Continue”;
- confirm sending a verification SMS to the specified mobile number (you can also choose a call in which the bot will read out the required numbers to you by voice);
- enter the received data in the appropriate field and click “Check”;
- Tap “Start” to go to the created mailbox.
Which email should I choose?
Before you set up mail on Android (Mail-Android), you should know that there are many sites on the Internet that will provide you with an email box with great enthusiasm. But beauty and convenience are not the most important thing in this matter, because not all clients are equally reliable: some are suspected of reading personal information from letters, some are malfunctioning, etc.
Most users of the Internet community recommend paying attention to the following email clients:
- Gmail from the Google search engine;
- "Yandex.Mail" from the domestic search engine;
- Mail.ru from a large Internet company.
In order to register a mailbox, just go to the main page of any of the above resources and select the “Mail” section. As for a smartphone, before setting up mail on Android, you must have a proprietary application from a particular client. You can download the official utility from the same Play Store.
Next, we will analyze each client in more detail.
How to Create Outlook Email on Phone
How to create an email address in Microsoft Outlook:
- Download the mobile app.
- Tap “Create an account”
- Enter your login and select the mail server that will be indicated in the address (outlook or hotmail).
- Create a password.
- In the next window, solve a simple puzzle to confirm that you are not a bot.
- Enter your phone number to verify your account and click “Send code.”
- Enter the resulting numbers in the appropriate field.
Registration in Microsoft Outlook should be done quickly: if you leave the application at one of the steps, it will return to the start screen without saving the data.
Gmail
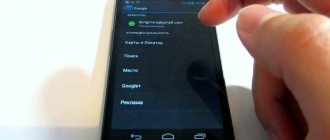
Before setting up mail on Android, it’s a good idea to look at the list of installed applications. In 95% of cases, there will be an email client from the famous search engine Google, that is, you won’t have to download and install anything.
Naturally, the box is primarily designed to interact with its own service. If you previously had to work with the Android operating system, then you probably already have an account from Google mail, and if not, then registration will not take much time. All you need is your full name, age and place of residence, and the rest of your profile can be filled out later.
The search engine provides its clients with 15 GB of cloud space for use. Enough for clips, audio and other documents. In addition, the mail has excellent spam protection and various filters for proper sorting of incoming correspondence, so not a single letter will be lost.
Using multiple mailboxes on one smartphone
To save your time and space on your smartphone, you can set up to receive letters from various email services in one mailbox . This can be done either from the browser (but this is not always convenient) or using standard smartphone utilities.
These methods differ somewhat in how they work, so you should choose the one that is more convenient for you:
- If you set up automatic collection of letters from another address, then all new messages will arrive in one account. In this case, you will not need to connect other services to the mail client. For example, when you log into Yandex.mail, you will see in your inbox list messages from all accounts from which the mail robot automatically picks up letters.
- The second method is to connect multiple accounts to one application. In this case, you will also begin to receive all letters in one “Inbox” section, but only in this program. If you log into your account from a browser or other service, there will be correspondence only from this account.
After you have created a new email, take care of its security: enable two-factor identification, and also (if the service allows) set up security questions to restore access.
How to add a mailbox to Gmail
To add another email address to the standard email receiving utility on Android:
- Open Gmail and go to settings, this can be done by swiping right from the home screen or using the “sandwich” icon in the upper left corner (the three-dash icon).
- Select "Add account".
- Click on the name of your mail service or select “Other” if it is not in the list.
- In the window that opens, enter your username and password. If you select the “Other” option, you may need to enter additional mail server data; they can be found in the technical support of a particular service.
- Tap on the “Login” button.
- Allow Gmail access to the mail service - without it, it will not be able to collect letters.
- Configure the synchronization frequency and other automatic collection parameters (you can change these later).
- If desired, enter a name for the new account.
When adding Mail.ru mail to Gmail, sometimes an error occurs, in this case, connect the mailbox through the “Others” menu
Adding an account on iPhone
The process of linking a new account to the native Mail app on iOS:
- go to your phone settings;
- select the "Mail" program;
- expand the “Accounts” section;
- tap “New account”;
- select your postal service or the “Other” option;
- enter your login password, and (if necessary, other data).
If you need to enter mail server parameters, you can find them out from the company's technical support.
Features of mail registration on various devices
We learned how to create an email address, but there are certain nuances of creating it through various devices. So, let's try to sort them out.
- How to Create a Gmail Email - Detailed Guide
note
The advantage of a laptop is its size, the ability to see the entire interface and make settings with ease. You can copy an additional window or place the icon on the desktop, which will simplify your task of logging into the box.
When registering for a specific email account, you must remember that tens of thousands, if not millions of people have previously used the service. And a situation may arise that the login you have chosen (the name of your address, containing up to @) is already occupied by another user.
There are two options for selecting a login:
- Use of your first and last name. Words should be written in Latin transliteration.
- Using other words. But here you need to be careful. Because very often, for fun, users use words such as: bunny, snowflake, cat and the like. However, if you use mail for business matters, you will find yourself in awkward situations.
Remember that the password is the key to your mailbox. And it must be reliable so that no attacker can get close to the data. Typically, experts recommend creating a password from capital and small letters, adding numbers and changing transliteration. There must be at least 8 characters! Remember, if your email is not secure, your data will be available to other people who get rich by selling it.
Many services offer a convenient feature - read receipts. It works like this: after you have sent or received a letter, the system automatically notifies you of its delivery, and when it is read, you or a specific recipient will receive a read notification. This is very convenient because you will get a 100% guarantee that your message served its purpose.
You can also set up a forwarding feature where emails from certain people or all mail will be forwarded to someone else. This will save you time on shipping.
How to forward emails from old mailboxes
Step 1. You need to log into your profile. Click on the cog above the letters.
Step 2. Select “Settings” from the pop-up list.
Step 3. Go to the “Accounts and Import” tab, scroll to the middle. Find the treasured item “Receive mail from other accounts” and select “Add”.
Step 4. In the window that appears, enter your previous email address and click “Next”.
Step 5. We are offered 2 options:
- Synchronization using Gmailify is necessary for those who are going to continue to use the old e-mail. You simply connect it to Gmail and you will send and receive correspondence directly from it.
- If you just want to save messages and contacts, but do not intend to use your old e-mail, select import (POP3).
When you've made a decision, move on.
Step 7. You will see scary words: SMTP protocol, access and delete emails - agree. This is permission so that you can work with mail from another mailbox without restrictions.
Step 8: Congratulations! Now you can read all messages from one site/application.
If for some reason you want to stop receiving correspondence from other mailboxes, click “Disable” in the settings.
Collecting letters
The GMail email client is distinguished by its reliability, pleasant and functional appearance, as well as smart filters for working with letters, so it can be called the optimal choice for the owner of a gadget on the Android platform.
To collect emails from other accounts, you must perform the following steps:
- launch Gmail and log in to the system;
- pull out the “curtain” from the left edge and go to the “Settings” section;
- find the menu item “Add account”;
- in the section for selecting email clients, select the one you need from the list: “Yandex”, “Mail.Ru”, etc.;
- enter your login (mail address) and password;
- Now mail from another account will appear in your GMail inbox.
Before setting up mail for Android in the Gmail service, it’s a good idea to know that the client does not delete letters from other accounts, but only duplicates them, but this point can be changed in the settings.
Testing the usability of Outlook
Internet users call Microsoft Outlook the ideal client for a corporate network. Its One Drive cloud integration, multi-box support, and extensive customization are perfect for the job. It is also highly compatible with Microsoft Exchange Server. You can create an account on a Samsung, Asus, Xiaomi or any other phone:
- The key disadvantage is immediately worth noting long installation from Play Market.
- You must specify the account with which you plan to work in the application and click the “Continue».
- The application offers enter password to access the box.
- After entering your password and confirming your account, Outlook asks for access to the main built-in mail and phone functions, after which the authenticity of the box is checked again.
- The last step before use becomes setting, consisting of 2 points.
Connecting Android to Windows local network
Outlook is a truly convenient application for your smartphone. Thanks to the built-in calendar, you can immediately plan meetings and transactions , and the high speed of sending messages will only save time. The only drawback is that it is impossible to block recipients sending spam. But this will soon be eliminated by the developers.